Today, a warm water floor is a popular heating system, which has a simple installation technology, has an acceptable cost and affordable operating costs. In addition, unlike electrical systems that emit electromagnetic waves, it is completely safe for human health.
It is important that the installation technology is not complicated, so installing a water heated floor with your own hands will not be difficult for almost every home craftsman. And an important advantage of self-installation will be a reduction in overall costs, which will undoubtedly affect the total cost of operation and installation of this heating system.
How to lay a heated floor: for a water heated floor, pipes with hot water are laid in a snake or snail pattern. For an electric floor, various heating elements are installed using certain technologies.
We also suggest you learn how to make a heated floor in a bathroom using a heated towel rail or in an apartment using central heating.
Advantages and disadvantages of water heated floors
The main advantage of hydraulic floors is ensuring horizontal, uniform heating of the room. In this case, heat spreads vertically, which creates a healthy microclimate, unlike radiator devices. Installation of such a system is especially recommended for rooms with high ceilings.
If we consider water structures from an aesthetic point of view, they also benefit because they are not visible and do not take up useful space. In addition, as mentioned above, they are more economical to use.
The efficiency of water floors depends on good thermal insulation, because an increased level of heat loss reduces heat transfer. But installing such a system in a bathroom or toilet has its drawbacks - the possibility of overheating the surface, since more often the heating element is connected to a heated towel rail.
In addition, such floors have a negative impact on the height of the room, because the “pie” implies the presence of a thick layer of concrete screed. Also, pouring concrete significantly makes the structure heavier, so it is necessary to carry out work to strengthen the floors.
Prepare the base
Ideally, a rough screed is needed as a base, which needs to be brought into an even state. Namely, to knock down bumps and sagging if they formed during pouring. This is necessary so that you can easily lay polystyrene foam in the future. Otherwise, it will “walk” and not adhere tightly to the surface.
In principle, you can lay a heated floor cake on the ground, but it must be carefully compacted so that there is no subsidence of the same polystyrene.
Water heated floor installation
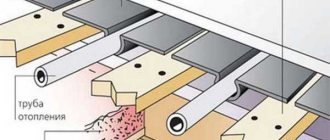
The heated water floor has a multi-layer complex structure, each layer has its own function. Consists of: base, hydro and thermal layer, reinforcing product, heating element and concrete screed.
A substrate is placed on the screed on which the floor covering is mounted; it must have a special symbol indicating the possibility of laying it on warm systems.
The junction of the walls and the screed, as well as the boundaries of the water circuit, should be laid with damper tape, this will help compensate for the expansion of concrete with temperature changes.
More often, independent installation of this heating structure is carried out using the “wet” method, that is, by pouring a cement-concrete screed. But “dry” installation is possible; it is used in houses with wooden floors.
Features of choosing a “warm floor”
Regardless of whether the underfloor heating was connected from heating in an apartment or from an autonomous heating supply in a private house, one of the main nuances is the choice of flooring. The best option for this is tiles.
For example, for infrared heated floors it would be better to use laminate.
When using an autonomous heating system in a private house, the correct heated floor in the bathroom must be water. It is allowed to lay parquet boards, ceramics, laminate, and even self-leveling polymer coating on top of it. It is also possible to lay carpet or linoleum on the pipes, although the use of these materials reduces the efficiency of the heating system.
Features of room preparation
Due to the fact that the structure is heavy, with a long length of pipes and connecting units, the installation has its own technological features.
As a result, it is necessary to lay each layer strictly according to the instructions. But first, we will look at the features of preparing the premises.
WARM FLOOR in 1 day! DIY water heated floor part 1
Premises requirements
Water-heated floors are recommended for construction in private buildings - find out how to install them yourself on a concrete floor. In multi-storey buildings, in addition to the heavy load on the floors, there is a risk of flooding of the apartment from below.
In addition, the coolant circuit is connected to the general heating system, but it is most often not intended for this purpose. This can lead to cold risers in your or a neighboring apartment. This is due to the reluctance of the relevant authorities to issue permits for the installation of this system in multi-storey buildings.
Today, two systems are often installed in new buildings: one for standard heating, and the other for warm floors.
The ideal solution is to make a water-heated floor yourself, even at the time of building the house. When installing the structure in a finished house, you should consider:
- the height of the ceilings, since such a structure leads to a significant decrease in them;
- size of doorways - their required height is not less than 210 cm;
- foundation strength.
In addition, the heat loss rate should not exceed 100 W/m2.
Base requirements
When installing a water floor correctly, a prerequisite is the presence of a smooth and clean rough surface. If the property is old, you need to dismantle the old floor screed and level the base.
The process is complex and time-consuming, but it is necessary. After which, the base is thoroughly cleaned of debris and dust.
For a water floor to work well, you need a horizontal base without differences; deviations of no more than 10 mm are permissible. If cracks or flaws are found, they must be repaired.
If you are the owner of a new home with panel ceilings, then the heating elements can be installed directly on them.
Types of heated floors
Now there are three main types of heated floors, which differ in the type of coolant, and also have different technology of arrangement. However, in general, they are united by one main advantage - the heating element is installed directly into the floor pie, due to which it is heated . At the same time, the air masses in the room also warm up, but near the floor the air will be warmer, while above this limit, at the level of a person’s head, the air remains slightly cool, which allows you to create an optimal microclimate in the room.
Electric floor under tiles
On a note! In certain cases, underfloor heating can completely replace a central heating system. But this is not always possible, and you still shouldn’t give up on basic radiators.
Water based heating
In this case, the coolant is ordinary heated water, which flows inside pipes laid according to a certain pattern and filled with concrete screed. The service life of such a system is approximately 20 years. A fairly reliable and safe option, but it is used either in private homes or in new buildings where it is possible to connect such a floor. In old multi-storey buildings, it will not be possible to connect a water floor without the permission of the management company, since installation will involve connecting it to a central heating system that is not designed for additional loads - in other apartments it can become very cold.
Water heated floor
The disadvantages of this design may be the likelihood of leaks and the risk of flooding of rooms located below, as well as the tendency of some types of pipeline to corrosion. Installation, of course, is labor-intensive, but this is one of the most economical flooring options. This type of heating can be installed under any finishing coating. However, if you want to use the capabilities of water-heated floors as efficiently as possible, study the features of different coatings. Our article will help you find the ideal option.
Operating principle of water heated floor
Heating with cable
Such floors can be installed in absolutely any room - be it in old or new apartments, houses, offices, etc. This option has become a real salvation for those who, for some reason, cannot install a water-heated floor. The system is quite simple to install and consists of a specially laid electrical cable located inside the screed. It converts electricity into heat.
Installation of cable heated floors
Self-regulating and resistive cables can be used to arrange heating . In the latter case, a two-core one is usually used (single-core ones often become sources of radiation harmful to the body, which is why they are not preferred to be used). Self-regulating wires do not have the disadvantages that resistive wires have. Typically, cable flooring is used if the finishing coating is made of tiles or linoleum.
Heating cable
IR floor
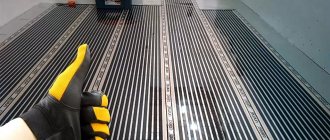
This is perhaps the most popular floor heating system, as it does not require pouring a new screed, is easy to install, but is not inferior in quality to other heating options. It is represented by thin mats with carbon strips connected to each other by wires. Such floors heat up quickly, but also cool down quickly (sometimes this function is needed), are very thin, allow you to quickly adjust the heating temperature, are economical in terms of energy consumption, are easy to repair and are completely safe for humans. This system also works thanks to electricity. There is a drawback - a little static and because of this - the attraction of dust to the base. Read more about infrared heated floors depending on the finish coating in separate articles on the portal: here for laminate, and here for tiles.
IR warm floor under laminate
Table. Comparison of characteristics of different systems.
| Characteristic | Water floor | Electric floor |
| Availability of EMR | No | Possibly depending on cable type |
| Possibility of arrangement in apartment buildings | Only in new buildings with a separate connection | Yes |
| Quickly manage settings | No | Yes |
| Dependence on heating season | Yes - in apartments and no - in private houses | No |
| Installation time | Long due to the need to fill the screed | Short |
| Possibility of laying any finishing coating | Yes | Certain types of coverings cannot be laid over an electric floor |
| Easy to repair | Complex repair | In the case of IR floors - quick repair |
Prices for electric heated floor "Teplolux"
electric heated floor teplolux
If you have not yet decided on the type of heated floor, read our article with instructions for choosing. There we examined in detail the advantages and disadvantages of different materials and compiled a list of recommendations.
IR film for heated floors
How to select and calculate pipes
Before you begin independent work on the construction of a hydrofloor, you should choose the right type of pipes and calculate the optimal diameter size.
Pipes for heated floors. Recommendations from experts // FORUMHOUSE
Types of pipes
Today, a large number of types of pipes are produced for installation in water-heated floors; they are made of various materials.
Professionals advise that when installing yourself, give preference to cross-linked polyethylene pipes such as PEX or PERT. The ideal option is PE-Xa, which has the highest cross-link density (85%).
This makes it possible to use axial fittings that have a sliding end; they can be safely mounted in a concrete structure. In addition, if such pipes are broken, it is not difficult to return them to their original shape using a hair dryer by heating the broken area.
Read the article: there are situations when it is necessary to connect pipes together in a screed, a pipeline has been pierced or you need to extend it - find out how to do this.
PERT circuits do not have a memory property, so it can only be used with push-in fittings, which are not recommended to be hidden in a screed. But if the system is assembled from solid pipes, then the connecting nodes will only be on the manifold, and this type of pipe is quite suitable.
When installing water systems, experts recommend using the PE-Xa or PERT model with a polyvinylethylene layer, which can be on the outside or inside. It is better to install pipes with an inner layer of EVOH.
For your information! By choosing a PE-Xa circuit, you can test it yourself. A section of pipe needs to be folded, and then this section must be heated using a hair dryer. If the product is of high quality, it will return to its original form.
In addition, metal-plastic pipes are often installed - the price is not expensive and they are not difficult to install. There are copper pipe products that are more expensive and require protection from alkaline exposure when pouring concrete mortar.
Another type of pipe recommended for heated floors is composite. They consist of two layers of cross-linked polyethylene with foil between them. The presence of inhomogeneous material that has a different expansion coefficient when heated can cause delamination of the circuit.
When choosing a model, you must consider:
- brand (Rehau, Tece, KAN, Uponor) is a guarantee of quality;
- labeling;
- certificate of conformity for products;
- take into account the coefficient of thermal expansion of pipes;
- cost of components required for installation.
Pipe size calculation
For water floors, three main pipe sizes are available: 16*2, 17*2 and 20*2 mm. The most popular sizes for installation are 16*2 and 20*2.
Before purchasing a heating circuit, you should calculate the size. If you are not sure that you can do it correctly yourself, it is better to entrust it to professionals. To do this, you need to decide:
- with a diagram of the location of the water heated floor;
- with areas of the floor where furniture will be placed and plumbing installed (pipes are not installed under furniture).
A product with a diameter of 16 mm should have a contour no more than 100 meters long, with 20 mm - 120 m. That is, each should occupy a maximum of 15 square meters. m, otherwise the pressure in the system will be insufficient.
If the room is large, it is divided into several circuits. They must be the same size, the difference is allowed within 15 meters. If there is good thermal insulation, the standard laying step is 15 cm, it is permissible to reduce it to 10 cm.
During the laying step:
- 15 cm - you will need 6.7 meters of heating element per 1 sq. m;
- 10 cm - 10 m.
In addition, when calculating the size of a water floor, heat loss, system power, material of pipes, ceilings and flooring are taken into account.
The standard formula for determining the size of the circuit is the heated area in sq. m. need to be divided by the laying step in meters. To this indicator add the size of the curls and the distance to the collector.
Laying the heat insulator
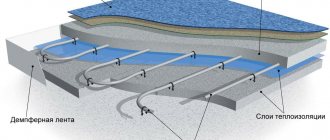
Extruded polystyrene foam and cross-linked polyethylene foam, only these two materials can be used for thermal insulation in a water heated floor system.
Before laying the heat insulation sheets, a damper tape 10-12 mm thick is glued around the perimeter of the room. It serves not only to compensate for the thermal expansion of the screed, but also to prevent heat from escaping into the walls. In height, it should protrude beyond the boundaries of the top layer of the screed.
The heat insulation sheets are laid out staggered and always on top of the waterproofing layer. For waterproofing, it is best to use polyethylene film with a thickness of 0.2 mm.
If you decide to make the thermal insulation thickness 10 cm, then it will be better if you lay two layers of slabs 5 cm thick. Be sure to have a spacing between the layers.
There is an option to use special slabs designed for organizing water-heated floors as a heat insulator. Their difference is in the bosses on one of the surfaces. A pipe is laid between these bosses. But their cost is unreasonably high. In addition, not all pipes will be supported in such slabs. For example, polypropylene and polyethylene pipes are too elastic and will require additional fixation.
The pipes are not attached to the heat insulator. The fastener must pass through the foam layer and be fixed in the screed. This is a very labor-intensive process considering the amount of work involved.
Mounting tapes are a more acceptable solution, but it is very difficult to lay a pipe on them in a spiral (snail).
The best option would be to fix the pipes on the mesh. In this case, the mesh will serve specifically for fastening pipes, and not for reinforcing the screed.
There are special meshes made of biaxially oriented polypropylene, or you can use a simple masonry mesh.
See also: Film heated floor
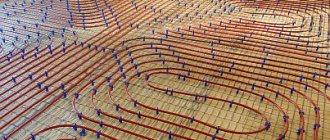
Selecting a circuit laying scheme and its installation
When choosing an installation scheme and calculating the pitch, you should take into account that the liquid cools down as it passes through the circuit, so installation must be done from the outer walls. This will help protect the heated room from cold air entering.
The level of heating of the room depends on the layout of the heating element:
- “snake” is the easiest way for self-installation, the degree of heating decreases gradually;
- “snail” - the process is more complicated, but the room with internal walls is heated evenly.
When installing a warm water structure, the calculation data and installation diagram are taken into account. The standard laying step is 15 cm, and contours longer than 100 meters must be divided into several. In addition, each room should have a separate circuit.
Couplings or fittings are installed only when eliminating breaks or carrying out repair work on heated floors.
In addition, when preparing the calculation and diagram, the hydraulic resistance is taken into account; it depends on the number of turns; the more there are, the higher the resistance. Each circuit connected to the manifold must have the same given value.
System design features
A water heated floor is a complex structure consisting of the following layers:
- base;
- hydro and heat layers;
- reinforcing elements;
- pipes;
- concrete screed.
The finishing floor covering is laid on the top concrete screed.
The coolant is supplied to the pipes from a gas boiler. It is also possible to connect pipes to a solid fuel boiler, but economically this option will be less profitable. Purified water or antifreeze is used as a coolant. In addition to pipes in the floor, radiators are installed in the room. But in most cases, with high-quality thermal insulation of the house, they are rarely used.
General diagram of a water heated floor
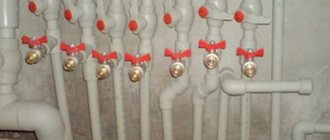
A distribution unit is connected to the boiler, which consists of a circulation pump, a mixing unit and a manifold group. It “routes” various heating circuits and allows you to regulate their heating.
Selecting a collector-mixing unit
The choice of collector (see types, principles of operation and installation of the collector, connection diagram and configuration) is directly related to the number of circuits that are planned to be installed. The device must have as many outputs as the water floor structure will have.
The device allows you to adjust and supply heated coolant into the system, and discharge it back to the device after working out.
The simplest model of the corrector has only a shut-off valve, and it cannot be used to adjust the operation of the structure. More expensive devices are equipped with valves for adjustment; they make it possible to independently set the level of intensity of water flows, separately for each circuit.
In addition, a mandatory attribute of any manifold is an air vent valve and a drain valve for emergency situations. In order for the device to work normally, you only need to adjust all the valves once, according to the required parameters.
It is worth noting that inexpensive collector models are often installed. But if you do not need to save money, then it is better to buy a model with servo drives and mixing units. This device allows you to automatically regulate the degree of heating of the water supplied to the water floor.
The collector is installed directly in the heated room or in a room nearby. To install the device, a special cabinet is made, its standard size is 50 by 50, and its depth is 12 - 15 cm. It is placed above the surface of a warm water floor. It is not uncommon that the manifold cabinet does not spoil the interior of the room, it is recessed into the wall.
Manifold for heated floors. Three ways to configure flow meters.
Areas of application of electric flooring
Due to its specificity, heated floors are used in conjunction with centralized heating in houses and apartments. Here are a few examples of its effective use:
Heating the kitchen and rooms . This type of space heating helps normalize humidity and temperature. Uniform heating of the floor surface does not allow convection currents to arise, and the electronic thermostat automatically maintains the set parameters.
Heat exchange in a room with central heating (A) and heated floors (B)
Application in damp areas . If you connect the system correctly (via an RCD or differential circuit breaker), and also ensure reliable grounding of the electric floor and install waterproofing, then you can take a shower without a tray or rubber mat.
An example of how to properly lay and connect a heated floor, as well as cover it with porcelain tiles
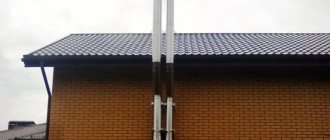
Balconies and loggias . Even on a glazed balcony or loggia you can get a cold in the winter; the situation can be corrected by equipping them with electric floors. This is smarter than making a heating battery there.
Installation of a warm water floor on a concrete screed
Installing a warm water structure with a concrete screed yourself is a labor-intensive and time-consuming process, since it takes about a month for the concrete to harden.
The construction of the structure consists of several step-by-step actions, which we will discuss below.
WARM FLOOR IN A READY SCREED WITH YOUR OWN HANDS. SIMPLE OR EASY?
Layers of water heated floor
Before installing the floor with your own hands, you should familiarize yourself with both the installation technology and the layers of the floor “pie” that will be laid. Each layer is laid strictly in a certain sequence. The thickness of the structure is from 8 to 14 cm, and the load on the floors is about 300 kg/sq.m.
Let's look at what a heated floor consists of and its design:
- foundation - reliable and durable;
- vapor barrier layer - a polyethylene film with a thickness of at least 0.1 mm is used;
- insulation - extruded polystyrene foam is used;
- reinforcement - it gives strength to the structure;
- heating elements - pipes laid according to the diagram;
- concrete screed with plasticizer - its thickness is from 3 to 5 cm.
If the heated floor is placed on the ground, then the “pie” is as follows:
- bulk soil - 15 cm;
- crushed stone fractions - 10 cm;
- sand - 5 cm;
- rough screed;
- waterproofing material;
- damper tape;
- insulation - 5 cm;
- reinforcing mesh;
- heating elements;
- cement-concrete screed.
After the concrete has hardened, the flooring is installed on the surface and the finishing coating is laid.
Waterproofing
The waterproofing layer, as mentioned above, must be laid on a prepared subfloor; it must be smooth and clean.
An ordinary polyethylene film is used as a waterproofing material; it should be laid overlapping, one strip on top of the other and on the walls (20 mm). For tightness, the joints must be glued with tape.
Damper tape
The damper tape is designed to compensate for the expansion of the concrete screed when the system heats up. It protects the surface from cracking. The standard thickness of the mounting tape is 5 - 8 mm, and the height is from 10 to 15 cm.
When concrete is heated to 40°C, it expands at a rate of 0.5 mm per 1 meter.
It is glued along the perimeter of the heated room, at the junction of the walls and floor. The tape should be higher than the screed, and its excess, upon completion of installation, is cut off with a knife. In addition, if there are several contours, their boundaries are lined with it.
Laying insulation
When installing a warm floor with your own hands, it is important to choose the right type of insulation. The efficiency of the device depends on it, because it does not allow waste of heat.
There are many types of material for thermal insulation, but experts recommend two:
- Extruded polystyrene foam - low thermal conductivity and high mechanical strength. EPS is not exposed to moisture as it does not absorb it. In addition, it has an acceptable cost. This type of gasket is produced in slabs measuring 50 by 1000 mm or 600 by 1250 mm, and with a thickness of 20, 30, 50, 80 and 100 mm. The product is equipped with snap-on grooves, which allows for a strong connection.
Expanded polystyrene sheets are equipped with a foil layer, which leads to higher prices for products. But there is no significant benefit from it, since the reflective property does not work in an opaque environment. In addition, the cement mixture is alkaline and will corrode the foil.
- Profile polystyrene mats are highly plastic, equipped with special bosses, and pipes are laid between them. Also, the bosses serve as a retainer for the heating elements. In them, the contour is attached in increments of 50 mm. Using a mat greatly simplifies the installation process, but the cost is higher than polystyrene foam insulation. The thickness of the slabs is from 1 to 3 mm, and the sizes are 500 by 1000 or 600 by 1200 mm.
When installing a water-heated floor yourself, you need to choose the right insulation thickness. To do this, you must adhere to the following rules:
- when laying heating floors on the ground, the minimum thickness of the insulation should be 100 mm; it is recommended to install two layers of 50 mm each, located perpendicular to each other;
- when installing on the ground floor, 50 mm is sufficient;
- when carrying out thermal insulation in rooms above warm rooms - 30 mm.
Sheets of insulation are placed around the entire perimeter of the area and fixed to the base. If EPS boards are used, they are fastened with disc-shaped dowels at the joints and in the center.
Reinforcement
The need for reinforcement during self-installation of warm water floors is that the mesh gives strength to the structure, ensures uniform heat distribution and heating elements are fixed to it.
The standard diameter of reinforcing mesh rods ranges from 4 to 5 mm, and the cells come in different sizes; they must be selected depending on the laying step.
Experts advise laying two reinforcing layers. The first is on the insulation, and the second is on top of the heating elements (pipes). The grids are connected to each other using wire.
Advice! If you do not want to lay two layers of reinforcement, then before installing the mesh on the insulation, you should make supports under it so that when pouring the solution, it can flow under the reinforcement.
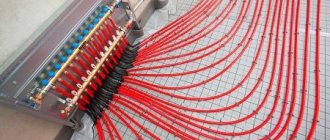
Laying and fastening of pipes
Laying heating elements is the most critical stage when installing warm water floors. In addition, it is good to have a device for unwinding pipes in coils, since removing them with rings is prohibited; a lot of tension is created, which interferes with installation.
It is unacceptable to remove the contour from a stationary bay; it must be rotated. You can go on a spree yourself, but it’s easier to do it with the help of a device.
If the insulation boards have markings, the installation process will be greatly simplified. If these are not available, they should be applied independently. It is necessary to make marks on the plates with a marker in accordance with the step of laying the heating element. Then, using a painting thread, mark a line and draw a route for the contours.
When installing water pipes yourself, you need to remember that you need to retreat 15 - 20 cm from the walls. Ideally, each contour will be single, without seams, and with a maximum size of 100 mm. Installation should be done according to the diagram, in accordance with the calculation. The permissible step near the walls is 10 cm, closer to the center - 15 cm.
The installation of the circuit must be done from the most remote areas from the collector. In addition, the transit sections of the product should be insulated with foamed polyethylene, this will save energy and prevent heat from being lost along the way. In this case, both ends should go to the place where the manifold cabinet will be installed.
To fix the circuit, fastening profiles are used, which must be screwed to the floor with dowels. After which, the pipes are pressed against the reinforcing mesh and secured with plastic fasteners. The pipe should not be pressed too hard; the loop should fit freely against it.
You need to bend the contour carefully, especially if it is made of polyethylene, because this material is subject to deformation. Polypropylene pipes are difficult to bend; they spring. Therefore, when installing heated floors, they are fixed directly to the grid with a large corner radius. If a white spot or streaks appear, the material is considered damaged and cannot be used.
If you are installing metal-plastic pipes with a diameter of 16 or 20 mm, then you can bend them with your own hands without using a special tool.
Advice! When the bending angle is of a small radius, so that it turns out smooth and the product does not burst, the bending process is carried out in several approaches (by intercepting the hands). To get an angle of 90°C, it will take 5 - 6 times.
Connecting and filling the circuit - hydraulic tests
After self-installation of heating pipes, the device should be connected and checked for functionality and integrity:
- Connection. The most common way to connect a water heated floor is a distribution unit. Its main purpose is to increase pressure, implement temperature regulation and uniformly supply coolant to several circuits. There are different devices - with manual or automatic adjustment.
Connecting the system involves connecting both ends of the pipe to the manifold distribution with clamp fittings. In addition, using a collector, the heated floor device is connected to the main heating system or to a specially equipped boiler.
When choosing a heating boiler, it is important to take into account its power; it should equal the power of all areas of the floor with a small margin.
The boilers have an inlet and outlet for water, which are equipped with shut-off valves.
Also, to circulate the coolant, it is necessary to install a pump. More often, it is included with the boiler, but if the heated area is large, you will need another one.
- Filling the system. Before pouring a concrete screed, the system should be filled and hydraulically tested. Since in case of malfunction, it will be difficult to repair a system filled with concrete. To do this, you need to connect a hose to the drain outlet of the collector and drain it into the sewer.
Advice! To make it easier to monitor the air coming out of the system, it is better to use a transparent hose.
The manifold, responsible for supplying the coolant, is equipped with a ball valve; tap water is connected to it. And a pressure testing pump is connected to one of the outputs connected to the heated floor circuit.
The system filling process is as follows:
- all underfloor heating channels close, with the exception of one, while all air vents open;
- water is supplied, and the degree of its purity and air exit from the system are monitored through the drain hose;
The inside of the pipes may be coated with technological lubricant; it must be washed off with water.
- when all the air has escaped and the water is completely clean, the drain valve is closed, after which the filled system is shut off;
- if there are several circuits, such actions must be done with each;
- After all circuits have been washed and filled, you should close the tap through which water is supplied.
Upon completion of the procedure, there should be no air left in the pipes, and the water should flow perfectly clean.
If a leak is detected during hydrofloor testing, it is repaired immediately, but first the pressure in the system must be relieved.
- Crimping. To carry out pressure testing, a special pump is required, which was already mentioned above; it must be connected to the output of the underfloor heating system.
Sequence of the crimping process:
- all circuits connected to the collector must be opened;
- fill the pump tank with water and open the supply tap;
- using a pump, you need to build up the pressure in the system, it must exceed the working pressure by 2 times (6 atm), it is monitored using pressure gauges located on the pump and manifold;
- after increasing the pressure, it is necessary to visually inspect the entire pipeline and its connections;
- after half an hour, raise the pressure again to 6 bar and carry out an inspection, repeat the action after another 30 minutes, if leaks are detected, the pressure is released and they are eliminated;
- if there are no leaks, the pressure should be raised again to 6 bar and left for a day;
- if, after this time, the pressure has dropped by no more than 1.5 Bar, it means that you have assembled the system correctly.
According to the law of physics, when pressure rises in pipes, they try to straighten out. If their fixation is not secure, then unpleasant surprises will arise during testing. In the future, when the contour is filled with concrete, there is no need to worry about this.
Installation of beacons
To make an even screed yourself, you need to pour it along the beacons. Experts recommend using a plasterboard profile as beacons when installing a warm water floor.
Installation of beacons is carried out in accordance with the level of the finished floor, minus the thickness of the floor covering. To secure the guide profile, mortar cushions are used, a plasterboard product is placed on them and leveled.
Although this method has a disadvantage - if the profile falls below the required level, you will need to take it out and add a solution under it. Therefore, a rigid support is recommended under the beacons; dowels can be used. The top of the cap should rise above the surface of the screed.
The standard installation of beacons is 30 cm from the walls, with a small distance between them, as the solution settles and dimples may appear on the surface. The recommended distances between beacons are 1.5 m, then the 2-meter rule for alignment is suitable.
The beacon installation process looks like this:
- A 30 cm indentation is made from the walls located on the right and left sides of the entrance and lines are drawn that will serve as a mark for placing the outer beacons.
- The space between the lines is divided into equal parts, their maximum size is 150 cm. One strip should be placed opposite the entrance.
- Parallel lines are drawn using the dividing marks made, the locations of the non-gels are marked on them, the installation step is 40 - 50 cm.
- A hammer drill makes holes into which they are installed.
To level the nongels, it is better to use a laser level. If you install beacons with your own hands and do not have such a level, you can rent one. Although, it is possible to do this work using a regular level, it will just take more time.
- A profile is placed on top of the screw heads. But in order for the beacons to be well fixed, before they are installed on the caps of the negels, mortar slides should be made in increments of 1 meter, slightly higher than the future screed. Then the profile is installed in place and pressed down, and the excess solution that protrudes is removed.
The evenness of the installed beacons is also checked by level.
Preparing the solution, pouring the screed
The concrete screed used to pour a heated water floor is subject not only to mechanical stress, but also to deformation under the influence of temperature, so the requirements for it are increased. And an ordinary concrete solution will not work here; you need to use a plasticizer or fiber as additives.
The use of a plasticizer reduces the ratio of water to cement in the solution, increases mobility and increases the strength of the screed. The degree of mobility is one of the most important indicators of a high-quality solution for pouring heated floors, since it must penetrate well under the pipes and release air easily. Based on consistency, additives are available in dry and liquid form.
Fiber significantly increases the strength of the structure and almost completely eliminates the risk of cracks. It comes in metal, polypropylene and basalt. Polypropylene and basalt fibers are intended for warm water floors. The standard fiber rate per 1 m3 is 500 grams.
There are a large number of mixtures available in stores; they already contain plasticizer and fiber. Of course, ready-made solutions are of high quality, and their use greatly simplifies the process of filling the floor, but they will cost more than those prepared by hand.
A mandatory condition that must be observed when making the mixture yourself is the mechanization of the process (using a concrete mixer or construction mixer), since it requires obtaining a high-quality solution.
When independently producing a cement-concrete composition for pouring water-heated floors, it is recommended to use a grade of Portland cement no lower than M-400. In addition, the date of its production should not exceed more than six months.
Sand, for use in the solution, must be sifted, washed and dried. River sand is not suitable for these purposes; it has the correct shape, which is not very good.
Sand and cement in the solution should be in proportions of 3 to 1. Water is needed approximately 1/3 of the amount of cement, 15 liters per bag (15 kg). But the use of additives reduces the ratio of water to cement, so you need to add water gradually.
According to the technology, the production of a solution for installing heated floors differs when using different devices. If a mixer is used, then first, the dry ingredients are mixed at low speeds - cement, sand and fluffed fiber. And only then water with a plasticizer is added. The mixture is prepared for about 7 minutes.
In a concrete mixer, the process looks exactly the opposite. Water with a plasticizer is poured into it, then cement is gradually added, then sand, then cement again and finally the rest of the water is poured in. Fiber is added little by little during the kneading process, always in fluffy form. The solution is prepared within 3 - 5 minutes.
The finished concrete solution has a uniform color and is plastic in consistency. If you squeeze it in your fist, no liquid should come out. You can put the solution in a pile; if it does not spread, but only settles slightly, then the quality is good.
Before you start pouring the water-heated floor, you need to vacuum the surface from dust. Also, it is necessary to close the windows in the room, since drafts and direct sun are contraindicated.
All work on the construction of the screed should be carried out at one time. Therefore, when carrying out self-filling, assistants are required. In addition, the device must have a working pressure of 2 atmospheres.
Laying the solution should begin from the far corner of the room, and fill in strips according to the beacons. The process must be completed with a strip at the exit. When leveling, you should not try to immediately create an ideal surface. It is important that there are no large holes. The minimum layer of solution above the heating elements should be 3 cm.
In this form, the screed is left for 1 - 2 days until it sets a little so that you can walk on it. After this, cleanup work begins. First, the damper tape, which rises above the surface, is removed using a construction knife.
Then, using a sharp edge, usually pressing it against the beacons, the concrete is cleaned away from you with short, sharp movements. This is done until the beacons are completely exposed. Any debris from the grout is removed, the surface is sprayed with water and covered with polyethylene.
After a day, the beacons are removed, and the furrows remaining from them are rubbed with a solution. The surface is wetted again and covered. The screed must be wetted daily for 10 days. Until the concrete surface has completely hardened, it must be kept for at least 28 days; until this time the system cannot be turned on.
Find out how to turn on a water heated floor correctly for the first time.
Expansion joints
If the temperature gaps are not positioned correctly or are missing, this can cause destruction of the screed. Therefore, there is a need to arrange shrinkage joints if:
- the area of the premises exceeds 30 square meters;
- wall size more than 8 m;
- the room has a significant difference in length and width, more than 2 times;
- curved room.
To do this, lay damper tape around the perimeter of the seams. It is necessary that the reinforcement in the seam areas is separated. And the gap intended for deformation at the base had a thickness of 10 mm.
Treat the upper part of the seam with sealant. If there is a non-standard room, it should be divided into parts, rectangular or square.
When heating elements pass through the seams, they are mounted in these areas in a corrugation; it should cover them 30 cm on each side. Seams should not be placed inside the outline.
If you want to lay tiles as flooring, then there is a high probability that they will come off in areas of expansion joints. Therefore, one part of the tile should be mounted with glue, and the second with sealant.
If it is necessary to make additional demarcation, the method of incomplete expansion joints can be used. They are made with a trowel, 1/3 thick. When the concrete hardens, they are also sealed with sealants.
Cracks in the screed
It is not uncommon that after the screed has hardened, cracks appear on it. Their formation is caused by the following reasons if:
- low density insulation;
- poor compaction of the solution;
- no plasticizer;
- screed too thick;
- no shrinkage seam;
- the concrete dried quickly;
- the ratio of components in the solution is incorrect.
Avoiding the formation of cracks in the screed is simple:
- use insulation with a density of at least 35-40 kg/m3, and preferably higher;
- make the filling solution plastic in consistency, with the addition of fiber and plasticizer;
- separate large rooms with shrink joints;
- prevent concrete from hardening quickly by covering it with plastic film the day after pouring.
Laying the finishing coating
You only need to choose the finishing coating that is intended specifically for installation on heated floors. On the packaging of such products you can find a special icon that indicates this.
The ideal coating for self-installation on a hydrofloor is ceramic tiles or porcelain stoneware. The use of laminate, linoleum or carpet as finishing for heated floors is permissible, but only if there is a marking that allows installation on warm structures. The floor covering should only be laid on a well-dried concrete screed.
Anyone can install a warm water floor themselves in a private house or apartment. Despite the fact that a lot of time and labor will be required, but in the end, your home will become cozy and comfortable.
Types and design, as well as features of heating elements
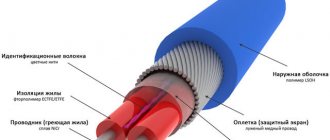
A single-core wire or a two-core cable is most often used as an electric floor heating element. The first option is notable for its low cost, but the increased background EMR imposes restrictions on its use in residential premises. The heating cable has two cores, one of which plays the role of a regular conductor, and the second - a heating element. This design can significantly reduce electromagnetic radiation, but increases the cost of the product.
Design of heating wire (A) and Teplolux heating cable (B)
More detailed information about the above heating elements can be found on the pages of our website.
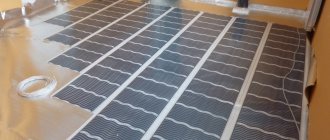
Installation can be greatly simplified if you use a heating mat . This design is nothing more than an ordinary thermal cable laid with a certain step width on a reinforcing mesh. As a rule, the width of the mats is about 0.45-0.5 m, and the length can vary from 0.5 to 12.0 m (accordingly, the maximum heating area for one segment is limited). There is no standard for mat sizes, so they may vary slightly from one manufacturer to another. The electromat, like the thermal cable, is a solid structure, the footage of which cannot be changed arbitrarily.
Heating mat Devi
Rod structures are considered a subtype of electric mats. They use special carbon rods with the addition of copper and silver as heating elements. Heating elements are connected in parallel with a certain step. The main advantage of this design is self-regulation. That is, if the temperature on any rod has increased due to poor heat transfer (for example, furniture has been placed), then the heat release is reduced. Thanks to this property, you can lay the mat over the entire area of the room.
Rod electric mat Energy Mat
Infrared film . This heating element became widely available relatively recently, literally at the beginning of the century. The term “infrared” used in the name is a marketing ploy aimed at distinguishing this product from a number of other heating elements. As you know from a school physics course, infrared emitters are also called thermal, therefore, any heating device can be classified in this category. The design of the film infrared heating element for a heated floor is shown in the figure below.
Heat Plus film heater device
Designations:
- A – coating made of film based on polyethylene terephthalate; this material is a good heat conductor.
- B – copper bus.
- C – silver tire.
- D – carbon strip coating.
- E – thermal insulation based on polyester.
Types of pipes used
Three types of pipes are suitable for a warm water floor.
- Pipes made of cross-linked polyethylene (PEX-EVOH-PEX) are inconvenient to work with because it is difficult to give them the desired shape (they straighten when heated). But they are not afraid of liquid freezing and are repairable.
- Metal-plastic pipes are the best option: low price, easy to install, and keep their shape stably.
- Copper pipes are expensive; when used in a screed, they must be covered with a protective layer to prevent alkaline attack.
Comparative characteristics
Since water and electric underfloor heating systems are the main ones, it is important to familiarize yourself with their comparative characteristics. Below are some questions to compare different types of systems.
Warm floor - which one is better to choose?
Table. Comparison of different floor heating systems.
| Question | Water system | Electrical system |
| Is there an EMR? | Absent | Depending on the type of cable used, electromagnetic radiation may be generated. |
| Is installation possible in apartments? | Exclusively in new multi-storey buildings, provided that there is a separate connection there | Yes |
| Are the systems easy to manage? | No | Yes |
| How long does installation take? | A lot, due to the implementation of the concrete screed | A little |
| What finishing coatings can be installed? | Almost everything | Some types of flooring cannot be installed |
| Ease of maintenance | Difficult maintenance and repair | When installing IR floors, maintenance is simple |
Choosing a heated floor
It is necessary to choose one or another type of heated floor taking into account not only your budget, but also the location of further installation. Once the system has been selected and all materials have been purchased, installation can begin.
Heated floor pipe circuit length calculator
Go to calculations
Features of calculating the required materials
After choosing the type of heated floors, you should calculate the required materials.
For example, if a cable system is selected, you should decide on the total length of the cable to be laid.
To do this, you need to take into account several factors:
- The cable should not be located under the furniture, therefore, when determining the parameters of the room, the area allocated for it should not be taken into account;
- The cable should not come close to the walls. The minimum distance from the cable to the walls should be 5 cm;
- The most common installation method is “snake”. With this installation, the cable stretches across the entire width or length of the room, not reaching the wall, is wrapped and laid to the opposite wall, where it is wrapped again. In this way, the entire floor area allocated for the system is covered. In this case, the distance between parallel parts of the cable must be at least 8 cm.
Calculating the number of thermomats or infrared film is much simpler; for example, a thermomat section is 50 cm wide and the length can reach 30 m. Therefore, calculating the amount of required materials will not be very difficult.
The infrared film has the same width, but its length cannot exceed 8 m.
You can use the formula.
The eternal question: cable with guides, or ready-made rolls (mats)
From a technical point of view, there is no difference between laying a cable prepared on a grid or configuring it yourself. Theoretically, when installing a separate cable, you can save a little: you lay it exactly according to the planned plan. But you can cut thermo-floor rolls along the reinforcing mesh and bend the wires as you please.
So choosing the configuration of heating elements is a matter of ease of installation, nothing more. Recently, preference has been given to ready-made rolls, since the cost has dropped almost to the level of a linear meter of cable.
Layout of power and control cables
It would be preferable to shorten their length. For this purpose, two-wire heaters are used, which are connected only on one side. However, this is not the most fundamental question. The main thing is to ensure convenient management and secure connections. Of course, there should not be any overlaps in the wire, so sometimes you have to pull a few extra meters.
The optimal solution is a junction box in a safe place where all power lines converge. And the control panel is installed separately, in a place convenient for use.
The diagram is typical, but for each heater model there may be separate instructions included in the kit. The rules for placing a remote control with a thermostat are the same as for other switching devices. There should be no direct sunlight, heat from a stove, or the possibility of moisture.