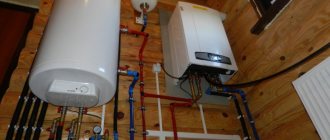
Heating a modern private home depends on many factors. This includes choosing a heating boiler, the presence of underfloor heating systems, and choosing a radiator connection diagram. But the most important factor influencing the energy efficiency of the system is the installation of various heating pipes in a private house, the choice of diameter and installation method.
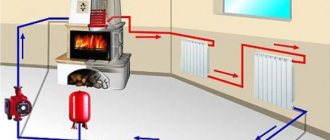
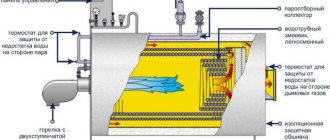
An example of the arrangement of a modern boiler room, in this case using a copper pipe
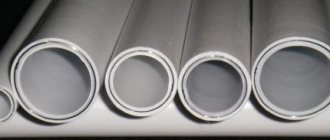
Selection of heating pipes
Having figured out which heating boiler will heat the water in your home, you can choose pipes for heating radiators and the system as a whole. Traditional materials for heating pipes:
- steel;
- copper;
- plastic.
Quite expensive and requiring the invitation of professionals for welding, steel or copper pipes are increasingly being replaced in practice by metal-plastic or polypropylene pipes.
Metal-plastic pipes
The connection and installation of metal-plastic pipes can be done using crimp and press fittings.
To make a connection using compression fittings and subsequent connection of heating pipes, you will need:
- spanners;
- flarer;
- springs for bending pipes.
The main disadvantages of connections on compression fittings are:
- their cost is quite high;
- fragility of rubber gaskets under high temperatures;
- periodic “downtime” of heating pipes in the summer, which also does not have a very favorable effect on the durability of rubber parts.
As a result, the need for preventive work to tighten joints may occur every five years or more often.
Rules for connecting metal-plastic pipes using a press fitting
A reliable, permanent connection with press fittings allows you to install heating with plastic pipes, hiding them directly in the walls. These pipes will last for many years without replacement if the temperature of the heating water flowing through them does not exceed 80°C.
The only disadvantage of using this type of connection is the need to purchase special equipment for installation
Polypropylene pipes
Recently, a leading place among suitable water and heat supply equipment has been occupied by a pipe for a heating boiler made of polypropylene. The use of polypropylene is due to the fact that it is very durable, is not afraid of system defrosting, and has a very affordable price.
Polypropylene pipes can be bent quite evenly (unlike metal-plastic). They will last quite a long time if all operating rules are observed.
Their only drawback is the need to use a special tool for welding.
There are the following features of connecting polypropylene pipes by welding:
- It is more convenient to weld polypropylene pipes together with a partner. The main condition for a high-quality connection of plastic pipes is the choice of the correct heating time, so as not to overheat them, and precise fixation, which does not allow shifts and displacements along the axis in the first few seconds after connecting the heated parts.
- Welding and installation of heating pipes is carried out at positive ambient temperatures - above +5 °C. When working in winter, it is necessary to create a “heat zone” where polypropylene pipes are welded.
To carry out high-quality work on soldering polypropylene pipes, it is necessary to comply with all the requirements of the instructions supplied with the device.
It would be a good idea to carry out several test welds on individual short sections of pipe using inexpensive couplings to gain at least some initial skill in handling the welding unit.
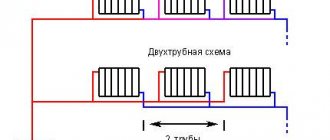
Beam system
The collector (radiant) heating scheme is the most advanced and modern in terms of thermal efficiency. In it, each of the radiators is connected to a pair of pipes from two common collectors for the floor, which are themselves connected to the boiler equipment. Temperature control with this wiring is more flexible. Plus, it is permissible to connect not only batteries to the collectors, but also a “warm floor”.
Among the advantages of such a heating system for a private house, the following should be noted:
- Convenient and flexible adjustment;
- High efficiency of thermal energy distribution;
- Possibility of replacing individual elements without turning off the heating as a whole.
In this case, the pipelines can be laid as desired. Often they are simply laid under the poured floor. The main disadvantage of the beam scheme is the high cost of the system as a whole and the long length of the pipes. Plus, it will be difficult to lay the latter in large quantities in an already finished cottage. Their installation should be planned in advance at the stage of designing a home.
Radial design - ideal heat distribution
This slate, if necessary, can be relatively easily replaced with another roofing material. The layout of the heating pipes is more complicated; changing it later is not so easy. Even the rigid dimensions of the ondulin sheet are not so scary; there are a lot of scraps, but this is only a slight increase in the roof estimate. With heating pipelines, especially for radial distribution, everything is much more complicated.
Connection of metal-plastic heating pipes
For metal-plastic pipes, similar connection methods can be used, with the exception of threaded ones. Since their operating principle was described above, there is no point in repeating them.
Installation of compression fitting for metal-plastic pipes
A fundamentally new connection option is represented by press fittings. They are divided into crimp and press-on or slide-on.
Compression press fittings
The sleeve that compresses the pipe can be fixed directly to the body or located separately. This type of work is performed using special pliers. The tool has a removable head, which is selected based on the diameter of the sleeve.
Scheme of crimp press fitting
Heating installation without welding pipes by crimping a press fitting is performed as follows:
- Cut the pipe using a pipe cutter.
- Clean the cut area.
- Use a gauge to eliminate ovality that occurs after cutting with a tool.
- Place the crimp ring.
- Place a dielectric gasket and an O-ring on the fitting, then press the element into the internal cavity of the pipe.
- Perform crimping using pliers.
If the work is done correctly, two stripes will be clearly visible on the inside of the sleeve where compression has occurred. These zones should not coincide with the locations of the sealing gaskets, otherwise they will be destroyed over time, which will significantly reduce the service life of the connection (5-10 years instead of 20-30).
Slide fitting
The difference between this connection option is that the ring is not compressed, but pulled onto the pipe. To do the job you will need a special press, not pliers.
Slide fitting
Connection instructions:
- Cut the pipe and put a metal ring on it.
- Expand the end of the part using an expander.
- Insert the fitting as far as it will go.
- Push the coupling using the press jaws and press it onto the fitting.
You can see how the sliding fitting is installed in this video:
https://youtube.com/watch?v=KKjkMvK5HZ4
The recommendations presented in the article will help you repair or install heating pipes without welding. The most commonly used option is compression fittings, which do not require preliminary preparation or the use of special tools.
Classification of polypropylene hoses (4 classes)
Often four classes of hoses are indicated, since the third is practically not used, but GOST specifies five classes for polymer products.
Polypropylene hoses are divided into classes according to heat resistance and operating pressure values:
- Class 1 - hot water distribution systems up to 60 °C;
- Class 2 - hot water distribution systems up to 70 °C;
- Class 3 - underfloor heating, low-temperature radiators up to 50 °C;
- Class 4 - underfloor heating, low-temperature radiators up to 70 °C;
- Class 5 - high-temperature radiators up to 90 °C;
There is also a class “XB” - intended for cold water supply.
It is assumed that the system will operate in certain temperature conditions, which differ for each season and off-season. For example, for high temperature radiators, the system should last 50 years: 14 years at 20°C, 25 years at 60°C, 10 years at 80°C and 1 year at 90°C. This means that in a region with an extended heating season, the service life will be reduced.
The emergency temperature for classes 1-2 is 95 °C, for class 3 - 65 °C, for classes 4-5 - 100 °C. That is, pipes can withstand significant excess operating loads for a short time, up to 100 hours over the entire period.
The maximum working pressure of thermoplastics should be:
- 0.4 MPa;
- 0.6 MPa;
- 0.8 MPa;
- 1.0 MPa.
Advantages and disadvantages of each method
Thread
Advantages:
- reliability;
- ease of assembly, possibility of disassembly;
- low cost.
Flaws:
- tension in the thread cavities increases material fatigue, reducing its strength;
- the need to use locking means to prevent the working element from unscrewing.
Flanges
Advantages:
simplicity and convenience of reusable connection and disconnection.
Negative properties:
- high labor intensity in manufacturing, therefore, high price;
- with prolonged use, the location of its connection decreases, loss of tightness.
Bonding
The advantages of this method include its not labor-intensive process, which does not require much skill and effort.
But the wait for gluing sometimes reaches three days, which is not always convenient.
This type of connection cannot be considered a reliable method.
Welding
Advantages:
- reliability;
- durability;
- tightness;
- the ability to connect parts of any shape.
Flaws:
- the occurrence of residual stresses;
- possibility of changing geometry;
- risk of destruction under vibration and shock loads.
Trumpet
In comparison with all types, socket pipes have the advantage of low cost, the possibility of small axial and lateral movements of the pipe, which is very useful during temperature changes and soil shrinkage.
The negative indicator lies in the difficulty of connecting the connector and insufficient reliability at high pressure.
Pressing
A common positive factor is excellent self-centering of the joined parts and stable state under shock loads. A simple and non-labor-intensive process.
Cannot be disassembled or dislodged from each other. Here are a few disadvantages of this method.
Methods for connecting metal pipes
Malleable cast iron and connecting parts made from it
The most common ductile iron parts for connecting steel pipes and other pipeline parts are: A) straight couplings B) reducing couplings C) coupling nuts D) fittings E) locknuts E) plugs.
To completely seal the system with a threaded connection, it is necessary to use sealants, for example, gaskets. In addition to them, for other types of fastening additional parts are used. If it is necessary to connect the elements of the pipeline using flanges, that is, without a coupling, then in addition to gaskets, bolts are also needed.
When connecting risers at an angle, they use connecting parts made of ductile cast iron: straight and transition angles, tees, crosses.
A cast iron coupling has a low collar around the entire perimeter of the end circumference, which serves to increase the strength of the part, unlike its steel counterpart, which does not have such an element.
The quality of connections depends not so much on the sealing methods and materials, but on the craftsman and the quality of his work. If he is responsible, neat, has basic plumbing knowledge and skills in working with a wrench or pipe wrench, then you won’t find a better specialist. If you follow the basic rules for installing pipeline systems, the pipeline will function for many years. This can be confirmed by anyone who has at least once installed a pipeline system, even the shortest and simplest one.
Try it yourself, experiment and see that you are the best specialist in installing pipeline systems using the threaded method of connecting pipeline elements.
Necessary materials
Choosing pipe material is a very important task.
If you do not approach it carefully enough, then in the future this will affect the performance of the pipeline. Most often, metals and polymers are used for their laying. Steel and cast iron perform well. High-quality copper also demonstrates high performance. This is what applies to metals. Among polymer materials, the choice is much wider: many types of polyethylene, polypropylene and so on. Pipes reinforced with fiberglass and aluminum are quite popular. All of the presented materials have certain features, thanks to which they have become popular. In the domestic market, steel pipes for pipeline installation are most in demand. This is due to the low cost of materials. But it has a number of disadvantages: such pipes are susceptible to corrosion, require painting, and installation is difficult.
As mentioned above, copper pipes are also used in pipelines. This material has a long service life, but is also expensive. Copper pipes are resistant to corrosion, overgrowing of the cross-section, and can withstand high and low temperatures, as well as temperature changes. Such a pipeline will last a very long time, but the costs for it will be corresponding.
Among polymer materials, polypropylene is most often chosen. Such pipes are relatively cheap, yet have high performance characteristics and are durable.
Detailed description of each method
Threaded
They can be done in several ways, the most common being squeezing.
The following tools will help you do this job:
- Pipe wrench.
- Coupling with internal thread.
- Seals for sealing. Maybe: hemp rope, FUM tape or sealant.
- Lock-nut.
Two pipes have external threads. We apply sealant to them. One has a longer thread length than the other. Where there are more turns the nut is screwed on until the end. Then the clutch. Then we screw it onto the second part, twisting it with the first one. When the coupling stops screwing, support it with a lock nut
Tighten with keys, carefully, so that the coupling does not burst
Flanges
For a flange joint you will need:
- two flanges;
- paronite gasket;
- bolts, washers, nuts;
- keys;
- manual arc welding;
- level.
The flanges need to be welded. Avoid displacement; they must be in the same plane.
We catch using a horizontal level. We screw two bolts into the upper holes. We put the part on the edge of the tube so that the bolts are at the top. We put a level on them and catch the position of the bubble between the strips in the middle. When caught, we make a tack by welding at the top point. The horizontal plane is ready.
We rearrange the level to a vertical position, leaning it against the flange mirror. We catch the level by slightly adjusting the lower end of the flange that is not yet stuck. Having established the vertical, we installed the second tack. And then two more, resulting in four even sections.
Then the welder welds the flange on both sides. Manipulations are carried out similarly with the second pipe.
Bonding
This method is used very rarely in metal parts. The process itself does not require any special skill from a person, but it takes a lot of time.
This job requires:
- glue. BF-2 or 88N or EDP;
- brush.
Before gluing the parts, first apply the first layer on their surface and allow to dry. This layer will be the bonding layer. Each glue has a drying time written in its instructions. Then a second layer is applied and the parts are placed under the press for a day or even more. It all depends on the glue.
Then clean the seam from any glue leaks.
Crimp connectors for steel pipes
Welding
The welding process is used in almost all metal pipe joints.
In order to obtain a seam, the following welding methods are used:
Gas welding is used to obtain permanent connections in small diameter pipes with minimal thickness.
The gas welding station consists of:
- oxygen cylinder;
- acetylene;
- rubber hoses;
- burners.
Resistance welding is rarely used. This method has proven itself more effective in working with plastic pipes.
The most popular method of producing permanent joints is electric arc welding, divided into:
- manual
- semi-automatic in protective gas environment
When constructing pipelines, connections are made only by welding
An important part is preparing the joint for welding
The pipe must be connected to another:
- no fractures or displacements;
- the joint must be cleaned;
- make a chamfer;
- set the gap to 1-3 mm.
Required welding equipment:
- electrodes;
- power source (transformer or rectifier);
- cable;
- Personal protective equipment for welders: overalls, mittens, brushes.
Soldering of polyethylene pipes end-to-end and using an electrofusion coupling
Trumpet
This type of connection is widely used in cast iron pipes for the oil and gas industry, housing and communal services. One of the simplest options for permanent joints.
The main process of obtaining a joint is to seal the gap between the socket and the surface of the conical pipe. Cement material is used for this.
To seal the socket, grade 300-400 cement is used, which is thoroughly mixed with water in a ratio of nine parts cement to one part water. The socket is filled with cement mortar using a scoop and embossed until the latter begins to bounce off the cement.
Pressing
This method of obtaining a permanent weld has become necessary for small-diameter connections made of non-ferrous metals. Conventional electric arc welding is not capable of welding such metals due to its technical parameters, so in this case they found a different approach.
To join such thin-walled non-ferrous metal pipes, press fittings with crimp sleeves are used. They perform crimping on the inside of the pipe, and external seals ensure the joint is sealed.
Advantages and disadvantages of a hidden heating pipe laying scheme
As for the advantages, there is one, but significant one - aesthetic beauty. When laid hidden, heating pipes in the wall or floor do not disturb the interior of the room
This is important for rooms with panoramic glazing, floor-to-ceiling windows, etc. Decor is also important in rooms with massive furniture; you don’t have to think about damage to products from the heat from the chimney
But the hidden scheme has more disadvantages:
- Hidden installation of heating pipes with your own hands is a difficult task. To reliably hide the outline, it is necessary to comply with regulatory requirements.
- Significant heat loss. Before the coolant warms up the house, it must first heat the screed or wall, then the finishing, and only then the heat enters the room.
- Increased cost of work. To hide the contours, you need to buy pipes made of steel or with reinforcement, sleeves, insulation, insulating materials - all this will require investment.
Before starting work, all the nuances are determined - access to key nodes of the highway, layout taking into account the load on the floor and wall. The optimal cross-sectional size for coolant circulation is also calculated without increasing the linear expansion property of the pipes.
And one more important nuance on which the performance of the circuit during hidden installation depends is the correct slope of the heating pipes. The standard slope is 0.5 cm per meter of highway. You can reduce the figures to 0.2 cm, but only if a good pump is integrated into the system and the circuit is selected with the correct diameter of the internal tunnel.
Features of pipes for hidden installation
Which pipes are best suited for hidden installations - this question is most often asked by owners of private houses
Professionals recommend paying attention to metal-plastic pipes with reinforcement. Plastic parts deteriorate under the influence of UV rays, so they are well suited for installation in a screed, thick wall
As for steel products, they are more difficult to bend, so more fittings must be used in rotating areas. An increased number of connectors increases the risk of leakage. It turns out that PP pipes with reinforcement are the best option for hidden installation of a heating system.
Mineral wool
Insulating materials using mineral wool are very effective heat insulators. They are used in a wide variety of conditions. Thermal insulators made of mineral wool tolerate temperatures up to 650°C without losing their thermal insulation and mechanical properties. At the same time, they do not lose their shape and have high chemical resistance to oil, solvent, acid, and alkali. They are non-toxic, and thanks to special impregnation, they have a very low degree of moisture absorption. (See also: Water floor heating)
Advice! Mineral wool is well used to protect heating network pipelines and hot water supply pipelines in residential and public buildings, domestic premises, as well as pipelines whose surface is subject to heating, for example, chimneys.
Types of mineral wool
Stone wool is made from alloys of basalt rocks. It was described above.
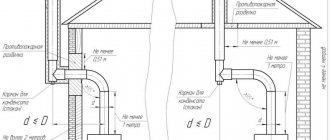
Installation of a chimney for a gas boiler
Installation of a chimney for a gas boiler begins with cutting out an exhaust hole, the size of which depends on the diameter of the chimney pipe
Options for laying out the heating pipeline in the house
There are two types of installation - open and hidden. An open network is installed along the bottom of the walls, a closed one can be recessed into the floor screed. The choice of method depends on the requirements of the owner and the skill of the craftsman. If the installation technology is followed, the network performance parameters are not reduced.
But there are some nuances that need to be resolved first:
- The laying technique depends on the material of the pipes for the circuit. For example, steel elements have a minimal thermal expansion rate. This property allows you to embed the contour into the screed and wall it without much risk. The risk of leakage due to deformation or rupture is minimal. The metal-plastic circuit has a significant linear expansion, so it is better not to hide such pipes in the walls and floor.
- High-quality pipeline insulation will reduce heat loss. The winding will prevent the risk of rupture of the circuit walls in the event of strong linear expansion.
Most often, craftsmen choose an open layout option. But only when we are not talking about the contours of a warm floor.
Hidden styling
The pipeline is laid out in the walls, floor or rises to the ceiling with installation behind a suspended or hemmed finish. It is most convenient to carry out work on hidden layout during a major overhaul or at the construction stage of the facility.
Features of the formation of hidden contours:
- a minimum number of joints, turns, bends - such networks are less at risk of deformation and leakage;
- accessibility of connection areas for inspection and preventive maintenance;
- Old heating pipes cannot be hidden in the floor screed.
In order not to forget all the details of the arrangement, it is recommended to draw up a detailed technical plan for the heating system. This diagram will help you quickly find the main line shutoff unit if the heating pipes in the floor screed leak.
Open display
Laying heating pipes in an open way is the simplest and most affordable option for a home craftsman. The complexity of the circuit or the number of turns does not matter here - with the correct selection of the section, performance does not decrease.
Additional benefits of an open network include:
- Low cost of work. Due to the absence of additional sleeves and other elements, the costs will not be so impressive.
- Possibility of quick renovation and repair. All details remain visible, restoration will not take much time.
How and what to seal pipe joints with
Types of seals, sealing methods
To prevent leakage of the pipeline working fluid, it is necessary to properly seal the pipe twists.
When threading steel pipes, the following are used as seals:
- gasket This method of sealing a threaded connection requires relatively thick end pipe cuts. The presence of smooth pipe ends can never ensure tightness. When using a rubber or plastic gasket, this problem is successfully solved. This option is ideal in case of articulation using a union nut;
- winding The materials can be linen strands, polymer threads, FUM tapes in combination with hardening sealants, paints, pastes.
When installing plastic risers, a sealing method is used based on the deformation properties of the material. The essence of this method is that a plastic pipe with an external thread is screwed into a riser with an internal thread. During deformation, plastic contributes to excellent filling of the intermediate space, eliminating the appearance of gaps.
When it comes to pipeline structures with high pressure, cylindrical threaded pipe connections are not entirely appropriate here. In such cases, a conical type connection is used. The principle of connection is that when screwing in, the pipes are tightly pressed until the gap completely disappears.
Materials for sealing joints
To make the joint impenetrable, the following are used as seals:
- flax (tow);
- asbestos;
- FUM tape;
- natural drying oil;
- whitewash;
- minium;
- graphite lubricant, etc.
A reliable sealant when twisting steel pipes onto threads is strands of flax impregnated with red lead or white lead. This connection is easy to install and reliable in terms of sealing. The seal has been used for a very long time and does not lose its popularity today, despite the emergence of artificial analogues.
For those who have little experience in installing fittings and pipes, we suggest that under no circumstances use flax without paint.
At first, the joint will not allow moisture to pass through. But several months will pass, the flax fibers will get wet and begin to decompose. Therefore, the quality of all connections will deteriorate, and in another month or two, water will leak at the junction.
Many people use FUM tape, which is in no way inferior to old traditional materials - tow with paint.
Sometimes there is no tightness at the junction of the risers. To eliminate this defect, you need to replace the sealing material, and clean the threaded area from dirt and sealant residues. After this, rewind the linen thread, FUM tape or other sealant, and assemble the structure.
Pastes and sealants of chemical origin are used as additional sealants, which will help strengthen this section of the pipeline.
Rules for choosing the diameter of heating pipes
The cross-sectional size affects the circulation rate of the coolant. If the diameter is chosen incorrectly, the transportation of the heated liquid will be slow, and the devices will heat up unevenly. Coolant fluid flow speed standards are 0.4–0.6 m/sec. Reducing movement to 0.2 m/sec. causes water stagnation and air pockets form. Provided the coolant circulates at a speed of 0.7 m/sec. Energy consumption increases and noise is heard. The optimal parameter for the speed of water movement in the system is 0.3–0.7 m/sec. From this calculation, the diameter of the heating pipe is selected.
Recommendations from experts on product selection:
- if no more than 2 radiators are connected in the network, the cross-sectional size is up to 16 mm;
- when integrating 1 battery with a capacity of 7 kW or several radiators with a capacity of up to 2 kW (in total, the total power should not exceed 7 kW) - the permissible circuit cross-section is 20 mm;
- with a total power of a group of radiators in the main line of 11 kW, a pipe with a diameter of 25 mm is needed;
- supplying heat to a dead-end distribution, for example, to a distant wing of a house, requires the installation of elements with a cross-section of 25 mm;
- parts with a diameter of 32 mm are mounted into a network with 12 batteries with a total power rating of up to 19 kW;
- if the house system has more than 20 radiators, the total power of which is not higher than 30 kW, products measuring 40 mm will be required.
It is also important to consider the capacity of the pipeline. If the water speed in the main line is no more than 0.4 m/sec, the polypropylene circuit ensures the transfer of the required amount of heat
Table of thermal energy release depending on the pipe cross-section:
| Thermal energy (kW) | Outer diameter (mm) | Inner diameter (mm) |
| 4,1 | 13,2 | 20 |
| 6,3 | 16,6 | 25 |
| 11,5 | 21,2 | 32 |
| 17 | 26,6 | 40 |
Types of radiator connections
The main methods of connecting heating system devices are several types:
- Lateral (standard) connection;
- Diagonal connection;
- Bottom (saddle) connection.
Side connection
Lateral radiator connection.
Connection from the end of the device - supply and return are located on one side of the radiator. This is the most common and effective connection method; it allows you to remove the maximum amount of heat and use the entire heat transfer of the radiator. As a rule, the supply is at the top and the return is at the bottom. When using a special headset, it is possible to connect from bottom to bottom, this allows you to hide the pipelines as much as possible, but reduces the heat transfer of the radiator by 20 - 30%.
Diagonal connection
Diagonal radiator connection.
Connection diagonally to the radiator - the supply is on one side of the device from the top, the return is on the other side from the bottom. This type of connection is used in cases where the length of a sectional radiator exceeds 12 sections, and a panel radiator is 1200 mm. When installing long radiators with side connections, there is uneven heating of the radiator surface in the part furthest from the pipelines. To ensure that the radiator heats up evenly, a diagonal connection is used.
Bottom connection
Bottom connection from the ends of the radiator
Connection from the bottom of the device - supply and return are located at the bottom of the radiator. This connection is used for the most hidden installation of pipelines. When installing a sectional heating device and connecting it using the bottom method, the supply pipe approaches on one side of the radiator, and the return pipe on the other side of the bottom pipe. However, the heat transfer efficiency of radiators with this scheme is reduced by 15-20%.
Bottom radiator connection.
In the case when the bottom connection is used for a steel panel radiator, then all the pipes on the radiator are located at the bottom end. The design of the radiator itself is made in such a way that the supply flows through the manifold first to the upper part, and then the return flow is collected in the lower radiator manifold, thereby not reducing the heat transfer of the radiator.
Bottom connection in a single-pipe heating circuit.
Connecting metal heating pipes without welding
The fastest connection method without welding is a compression fitting. However, we will consider other methods: threaded connections and installation of a repair and mounting clip. The latter is used both for joining and eliminating leaks caused by metal cracking.
Thread
It is possible to create a threaded connection only if there is free access to the pipe, i.e. at the initial installation stage. In other cases, thread cutting will be quite problematic or impossible. The procedure itself is carried out according to the following scheme:
- Clean the pipe from paint and rust. If there are metal deposits after previously performed welding, they should be cut off. The surface to be joined must be clean and smooth.
- Using a file, chamfer the end where the cut was made.
- Take a die of a suitable size and screw the handles into it. Lubricate the cutters with grease or lard.
Die
Install the tool on the pipe, make sure that it is positioned strictly perpendicular. Make a half turn of the die clockwise, then a quarter turn counterclockwise. Then repeat the movement until the thread is cut.
Now let's figure out how to cut into a heating pipe without welding. To do this you will need to use a coupling with a nut. It can have three branches to create wiring. When creating a thread, remember that on one pipe it should be 2 times longer. Securing the coupling:
- A nut is screwed onto the longer thread, then a coupling.
- A nut is screwed onto the second pipe.
- The parts are matched together, after which the coupling is twisted off the long thread and partially screwed onto the short one. The element should be approximately in the middle of the cut.
- All that remains is to screw the nuts on both sides, having previously wound a sealing material (fum tape, tow) onto the threads.
Such a connection is considered quite strong and can last for more than one year.
Installation of threaded coupling
Compression fittings for steel pipes
This type of connection allows heating without welding pipes and cutting threads. At the same time, experts note the high reliability of compression fittings, the leader in production of which is Gebo. This often results in confusion of concepts - many name these connecting devices after a popular manufacturer (a striking analogy is the Xerox brand, which has become a household name for document copying work).
Compression fitting
Among the advantages of this connection method are the speed of operation and the absence of the need to use special tools. All you need are two balloon wrenches to hold and tighten the fitting.
The working method is as follows:
- Place the fitting parts onto the pipe in the following sequence: nut, clamping ring, clamping ring, sealing ring.
Compression fitting installation diagram
Put on the coupling, make sure that all elements are positioned correctly and without distortions. Tighten the nut. One turn of thread should remain visible. If after supplying the coolant a small leak appears, the nut can be tightened. Carry out the same actions for the second side of the fitting.
You can learn more about compression fittings by watching the video:
Repair and installation clip
When operating old systems or exceeding pressure, the question often arises of how to seal a heating pipe without welding. For these purposes, a repair and installation clip is used. It can be made in the form of a coupling or tee. The outer part of the part is metal with clamping bolts, inside there is a rubber gasket.
The element is often used for emergency repair of leaks, but can also be used as a permanent option for connecting water supply pipes. Instructions for use:
- Clean the pipe contact areas from paint and other deposits that may affect future tightness.
- Apply a rubber seal to the joint. Make sure that its cut does not hit the junction of the upper and lower parts of the holder.
- Coat the cut with sealant and, if possible, allow some time to dry.
- Install the frame parts and secure with bolts.
Installation diagram for a repair and installation clip
These are all options for creating a strong connection between metal pipes without using a welding machine. Now we will describe several methods when working with metal-plastic parts.
Vertical scheme with top wiring
This type of heating involves supplying coolant from the boiler to the top point of the system through a supply pipe and distributing it along risers that supply coolant to heating devices. The cooled water is returned through the return pipes of the system. To prevent air accumulation in the system, an expansion tank is provided.
Due to the supply of higher pressure through the risers, a heating system with overhead wiring is considered more efficient.