Here you will learn:
- Single pipe systems
- Single-pipe horizontal
- Single-pipe vertical
- Scheme "Leningradka"
- Two-pipe system with bottom wiring
- Two-pipe system with top wiring
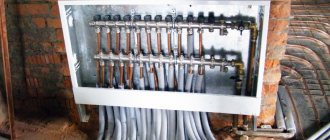
- Beam system with collectors
- With forced and natural circulation
One of the stages of building a private house is the design and creation of a heating system. This is a difficult stage, since you need to not only design the heating, but also save on materials. An important factor is that the heating created must be efficient and economical. We create heating for a private house with our own hands - you can find wiring diagrams (the most basic) in our review.
There are many schemes for laying heating pipes in private households. Some of them are combined, which allows you to increase the efficiency of the system and achieve more uniform heating throughout the house. In our review we will consider only the most basic schemes:
- single-pipe horizontal circuit;
- single-pipe vertical design;
- "Leningradka" scheme;
- two-pipe system with bottom wiring;
- two-pipe system with top wiring;
- beam system with collectors;
- schemes with forced and natural circulation.
Let's look at the features of the presented schemes, and also discuss their advantages, disadvantages and installation features.
Single pipe systems
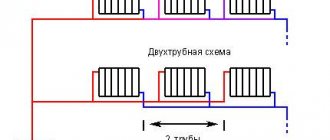
In single-pipe heating systems, the coolant passes sequentially through all radiators.
When creating heating for a private house with your own hands, the easiest way is to equip a single-pipe heating system. It has many advantages, such as cost-effective use of materials. Here we can save a lot on pipes and achieve heat delivery to every room. A single-pipe heating system provides for sequential delivery of coolant to each battery. That is, the coolant leaves the boiler, enters one battery, then another, then a third, and so on .
What happens in the last battery? Having reached the end of the heating system, the coolant turns around and is sent back to the boiler through a single pipe. What are the main advantages of such a scheme?
- Easy to install - you need to sequentially pass the coolant through the batteries and return it back.
- Minimum consumption of materials is the simplest and cheapest scheme.
- Low location of heating pipes - they can be mounted at floor level or completely lowered under the floors (this can increase the hydraulic resistance and require the use of a circulation pump).
There are also some disadvantages that you have to put up with:
- limited length of the horizontal section - no more than 30 meters;
- The farther from the boiler, the colder the radiators.
However, there are some technical tricks that can mitigate these shortcomings. For example, the length of horizontal sections can be dealt with by installing a circulation pump. It will also help make the last radiators warmer. Bypass jumpers on each radiator will also help compensate for the temperature drop. Let's now discuss certain types of single-pipe systems.
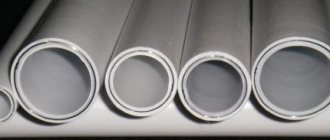
Two other varieties
Steel structures. They gave way to other, newer types of pipes, which create less costs in creating heating pipelines.
It is worth noting that most multi-storey buildings, industrial and public buildings contain heating pipes based on metal.
They are not used so often in individual houses, but are excellent for laying main pipelines.
Cross-linked polyethylene. This is a type of plastic pipeline.
- The polymer is produced in production by cross-linking links of ethylene molecules.
- This type of pipe began to be designated PEx, the first two letters mean polyethylene, and “x” indicates cross-linking.
Joints made of cross-linked polyethylene bend well and are resistant to mechanical loads, so they are often used for laying closed heating systems for underfloor heating.
Single-pipe horizontal
The simplest version of a single-pipe horizontal heating system with a bottom connection.
When creating a heating system for a private house with your own hands, a single-pipe wiring diagram may turn out to be the most profitable and cheapest. It is equally suitable for both one-story and two-story houses. In the case of a one-story house, it looks very simple - the radiators are connected in series - in order to ensure consistent flow of coolant . After the last radiator, the coolant is sent through a solid return pipe to the boiler.
Advantages and disadvantages of the scheme
First, we will look at the main advantages of the scheme:
- ease of implementation;
- excellent option for small houses;
- saving of materials.
A single-pipe horizontal heating circuit is an excellent option for small spaces with a minimum number of rooms.
The scheme is really very simple and understandable, so even a beginner can handle its implementation. It provides for a serial connection of all installed radiators. This is an ideal heating layout for a small private house . For example, if this is a one-room or two-room house, then “fencing” a more complex two-pipe system does not make much sense.
Looking at the photo of such a circuit, we can note that the return pipe here is solid, it does not pass through the radiators. Therefore, this scheme is more economical in terms of material consumption. If you don’t have extra money, this type of wiring will be the most optimal for you - it will save money and allow you to provide heat to your home.
As for the shortcomings, there are few of them. The main disadvantage is that the last radiator in the house will be colder than the very first one. This is due to the sequential passage of the coolant through the batteries, where it releases the accumulated heat into the atmosphere. Another disadvantage of a single-pipe horizontal circuit is that if one battery fails, the entire system will have to be turned off at once.
Despite certain disadvantages, this heating scheme continues to be used in many small private houses.
Features of installation of a single-pipe horizontal system
When creating water heating for a private house with your own hands, the scheme with single-pipe horizontal wiring will be the easiest to implement. During the installation process, it is necessary to mount the heating radiators, and then connect them with pipe sections. After connecting the very last radiator, it is necessary to turn the system in the opposite direction - it is advisable that the outlet pipe runs along the opposite wall.
A single-pipe horizontal heating circuit can also be used in two-story houses; each floor here is connected in parallel.
The larger your home, the more windows it has and the more radiators it has. Accordingly, heat losses also increase, as a result of which the last rooms become noticeably cooler. You can compensate for the temperature drop by increasing the number of sections on the latest radiators . But it is best to install a system with bypasses or with forced circulation of the coolant - we will talk about this a little later.
A similar heating scheme can be used to heat two-story houses. To do this, two chains of radiators are created (on the first and second floors), which are connected in parallel to each other. There is only one return pipe in this battery connection diagram; it starts from the last radiator on the first floor. The return pipe coming down from the second floor is also connected there.
Choosing a coolant
It is well known that filtered and, if possible, desalted water is most often used for this purpose. But under certain conditions, for example, periodic heating, water can freeze and destroy the system. Then the latter is filled with a non-freezing liquid - antifreeze. But you should take into account the properties of this liquid and do not forget to remove all regular rubber gaskets from the system. Antifreeze quickly causes them to become limp and leaks occur.
Attention! Not every boiler can work with non-freezing liquid, which is shown in its technical data sheet. This must be checked when purchasing it.
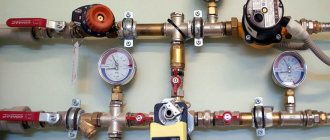
As a rule, the system is filled with coolant directly from the water supply through a make-up valve and a check valve. During the filling process, air is removed from it through automatic air vents and manual Mayevsky taps. In a closed circuit, pressure is monitored using a pressure gauge. Usually when cold it is in the range of 1.2-1.5 Bar, and during operation it does not exceed 3 Bar. In an open circuit, it is necessary to monitor the water level in the tank and turn off the replenishment when it flows out of the overflow pipe.
Antifreeze is pumped into a closed heating system using a special manual or automatic pump equipped with a pressure gauge. To ensure that the process is not interrupted, the liquid must be prepared in advance in a container of appropriate capacity, from where it must be pumped into the pipeline network. Filling an open system is easier: antifreeze can simply be poured or pumped into the expansion tank.
Single-pipe vertical
How else can you heat two-story households with a single-pipe system? There really is an alternative - this is a single-pipe vertical heating system, which is used by many people who are looking for a suitable steam heating scheme in a private home. There are no difficulties in such a scheme; you just need to bring the supply pipe with the coolant to the second floor and connect the batteries located there, and then make branches down to the first floor .
Advantages and disadvantages of a single-pipe vertical scheme
As usual, let's start with the positive features:
In single-pipe vertical heating systems, the coolant flows from the radiator on the top floor to the lower floors.
- greater savings on materials;
- relatively equal air temperature on the first and second floors;
- ease of implementation.
The list of disadvantages is the same as the previous scheme. It included heat losses on the last radiators. And since our coolant is supplied through the upper floor, it can be cooler on the first floor than on the second .
The savings on materials are more than substantial. We only have one pipe going upstairs, from which the coolant is distributed to all the radiators on the second floor (not sequentially). From each upper radiator, pipes go down to the radiators on the ground floor, after which they end up in one common return pipe. Thus, this scheme involves minimal use of materials.
Features of installation of a single-pipe vertical system
When installing a vertical single-pipe system, you will receive as many chains as there are radiators on each floor.
In the previous gas heating scheme in a private house, the pipes sequentially bypassed the radiators on the first and second floors. That is, we got two parallel chains, each of which included several radiators . In the current scheme we also have chains, but they are vertical. For example, if there are four radiators on each floor, then we get four chains connected in parallel.
This scheme assumes one solid supply pipe passing along the top floor. Branches are made from it to each radiator. After passing through the upper radiators, the coolant flows to the lower radiators, and only after that into the return pipe passing along the first floor.
If in the first case the greatest heat losses were observed in the distant radiators of the first and second floors, then in this scheme it will be cooler on the first floor, since part of the heat will be consumed on the second floor.
A single-pipe vertical heating scheme for a private house with a gas boiler can be implemented without forced circulation of the coolant. The thing is that the temperature of the coolant supplied to the radiators on the second floor is the same. A drop in temperature is observed only on the first floor. But if we supplement the radiators with bypass jumpers, then the temperature change will be minimal - it can be neglected.
Thus, this circuit, supplemented by bypass jumpers, will become the most economical and inexpensive among any other circuits. Instead of a gas boiler, any other boiler can be used. The electric heating circuit of a private house is no different from gas heating (except in the type of boiler).
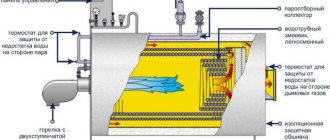
Solid fuel boilers
Solid fuel boilers are divided into 3 types: direct combustion, pyrolysis and pellet. The units are popular due to their low operating costs, because compared to other energy sources, firewood and coal are inexpensive. The exception is natural gas in the Russian Federation, but connecting to it is often more expensive than all the heating equipment including installation. Therefore, wood and coal boilers, which have an acceptable cost, are being purchased by people more and more often.
On the other hand, operating a solid fuel heat source is very similar to simple stove heating. You need to spend time and effort to prepare, carry firewood and load it into the firebox. The unit also requires serious piping to ensure its long-lasting and safe operation. After all, a conventional solid fuel boiler is characterized by inertia, that is, after closing the air damper, the heating of water does not stop immediately. And efficient use of generated energy is possible only if there is a heat accumulator.
Important. Boilers that burn solid fuels generally cannot boast of high efficiency. Traditional direct combustion units have an efficiency of about 75%, pyrolysis units - 80%, and pellet units - no more than 83%.
The best choice in terms of comfort is a pellet heat generator, characterized by a high level of automation and virtually no inertia. It does not require a heat accumulator and frequent trips to the boiler room. But the price of equipment and pellets often makes it inaccessible to a wide range of users.
Scheme "Leningradka"
The Leningradka heating system is an improved single-pipe system.
Both considered schemes have one common drawback - a drop in temperature in the last radiators. In the case of a horizontal circuit, we have cold radiators in horizontal chains, and in the case of a vertical circuit, in vertical chains. That is, in the latter case it is the entire first floor.
The Leningradka heating circuit in a private house allows you to compensate for the cooling of the coolant when passing through the next radiator . How is it implemented? This circuit provides bypass jumpers located under the batteries. What do they give? The jumpers allow you to direct part of the coolant bypassing the radiators, so the coolant at the outlet is as warm as at the inlet (minor deviations can be neglected).
Advantages and disadvantages of the Leningradka scheme
Leningradka promotes more uniform heating of rooms.
Each scheme has its own advantages and disadvantages. What are the advantages of the Leningradka scheme?
- More even heat distribution throughout the house.
- Relatively simple upgrade.
- Possibility of adjusting the temperature in individual rooms (as in two-pipe systems).
Single-pipe heating is not perfect, so the Leningradka scheme allows you to compensate for some of its shortcomings. But she has negative features:
- limited length of the line - if there are many radiators in a horizontal chain, then there will still be losses ;
- the need to use large diameter pipes for more uniform heat distribution.
The last drawback can be eliminated by installing a circulation pump in the system.
Features of installation of "Leningradka"
Connection options for Leningradka in a single-pipe vertical circuit.
When creating heating systems for private houses with their own hands, many people actively use the Leningradka scheme. How is it laid? To create a circuit, it is necessary to place radiators and lay a pipe under them, from which branches are made to the inlets and outlets of the radiators. That is, a jumper is formed under each radiator. In addition, we can install three taps on each radiator - the first two taps are installed at the inputs and outputs, and the third is installed on the jumper itself. What does this give?
- Taps can be used to regulate the temperature in individual rooms.
- The ability to exclude any radiator without shutting down the entire system (for example, if one radiator is leaking and needs to be replaced).
Thus, the “Leningradka” scheme is the optimal scheme for small one-story and two-story houses - you can save on materials and achieve uniform heat distribution throughout the rooms.
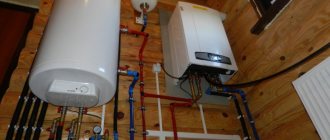
How to choose a heating unit
Factors influencing the choice of a boiler (or several water heating devices):
- energy carrier used;
- heat generator power;
- dependence on external energy sources;
- price;
- functionality, ease of use.
Note. The heater selection criteria are arranged in order of priority. It is important for the user that the unit consumes cheap fuel and produces enough heat. Price plays a secondary role; comfort and functionality come in third place.
All household boilers are usually divided into groups according to the type of fuel (energy carrier) burned:
- gas;
- electrical;
- solid fuel;
- liquid fuel, consuming diesel fuel and waste oil;
- universal, operating on 2-3 types of energy carriers.
Each of the listed groups is divided into varieties according to the operating principle, installation method and other criteria. We will review existing boilers and give a number of useful recommendations.
Types of gas boilers
To organize heating in private homes, 3 types of units using natural gas are sold:
- Atmospheric. The combustion chamber is open, combustion air is taken from the boiler room. The operating efficiency is in the range of 86...88%.
- Supercharged (aka turbocharged). Air is forced into the closed firebox by a fan controlled by an electronic circuit. Boiler efficiency is 90...93%.
- Condensation. Structurally similar to turbocharged heaters, but the heat exchanger and burner are designed in such a way that in a certain mode the boiler uses the latent heat of combustion of the fuel. Efficiency – 95%.
Reference. All heat generators are capable of burning 2 types of fuel - natural gas and liquefied propane-butane mixture (LPG). To switch to LPG, the fuel jets are replaced and the automation is adjusted.
Boilers are manufactured in wall, floor and parapet versions. The first group is ready-made mini-boiler rooms, equipped with their own expansion tank and pump. The second type is high-power units, or those that do not depend on electricity. Parapet models are placed near the outer wall, the chimney goes directly to the street.
Among the large assortment of gas water heaters, it is not easy to make the right choice. Our recommendations are:
- If you are on a limited budget, purchase an atmospheric wall-mounted boiler. But remember - open-chamber heaters require a traditional chimney.
- To work together with the gravity system, you will need a non-volatile floor-mounted atmospheric unit.
Floor-mounted non-volatile heater equipped with a single-stage burner, mechanical automatic safety system EuroSIT and a cast iron heat exchanger
- It is better to install a forced-air heat generator in an apartment or cottage without a ready-made chimney. Organize the removal of combustion products through a coaxial pipe laid through the outer wall.
- To supply hot water to 1-2 consumers, buy a dual-circuit model. If the consumption in the DHW network is high, you will need an indirect heating boiler connected to a conventional single-circuit heater.
- Read the detailed description of all gas heaters presented in a separate article.
A condensing boiler is the most economical among gas-using devices. The disadvantage of the unit is the complexity, high price of the equipment and its repair.
Electric hot water installations
A feature of electric boilers of any type is their high efficiency, reaching 99%. The second positive point is the low installation costs and purchase of the heaters themselves. The units should be used as auxiliary heat sources, operating at night at half the light tariff.
There are 3 types of electric boilers (all are available in wall-mounted versions):
- With traditional tubular heaters - heating elements. Modern devices are equipped with an expansion tank and a circulation pump.
- Electrode. Heating of the coolant occurs due to a chemical reaction resulting from the passage of current through the water layer between the 2 electrodes.
- Induction. Here the coolant is heated by the steel core of a sealed coil, which creates eddy currents in it.
Heat generator with tubular heaters (TEN) in section
To install electric heating, it is better to take a classic heating element boiler, which does not require serious wiring. The device is reliable and easy to repair - you can always replace a burnt heating element yourself. An induction heat generator is expensive and cannot be repaired in the event of a breakdown, and an electrode heat generator is highly dependent on the salt content in the coolant.
Advice. Don't listen to salespeople who call induction boilers energy-saving. All electrical installations heat water equally efficiently - losses do not exceed 2%, the rest of the energy is converted into heat.
Classification of solid fuel boilers
For heating country cottages, 3 types of solid fuel units are used:
- direct combustion - atmospheric and turbocharged;
- pyrolysis;
- automatic pellet and coal.
There are many myths about the efficiency of TT boilers. Manufacturers of pyrolysis heat generators claim an efficiency of 85-86%, pellet heat generators - up to 90%. In reality, the figures are much more modest: traditional wood-burning units - 75%, pyrolysis units - 75%, boilers using pellets and coal chips - up to 86%.
Construction of a direct combustion boiler with a fire tube heat exchanger
Reference. In addition to the listed types of heaters, there are long-burning TT boilers with an increased size of the firebox. How to distinguish such installations from classic wood-burning heat generators, read the corresponding publication.
Recommendations for choosing a solid fuel boiler:
- A steel direct combustion apparatus equipped with a chain draft regulator is perfect for burning wood, coal and briquettes. Turbocharged examples are automated and burn wood better, but rely on electricity.
- Pay attention to the volume of the firebox of a traditional boiler - the duration of combustion depends on this indicator.
- Automated pellet units are a good solution for lovers of comfortable heating. You don’t have to chop and carry wood, remove coal dust, just clean the firebox and burner weekly.
- Do not mess with pyrolysis TT boilers, they are a priori more expensive than conventional ones, demanding on the quality of fuel, and in addition they consume electricity.
- Avoid models with water-filled grates if you plan to burn with coal. The temperature difference forms a hard crust on the surface of the grate, which is not easy to knock off.
Grate of a TT boiler made of pipes filled with coolant
When choosing a heat generator, remember the old saying “the miser pays twice.” It is better to take a high-quality classic device with a cast-iron heat exchanger than a cheap “pellet generator” with electronics of unknown origin.
Diesel and combined models
This heating equipment is used much less frequently than gas, wood and electric boilers. Diesel fuel is more expensive than other energy sources, and waste oil is a specific fuel that is clearly unsuitable for the average homeowner. Accordingly, such heating devices are operated only in certain conditions when access to other resources is limited.
Multi-fuel boilers from different manufacturers combine 2-3 energy sources, for example, wood + electricity, gas + coal. Advantage: you buy one heat generator and get two. Disadvantage: the unit cannot boast of high efficiency and functionality. The most popular option is shown in the photo - a TT boiler, equipped with a heating element unit for electrically heating water after the flame in the firebox has died out.
Electric wood heater from the Russian company Teplodar
Heat generator power calculation
To select a boiler based on performance, you should find out the load on the heating system of the house. That is, calculate the heat losses of the building. We propose to calculate this indicator in a simplified way:
- If a living room is separated from the street by one wall with 1 window opening, then 0.1 kW of heat is consumed to heat a square meter of area.
- A room with two external walls (corner) and 1 window – 0.12 kW/m².
- The same, with 2 light openings - 0.13 kW/m².
An important nuance. The calculation is performed for each room separately, then the results are summed up.
The algorithm is suitable for buildings with floor heights up to 3 meters. If the ceilings are higher, heat consumption is calculated based on the volume of the room. Accordingly, in a room with 1 fence and a window, the volume value is 35 W/m³, in a corner room – 40 W/m³, in a corner room with two openings – 45 W/m³.
Having determined the need for thermal energy at home, we select the power of the boiler installation according to the instructions:
- The performance of a unit operating only for heating is taken with a margin of 20%. That is, we multiply the found amount of heat by a factor of 1.2.
- The heat generator providing hot water supply must be taken with a reserve of 50% (coefficient 1.5).
- For TT boilers, the increasing coefficients are 1.5 and 2, respectively.
If you live in an area with a mild southern climate, then the coefficients should not be used. Conversely, residents of the northern regions should increase the initial heat loss figure by 1.5-2 times.
Calculation of heat losses by volume of residential premises
Two-pipe system with bottom wiring
Next, we will consider two-pipe systems, characterized by the fact that they ensure uniform heat distribution even throughout the largest households with many rooms. It is the two-pipe system that is used for heating multi-storey buildings, in which there are a lot of apartments and non-residential premises - here this scheme works great . We will consider schemes for private houses.
Two-pipe heating system with bottom wiring.
A two-pipe heating system consists of supply and return pipes. Radiators are installed between them - the radiator inlet is connected to the supply pipe, and the outlet is connected to the return pipe. What does this give?
- Uniform heat distribution throughout the rooms.
- Possibility of adjusting the temperature in the rooms by completely or partially closing individual radiators.
- Possibility of heating multi-storey private houses.
There are two main types of two-pipe systems - with bottom and top wiring. First, we will look at a two-pipe system with bottom wiring.
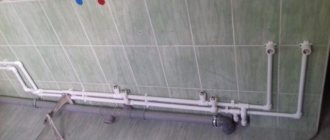
Bottom wiring is used in many private homes, as it makes heating less visible. The supply and return pipes pass here next to each other, under the radiators or even in the floors. Air is removed through special Mayevsky taps. Heating schemes in a private house made of polypropylene most often provide for just such wiring.
Advantages and disadvantages of a two-pipe system with bottom wiring
When installing heating with bottom wiring, we can hide the pipes in the floor.
Let's see what positive features two-pipe systems with bottom wiring have.
- Possibility of masking pipes.
- The ability to use radiators with bottom connections makes installation somewhat easier.
- Heat losses are minimized.
The opportunity to at least partially make heating less visible attracts many people. In the case of bottom wiring, we get two parallel pipes running flush with the floor . If desired, they can be placed under the floors, having provided for this possibility at the stage of designing the heating system and developing a project for the construction of a private house.
If you use radiators with bottom connections, it becomes possible to almost completely hide all the pipes in the floors - the radiators are connected here using special units.
As for the disadvantages, they are the need for regular manual removal of air and the need to use a circulation pump.
Features of installing a two-pipe system with bottom wiring
Plastic fasteners for heating pipes of different diameters.
In order to install a heating system according to this scheme, it is necessary to lay supply and return pipes throughout the house. For these purposes, there is a special plastic fastener on sale. If radiators with a side connection are used, we make a branch from the supply pipe to the upper side hole, and take the coolant through the lower side hole, directing it to the return pipe. We install air vents next to each radiator. The boiler in this scheme is installed at the lowest point.
It uses a diagonal connection of radiators, which increases their heat transfer. Bottom connection of radiators reduces thermal output.
This circuit is most often made closed, using a sealed expansion tank . The pressure in the system is created using a circulation pump. If you need to heat a two-story private house, we lay pipes on the upper and lower floors, after which we create a parallel connection of both floors to the heating boiler.
Recommendations for laying heating pipes in a private house
A main pipeline of any complexity can be completed independently if you have the time, effort and desire. However, in order for the resulting heating network to be reliable, efficient, durable and easy to maintain, the following recommendations must be adhered to.
- When designing a heating network, the direction of movement of the coolant is determined based on the layout of the house and its location relative to the cardinal points and wind rose. It is advisable to position the main so that those rooms where the highest air temperature is needed are heated first: children's rooms and bedrooms, as well as rooms with two or more external walls, rooms on the north and windward sides of the house. The outline is usually completed by kitchens and other non-residential premises.
- It is advisable to equip heat exchangers connected to the main line with bypasses - short additional pipeline branches connecting the supply pipe to the return pipe, respectively, in front of the inlet and outlet openings of the battery. Such a device will allow you to turn off the heat-emitting device during its repair or replacement, without stopping the entire heating system.
- When laying in an open way, it is recommended to connect the pipeline elements using detachable fittings for ease of repair work. If the line is laid in a hidden way, all connections to which there is no direct access must be permanent, so that in the event of depressurization the floor, wall or ceiling will not be damaged.
- When installing a heating circuit in a hidden way into channels in walls or ceilings, the pipes must be insulated to reduce heat loss.
- Installation of heating networks from polypropylene pipes is allowed if the heating device heats the coolant no higher than 80 degrees. At the same time, such pipes can be laid in a hidden way only under suspended structures. Screed installation is not permitted.
Two-pipe system with top wiring
In a two-pipe heating system with overhead wiring, the expansion tank is placed at the highest point.
This two-pipe scheme is very similar to the previous one, only here it is provided for the installation of an expansion tank at the very top of the system, for example, in an insulated attic or under the ceiling . From there, the coolant goes down to the radiators, gives them part of its heat, and then is sent through the return pipe to the heating boiler.
Why is such a scheme needed? It is optimal in multi-storey buildings with a large number of radiators. Thanks to this, more uniform heating is achieved, and there is no need to install a large number of air vents - the air will be removed through the expansion tank or through a separate bleeder that is part of the safety group.
Advantages and disadvantages of a two-pipe system with top wiring
There are a lot of positive features:
- it is possible to heat multi-storey buildings;
- saving on air vents;
- you can create a system with natural coolant circulation.
There are also some disadvantages:
Using vertical wiring will lead to additional difficulties when installing hidden heating.
- pipes are visible everywhere - this scheme is not suitable for interiors with expensive finishing, where elements of heating systems are usually hidden ;
- in tall buildings it is necessary to resort to forced circulation of the coolant.
Despite the disadvantages, the scheme remains quite popular and widespread.
Features of installation of two-pipe systems with top wiring
This scheme eliminates the need to locate the heating boiler at the lowest point. Immediately after the boiler, the supply pipe is diverted upward, and an expansion tank is installed at the highest point. Coolant is supplied to the radiators from above, so a lateral or diagonal radiator connection scheme is used here. After this, the cooled coolant is sent to the return pipe.
Main mistakes
All stages of organizing heat supply must be carried out with the utmost care.
Soldering of polypropylene joints must be carried out at the recommended temperature, which guarantees that joints with the required characteristics are obtained. Failure to comply with these conditions may result in the need for a complete rework of the system.
Beam system with collectors
Radiant heating system using a collector.
This is one of the most modern schemes, which involves laying an individual line to each heating device . To do this, collectors are installed in the system - one collector is the supply, and the other is the return. Separate straight pipes diverge from the collectors to the batteries. This scheme allows for flexible adjustment of heating system parameters. It also makes it possible to connect heated floors to the system.
The radial wiring diagram is actively used in modern homes. The supply and return pipes here can be laid in any way - most often they go in the floors, after which they are suitable for one or another heating device. To regulate the temperature and turn on/off heating appliances, small distribution cabinets are installed in the house.
According to heating engineers, this scheme is ideal, since each heating device operates from its own mains and is almost independent of other heating devices.
Advantages and disadvantages of beam systems
There are many positive qualities:
- the ability to completely hide all pipes in the walls and floors;
- convenient system setup;
- possibility of creating remote separate adjustment;
- minimum number of connections - they are grouped in distribution cabinets;
- it is convenient to repair individual elements without interrupting the operation of the entire system;
- almost perfect heat distribution.
When installing a radiant heating system, all pipes are hidden in the floor, and the collectors are hidden in a special cabinet.
There are also a couple of disadvantages:
- high cost of the system - this includes the costs of equipment and installation costs;
- difficulty in implementing the scheme in an already built house - usually this scheme is laid out at the stage of creating a home ownership project .
If you still have to put up with the first drawback, then there is no escape from the second.
Features of installation of radiant heating systems
At the project creation stage, niches are provided for laying heating pipes, and installation points for distribution cabinets are indicated. At a certain stage of construction, pipes are laid, cabinets with collectors are installed, heating devices and boilers are installed, a test run of the system is carried out and it is checked for leaks. It is best to entrust all this work to professionals, since this scheme is the most complex.
Despite its complexity, a radiant heating system with collectors is one of the most convenient and efficient. It is used not only in private homes, but also in other buildings, for example, in offices.
With forced and natural circulation
All the schemes presented above can be created on the basis of heating boilers of any type. For example, a stove heating scheme for a private house is built on the basis of a wood or coal stove, and pipe routing can be carried out according to almost any of the schemes described above. True, it would not hurt to add forced circulation to many of them. What is it for?
The main difference between a system with forced circulation of coolant and a system with natural circulation is the circulation pump.
As we remember, single-pipe heating systems are characterized by a decrease in coolant temperature as it moves away from the boiler - part of the heat remains in the radiators. These losses are partially compensated by the Leningradka scheme, but in some cases this is not enough. In order to correct the situation, a circulation pump is installed in the heating system, providing forced circulation of the coolant .
Forced circulation is also necessary in many other schemes, including two-pipe ones. The thing is that the small diameter of modern polypropylene pipes, numerous connections and turns create hydraulic resistance. In addition, the use of forced ventilation allows for faster heating of households.
Advantages and disadvantages of forced and natural circulation
Each system has its own advantages and disadvantages:
When heating a room with a large number of radiators, a circulation pump is simply necessary.
- natural circulation is simpler and cheaper - there are no costs for circulation pumps;
- forced circulation makes it possible to improve heating performance in large buildings - in some cases you can get by with natural circulation, but then the system warm-up time increases;
- forced circulation is characterized by a slight hum – natural circulation is completely silent.
That is, everything has its advantages and disadvantages.
Heat consumption for ventilation
To find out how much heat a private house loses as a whole, you need to add up the losses of all its rooms. But that’s not all, because we must also take into account the heating of the ventilation air, which is also provided by the heating system. In order not to go into the jungle of complex calculations, it is proposed to find out this heat consumption using a simple formula:
Qair = cm (tв – tн), where:
- Qair – required amount of heat for ventilation, W;
- m – amount of air by mass, defined as the internal volume of the building multiplied by the density of the air mixture, kg;
- (tв – tн) – as in the previous formula;
- с – heat capacity of air masses, is taken equal to 0.28 W / (kg ºС).
To determine the heat demand for the entire building, it remains to add the value of QTP for the house as a whole with the value of Qair. The boiler power is taken with a reserve for the optimal operating mode, that is, with a coefficient of 1.3. Here you need to take into account an important point: if you plan to use a heat generator not only for heating, but also for heating water for domestic hot water supply, then the power reserve must be increased. The boiler must operate effectively in 2 directions at once, and therefore the safety factor must be taken at least 1.5.