Naturally, no one in their right mind would undertake the installation of heating equipment, especially one powered by gas, without having the required amount of knowledge and experience behind them. However, knowing everything about this matter is very useful. This will help you monitor the work of the hired personnel and understand how best to equip the heating system in your home so that it is as comfortable as possible for you. Today we will tell you how to install a heating boiler in a private house, using the example of gas wall-mounted and floor-mounted options.
How to install a solid fuel boiler
Such devices give off heat by burning solid fuel. Most often, firewood is used as fuel. Solid fuel boilers are good because in the absence of access to gas and other resources, it becomes indispensable, since it can be heated even with suitable materials at hand.
The disadvantages of this design are as follows:
- Increased inertia. Today there are no methods to instantly extinguish burning solid fuel in a firebox.
- Formation of condensation. It occurs in the firebox when coolant with a temperature below 50°C enters the boiler tank.
Main and additional boiler
When installing a backup (emergency) boiler, it is recommended to increase the area of the boiler room by 4 m². An additional heater helps maintain the temperature of the coolant, avoiding accidents when the main unit breaks down or when the fuel runs out. Design options:
- Electric. Installed separately or in the form of combined models - heating elements are built into the solid or liquid fuel boiler, which automatically turn on when the coolant cools;
- Solid fuel or liquid fuel. They can complement a gas boiler or work “in pairs” - the liquid fuel heater starts when coal or firewood runs out;
- LPG. Many people leave the gas holder after connecting the main gas - liquid fuel is stored in the gas holder for years and is used as needed. Its own capacity ensures that the house will not be left without heat in the event of a gas pipeline accident.
The additional boiler is installed in a finished boiler room or separately. If main gas is used as the main energy carrier, then when installing additional equipment in the same room, you must rely on the requirements of SP 62.13330.2011.
It is possible to combine heating equipment into a “smart home”, connect to remote control, and automatically adjust the temperature taking into account the readings of weather-sensitive external sensors.
Tools and accessories
To install boiler equipment you will need the following:
- Special clothing, welding mask and leggings;
- Welding machine;
- Grinder with discs;
- Level;
- Square;
- Screwdrivers;
- Wrenches, including adjustable ones;
- Marker;
- Roulette;
- Sealant with a gun for it.
To connect the boiler to the heating system you will additionally need:
- Metal pipes;
- Pipe with a valve for the chimney;
- Bends;
- Adapters;
- Three couplings made of steel;
- Circulation pump;
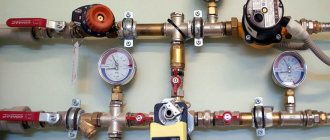
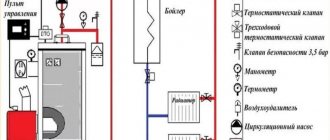
- Safety kit, which includes: safety valve, water drain, pressure gauge, two ball valves;
- Two valves with a ball mechanism, a drive and a double-sided thread;
- Sealant;
- Rewinding.
Useful tips
- Even if you have thought out the entire heating system perfectly and installed the coolest equipment, the system will still work intermittently if it is not cleaned in a timely manner.
- A safety valve must be installed in a heating system with a TT boiler; in this case, if it overheats, the valve will drain excess coolant into a special container or sewer.
- If you want to consume less fuel and wisely use the heat generated by the boiler, then you should definitely install a heat accumulator.
- If the power supply is often cut off in your region, then you should take care of installing an uninterruptible power supply. In this case, even after a power outage, the circulation pump will circulate the coolant for several hours, which means the system will not boil.
We hope that our article was useful and informative for you, now you know how to install a heating boiler in a private house. All the best!
Boiler installation stages
Before starting installation work, you need to assemble and check the functionality:
- Heating systems;
- Smoke exhaust systems;
- Ventilation.
Installation of solid fuel boilers:
- Unpack the product.
- Install all the individual elements (ash drawer, doors, etc.), do not touch the appliances and fan for now.
- Install the unit on the prepared foundation, the gas exhaust pipe must be in line with the chimney pipe.
- Secure the boiler so that it stands securely and without any distortions.
- Connect the flue pipe, install the fan, control unit and safety kit.
- Connect the boiler to the heating system.
If the room has a small area where assembly is not convenient, then it is better to assemble the unit in a spacious place, and then move it to the boiler room.
Installing a heating boiler will most likely require the help of a partner, since the most compact product weighs about 50 kg.
How to properly arrange a boiler room
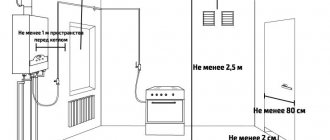
If a gas boiler has an open combustion chamber or its power exceeds 30 kW, then it can only be installed in a separate non-residential premises, which must comply with the standards and norms prescribed in SNiP. Most often, a room in the basement is chosen for these purposes, but remember that this can only be done if you have a single-apartment house.
- You are free to choose the boiler power at your own discretion.
- The total area of the boiler room should not be less than 4 square meters. We have already written about volume.
- The minimum ceiling height is 220 cm – 250 is better.
- The boiler room must have a window for natural light. Its size is also important - 0.3 m² for every 10 cubic meters of room volume, but not less than 0.5 square meters.
- The width of the entrance door should not be less than 80 cm. The distance from it to the boiler should be left free, at least 1 meter.
- The floor must be leveled, which will allow the boiler to be placed level. Thanks to this, it will make much less noise during operation. There will be less vibration, which will allow all screw connections that fit the boiler to last longer.
- The walls are finished only with non-combustible materials - usually plaster and whitewash or tiles. If the boiler is adjacent to any surfaces, it is recommended to lay thermal insulation materials in the gaps. A sheet of iron or ceramic tiles are laid under the boiler.
- Cold water and sewerage are supplied to the boiler room - here, we think, comments are unnecessary. Although not everyone will understand why sewerage is needed. It is required to drain coolant from the heating system.
- Electricity is also provided. The sockets used must have a properly connected ground circuit. This measure is necessary to avoid electric shock.
- A chimney system is being installed - its type depends on the type of boiler. The chimney needs open access to make it possible to inspect the equipment if necessary.
Ventilation and sewerage
The boiler room must have natural ventilation. The ventilation shaft runs parallel to the chimney, but has a smaller cross-section.
The opening of the ventilation shaft is equipped with a forced exhaust; its role is as follows:
- Attracting air from other rooms, which is necessary for combustion, but in the boiler room itself it quickly burns out.
- Removing combustion products from the premises.
The boiler room must have a sewer outlet, since it is periodically necessary to remove the water jacket in the boiler and reset the safety valve, and sometimes reset the entire system.
Requirements for a boiler room in a separate building
Boilers and related equipment may be installed in a separate building - a boiler room. The dimensions of the latter, as well as the building materials from which it is made, are regulated by the relevant SNiPs. More stringent requirements are established for a gas boiler room, since during its operation an explosion and fire of the gas-air mixture is possible. Such a project must be approved by the supervisory authorities.
For your information!
The latest change in legislation regulates the installation of a gas alarm, which automatically stops the gas supply to the boiler room when a leak is detected. This standard applies to boiler units with a capacity of more than 60 kW.
For boiler rooms that are designed for equipment running on electricity or solid fuel, less stringent requirements are put forward, since the unit in this case is not classified as explosive. Therefore, design and construction work can be done independently. When constructing a building, non-flammable or low-combustible materials are used to prevent the spread of fire in the event of a fire.
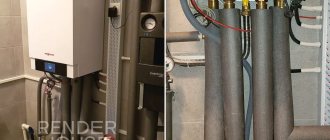
We install a gas boiler with our own hands
A boiler of the simplest design (“water heater”), consisting of a heat exchanger and burner. A gas supply and a water system are connected to the product, and a chimney is also installed.
But even to install such gas boilers with your own hands, you must obtain permission.
Installation on different walls
Boilers are quite heavy, and therefore problems can arise if you do not take into account the reliability of fixation to the wall. There are certain standards for installing boilers, which indicate that installation work must be carried out only on a rigid wall.
Requirements may vary greatly depending on the material that was used to build the walls in the house. There are standards for wooden, reinforced concrete, plasterboard and brick surfaces.
Installation on a reinforced concrete wall
Reinforced concrete walls are the most suitable option for installing a wall-mounted gas boiler. They have increased strength and are completely non-flammable. Therefore, there was no need to use additional methods of protection in the form of cladding. To fix the heat generator body, metal anchors are used, onto which the mounting plate is fixed. After this, the unit is installed on the prepared site. Any type of heating system can be installed on concrete walls: those with high power or a conventional storage-type broiler.
Installation on a brick wall
The installation standards separately stipulate the conditions for fastening to a brick wall. Brick is another high-quality non-combustible material, and therefore the equipment is installed directly on the wall, but this time you will have to prepare the surface.
Photo source: obustroeno.com
In order not to violate the requirements of gas workers, the wall must be plastered before installation work. During this work, you will need to install a special strip. After finishing the plastering, two bolts should protrude from the wall, which serve as a seat for the equipment.
Is it possible to hang a boiler on a wooden wall?
Installing a wall-mounted gas boiler in a wooden house is a difficult task due to a number of nuances. A wooden wall can catch fire, so you need to take safety precautions.
To properly install a heating boiler, you will have to fulfill several special conditions:
- Carefully treat the wood at the installation site. It’s quite easy to do this with your own hands - there are special fire retardants in hardware stores. They will need to treat the wall generously.
- The wall must first be covered with plaster (thickness – 15 mm). This is the minimum value that guarantees protection against high temperatures. You can also line the wall with roofing steel.
If you do not want to use plaster or metal cladding, you can put a gypsum fiber board in the place where the heat generator is mounted, and then cover it with ceramic tiles.
To prevent a heavy heating boiler from falling from its installed place, it is necessary to strengthen the platform with a powerful beam, which is placed under the facing material. Thus, it will be possible to securely fix the heat generator on the wall.
Can it be hung on drywall?
When installing drywall, voids cannot be avoided. This creates problems with fastening a heavy heat generator. However, there is an option to eliminate this shortcoming.
Boiler on a plasterboard wall. Photo source: primtara.ru
When the metal frame is being manufactured, it is necessary to select in advance a place to fix the boiler and carry out preparatory work. It is necessary to reliably strengthen the site using wooden beams and metal profiles. For installation on fragile drywall, special fasteners are used. These are plastic plugs that are screwed into the facing material. The hardware must be mounted into the already installed plug. Experts say that ready-made fasteners gradually become loose, which leads to deterioration of fixation.
Mounting the boiler on foam concrete and aerated concrete
If the house is built of aerated concrete or foam concrete, then several methods can be used to install the boiler:
- The fastenings are installed in advance at the moment when the blocks are laid. The boiler is installed when the masonry mixture has completely hardened.
- In stores you can find screws for fixing in foam concrete. They are very similar to the cork used for drywall. But they have a deeper thread and a larger pitch. As soon as the material is screwed into foam concrete or aerated concrete, any anchor can be installed in the screws that will reliably hold gas equipment.
- Another reliable method of fixation is with studs. They are installed with a small gap from each other, and a strip is mounted into the wall (on each side), which is firmly fixed with bolts for maximum reliability.
- You can also use liquid, chemical anchors. They provide a strong hold, but are more expensive than previous options.
Wall type
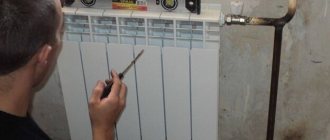
Installation of a wall-mounted boiler:
- Initially, you need to protect the part of the wall on which the boiler will be installed. For this purpose, fire-resistant material is used. The gap between the wall and the protective layer is about 45mm.
- Prepare the boiler for installation. Clean the walls of the inlet openings with strong water pressure.
- Install the filter with shut-off valves on both sides onto the water supply pipe.
- Bring up the chimney. There are some requirements for it, which can be found in the boiler operating manual. It is better to use a cylindrical chimney made of steel with the possibility of cleaning.
- Check traction. If it is weak, the gas supply should stop due to automatic operation.
- Connect the boiler to the gas pipeline using a steel pipe and a drain designed for this purpose. This is carried out by a specialist from the gas service.
- Connect the boiler to the electrical network and connect the overload protection circuit breaker.
Technical and legal preparation for installation
The technical part of the installation will not take you very much time - within a few days, qualified craftsmen will install all the pipes around the house, install radiators, connect the heated floor system if necessary, and, of course, install the boiler itself (filling the screed, sealing the grooves in the walls, etc. We do not take finishing activities into account). It will take much longer to obtain documents for this whole matter and coordinate the work with supervisory authorities - sometimes this can take a whole year. In this article we will tell you in detail about all the important stages that you have to go through.
Floor type
Installing a floor-standing boiler is also not difficult, you need:
- Prepare a strong pedestal that can support the weight of the boiler. This is usually done by pouring a concrete solution, sometimes a sheet of galvanized iron is securely laid on the floor.
- Install the boiler, leveling its position using a building level.
- Connect the chimney to the unit, check the draft if there is no forced exhaust.
- Connect the device to the heating system by installing a filter at the end of the outlet line, i.e. just before the entrance.
Characteristics of electric boilers
Heating with electricity is not considered the cheapest. But, manufacturers of modern electric heating systems use advanced technologies to reduce the energy consumption of their products. In general, the consumer is offered a choice of:
- heating devices based on conventional heating elements;
- a product of innovative technologies - ion (electrode) boilers, which do not have a heating element;
- advanced developments are induction boilers, which use the property of induction currents to heat the metal placed in them.
Operating rules
Installation and operation of gas boilers is permitted only in a dry room.
High humidity prevents gaseous substances from dispersing into the air.
- By protecting the heat exchanger from foreign substances, its performance increases. This can be done by installing a coarse filter. Also, using a filter can improve the quality of water.
- Before the heating season arrives, it is necessary to carry out maintenance of all equipment. If this is done regularly, many dangerous situations can be avoided.
Correct connection and proper operation of the boiler, as well as regular maintenance, increases the service life of all equipment, while reducing fuel consumption.
The chimney is an important component of the heating system
We need to tell you more about chimneys, since not only the efficiency of the equipment, but also your safety depends on their proper operation. Ventilation systems are also equipped strictly in accordance with regulatory documents. They are subject to the following requirements:
- It is prohibited to connect ventilation ducts and chimneys, as gas combustion products will enter the room and can cause serious harm to human health.
- The boiler room must provide for supply ventilation - it does not matter if the boiler operates with a coaxial pipe. Air intake can be organized through the lower part of the outer wall, in the form of a built-in metal grille, or an entrance door. The size of the supply window must be made no less than 1/30 of the area of the entire boiler room. For example, your boiler room is 5 square meters. We divide this value by 30 and get 16 cm² - of course, more is possible. There is also a link between the size and the boiler power - 88 mm² per kilowatt if air is taken directly from the street, and 300 if from neighboring rooms.
- The chimney pipe should be installed as close as possible to the boiler.
- The diameter of the chimney pipe should not be smaller than the outlet pipe on the boiler - this seriously reduces draft.
- It is necessary to avoid turning the chimney by 90 degrees. There should be no more than 3 turns in total.
- Chimneys can be made of different materials - primarily ceramic and carbon steel.
- The height and other parameters of the chimney that affect the quality of draft must strictly comply with all standards. The figure shows the relationship between the height of the projection above different types of roofs. Compliance with these rules is necessary to ensure that the pipe does not fall into the area of wind pressure.
- If the roof is flat, the exiting chimney at the peak, not counting the umbrella, should be 50 cm higher than it. If a parapet is installed around the perimeter, measure the height from it.
- If the pipe passes through a slope, the height is affected by its distance from the roof ridge. If the offset is less than 1.5 m, then the chimney is made higher than the ridge by the same 50 cm. If it is from 1.5 to 3 m, it is made flush with it. For large values, they maintain a slope of 10 degrees - remember the rules of geometry.
Photo of correct boiler installation
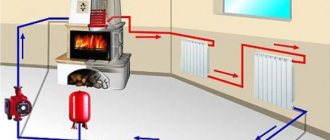
Installation of a solid fuel unit with a heat accumulator
If the boiler does not have automatic loading of fuel, then it must be regularly added to the firebox yourself. This is inconvenient because the boiler needs to be fired according to a strict schedule.
This problem can be partially solved by a heat accumulator in the form of a tank of water, which is heated by the supply circuit.
Its installation allows:
- reduce the coolant temperature at maximum boiler operation;
- heat the cooled coolant when the temperature in the system decreases.
When choosing a buffer tank, it is necessary to take into account that for a house with parameters of 150 m² or more, a tank with a capacity of at least 1 m³ is required.
Installation of an additional mixing unit
Another such unit is installed between the buffer tank and the heating registers.
Thanks to this element, it is possible to avoid large temperature differences when water boils in the circuit.
Emergency circuit installation diagram
The main problem of heating a building with a solid fuel boiler is overheating of the coolant. It is necessary to prevent steam formation in the heating circuit, so it is necessary to cool the coolant in a timely manner.
There are 3 effective methods of cooling the coolant:
- Another heat exchanger is installed in the firebox. The first heats the coolant, and the second allows it to be cooled when it is very hot. The inlet pipe of the latter is connected to the cold water pipe, and the outlet to the sewerage system. To urgently cool the coolant, you need to open the tap on the pipe, after which cold water will flow through the additional heat exchanger.
- During the installation of the boiler, one heat exchanger is installed inside another, which allows you to quickly reduce the coolant temperature if necessary.
- 2 pipes are connected to the heat exchanger pipes, the first is connected to the cold water pipe, and the second to the sewer pipe. A valve is then installed to allow cold fluid to enter the system. As a result, some of the hot water will be discharged into the sewer.
All 3 methods allow you to achieve the desired result.
Combined boiler connection diagram
Today, a combined connection scheme for solid fuel boilers is often used, which allows heating the coolant when external problems arise. For example, a system with a solid fuel boiler can be supplemented with a gas and electric unit.
The electric boiler is connected to the system in parallel, that is, it is simply connected to the supply and return.
Shut-off valves must be installed at the junctions of two connections. To automatically turn on the backup electric boiler, install a room thermostat and check valves.
Connecting a bypass to a solid fuel boiler
Experts advise taking into account possible problems with the electricity supply when choosing an option for piping a solid fuel unit. Because of this, the water in the system will boil sharply, which will lead to all the ensuing consequences. You can get rid of this problem by installing a bypass, which will isolate the de-energized pump from the system.
Shut-off valves are often installed on the bypass, which allows, if necessary, to redirect the water flow to the reserve line.