Solid fuel boilers are used to heat private buildings that are not connected to centralized gas mains. Illiterate installation of units that process solid fuels can become a serious danger for home owners. Strict adherence to installation rules will eliminate the threat. Do you agree?
We will tell you how to install a solid fuel boiler in strict accordance with regulatory requirements. The article carefully describes the preparatory and installation stages and provides the rules for arranging mini boiler rooms. Taking into account our advice, connecting the unit to the heating will not cause any difficulties.
Selecting a room to place the unit
Let's look at it in as much detail as possible, what is a boiler that runs on solid fuels? This is a thermal device equipped with an open combustion chamber.
The scheme for connecting it to the heating system of a private house can be based on the technical requirements for open or closed heating systems. Everything will depend on the operating conditions.
The requirements for open systems are:
- connecting the system for removing solid fuel combustion products to a chimney in which draft will be carried out naturally;
- installing an expansion tank at the highest point of the heating circuit, through which a connection between the coolant and the atmosphere will be established;
- constant provision of the heating system with the water necessary to maintain it in working order.
Although owners of private houses more often install closed heating systems rather than open ones.
All solid fuel boilers have quite impressive dimensions. Therefore, they are manufactured exclusively in a design that provides for floor placement.
Before you begin installing a solid fuel boiler, you should clearly determine the location, layout and method of its installation.
Installing a solid fuel boiler involves a considerable amount of work:
- determination of premises for placement of a solid fuel thermal generator;
- preparatory work in the boiler room;
- installation of a supply and exhaust ventilation system;
- installation of a boiler and chimney system;
- boiler piping;
- test run of the heating system.
Only by following this algorithm of actions can problems be avoided during the installation of a solid fuel unit, as well as during its further operation.
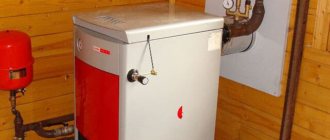
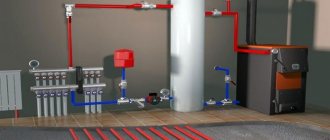
An ideal option for arranging a boiler room when all heavy equipment is installed on the floor
Points 1-3 of the above work order represent preparatory work. But this does not mean that their implementation should be approached less scrupulously than the installation work itself.
If you choose the wrong room for installing a heating unit and make mistakes when installing the ventilation system, problems with the operation of the heating system of a private home will not take long to occur. And a solution will have to be sought at the height of the heating season, during the cold season.
Therefore, it is better to immediately correctly install both the heating equipment in a private house and the solid fuel boiler itself. To do this, it is necessary to develop in advance a detailed installation diagram, taking into account that the installation of some types of solid fuel boilers may involve power supply from the electrical network.
One of the correct options for installing a solid fuel thermal unit involves placing it in the basement, first or basement floor
When it comes to installation, you have to rely on the basic standards of SNiP “Heating and Ventilation” and some provisions of SNiP 31-02-2001 “Single-apartment buildings” (for the Russian Federation).
Burning solid fuels increases the level of dust in the room, and when burning wood or coal, varying amounts of smoke can leak into the room.
Therefore, installing the boiler in close proximity to residential premises is undesirable. Although, according to regulatory documents, the installation of a solid fuel boiler is permitted in the kitchen, hallway and other non-residential rooms.
A boiler room in the form of an extension can be built near the house. This design solution will be quite convenient
The optimal place to install the boiler is in a separate specialized room, preferably separated from the house. As an option, a properly equipped technical room attached to the house is suitable.
It is also a good option to place the heating unit in the basement or garage. You can install it in the corridor, but provided there is sufficient space and good ventilation of the room.
Closed type
A closed system of pumpless coolant circulation is successfully used for heating one-story and two-story houses. It functions as follows:
- when the coolant expands, excess liquid is forced out of the heating circuit;
- the liquid enters a membrane-type expansion tank - this is a closed container with an elastic membrane that separates the part intended for the coolant and the section of the tank filled with air or nitrogen;
- the heated liquid stretches the membrane, compressing the gas in the second section of the tank; when the coolant cools, the gas expands and pushes the liquid back into the system, as a result of which the water circuit constantly remains full.
Installing a membrane tank in a gravity heating circuit reduces the risk of corrosion of the metal elements of the system. But in Russia, this solution is used relatively rarely, since the cost of a membrane tank is several times higher than the cost of purchasing or independently manufacturing an open-type tank.
Ventilation device in a room with a boiler
When there is little fresh air, the fuel combustion process will be difficult. If it is supplied in excess, the combustion process of solid fuel becomes difficult to control.
If the supply of fresh air is difficult, it is necessary to build a ventilation system.
Ventilation is necessary in order to:
- ensure the supply of fresh air at the level necessary to maintain the combustion process in the boiler furnace;
- remove solid fuel combustion products that accidentally escape from the furnace into the boiler room;
- ensure that an adequate volume of fresh air is supplied.
Such simple measures will help you operate your solid fuel boiler safely and efficiently for a long time.
To ensure complete removal of combustion products, a natural or mechanical ventilation system must be installed in the boiler room. The ventilation process must be at a sufficient level
As for the actual arrangement of the ventilation system for the boiler room, the following tips are designed to help you build it correctly. Firstly, the exhaust and supply openings must be located at different ends of the boiler room.
It is advisable to place the exhaust hole closer to the roof, and the supply channel should be located in the lower part of the room, in close proximity to the solid fuel boiler itself.
Secondly, it is not advisable to install an exhaust device near a heat generator, the design of which includes a fan (supercharger) or a smoke exhauster.
In this case, during operation of the turbine, the draft in the air duct will forcibly change the direction of the air flow, and the air that should go into the exhaust will be again supplied as an influx into the boiler room.
If the entrance to the boiler room is equipped directly through the door from the living room, it would be advisable to install a supply grille in the lower part of the door. The influx of warm air from the living space will increase the thermal output from the burned solid fuel.
Considering that most of the supply air ends up directly in the combustion chamber of the boiler, where it reacts with carbon released as a result of the combustion of solid fuel, and then comes out in the form of carbon dioxide, the exhaust hole should have a smaller diameter than the inflow hole.
Scheme of the optimal location of a solid fuel boiler in relation to sources of air flow into the boiler room
The best option would be to install the boiler closer to the external walls. This will avoid the hassle of laying a long horizontal chimney duct, especially in cases where it has to be discharged through the roof.
Common boiler room layout diagrams and technical room design rules are given here.
How to reduce the cost of harness
To reduce the cost of piping, you can use a three-way valve with a simplified design, which does not require connecting an overhead temperature sensor and a thermal head. It contains a thermostatic element, which is set to an operating mode with a fixed value of +55…+60°C.
The use of such a part makes it possible to reduce the cost of piping a TT boiler, but deprives consumers of the ability to adjust the temperature using a thermal head.
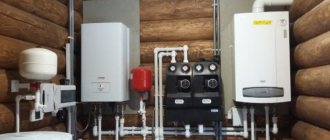
You can also connect 2 units that run on different fuels:
- Wood or natural gas.
- Due to electricity.
Connecting a buffer tank with copper or polypropylene pipes (experts recommend choosing options with copper) allows you to simultaneously service different systems in the house: radiators, heated floors, boilers. However, this option requires large investments and is rarely used.
Installation work on chimney installation
The procedure for installing a heating boiler on a special foundation or floor is extremely simple. It consists of simply setting the thermal unit to the position in which it will continue to work. Next, its location needs to be leveled by adjusting the legs, or special metal linings.
But it is not at all necessary to ensure that the axes of the chimney pipe and the corresponding hole in the wall coincide during the installation process. Here the alignment can be easily adjusted by adjusting the knees.
In order to avoid possible problems associated with the appearance of condensation during the operation of the boiler, it is advisable to construct the chimney of a solid fuel boiler from insulated sandwich pipes, or, as an economical option, assemble the structure yourself from pipes wrapped in basalt fibers.
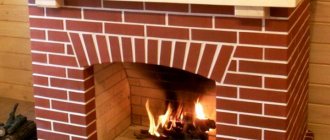
The simplest chimney option in terms of both design and installation would be an attached-type chimney duct adjacent to the house from the outside
Installation of this type of chimney is carried out as follows: the pipe is attached to the wall in a vertical position, and the gas duct from the solid fuel boiler is connected to it via a tee.
As for the installation of a chimney in wooden houses, the hole in the outer wall or roof is made in strict accordance with fire safety rules.
First, an equilateral opening is cut out in the partition, and the dimensions of its sides must exceed the dimensions of the internal chimney pipe by 380 mm. from each side. For example, we have a channel with a diameter of 100 mm and a sandwich pipe, the insulation thickness of which is 500 mm. In this case, the size of the opening will be: 100 + 380 x 2 = 860 mm.
Next, the installation of a passage unit made in the form of a box made of zinc-coated steel is carried out. A sandwich pipe is pulled through this box, and the voids surrounding it are filled with basalt wool. The final operation will be to secure the assembly cover located outside.
When performing installation work, it is worth remembering that it is easiest to lay a chimney duct in a brick wall or a foam block wall using a seal and a steel sleeve.
The diagram for assembling and connecting an attached chimney from a sandwich is simple and unpretentious, and therefore its implementation is within the power of anyone
However, during the installation of the chimney duct, the following requirements must be observed:
- the pipe should be turned no more than three times, and its minimum height, calculated from the grate of the solid fuel unit, should be at least five meters;
- the sections of the chimney pipe must be connected so that rainwater flows down the outer wall, and condensation moisture flows down the inner wall;
- the horizontal part of the pipe must be installed at a slope towards the boiler.
At the bottom of the chimney, it is necessary to install an inspection hatch and a tank to collect accumulated condensate moisture. And in order to avoid the intersection of the chimney with the roof eaves, the latter can be wrapped around the pipe by using two adapters at 30 degrees.
It is best to lay the gas duct inside the house according to the proposed scheme. In this case, he will perform his direct functions flawlessly
During the installation of the chimney, it is necessary to ensure that the joints of the chimney sections do not coincide with the placement of the pipe fasteners to the wall. It is advisable to place a protective cap or a rotating weather vane on the top of the chimney.
The height of the section of the chimney that rises above the roof depends on the distance between the chimney and the ridge. The diagram shows minimum height standards, the value of which may be affected by local conditions, for example, a tall tree next to the house on the leeward side
When working on creating a smoke ventilation system, it is worth remembering that the head of the chimney pipe should not be located in the zone of wind pressure of any of the houses (both your own and neighboring ones). And in order for the draft to always be consistently good, the chimney pipe must be installed at the level shown in the above diagram.
For ease of maintenance and cleaning of the heat exchanger of a solid fuel unit, it is necessary to create access to the boiler from all sides from where these actions are planned. The ideal option would be to create a meter gap in front and on the side and rear walls of 60 cm. The minimum of these gaps should be 25 cm.
When installing a solid fuel boiler, you should remember that it is strictly prohibited to connect the gas duct of the heating unit with the brick wells of the ventilation lines of the house passing through the internal walls.
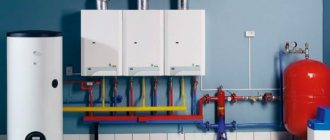
On the eve of purchasing and installing a solid fuel boiler, you should carefully check its height with the height of the future boiler room. It is also worth pre-calculating the placement of other large equipment, such as a heat accumulator, buffer tank and indirect heating boiler.
Solid fuel boiler Sakovich W Standart 10 kW
The advantage of the boiler is a large combustion chamber and large loading doors, operating time on one load, simplicity and durability of the design, and the ability to be used in a non-volatile system. Reviews (2)
RUR 2,029 Buy
Bestseller!
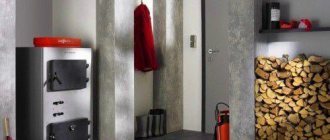
Preparing the boiler room for installation of the unit
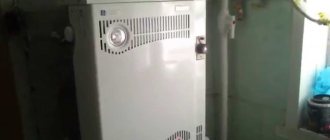
Solid fuel boilers with an open combustion chamber must be placed in separate special rooms - boiler rooms. Such rooms are arranged in the basement or in the basement, equipping them with an intensive ventilation system to ensure normal operation of the solid fuel unit.
If necessary, pour a special foundation at the site where the heating unit is supposed to be installed.
Boilers that consume solid fuel can be installed manually, and without any coordination with the relevant services. However, during the installation of a solid fuel boiler, a set of rules must be followed.
So, the floor at the installation site of the solid fuel boiler should be made perfectly flat and durable. In most cases, boilers are installed on special plates made of non-combustible materials.
In some cases, the boiler is placed on a flat base made of concrete screed with a thickness of 50 mm or more
The boiler should be installed at some distance from the walls. The gap between the rear wall of the boiler and the room wall must be at least 60 cm, while the distance between the boiler room wall and the front surface of the boiler must be at least 25 cm.
Before installing the heating unit, the walls and floor of the boiler room must be covered with fire-fighting material with a minimum fire resistance limit of 0.75 hours. For these purposes, the following can be used: sheets of metal, basalt cardboard, mineralite or asbestos cement.
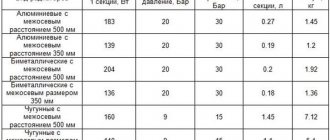
Also, the boiler room must be equipped with a low-flow ventilation system. This could be a regular window, or a hole made in the wall. In this case, its area is calculated based on the boiler power: per 1 kilowatt of boiler power there should be 8 square centimeters of the ventilation opening.
In the case where the boiler room is equipped only with lighting, it is worth installing sockets powered by a 220 V power supply.
If the boiler is located at a distance of less than 38 centimeters from the wall, it is sufficient to insulate this wall with a sheet of fire-resistant material
It is worth covering the floor directly at the boiler installation site with a heat-resistant sheet so that the protective material protrudes forward 80 cm from the front wall of the boiler. This measure will help prevent a fire in the event of heat loss from the firebox.
All manufacturers of heating units in the installation instructions for their products recommend building a foundation for installing a boiler on it. So, if the boiler is of low power, the weight of which does not exceed 200 kg, it can be installed on a base made of cement screed with peace of mind. If properly installed, it can withstand this kind of load without any problems.
But for the installation of a unit whose weight exceeds 300 kg, it is advisable to build a base of reinforced concrete screed. Moreover, its thickness should be from 10 to 12 cm. If the weight of the boiler exceeds 300 kg, then it must be installed exclusively on a base consisting of a separate foundation slab.
Installation of pellet boilers with an electric motor and a pellet auger is carried out on a specially poured foundation in order to minimize the influence of vibration load on the foundation underneath them
Solid fuel boilers are allowed to be installed on wooden floors. However, to begin with, you will have to prepare the installation site yourself, having previously reinforced it with timber-shaped logs, the cross-section of which is at least 100x50 mm.
If it is planned to install additional heavy equipment in the boiler room, then pouring a foundation for each unit is impractical. In this case, it is much easier to fill the so-called industrial floors, that is, make a concrete screed to a height of 12 cm.
In this case, its filling should be reinforcement with a diameter of 8 to 14 mm. Then you need to make a dense cushion of crushed stone, and put a mesh on top with a window size of 20x20 cm.
The area of the room allocated for boiler room equipment must be at least 15 square meters, with a ceiling height of 2.5 meters
Based on how the boiler is connected to the chimney: through the roof or through the wall, it is necessary to design the location of the hole through which the chimney pipe will be led out and make it. In this case, its internal diameter should coincide with the diameter of the outlet neck of the solid fuel unit or be slightly larger.
Mayak AOT-16 Standard
Floor-standing, solid fuel, single-circuit long-burning boiler. With an open combustion chamber, with cast iron grates. Steel thickness 4 mm. Control - traction regulator. Burning time 6 hours. Power 16 kW. Country of origin: Ukraine. Reviews (2)
RUB 1,856 Buy
Bestseller!
Main stages of boiler installation
In order to install a heating system based on the use of a solid fuel boiler, you will need the heating unit itself, pipes and heating radiators, an expansion tank, a circulation pump, a heat accumulator, and components of the automatic boiler control system.
The latter include:
- safety valve;
- air valve;
- pressure gauge;
- Temperature regulator.
All manipulations associated with the installation of a solid fuel boiler and the connection of peripheral systems and devices are carried out in accordance with a strict step-by-step algorithm. So, on the eve of installing the boiler, a specialized foundation is erected at the site of its planned location.
In this case, it is imperative to maintain all the required dimensions of the indents and correctly position the body of the heating unit both vertically and horizontally.
Next, electric heating elements are installed if they are included in the boiler package. As a rule, solid fuel boilers are equipped with mounts for mounting heating elements, next to which a temperature regulator is installed.
The next stage involves the installation and connection of the heating system pipes. It is important to close all connections using intermediate shut-off valves, and seal the butt joints with plumbing tape or material consisting of flax fibers. This will make it easier to access for future repairs.
Installation of thermal communications is done so that during operation of the heating system it is possible to easily carry out maintenance and repair work
In the case when the heating system involves the use of connections to the home’s electrical network, at this stage it is necessary to make all the necessary wire connections, their insulation and grounding.
Next, the security group is installed. Its configuration depends on the model of the solid fuel boiler, but, as a rule, it consists of: a safety valve, an air valve, a temperature regulator, a draft sensor, a pressure gauge and other devices. All these devices are installed before all locking devices.
The next step will be the installation of the chimney pipe. At the junction points of the smoke exhaust system elements, sealing is carried out with a sealing substance that is resistant to high temperatures.
The installation method, the height of the chimney duct, as well as the cross-sectional area are calculated in such a way as to further ensure the process of natural draft at the proper level. And to do this, you must strictly follow all the instructions in the operating instructions for the boiler model being installed.
Next, the thermal circuit of the solid fuel boiler is filled with water. At first, the water pressure level should be slightly higher than the working one. This stage involves testing the system for leaks.
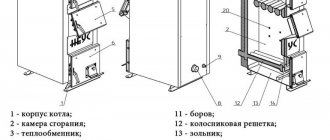
Then you need to check all the internal elements of the solid fuel boiler firebox: plugs for cleaning, ignition valve, fireclay stones, grate bars, etc.
And finally, you should release the pressure in the boiler to operating values, put the dampers in the firebox and in the chimney in the position prescribed in the instructions, and put solid fuel into the boiler.
Having completed all the above manipulations, you can proceed to starting the heating system based on the use of a solid fuel boiler
To start the heating process, simply load fuel into the boiler and set it on fire. Then, after 10-15 minutes, you need to tightly close the kindling damper.
After the temperature is established at 80-85 degrees, you will need to set the temperature controller to the desired heat supply mode. Subsequently, you will simply need to supply the boiler with solid fuel if necessary.
Collector wiring
In a long, highly branched pipeline of a large cottage, one pump may not be enough. In this case, two or even more of them are installed, for each circuit. Separately heated floor, radiators, hot water supply. Since the temperature of heated floors is initially low (within 50 degrees), you can install a pump at the entrance to the circuit.
The optimal wiring option for a large house with several circuits is collector (radial). Each circuit receives coolant from the boiler through its own pipe. The heat is distributed evenly, the liquid does not cool down, consistently passing through the entire system.
The collector includes at least two combs, forward and reverse. The corresponding lines from the boiler are connected to the ends of the combs, and the forward/return pipes of the circuits are connected in parallel to the fittings on their bodies - radiators and heated floors, different floors, utility rooms, DHW - each with its own temperature regime.
Collector
A pressure gauge and a safety valve are installed at the entrance to the manifold, an air vent is installed on the opposite side on the “hot” comb, and a tap is installed on the “cold” side to drain the coolant from the system. The pipes are equipped with control valves - this is one way to set different temperatures in the circuits. A large house may have several pairs of combs.
Another way to set different modes is a hydraulic arrow. A vertically placed section of large cross-section pipe is connected to the direct pipe and the return pipe of the boiler, and circuits are connected to the body at different heights. The higher the connection, the hotter the coolant.
In small circuits, the temperature can be adjusted as follows: the free ends of the combs are connected by a bypass to a shut-off valve. When the valve opens, cool water from the return pipe is mixed into hot water from the supply pipe.
Connecting the unit to the heating system
After completing the installation of the solid fuel boiler and smoke exhaust system, the next stage of work will be the so-called piping. When performing this, one rule must be strictly observed: during operation of the heating unit, under no circumstances should cold water enter it. Especially one in which the heat exchanger is made of cast iron.
If this happens, the walls of the boiler will immediately become covered with condensation moisture. The reason for this will be a sharp temperature change. This liquid is dangerous because upon contact with carbon deposits deposited on the sides of the boiler, it turns into a viscous and dense layer of plaque.
Sticky deposits are quite difficult to remove from the surface of the boiler walls; moreover, it significantly reduces the efficiency of the heating unit. To minimize the process of condensate release when burning solid fuel in a boiler, you can follow a standard piping scheme with a three-way valve and bypass when setting the coolant to a stable temperature of 50-55 degrees.
Thus, the water in the system will move in a circle until it reaches the above-mentioned temperature. And after that the valve will begin to let cold water into the system.
When tying a solid fuel unit, it is important to take into account the features of a particular model by studying the manufacturer’s instructions. Thus, it is important to carefully connect the control unit and burner. Sometimes boilers of European brands are equipped with an automatic fire protection system connected to the central water supply.
In order not to make mistakes during the installation of a pellet boiler, it is necessary to obtain technical advice from official representatives of the boiler manufacturer. It is important to install all components of the solid fuel system in accordance with the relevant instructions.
After installing the system, it must be tested by filling it with water to create a pressure of 1 bar. And then check the operation of the boiler with a test fire
Step-by-step instructions for building a solid fuel boiler
So, the whole process of how to make a boiler with your own hands according to the drawings can be divided into several successive stages:
- Using a grinder, you need to cut blanks from pipes and profiles. The profiles will be racks; you need to cut round holes in them with a gas cutter for joining with the pipes. You will need to make 4 holes along the Ø50 mm pipe in the front pillars and the same number in the rear ones. In addition, we also need holes for inserting into the heating system. Sagging and deposits as a result of cutting or welding must be cleaned with a grinder so that they do not interfere with the movement of water through the pipes.
- Next, the blanks are assembled into a single structure. Two people will have to work - the welder will need an assistant to hold the tubes in a stationary position. To make it more convenient, you can place the racks with pipes on a flat surface and weld the front and back parts of the boiler.
- Now you need to ensure the supply and drainage of water from the boiler. The incoming and return pipes are welded to the finished frame, and the ends of the rectangular profiles are welded with pieces of metal 60x40 mm.
- Before installing the heat exchanger, it is checked for leaks. To do this, install it vertically, close the bottom hole and fill it with water. If there are no leaks at the seams, then you can continue working.
- The boiler body is built from brick and a heat exchanger is built into it, leaving a gap of at least 1 cm between them. The register must be installed in such a way as to create a rise towards the exiting hot water. The level difference between the outlet and the front right upper corner of the heat exchanger must be at least 1 cm. This will improve coolant circulation and eliminate air pockets.
- The brickwork should overlap the heat exchanger from above by 3-4 cm. A cast-iron slab is laid on top of the masonry. The chimney is installed at the discretion of the owners - brick, metal, or led into a ready-made pipe.
Recommendations for effective operation
During operation of a boiler that consumes solid fuels, slag deposits remain in its firebox. As they accumulate, they must be removed periodically. In addition, to maintain the energy efficiency of such a boiler, certain actions should be taken periodically.
Firstly, from time to time the walls of the boiler must be cleaned of accumulated ash and soot. Due to the millimeter layer of carbon deposits on the walls, the energy efficiency of a solid fuel boiler decreases by 3%. It must be cleaned at least once every seven days. In this case, the boiler must be turned off and its walls cooled down.
Secondly, as the grate becomes clogged with ash, the boiler will also gradually lose its energy capacity. If such a phenomenon has been noticed, it can be eliminated quite simply - by slightly moving the contents of the firebox.
Modern models of solid fuel boilers are equipped with a special lever for turning the coals, and, if necessary, it will help dump the coals.
Thirdly, in order to improve the circulation of water along the thermal circuit of the boiler, a circulation pump can be used. This will significantly increase the energy efficiency of the thermal unit, since the movement of the coolant through the system will occur much faster, and it will return to the boiler at a higher temperature.
This means that less thermal energy will be required to reheat it, therefore, the energy efficiency of such a boiler will be noticeably greater.
The circulation pump can be located in front of the boiler entrance in the water return pipe
Fourthly, it is worth monitoring the state of draft in the smoke exhaust duct. To keep it in optimal condition, the chimney must be cleaned at least once a year. Sections of the chimney duct running through rooms without heating must be insulated.
This must be done to prevent the formation of condensation vapors. They, in turn, are harmful because, when they accumulate, they interfere with the normal release of combustion products.
And in order for the fuel to be used most efficiently, it is necessary to set the temperature regulator to the minimum performance position, but only when the room in the house has warmed up well and the temperature outside has become warmer.
The owner of a private house can always choose how to perform the entire range of work: with his own hands or through specialists from companies involved in installing boilers
Security group
Functions of control and safety devices:
- protection of the pipeline from depressurization due to a sharp increase in pressure;
- protection against overheating of the boiler itself;
- temperature control;
- preventing condensation formation. This usually happens due to too large a temperature gap between the supply and return. The optimal temperature delta is 20 degrees.
This group of devices includes:
- safety valve for releasing excess pressure/excess coolant;
- control pressure gauge;
- air vent;
- emergency heat exchanger;
- control fittings, incl. thermostatic valves.
Security group
Varieties
Before directly manufacturing a boiler for heating a house, you need to decide on its configuration and type. Depending on the type of coolant heating, boilers are:
- Gas;
- Wood-burning;
- Coal;
- Electrical;
- Pyrolysis;
- Oily;
- Pellet
As for the configuration, it can be anything:
- Round;
- Rectangular;
- Trapezoidal;
- Conical