A shower enclosure is a shower stall without back walls and a roof, in other words, an “open type shower.” An excellent alternative to closed shower boxes, which, for the most part, are made in China and have very questionable quality, although a very attractive and low price. Our online store offers a large selection of shower enclosures from European manufacturers, which over the years have become a “must-have” solution for customers who value the right balance between price and product quality.
Today we will talk about how to install a shower enclosure with your own hands, with and without using a tray. Let's divide the installation guide into stages:
- What will you need?
- Floor or pallet mounting?
- Installation of a shower tray
- Installation of shower enclosure partitions (curtains)
- Video: “How to install a shower corner correctly?”
Option with purchased corner
We won’t consider it, because anyone can adjust the legs and connect the water supply.
But there are times when a person builds a pallet himself, and then is too lazy to assemble the corner, because it is difficult and sometimes expensive. For such a case, the process looks much more complicated. If the corner is purchased separately, then the pallet is already ready. Two situations arise:
- The pallet is purchased.
- The pallet is made by hand from tiles and bricks.
And now about how to install a shower enclosure (enclosure).
Purchased pallet
Only the corner that strictly fits the shape is installed on the purchased pallet. The slightest discrepancy and the product will not fit. Therefore, the installation process is quick, but it is preceded by a painstaking selection on the counter
Pay special attention to products with rounded outer corners. The radius in this case may be different
It is a typical misconception to think that any rounded corner will do.
The store sells complete fencing (of four walls) and incomplete (of two walls). The first option is simply placed on a pallet, and the mixer is mounted on the back surface using liners. The purchased corner is good for its ease of installation. Even an incomplete one can be installed quickly by attaching the sections to the bathroom wall with dowel nails.
In the latter case, you need to take care of creating a tiled apron to protect the slabs from moisture. In addition, the question arises of where the mixer will be mounted. An incomplete corner does not provide any means for this. Therefore, there is only one option left - the bathroom wall. But installing a mixer here is not always possible.
Shower tray from the store
DIY pallet
The advantage of this case is that you can adjust the perimeter to a purchased corner of any shape. A step to the left, a step to the right - everything is possible for a master. Problems, again, arise with the installation of the mixer. The fact is that the cheapest ones consist of two sections. It is in this case that the cost of the product drops significantly. Which allows you to save money.
But the problem arises where to put the mixer. As one of the options, it is possible to install a plasterboard false wall and then finish it with tiles. In this case, the water supply pipes pass between it and the bathroom wall. If the cost is not scary, take a ready-made solid sheet of polycarbonate 8-10 mm thick. This is a strong and durable product that is not afraid of moisture and will allow you to mount the mixer without any problems. The only advantage in this case is that any design can be implemented. Because the cost of the sheet will be very high (thousands of rubles per square meter).
Possible malfunctions and their prevention
If all manipulations are carried out correctly, then malfunctions will not occur for many years. It is also important to take into account voltage drops in the network. You can install a separate uninterruptible power supply or stabilizer in the bathroom with power to the washing machine and shower.
If the pipe is bent, water leaks and control system failure may occur. To avoid this, it is worth controlling the bending angle of the water supply pipe on the rear wall of the cabin, without bending it.
It is also important to consider that in many respects, the quality of components is determined by the price of the product: low cost implies the use of the same inexpensive components with a short service life.
Installation and assembly of a shower cubicle in a corner is a feasible task if all work is carried out one by one and sequentially, in compliance with the standards and requirements.
Detailed instructions will help you carry out fastening and assembly in a few hours with your own hands and without outside help.
Tile or mosaic cladding
In many cases, side cladding is required to hide the mounting bases. One of the most convenient options for solving the problem is to use mosaic tiles on a plastic or glass base.
A layer of glue is applied to the base using a notched trowel. After pressing the tiles, excess adhesive must be removed immediately.
With the help of mosaic, you can cover any uneven surfaces, since it can be easily cut with construction scissors or a knife thanks to its paper base.
It doesn't matter whether you use tiles or mosaics, all seams need to be sealed. This especially makes sense when you decide to build the pallet yourself
The space between the pallet and the floor can be closed using mosaic or tile cladding. Mosaic fragments are flexible and allow you to quickly and efficiently line the sides or the entire pallet if you build it yourself
When forming seams, use crosses. After facing, you need to grout the seams using waterproof grout and a rubber spatula. Then the remaining grout is removed and everything is wiped with a piece of cloth. After everything has dried, you need to wash the tiles.
Installation procedure
The process of installing a shower enclosure always begins with installing a tray. To do this, you will need a wrench and waterproof silicone-based sealant. And also, of course, the design elements themselves: a tray, a siphon included in the package and a drain hose.
In some models there is no siphon as such. In such cases, the hose itself takes over its function. As a rule, the kit then includes special devices that, when installed on the hose, give it a curved shape. A siphon bend is necessary to prevent the penetration of unpleasant odors from the sewer pipe into the room. So don't ignore these devices.
So let's get started.
- Turn the pan upside down and find the drain hole on it. Connect a siphon to this place.
- Then fix the drain hose in the siphon. If you connected it directly to the drain hole in the pan, then install a bending device.
- Attach an elbow to the opposite end of the hose - this part is also usually included in the package.
- Install the elbow into the drain hole located in the floor. You need to insert it in such a way that it goes completely there.
- Now take a waterproof silicone sealant and sequentially treat all the places where the joining took place: the pan and the siphon, the siphon and the hose, the hose and the pipe, the pipe and the sewer hole. After application, allow the sealant to dry. This usually takes approximately two hours. Try not to touch the structural elements until the sealant has completely hardened, so as not to compromise the strength of the layer.
- After the silicone sealant has completely cured, turn the tray upside down, place it in the desired place and adjust the legs to the height. This is done using a wrench. Turning the leg clockwise will make it shorter, counterclockwise will make it longer. Do not forget to regularly check the levelness using a building level during the process.
- We are done with the connection, now we attach the pallet to the wall using fasteners and treat the joints with silicone sealant. We wait again for two hours.
Put the glass parts aside for now, let's work on the frame first. Assemble it from metal frames. After assembly, check the evenness of all ends, as well as the verticality of the corresponding elements. Only then fix it with screws. Try not to tighten them too much, otherwise the frame may become warped.
Now we place the assembled metal structure on a pallet and check how smoothly everything is installed and fits together. It is better to do this together, since the frame must be supported on both sides.
Drill into the wall at the marked locations. If it is covered with tiles, then do this very carefully to avoid cracking the tiles. You will need two diamond-coated drill bits designed specifically for this type of finishing material.
First, make notches on the glaze of the tile, then drill through the entire thickness of the tile with a very thin drill, and then take a nozzle of the required diameter (corresponding to the dowels) and bring the holes to the desired depth and width. Secure the dowels in them.
Place the frame back on the pallet and secure it to the wall using screws. Before doing this, coat the side frames with waterproof silicone sealant, this is done on the side that will be adjacent to the wall surface. After tightening the screws, remove excess sealant with a damp cloth without waiting for it to dry.
Install the fasteners, seals and rollers included in the kit onto the frame. Next, mount the side panels, and then the door.
Be sure to check the latter: open and close several times, paying attention to the ease of sliding.
Finally, secure the door handle and treat all joints on the structure with sealant. Don't forget to remove any excess before it dries. After it hardens, the shower enclosure will be completely ready for use.
That's all, dear friends. As you can see, the installation procedure does not cause any difficulties. In addition, some people prefer not to bother at all and install only a tray around which they hang a regular shower curtain.
Of course, this option looks less modern and stylish, but it also has a right to life. But in this case, you will have to first take care of high-quality waterproofing of the floor, since the curtain protects it from water much worse than a fiberglass structure. The choice is yours. Good luck!
https://www.youtube.com/watch?v=rl2aZK_r_4s
DIY repair
In some cases, it is not profitable to buy a new shower stall due to a minor malfunction. Here's what you can do with your own hands...
Pallet
Most pallets are made of plastic. How to make repairs? Acrylic can be welded perfectly using standard means. Therefore, it is possible to repair the pallet using standard methods. But how much will it cost? For a small piece of acrylic rod in the store they charge many thousands of rubles. Cooking without an additive is not an option. In this case, knowledge from chemistry will help. Let us remember that mainly thermoplastics are used for pallets.
This is the same (but not in chemical composition, in physical properties) from which polyethylene and polypropylene pipes are made. Therefore, it is enough to take out a piece of the ABS plastic window frame to solve the problem. Moreover, most plastics have excellent mutual adhesion. Before starting leak welding, try the method on an area of the pallet that is not visible from the outside.
Corner
Most often, the rollers holding the door break. Carry out repairs by replacing damaged ones with purchased ones. To reduce the likelihood of breakage, use silicone lubricant. It can be bought in most stores. Repairs can be reduced if you use even ordinary waterproof Litol. Lubrication not only reduces friction, but also protects the surfaces of parts from corrosion.
The corner often starts to leak. Repair comes down to treating all cracks with sealant. If necessary, plumbing corners are used around the perimeter of the pallet and fence, in areas adjacent to the wall, and at joints. Additionally, a review about sealing the shower stall.
If the glass breaks. Replace the sheet with cellular polycarbonate, or look for a new one. However, the repair can be done with your own hands by cutting out glass of suitable size. A lot depends on skill here. And most importantly, the master is afraid of repairs!
Stage two.
Before assembling, place the remaining cardboard boxes on the floor . This way, you will assemble the pallet and, most importantly, the glass without damage.
Never place glass on a bare floor, especially tile or concrete.
In general, handle shower glass very carefully during assembly. Although tempered safety glass used in shower enclosures is very strong, it does have weak points, especially at the corners. Never place glass on a corner. Do not drill holes in the glass, it will simply crumble into small fragments.
All the necessary holes are already there and were made at the factory. If, in your opinion, a hole is missing, it means this is a manufacturing defect, or the manufacturer has replaced the equipment.
Arranging a corner without a pallet
Do-it-yourself installation of a shower enclosure begins with the installation of a screed. First you will need to install the formwork. If you plan to subsequently finish the floor with tiles or other finishing elements, their thickness must also be taken into account.
The formwork structure is filled with concrete mortar. It must be remembered that there must be a slight slope (at least one and a half percent) from the beginning of the corner to the ladder. To ensure this moment, a certain portion of the mixture is smoothed over the outermost area, gradually moving towards the ladder. After the screed has dried, you can begin arranging a homemade pallet. There are two variations of its manufacture:
- monolithic design;
- brick side.
In the second case, the brick is installed, plastered and the entire workpiece is finished. Then work is carried out on the construction of a shower cabin. For this, you can use a curtain frame or glass doors with a minimum thickness of 60 mm.
Sealing
All work on installing the frame, fillings and doors is performed using sealing elements. If there is no confidence in sealing, the joints are additionally coated with acrylic or silicone.
The paint sticks to acrylic, so the joints can be touched up. Decorative compounds roll up on silicone, so they are used to process thin and inconspicuous joints.
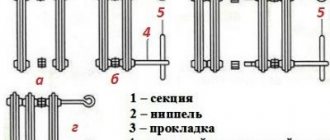
Gaskets made of paronite, rubber, and polymers are used.
The first material is composite, it is obtained by vulcanization and rolling; it contains rubber, fillers (powders) and asbestos. Rubber belongs to the standard category, consisting of raw rubber, which is vulcanized during manufacture. The color is always black or dark grey. Polymers made from modified PVC are elastic, return to shape when deformed, and are springy.
Design
If a lightweight design is preferred, then choose a frameless shower enclosure, which is completely glass and has hinges that align the profiles (they are used to secure the glass to the wall).
There is a so-called “semi-framed” type, which does not have vertical guides, but thanks to the doors (they are sliding) you can save space.
The frame design of the shower stall is more popular among consumers, since due to the fact that the glass is inserted into the frame, the strength of the device increases.
The corners come in different shapes, for example: oval, square or rectangular. And the sizes range from 0.75 X 0.75 m to 0.9 X 1.2 m, and sometimes 1.0 X 2.0 m. When sold together with an acrylic tray, the kit includes a shower channel or mini-bath.
The corner may have doors that fold, rotate, slide apart, or operate using a lift-and-turn design.
The first type saves space and prevents water from spreading.
When the door opens, all the liquid flows into the pan.
If the door rotates, then its mechanism does not require special maintenance, and when opened, part of it opens inward.
Although the folding door is small in size, its entrance width is large.
For the vertical movement of doors, a lift-and-turn design is used, which ensures that the doors move vertically, that is, when they open, they rise automatically and, when closed, they completely adhere to the floor (or pallet).
First launch of the cabin
Before this, you need to connect the shower stall to the water supply using hoses and pipes. The order will be as follows:
- Preparation of materials for an individual installation project. A selection of fittings, taps, pipes being cut.
- Shutting off the water supply to the bathroom.
- Connecting taps.
- Connection of the cabin with pipes.
- Checking the tightness of the system (short-term water supply).
An example of connecting to a water supply Source www.remontnik.ru
If the cabin is equipped with hydromassage, it is recommended to install filters. They are necessary to purify water before it directly enters the nozzles, which quickly become clogged with dirt.
If the cabin is located at a height, then a pump is used. It will allow you to supply water to a height with sufficient pressure. For this purpose, a separate tank is prepared, from where water will be pumped.
An important step when connecting a shower cabin is the first launch, which is necessary to assess the performance of the created system. But before this, an additional check is carried out at the joints, holes and fastenings from which water may leak. The installed pallet is also checked; for this, a person must enter the constructed cabin and stomp around in it. Sounds and swaying should be excluded.
If the entire system appears to be working properly and has no flaws, then water is supplied for 10-15 minutes. A continuous flow will allow you to understand whether there are leaks and where the created system is leaking. Any leak, even minimal, can grow, so even the causes of small drops are eliminated before the booth is put into operation.
Connecting the cabin to the network Source gidroguru.com
Choosing a base for a pallet
Installation of the bottom of the shower enclosure is carried out:
- on a brick base;
- on plastic supports;
- on a metal frame.
The base is selected depending on the completeness of the model itself, its material and related technological characteristics.
Proper arrangement of the foundation is the key to the correct operation of the drainage system: the drainage hole must be higher than the level of the sewer system line. Only under this condition does waste water leave without delay. The angle of inclination of the bottom to the inlet to the sewer is maintained at 3 degrees. If the pan does not rise on a pedestal, or the entrance to the sewer does not lower, then only a pump for pumping out water will be able to establish the operation of the drainage system.
Many deep pallets are sold complete with a metal profile frame. But if the model has thin walls, then it is better to install it on a flat floor without a foundation. This is how ceramic bottoms are installed. But the question remains about the correct organization of the height of the drain hole. The hole must be higher than the outlet so that the water goes into the sewer. The bottom sits on the floor using glue or a cement tile mixture.
Bottoms made of cast iron and stone are mounted on the floor. Their height does not interfere with the drainage of liquid into the sewer. But there is a difficulty in arranging the siphon. It is mounted directly on the floor surface or a flexible unit is installed, which is carried into a wall niche.
Depending on the type of foundation, the algorithm for performing the work is different.
Video description
Assembling the cabin frame in this video:
Panel installation
The prefabricated panel is a distinctive feature for hydroboxes. It should cover the wall and allow you to control all functions. All holes on which the panel will be installed must be treated with sealant to eliminate possible leaks.
Particular attention should be paid to the injectors. Hose sections are used to connect the injectors to each other. To avoid leaks, clamps are used to tighten the tubes. For additional protection against moisture, a sealant is used to coat all connecting elements.
Working with sealant Source e-stroy.pro
What do you need to know when installing a shower enclosure?
The key differences between a shower corner and a stall are that the first structure is nothing more than a fenced-off part of the bathroom. The shower stall is a more complex design. This is a kind of capsule in which manufacturers have provided such additions as hydromassage, a steam generator, a telephone and other useful elements. However, in addition to physical differences, these two designs also differ in installation. It is more difficult to install a shower stall, but anyone can handle installing a corner.
Before revealing the secrets of how to install a shower enclosure yourself, it is worth highlighting several features of this design:
- Frame structures are sold assembled or partially assembled.
- Installing a frameless shower enclosure requires the most accurate measurements and accuracy in installation work. The walls of a frameless corner are fragile and can crack or break.
Before installing the shower enclosure walls, you need to take care of:
- Reliable drainage.
- Connecting cold and hot water.
- Pallet organization.
You can make the tray yourself by laying out the frame with tiles and installing a shower drain into the floor.
Or buy a shower tray with the required parameters and install it in your bathroom. The latter option will be more reliable, since pipes can be hidden under the pallet and, in the event of a breakdown, it is easier to dismantle. There will be no need to tear off tiles to get to the drain pipe.
It is worth distinguishing two types of walls for shower enclosures:
- Plastic. Lightweight, easy to install. May have a print.
- Glass. Heavier than plastic ones. Strength depends on the thickness of the glass.
The choice of material for the walls of the corner is a personal matter, which depends not only on the aesthetic preferences of the person, but also on the budget.
Installing a shower enclosure with a tray yourself
In terms of installation time for shower enclosures, frame structures take the least amount of time, since very often they are supplied assembled by the manufacturer. Frameless shower enclosures take the longest and most painstaking time to install, but later you will get a stylish and beautiful shower stall.
The acrylic tray is always installed first
The floor and walls must be leveled to avoid leaks at the junction of the shower stall and the wall. This will prevent water from leaking through these cracks into the rest of the bathroom. The walls and floor should not contain any gaps or cracks. They must be made of moisture-resistant materials.
Materials required for installing a shower enclosure with a tray:
- shower corner;
- shower tray;
- installation kit included with the corner;
- instructions for installing and assembling the corner (included);
- hammer drill or drill;
- silicone sealant;
- construction tools (screwdrivers, hammer, level, etc.).
First of all, you need to try on the corner and determine its further location in the bathroom. After all preliminary measurements, a sewer outlet is connected to the pan to drain the water. Only after this are all seams and cracks filled with silicone sealant, which is used to ensure reliable connection and integrity with the floor.
The next step is the installation and installation of the frame and guides of the shower enclosure. To do this, use a level to vertically align one side of the shower enclosure. After this, mounting holes are drilled in the wall through the installation profile, and the shower enclosure frame is screwed to the wall using special screws.
Before pressing and tightening the frame with screws, a layer of sealant is applied to its back and bottom sides to obtain a reliable, airtight connection with the bathroom wall and the surface of the tray. This will prevent water from flowing outside the shower enclosure.
A similar procedure is carried out for the remaining vertical mounting profiles. After completing the installation of the shower enclosure frame, until the silicone sealant has completely hardened, it is recommended to double-check the correct installation using a level. If there is a slight misalignment in any place, then you should slightly loosen the screws and re-align the profile. After this, re-tighten and secure the frame.
Frame, doors, additional elements
The door frame made of glass or acrylic (less commonly plastic) is mounted using stainless steel dowels. First, vertical supports are installed strictly according to level, and horizontal guides are attached to them. The most difficult moment is installing the canvas on rollers. Firstly, they must be strictly perpendicular to the floor. Secondly, the rollers in the grooves are placed in such a way that they move freely in them, without delays.
If the faucet and shelves were dismantled in your shower enclosure when it was installed, then they must be installed before installing the door structure on rollers. An exception is allowed only if you prefer not sliding glass doors, but a curtain system: it has only one guide rod, and it will not interfere with the installation of additional elements. Although it is still better to install all the additional elements first, and only then work on the insulating structure.
After finishing the work, all existing seams are filled with sealant. Before using the silicone composition, the surfaces must be cleaned and dried. When the sealant has completely dried, the reliability of the insulation is checked. To do this, a stream of water is directed at the sealed joints. If leakage is detected, the sealant treatment is repeated.
The height of the tray and sides is selected individually
Installation instructions
There are two principles for installing shower trays: built-in on a foundation and installed on a frame frame.
On the foundation
For the most correct arrangement of shower rooms of this type, the horizon of the floor surface, as well as its waterproofing, are of great importance. Therefore, the first step will be to screed the floor along the beacons if the level is not met. Careful waterproofing of the joints between the floor and walls will help avoid possible troubles in the event of a leak in the drainage system. The most correct solution would be to use two-component waterproofing applied to the walls and floor of the bathroom in two layers, extending about 15 cm beyond the dimensions of the final product.
Before installing the pan, you need to study its characteristics (strength, wall thickness, design of the drain used). If the product can be deformed under the weight of a person, then the foundation must be laid across the entire space of its bottom so that the entire bottom of the pallet rests on it. To eliminate noise when choosing steel pallets, it is recommended to isolate it from the foundation with a small layer of polyurethane foam or fill the manufactured frame made of bricks or blocks with fine sand. You need to connect the siphon to drain the water before installing the pan in its seat. In this case, it is necessary to install sewer pipes with such a slope that water can flow freely through the drain.
When making a foundation, it is important that the sides of the pallet around the entire perimeter rest on a rigid structure. Therefore, gas silicate blocks have more advantages over bricks; they are easier to adjust in place using an ordinary small hacksaw
To eliminate possible leaks and better fix the tray around its entire perimeter, you need to place it on silicone with antifungal additives. After this, you can begin decorating the shower corner with mosaics or ceramic tiles.
In addition to steel, this type of pallet installation includes ceramic pallets. The care required for its installation is dictated by its fragility, like any morocco product. The difference in installing ceramics on a foundation is that it is necessary to provide an inspection hole for access to the drain communication. At the landing site, along the entire perimeter and under the bottom, the pallet must be fixed with a solution of tile adhesive or sand concrete.
On a frame frame
Such pallets stand on legs fixed in a frame that can be adjusted in height. Sometimes manufacturers supply their products already assembled for installation, but more often the frame comes as a separate kit. In the latter case, before installing the pallet, you need to assemble it according to the diagram included in the instructions, then secure it to the pallet. Before installing the product in the marked place, you need to install a drain.
The siphon is connected to the sewer pipe, the hole is sealed with a cuff and insulated with silicone sealant. The drain funnel is installed after installing the pan in its regular place. Despite the presence of a frame, acrylic pallets can bend under the weight of a person, which can subsequently lead to cracks and replacement of the product. In this case, it is necessary to measure the distance from the floor to the bottom of the bottom, and also make reinforcement from metal pipes or bricks, gas silicate blocks, then cover it with a rubber mat of a suitable size.
Acrylic pallets on a frame frame are equipped with “aprons” - decorative plastic panels that repeat the shape of the front part. The aprons are installed after installing the pallet using self-tapping screws. The screw heads are covered with decorative buttons included in the kit. After installing the decorative apron, the frame and possible reinforcement become invisible to the eye. If the pallet does not provide for the installation of curtains or a cabin on it, then the last operation will be to seal the joints between the wall and the edge of the product with sanitary silicone sealant. If you decide to mount the structure on a wooden floor, you need to choose a suitable sealant for it. When dismantling it yourself, you need to dismantle all the fences, screen, metal frame and remove the seal.
How to equip a shower box: important components
Shower corners for bathing must consist of several mandatory parts: plumbing communications (water supply and sewerage), a tray, a mixer with a watering can, and doors. Let's look at some tips on how structures should be selected and positioned.
Water pipes
Hot and cold water must be supplied directly to the place where the shower corner for bathing will be located. It is better to make risers from plastic; all fittings and taps must be installed before arranging the corner.
Drain
It is better to build a sewerage system in advance, for example, at the screed stage, and for the proposed shower you should leave a drain with a waste pipeline. Nowadays, preference is given to plastic structures
Please note that you should choose a flat siphon if you plan to install a purchased bottom with a minimum depth. Minimum pipeline diameter 80 mm
Pallet
Often, a corner shower is built with your own hands using a store bottom of different dimensions. However, you can cope on your own by equipping a corner of stone or brick. It can be made of different heights, the main thing is that the drain is located at the level of the toilet sewer pipe. To prevent your structure from spoiling the attractiveness of the room, it can be hidden behind a decorative panel of the appropriate color and design.
Doors
The shower corner can be equipped with doors or exist without them. When choosing installations, we can conclude that plastic and glass are considered especially popular. Both of these types have attractive qualities, they are transparent and matte, some even have decoration in the form of an image that repeats the features of the bathroom interior.
Some nuances
In some cases, it is advisable to perform preliminary assembly to familiarize yourself with how to assemble a shower stall. This is useful to do in order to understand the installation principles, mark the holes, and, if necessary, purchase missing fittings.
The installed drain must be equipped with additional outlets for connecting other plumbing fixtures. We should not forget about including an audit in the sewerage system.
The process of operating plumbing fixtures involves periodic inspections and ongoing repairs. Loose fastenings, depressurized joints, replacement of doors or rain showers necessitate complete or partial dismantling.
If the assembly was carried out independently, the question of how to disassemble the shower stall does not cause confusion. When disassembling, follow the reverse order of installation. Assembling the cabin yourself saves money and increases confidence in the correct use of this convenient plumbing equipment.
Shower assembly video:
More detailed video:
Installation of a corner with a bottom
The first step is installing the pallet.
Most often, the corner package does not include a frame for the pallet. It is made independently. To do this, use iron corners and a pipe with a cross section of 30-40 mm. In addition, the bottom is still installed on a brick mount. A fastening is created so that it stands firmly on its base.
The second stage is the installation and operation of the drain.
The siphon is installed on the outside of the tray before the bottom of the shower enclosure is finally mounted on its frame. In order to be able to inspect the siphon, it is necessary to organize an inspection window in the frame. After connecting the siphon, a control check is carried out for the tightness of the connections. The bottom container is filled with water and lowered into the drain.
Installation of the corner walls begins with the assembly of the iron frame. After this, the lower guide is secured with sealant. Without a plumb line and level, it will not be possible to accurately align the vertical posts. Where there will be fastenings for the racks, dots are placed on the wall with a marker. Small holes are drilled for the dowels. The inside of the vertical posts is lubricated with sealant before being installed on the walls. The guide post is secured vertically with self-tapping screws. Glass is installed in an iron frame. The doors are adjusted according to the manufacturer's instructions included in the kit. This is necessary so that they do not come into contact with other elements of the corner. The fittings are installed in their places. The sealing of all cracks is checked. The sealant is applied only after the surface has been degreased. The areas around the tiles and on the pallet are carefully treated with sealant.
The importance of sealing these places should not be ignored.
Stage eleven
Connection to communications
1. Connect the hoses coming from the mixer to the hand shower, rain shower and to the nozzles (if any)
2.If you have an electrician, connect the wires going to the lighting, hood, and radio.
Installation Guide
The main installation steps are already listed
All that remains is to look at them in more detail and pay special attention to small but important details
Installation of a tray, connection to the sewer
When installing shower enclosures with your own hands, you need to start with installing and connecting the tray to the sewer pipe. We will consider the optimal option in terms of labor costs - when the pallet is raised above the floor and pipes are placed in the resulting gap.
The instructions for performing the work will look like this:
- The pan itself is first tried on, the position of the drain hole is noted;
- then the sewer corrugation is attached to the sewer pipe, its other end is attached to the siphon using a union nut;
- after this, the siphon is attached to the pallet itself, installed in the corner. The horizontal level of the pallet is checked by level and, if necessary, its position is adjusted using threaded legs;
The photo shows the installed siphon
Instead of decorative panels, you can lay out brick sides
At this stage, the main problems most often arise with how to seal the shower enclosure. Regular silicone sealant is also suitable for this; you should not try to find a miracle composition, the main thing that needs to be ensured is the rigidity of the pallet, it should not bend even a millimeter.
This is what most often causes dampness in the space underneath. Even if the deflection is 1-2 mm, the edge of the pan easily peels off from the layer of hardened sealant, and water seeps into the resulting gap without any problems.
If the rigidity of the factory frame is not enough, then you can always place an ordinary brick under the pallet (put a piece of rubber on top so as not to scratch the plumbing fixture).
Checking frame rigidity
If, despite all the efforts to seal the shower corner in the bathroom, you still feel damp, musty and the fungus cannot be removed, then the cause should be sought in poor ventilation. Of course, you should first check the tightness of the joints.
Installation of walls
This stage can be considered the final stage in deciding how to install a shower enclosure.
Much depends on the design of the corner:
- If the bathroom is tiled, then the walls of the bathroom itself can act as the back wall. In this case, installation is very simple - you just need to fix the metal profiles and insert glass or plastic into them;
- but a shower enclosure with a back wall will require a little more effort; you will also need to install rear opaque walls.
Shower corner option with rear wall
As for how to properly install a shower enclosure, the installation procedure remains the same; if placed against a wall, you need to:
install metal profiles on the wall and floor. Naturally, before installation, the vertical position is checked, then the holes are simply drilled and the profile is attached to the wall with dowels;
The pallet is installed, the profiles are secured
The joints are carefully coated with sealant
then the glass walls are simply inserted into the profiles. Formally, rubber gaskets should provide sufficient tightness, but it wouldn’t hurt to be on the safe side and additionally coat them with silicone. In this case, water will definitely not get into the gap between the glass and the gasket;
Insufficient tightness of joints can lead to this result.
It is also advisable to additionally fix the glass sheet on top with a metal bridge to the opposite wall, which will increase the rigidity of the structure. At this point, the question of how to assemble a shower enclosure can be considered closed.
For shower corners that are not adjacent to the bathroom walls, the procedure remains the same, except that the profiles do not need to be fixed to the wall. The frame is simply assembled, and then the walls are mounted.
https://youtube.com/watch?v=rl2aZK_r_4s
Project part
First of all, you need to choose wisely where and how to install the shower enclosure. To do this, you need to follow a number of rules.
- Close sewerage and water supply. Incorrect design will lead to the need to lay additional pipes, cluttering up an already small room.
- The drain for the shower enclosure must be at least 8 cm in diameter. Otherwise, water will stagnate in the pan.
- The drain of the shower corner must be laid in the same plane as the drains of other plumbing fixtures. Excessive bends only increase the likelihood of gaps forming and will require additional sealing.
- The design of the shower corner should not occupy more than a third of the bathroom so that family members do not feel cramped in it. At the same time, the bathing place must be spacious enough (minimum 70x70 cm), otherwise taking a shower will be extremely uncomfortable. If these requirements conflict with each other, redesign your bathroom. For example, move the washing machine to the kitchen or do away with the sink.
- To ensure the required angle of inclination under the drain, it is often necessary to increase the thickness of the floor. In this case, you will have to dismantle the covering, even if you are completely satisfied with it, and screed the floor in the entire bathroom.
Only by fulfilling the listed conditions and correctly calculating the installation location of the shower enclosure, you can count on the fact that the design of the shower enclosure with your own hands will be functional, comfortable and will serve your family for many years without causing irritation.
Summing up communications
The routing of pipes in a bathroom with a shower depends on where the drain is located in the pan. If the vertical riser is located far from the planned installation location of the shower, it is necessary to lay the sewer pipes in advance at a slope of 2-3°. The flexible siphon must be selected with a small margin of length to facilitate connection with the drain pipe. It is necessary to take care of the cleanliness of the sewer drain before starting work and close the sewer pipe with a plug.
Water supply
Pipes to the pallet are brought through holes in the wall or, when laid on a surface, they are hidden behind plasterboard sheathing
It is important to pressure test the pipes before tiling your shower. To do this, place a mixer or plug with an air bleeder on the thread.
The test is carried out within 20 minutes after the air is released. During this event, it is important to check all areas with joints and threads for leaks and repair if found.
Electricity supply
If you plan to have lighting in the shower, you need to drill channels for the cable in advance. If communications are hidden inside a plasterboard box, then the wiring is attached to plastic clips. To illuminate shower rooms, use a copper flexible cable with double insulation and a minimum cross-section of 2.5 square meters. The connection is made directly from the panel with the installation of a residual current device. For installation in the shower, only moisture-proof recessed luminaires with a minimum degree of protection of 65 IP are used.
Preparing for work
The location is chosen so that the sewer pipe from the receiving point to the entrance to the socket of the riser is no more than 1.0 m long. If it is longer, a pedestal must be built for the pallet to ensure a slope. Usually in an apartment this is the far corner of the bathtub.
Prepare working tools:
- flat and Phillips screwdrivers, power tools: screwdriver, hammer drill, angle grinder (grinder) with discs for metal and stone;
- hammer, pliers, clamps, knife;
- adjustable gas wrench or set of open-end wrenches;
- rubber spatula, sealant gun.
You will need rubber-sheathed or metal-braided hoses to connect to the water supply. Rigid pipes with corner fittings and straight bushings are also used. Hoses are sold with a mixer; if they are not suitable in quality or length, then they buy others.
Compression couplings are used to connect hoses, routing and joining. The seal is made of rubber gaskets and professional FUM tape. You will need silicone sealant. To purify water from the public main, filters with replaceable cartridges are purchased and installed.