The need to disassemble heating radiators may arise in every home. If one of the sections leaks, it needs to be replaced or removed. It is necessary to add additional fins when the existing ones do not warm the room to the required temperature. And if during the heating season the apartment becomes hot, you need to remove the extra sections. Such problems can be solved with the help of professionals, but if your financial condition leaves much to be desired, you will have to learn how to disassemble a heating radiator with your own hands. This will allow you to save money and gain useful experience.
How to disassemble a heating radiator with your own hands
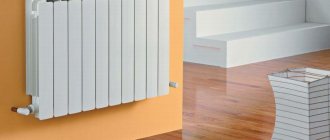
Pros and cons of aluminum batteries
To properly assemble and disassemble an aluminum system, you need to familiarize yourself with the advantages and disadvantages of the equipment.
The advantages of bimetallic radiators include:
- Good thermal conductivity of aluminum - helps to compensate for instability of coolant pressure.
- The light weight of the material facilitates the process of installation and delivery to the destination. Repair work related to heating can be done with your own hands.
- The price is more affordable compared to copper and cast iron counterparts.
- Sufficient diameter of passage holes.
- Fast heating, fast cooling - allows you to set the optimal temperature in a short time, in accordance with the weather outside.
The disadvantages of the aluminum system should be noted:
- It is not universal, it does not fit into all systems, and adapters are required for installation.
- High risks of air stagnation, leaks, aluminum radiators do not respond well to pressure surges.
Based on the shortcomings, skills in disassembling radiators are developed. Aluminum is a popular material for heating systems and is in demand.
How to disassemble a cast iron heating radiator into sections
Before disassembling a cast iron heating radiator, you need to prepare a set of tools:
- Wrench for disassembling cast iron batteries (5/4 inches for old devices and inch for new ones);
- Adjustable wrench of the second or third number;
- Chalk;
- Inch pipe 50-100 cm long.
You also need to find a convenient platform on which to disassemble the radiator. A good option would be a durable wooden board placed on a flat area. The battery is placed horizontally on this shield, and disassembly can begin.
The technology for disassembling the radiator is as follows:
First of all, you need to understand in which direction the blind plugs are unscrewed, after which they need to be unscrewed. Before disassembling the heating battery, it is necessary to mark on the key the length to the unscrewed nipple. To do this, the key is placed on the battery and its edge is brought to the point where the bushing is located. A mark is made on the key using chalk in a circle until the key is inserted into the battery. Next, you need to figure out in which direction the key for cast iron batteries should rotate - they can have both left- and right-hand threads. Accordingly, when rotating in different directions, the battery sections will diverge or converge. The direction of rotation is determined using a fitting, which is screwed in on the same side where the key will subsequently be inserted. With a right-hand thread, the fitting is screwed in clockwise, so the direction of rotation of the key when unwinding will be the opposite. With a left-hand thread the situation is exactly the opposite. The actual promotion of the radiator begins with the first section. The first step is to strip the threads on both nipples one by one (as a rule, just half a turn of the wrench is enough)
Next, the battery is gradually untwisted on each side so that the distance between the sections is about 0.5 cm. When unwinding, it is very important to maintain the specified gap between the sections - if you untwist the battery on one side more strongly, there is a considerable chance that the thread will jam. During the unwinding process, it is worth putting a pipe on the key to reduce the required effort.
Any modern radiator can be disassembled using this technology. Often, such heating devices have plugs with the thread direction marked.
Tools
To properly disassemble a bimetallic battery, you will need a nipple wrench. It cannot be purchased in stores, but can be obtained in the following ways:
- A local market that sells used tools and other useful plumbing supplies at an affordable price.
- Go to the workshop and ask for a tool to rent.
A nipple wrench is an iron rod with a spade-shaped head on one side and a hole on the other.
Nipple key
It is important to prepare the tools, then remove the battery correctly. In accordance with its type and condition, the following is required:
- adjustable wrench, a set of wrenches of different sizes;
- grinder, autogen;
- hammer;
- construction hair dryer;
- chisel.
When the tools are ready, you can begin preparing the work site. Do this on the floor, on a sturdy table, taking into account that dirty water will flow from the radiator.
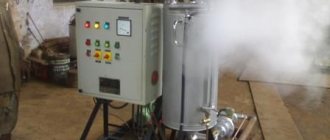
Preparing for washing
Do not be mistaken that this is easy to do, especially when it comes to cast iron. But if you approach the situation wisely and your hands “grow from where they should”, two men will cope with the task.
Preparation technology:
- It is better to choose a day before mid-autumn, when services have already purged the main line, but water has not yet been released into the system. Ideally, you need to clean the batteries of all neighbors in the riser at the same time. Otherwise, dirt in a radiator located in another apartment will end up in yours, and the procedure will become useless.
- Draining water from the system in a private home is not difficult and can be done at any time. In an apartment building, you will have to negotiate with a plumber to carry out all the manipulations in the basement, where the distribution center of the house is located. You need to notify your neighbors if this happens during the heating season. Although the latter is resorted to when there is a blockage. It is better to carry out routine cleaning of radiators in the summer.
- If you have only superficial knowledge about the operation of batteries, their connection to the system and other nuances, it is better to first study the hardware. Or call a professional.
- Prepare a container in advance where the remaining liquid will drain.
- After unscrewing the element, you need to remove it. At this stage you will need an assistant. Even a bimetallic product is inconvenient to dismantle alone.
- The coolant should be inspected. Maybe there is no point in cleaning it anymore.
- If you plan to wash the product with water in the bath, you need to put something under it. For example. silicone mat. Otherwise, the scratches on the tank will be so serious that you will then have to pay for the restoration of the bathtub.
Do-it-yourself disassembly and assembly of an aluminum radiator
Before disassembling the battery, you need to determine the material of the central part. If it is copper, there is a risk of deformation of the ends of horizontal tubes. Damage will compromise the seal of the radiator.
To prevent damage to the core, two nipple keys are needed. After the connecting nuts are broken, you need to work with them simultaneously. If there is no second key, it is permissible to turn them individually, a maximum of one turn.
Disconnection from the heating network
Before you start disassembling the radiator from the heating network, you need to see if there are shut-off valves. If not, you won’t be able to avoid inviting a housing and communal services worker to turn off the riser. During the heating season, after shutting off the riser, you need to wait a while for the hot water to cool down. The coolant is drained and sections begin to be removed. After dismantling is completed, the surface of the radiator is washed with running water.
How to disassemble and reassemble the battery
Aluminum batteries need to be removed in the following situations:
- complete replacement of the system;
- building up or removing sections;
- eliminating leaks.
All actions are carried out in the following sequence:
- Removing coolant from the system. When analysis is carried out during the heating season, it is important to wait time for the coolant to cool.
- Unscrewing the coupling with a wrench - it connects the hose between the battery and the heating pipe.
- After disconnecting the battery, it is freed from any remaining water and placed on a flat surface with the front side up.
- Removing the filter, washing. It is important to do this immediately, the dirt begins to harden and it will soon become impossible to remove it.
- Analysis by sections. The sections are connected by nipple nuts. To remove, a special wrench is required; the nuts are turned counterclockwise. It is important to do the work carefully, otherwise a distortion will form.
After disassembly, the parts are washed and assembled in the same sequence.
Disassembly process
To stop a leak in an aluminum radiator, you need a solution of epoxy resin with a small amount of bronze powder. You will need to work with the mixture quickly - hardening occurs in a few minutes, so the leak site must be cleaned and prepared in advance.
How to assemble an aluminum radiator
The radiator is assembled in the reverse order. Sections are laid out on a flat surface. When the battery is not new, the end cap and Mayevsky tap are unscrewed.
Before starting installation, you need to check the threads and grooves so that they are in working order and there are no chips or changes. The threads are driven on the installed sections - the nipple is screwed in and out. Sometimes, under a layer of paint, there is a gasket in front of the thread. The end is wiped with fine sandpaper; if a gasket is found, it is cut off with a sharp blade or knife.
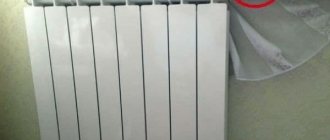
Aluminum battery in section
Before building up sections, the ends are cleaned until smooth; it is important to remove the factory paint. Under the influence of water, the paint will begin to peel, crack, and water will seep into microcracks, regardless of the condition of the gaskets. Cleaning ensures uninterrupted operation of the system.
To improve tightness, the ends are additionally degreased, for example, with gasoline. The same is done with the gaskets - washed with soapy water. When filling the system with water, degreasing is not necessary. For antifreeze systems, work must be done. Antifreezes have good fluidity and seep into microcracks. Assembly begins after complete drying.
Sequence of work:
- The nipple nut is tightened half a turn. Heat-resistant paronite or silicone gaskets are placed on top of the nipple to seal the joints.
- Take the section and attach it tightly to the nuts, checking the tightness of the joint.
- The key is inserted into the upper hole and twisted 1 - 2 turns. You need to twist it by hand.
- Do the same for the bottom hole, repeat several turns one by one, tightening 2 nuts at the same time.
- After manual tightening, it is permissible to use the lever - in two stages on each of the nipples. There is no need to use excessive force to avoid stripping the thread; aluminum is a malleable metal.
- When the section is assembled, plugs are screwed onto the unused holes on one side and a Mayevsky tap on the other. The valve helps bleed air from the system.
How to separate cast iron sections
This is how the sections are connected.
Now about how to disassemble a cast iron heating radiator. The most common of them in old houses and apartments are MS-140. Their sections are also assembled using nipple nuts and gasket seals.
If the heating battery is old, it will be quite difficult to disassemble it:
- over time, the interface between the sections “boils” due to rust;
- The key grooves are corroded by water.
Nipple wrench design.
Prepare the following tools:
- radiator key (nipple);
- plumbing analogues (No. 3 and 2) for twisting fittings (side plugs) and plugs;
- small sledgehammer and chisel;
- a blowtorch or a hair dryer and a wire brush.
- several bars to raise the battery off the floor.
A radiator key, the price of which is not very high, is a round rod with a cross-section of 1.8-2 cm. The metal is flattened at one end. The width of this blade is 2.8x4 cm, thickness 0.6 cm.
A ring is welded to the rod at the opposite end. A lever is inserted into it to facilitate operation.
The length of the tool is half the length of the largest battery (12 sections), about 30 cm is added to this value.
It is often necessary to heat the joints of sections in order to twist them.
- It is difficult to work with stuck intersection joints. Sometimes they “grow together” so firmly that even great physical efforts do not separate them. In this case, the instructions recommend heating it with a blowtorch or hairdryer before disassembling the joint.
- Heat the cast iron until it glows crimson, then try to disassemble the joint.
- Unscrew the plugs first.
- Place the key on top of the battery, aligning its head with the twist area of the nipple nut. Along the sectional end, draw a circular mark on the tool shaft with chalk.
- Secure the spatula in the lower inner groove. Slightly turning the tool along the left-right axis, pull it to the mark.
https://youtube.com/watch?v=CFOkZ07OeYE
When the thread yields to your efforts, do not unscrew it immediately. Tighten the nipple one full turn, then repeat the operation with the upper nut. Thus, proceed until you unscrew the section
Such caution is necessary because cast iron may burst due to misalignment.
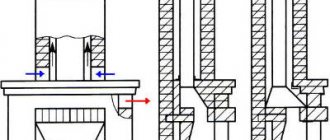
Connection errors
The biggest connection error is the feedback circuit. The correct scheme is to bring the coolant to the upper inlet and remove it from the lower part of the pipe. When the tape changes direction, the heating power is halved. A professional plumber will not make this mistake; this is a common problem with self-assembly.
Possible mistakes
Another important cause of errors is the removal of air pockets. The process involves tilting the pipe. The hot water supply line should be directed to an expansion vessel where air can escape. The slope of the return pipe must be directed into the boiler. At the end of the return, a drain pipe is installed to remove the refrigerant from the heating system.
Theoretical part
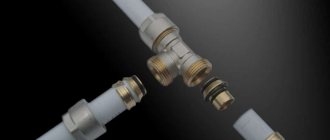
Nipple nuts are ring-type seals equipped with external threads on both ends of the element. In the inner part there are special grooves designed for installing a radiator key. By rotating it in one direction or another, you can close or open individual sections.
Heating batteries are disassembled into sections, as a rule, in the following cases:
- During installation of the heating system.
- When the battery is expanded with additional sections.
- If the radiator starts to leak.
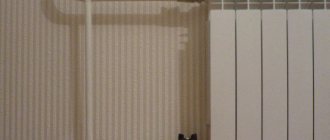
Features of installation of heating radiators
According to industry SNiP, the following standards must be adhered to:
- between the radiator and the floor you need to maintain a distance of 10 cm, between the heating device and the window sill - from 5 cm, to the nearest wall - 3-5 cm,
- the length of the device fixed under the window should be no more than 50-75% of the width of the opening,
- the vertical axis of the battery (it is determined by eye in the middle) should continue with a similar parameter of the window. There may be a deviation of no more than 2 cm,
- installation of radiators is most appropriate in areas where there is intense air circulation - near doorways, under windows.
If you apply a heat-reflecting screen to the wall (in particular, attach foil material), the battery can be placed closer - at a distance of 2.5 cm. An additional finishing layer helps to reflect heat from the wall, which leads to energy savings and faster heating of the room.
The assembly technology is determined by the type of system being used and the selected equipment connection diagram.