Radiators are a critical and emergency-hazardous element of the heating system. Signals for immediate replacement of heating batteries:
- leaks at the junctions of sections or anywhere in the housing;
- the appearance of cracks on the paint layer, indicating the beginning of the destruction of the radiator;
- uneven heating of the convector surface, which deflation did not help eliminate.
Batteries are often changed when purchasing a new home or carrying out major renovations.
In each case, the operating algorithm may vary. This is influenced by: the type and material of the supply pipes; season; presence or absence of shut-off valves; wiring diagram.
Turning off the coolant supply
Let's move on to practice.
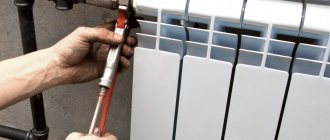
Before removing the radiator, you need to turn off the heating and drain the water. How to do it?
I will analyze the heating shutdown in an apartment in an apartment building. It is difficult to give any general recommendations for autonomous heating systems due to their individuality.
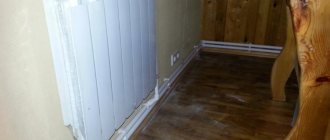
The simplest scenario is to turn off the water using valves, ball valves or chokes installed on the supply lines. It is enough to close the shut-off valves on both connections - and you can disassemble the connections on the radiator plugs, after first placing a basin or other container under them to drain the water.
A jumper must be installed between the connections with shut-off valves. Without it, a closed throttle or tap will stop circulation throughout the entire riser. Very soon your neighbors will come to you and begin to loudly question your high moral qualities.
Correct connection: shut-off ball valves on the connections and a jumper between them.
If the connections do not have shut-off valves, you will have to look for and reset the riser. It’s worth making a short lyrical digression here.
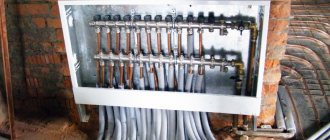
In apartment buildings with standing wiring, two bottling layouts are used:
Top filling means supply to the attic. Risers connect it to the return bottling located in the basement or subfloor. Each riser operates independently of the others and is switched off at two points - below and above;
A pair of heating schemes with top filling.
In a house with bottom filling, the supply and return wiring is done in the technical basement. The risers are alternately connected to both bottlings and connected in pairs by jumpers on the top floor of the house. Accordingly, two risers will have to be turned off - supply and return.
To determine the type of wiring, look into the basement. If there are two horizontal pipes in thermal insulation along the perimeter of the house, you have a bottom fill, and one has an top fill.
Bottom filling: both return and supply lines are laid around the perimeter of the house.
First, find your boner. In the basement it is easiest to navigate along the flights of stairs between the entrance and the first floor landing, in the attic - by the windows of the apartments. Further actions depend on the type of bottling.
Top filling
In the case of top filling, the shutdown procedure will be as follows:
- Turn off the attic valve. Do not unscrew the plug;
The outlet of the riser from the supply bottling in the attic looks something like this.
- Turn off the valve in the basement;
Riser and return flow in the basement.
- Unscrew the plug one or two turns and wait until the pressure of the stream of water hitting the thread drops. This will ensure that the shut-off valves are in full working order;
- Unscrew the plug completely. The water hanging in the riser will flow out after you open the line to the radiator.
Bottom filling
Here are instructions on how to turn off the heating riser in a house with bottom filling with your own hands:
- Shut off your riser and the two adjacent to it;
- Unscrew the plug one or two turns;
If instead of a plug there is a sump on the riser, the task will be greatly simplified.
- Open the valves on adjacent risers one by one. This way you will identify the boner associated with yours;
- Fully open the valve you don't need. Close the riser connected to yours;
- Unscrew the plugs on your riser and the risers connected to it.
Top filling type
If the building has an overhead filling method, proceed as follows:
- shut off the valve located in the attic (do not unscrew the plugs);
- shut off the shut-off valves in the technical floor;
- then you need to unscrew the plug a couple of turns and wait until the pressure of the coolant stream drops; now you can completely unscrew the plug.
Any water remaining in the pipe will flow out when the radiator is disconnected.
Can you see everyone?
Why are we talking about different ways to dismantle radiators?
How do they differ in connection methods?
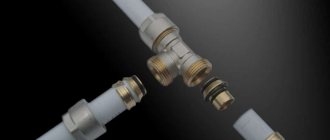
- Fittings used. Traditionally, for the installation of Soviet-style cast iron radiators, a combination of a conduit (a pipe with a long thread) and a lock nut were used; now the batteries are more often connected with American ones - quick-dismount fittings with union nuts;
The photo shows the connection of an aluminum sectional radiator by an American woman.
Connection on the lines.
The location of the connections relative to the radiator. The connection can be one-way or two-way
This is important when installing on squeegees: one of the radiator plugs through passage will have a left-hand thread.
A special case
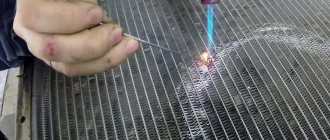
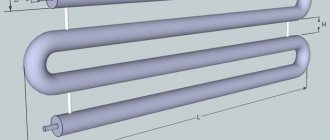
- In many houses built in the 80s and 90s, convectors are used as heating devices. The convector is a coil made of a steel pipe of the same diameter as the riser, with fins that increase heat transfer. The typical method of connecting a convector and a steel line is a butt weld.
The heating device is connected to the riser by welded seams.
Why is this necessary?
Dismantling is necessary in the following cases:
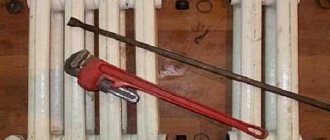
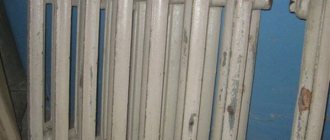
- In case of intersectional leaks of a cast iron battery at a short distance from the connections. If there are many sections, the length of the radiator wrench is often not enough to reach the required pair of nipples on the side of the blind plugs. The only solution is to disassemble the radiator from the supply side;
Leaking between sections is a typical disease of cast iron batteries.
- In case of fistulas on the connections to the radiator. To replace the hose (on threads or welding), you need to completely remove the heating device;
- When replacing radiators with new ones (with higher thermal power or more aesthetically attractive);
- When restoring radiators by annealing them;
Cast iron sections clogged with petrified silt can be brought into working condition by heating them (for example, in a fire) and tapping them with a wooden or rubber mallet. The burnt dirt is poured out through the collectors. Of course, after annealing, the intersection gaskets must be replaced.
- When renovating a room. Plastering a wall or wallpapering behind a radiator, you will agree, is quite problematic.
To wallpaper a window sill niche, it is better to remove the battery.
Non-standard situations
An unpleasant situation can happen when, when dismantling cast iron batteries, the bottom of the plug breaks off and the thread remains inside.
Proceed as follows:
- the collector is heated;
- put a chisel to the part in the direction of unscrewing it and try to turn it with a hammer;
- As soon as the edge of the thread is stuck out, it is turned out with pliers.
It is often necessary to remove old rusty batteries in which the threaded connection is corroded or even perforated.
In this situation, you need to do the following:
- “arm yourself” with a coupling made of brass or cast iron of the required diameter;
- cut off the thread from the liner, but leave the first five turns;
- drive the thread with a die;
- wrap the threads with plumbing linen soaked in paint (organic solvent), which dries quickly;
- screw on the prepared coupling;
- Now the wound thread is screwed into the coupling, and the problem is solved.
Sgony
How do you remove a radiator that is connected to the connections by means of leads?
- Using a pipe wrench No. 1 - No. 2, tighten the lock nuts on the connection. The locknuts always have right-hand threads, regardless of their location relative to the radiator;
- Bend the locknuts to the end of the threads of the bends. If layers of paint and rust prevent you from doing this, pre-heat the liner with a hair dryer, a blowtorch or an improvised gas burner from a spray can and an attachment for it;
On the left is the initial position, on the right is the locknut bent along the thread.
- Remove the remnants of compressed winding from the threads (usually old threads are wound with plumber's flax soaked in red lead). This can be done with a flathead screwdriver or a knife;
- Straighten and drive the radiator plugs after the locknuts. With a one-way connection, both passage plugs have a right-hand thread, but with a diagonal connection, one of the passage plugs is left-handed. The reverse thread is indicated by the letter “l” on the plane of the second plug located on the same side of the radiator.
The letter "L" indicates a left-hand thread.
To unscrew the cast iron plug, use a pipe wrench #3-#4. If it does not move, warm up the manifold of the first section. Next, thermal expansion will play on your side: the diameter of the collector will increase slightly, and the thread will move out with little effort.
Be prepared for residual water and dirt to leak out of an opened battery.
I emphasize: it is not the plug that needs to be heated, but the section.
When unscrewing the left plug, an unpleasant surprise awaits you: by rotating it, you will simultaneously screw the squeegee into the radiator. If there is a threaded connection on the supply side, do not unscrew the radiator cap, but unscrew the fitting from the coupling or angle. It will go into the hole in the plug, and then, after dismantling the heating battery, it will come out without any effort.
Diagonal connection on spigots. On the left, you do not need to unscrew the plug, but disassemble the thread closest to it on the liner.
What to do if the bottom of the cast iron plug breaks off, but the thread remains inside the section?
- Warm up the collector;
- Place the chisel on the cast iron part tangentially as it is being unscrewed, and turn it several turns with hammer blows;
- When the edge of the thread appears from the manifold, unscrew it with pliers.
Often the long thread at the end of the liner near the locknut turns out to be corroded by rust or decorated with a fistula. What to do in this case?
We will need:
- Brass or cast iron coupling of the appropriate diameter;
Brass coupling. Size - 1/2 inch.
- Short drive with long and short threads. Better - brass. Yes, its price is two to three times higher than that of a steel part, but this is compensated by its almost unlimited service life.
Brass squeegee DN 15.
The method for repairing the liner is extremely simple:
- Cut off the thread from the eyeliner, leaving only the first five threads;
- We drive the thread with a die;
- We reel in;
For heating, I use plumbing linen impregnated with quick-drying organic solvent paint. It prevents organic fiber from rotting at low temperatures and burning out at high temperatures.
The condition of dye-impregnated linen after several decades of service.
- Screw on the coupling;
- We screw the wound short thread of the drive into the coupling.
What to do when the battery is welded
Convectors were usually attached using a weld seam. To dismantle them, it is advisable to arm yourself with a grinder with a disc for cutting steel. You can, as a last resort, take a hacksaw for metal, but the work will be much harder. The liner just gets cut
The main and very important condition for this is that this must be done strictly at a right angle.
To install a new battery, you will need to make a new thread. This is not difficult as it seems at first glance, but, of course, cutting off the battery is much faster.
Step-by-step instructions on how to make a new thread:
Using a grinder or a regular file, remove a gentle chamfer at the end of the pipe; To facilitate the process, lubricant is applied to the place where the pipe will be cut (the one used for a sewing machine is suitable); The die is carefully put forward with the holder; Now you need to clamp the liner with a pipe wrench. This must be done, otherwise, when cutting, you can tear the riser away from the batteries, which are attached to it using American wires (in the next apartment)
The consequences, of course, will be disastrous. Next, the thread is cut. Don't forget to hold the eyeliner or riser. The main thing is not to rush, do everything carefully, and don’t over-exert yourself. Usually it is enough to make five turns.
Goodbye America
How to remove the battery installed on American models?
Extremely simple:
- Unscrew the American nuts with an adjustable, open-end or pipe wrench. The threads on them are ordinary, right-handed;
Installing and dismantling the radiator on American models takes no more than a couple of minutes.
- Pull the line away from the radiator plug a few millimeters;
- Remove the radiator from the brackets.
The only problem that may arise during dismantling is the significant force required to release the steel connections when connecting diagonally. In this case, slightly tilt the radiator on the brackets, and the American ones will come apart.
Cast iron battery
In many apartments of old houses, it is the cast-iron battery that needs to be removed, so the first thing you have to do is contact the housing office or the building manager. This must be done because you will have to drain the water from the heating system, and this can only be done by an appropriate specialist.
After you have agreed to lower the system on a certain day, you need to prepare the tool. You will need:
- pipe wrench number 3, in order to unscrew the locknuts and fittings (special nuts that connect a pipe of a larger diameter to a pipe of a smaller one);
- pipe cutter or grinder for cutting pipes;
- hacksaw for metal;
- hammer;
- chisel;
- metal brush to remove rust;
- blowtorch or industrial hair dryer;
- basin for water;
- rags.
After all the tools are prepared and the water has been drained from the system, we proceed to dismantling.
- It should be remembered that if there is no water in the system, this does not mean that the battery is completely dry. This is why we need a basin and rags. They should be used to remove remaining water from the radiator after dismantling.
- As a rule, old radiators are covered with more than one layer of oil paint. And not only the radiators themselves, but also all the fasteners. To remove the paint, use a blowtorch or hair dryer. We need to burn off the old paint on all joints.
- After this, we finally clean the connections with a wire brush.
- Now, using a pipe wrench, unscrew all the nuts. It is this period of operation that is the dirtiest, since the remaining rusty water will pour out of the radiator. You should be prepared for this.
- It may turn out that even after burning the old paint, it will not be possible to unscrew the nuts on the supply pipes. Especially if the radiator has not been cleaned for 10 years or more. In this case, you will have to use a pipe cutter or grinder and cut the supply pipes immediately in front of the radiator.
- The cast iron battery is held on the wall by special brackets. You need to lift it up and remove it. If the battery consists of 3-5 sections, you can carry out a similar procedure yourself. If there are more sections, you will need help: cast iron radiators are very heavy.
Basic selection parameters
Before connecting a circulation pump to the heating system, professionals select a device taking into account the features of the existing heating circuit of the house. During this process, they must pay attention to the following parameters of the device:
- The operating voltage should be 220 V. This characteristic allows you to connect the electric pump to a household power line. Therefore, there is no need to install separate wiring.
- Power – the optimal value is the minimum value. It is recommended to choose a device with power consumption class A. This device is the most economical. As the class decreases, power consumption increases.
Manufacturers produce modern pumping units with two or even three operating modes. They allow you to change the pressure of the pumped liquid. At the same time, the power of the device will change. These parameters are usually marked on the body of the electric pump.
How to temporarily remove a heating radiator
This article is about how to temporarily remove a heating radiator. to replace it or paint the wall behind it. Removing the radiator is not at all difficult, as it might seem at first glance; we will talk about this in the article. First of all, you must understand the consequences of a failed attempt to remove the radiator: if you do not know how to remove the radiator correctly, a leak may subsequently appear and you will ruin the flooring
However, if you pay attention to our tips, you will eliminate all problems at once during the radiator removal process
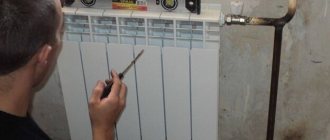
First of all, we must show you the main elements of the radiator: at the top right - the control valve, at the bottom left - the shut-off valve (for regulating the water supply), at the top left - the Mayevsky valve for bleeding air from the heating radiator.
Using a control valve, you can adjust the flow of incoming water into the radiator by opening or closing the valve, you will regulate its heating temperature by increasing and decreasing it accordingly. Using the shut-off valve, you can adjust the intensity at which the water will flow out. Most often, such a valve is used to balance all radiators and is installed on each one.
First of all, close the valves. The adjusting one is closed by hand, and the locking one is closed using a hex key.
TIP: When you close the shut-off valve, remember how many turns you made so that you can then open it the same amount.
Now you need to disconnect the radiator from the valves. To do this you will need a wrench or a gas wrench. The faucet structure consists of an American type (removable coupling). Unscrew the American nut to separate the radiator from the valve.
TIP: To avoid damaging the flooring, place unnecessary rags under the radiator.
Unscrew the shut-off valve...
We unscrew the control valve in the same way... For reliability, use a second wrench to hold the American fitting while unscrewing the nut.
The last step is to remove the radiator from the brackets. The best advice we can give you is that you remove the radiator with someone, as a radiator with water is very heavy. This operation requires at least two people.
ADVICE. If you will be painting the wall behind the radiator, seal the valves in bags or paper.
During the process of painting or gluing the wall, place the radiator so that it does not get scratched. When you are finished painting, hang the new radiator you bought or the old one on the brackets.
With the radiator hanging in place, connect the valve and radiator using an American tie rod. When tightening the shut-off valve, remember the number of turns you had to turn to close it and open it exactly the same amount.
Open the control valve to supply coolant, while you need to open the Mayevsky tap so that air comes out through it and the radiator is filled with water. After water drips from the Mayevsky tap, turn it off, this will mean that the radiator is filled with coolant.
Thanks for reading our article on how to temporarily remove a radiator. and our other articles. Don't forget to Love our projects and share them with your friends using social widgets.
Briefly about the main thing
Installing an electric pump in the heating circuit of the house allows you to provide the necessary pressure in it. This will allow the premises to be heated as efficiently as possible. Electric pumps are installed in homes in “dry” and “wet” versions. The second type of device is more common.
They usually try to install the electric pump on the return line after all radiators, tie-ins and a reservoir for expansion of the coolant. If necessary, it can be mounted on the supply, but at the maximum distance from the boiler.
The pump is installed on a bypass. This is a loop with a filter and shut-off valves. First, all its elements are assembled into a single structure, and then it crashes into the main pipeline with a separate tap to shut it off.
Radiator connection diagrams, operating efficiency
Depending on the design of the heating system, there are different schemes for connecting heating devices to it. If you look at the cross-section, each radiator has upper and lower full-flow channels through which coolant flows in and out.
Each section has its own channel connected to two common ones, the task of which is to pass hot water through itself and receive part of the thermal energy. The overall efficiency of the device depends on the amount of hot liquid that has managed to pass through the channels of the sections and the heat capacity of the material from which the heating elements are made.
The amount of coolant passing through the channels of individual sections directly depends on the connection diagram of the heating device.
Side connection
With this scheme for installing heating radiators in an apartment, the coolant can be supplied from above or below. When the supply is from above, the water passes through the upper common channel, descends through the vertical channels of individual sections to the lower one, and leaves in the same direction from where it came.
Theoretically, the coolant should pass through the vertical channels of the sections, heating the radiator completely. In practice, the liquid moves along the path of least hydraulic resistance.
The further the section is from the entrance, the less coolant will pass through it. With a large number of sections, the latter will heat up much worse, or even remain cold at low pressure.
With the side installation method for heating radiators in the apartment and supply from below, history repeats itself. The efficiency of the heater here will be even worse - hot water must rise up through the channels, and gravitational load is added to the hydraulic resistance.
The lateral connection diagram is most often used for riser wiring in apartment buildings.
Bottom connection
With this scheme, the coolant is supplied from below, passes through the sections, and exits through the same lower channel. The principle of convection is used here - hot water always rises, cold water always falls.
This is theoretically intended. In practice, most of the hot water passes from the supply inlet to the outlet, the lower part of the battery heats up well, and the coolant flows poorly to the top. The efficiency of a heater with a bottom connection of both flows is 15 - 20% lower than with a side-piping scheme.
The connection from below is good because when the battery is aired, the rest of the battery heats properly.
Diagonal connection
The classic method of tying batteries is diagonal. With proper installation of heating radiators in an apartment in a diagonal manner, the sections are heated evenly, increasing the efficiency of thermal energy use.
With the diagonal piping method, hot liquid enters through the upper common passage opening, descends through the channels of each section and exits the lower passage channel on the other side. Here the liquid descends from top to bottom, hydraulic losses are minimal.
This method also has disadvantages. The battery is becoming airy, you need to monitor this and bleed the air through the Mayevsky tap. Second, dead zones with cold water at low pressure may form below.
How does the power unit cooling system work and how does it work?
A radiator is two tanks connected to each other by pipes. Technical fluid circulates through them. It is cooled by the power unit fan. The cooling process prevents the t0 mode from increasing.
For fluid in modern cars, expansion tanks made of plastic are used. Unfortunately, they are subject to deformation as a result of mechanical damage and crack over time. As a result, liquid leaks through the cracks of the tank.
Tubes are also short-lived and deteriorate over time. Coolant also flows through them. Reducing it leads to overheating of the motor, which can cause serious damage.
As a result of overheating, the fuse insert made of plastic is deformed. As a result, the fuse will need to be replaced.
Turning off the heating and draining water from the heating radiator
The first step when dismantling a radiator is to turn off the heating system and drain the coolant
And it doesn’t matter whether the problem being solved is how to remove a cast iron battery or an aluminum one: the algorithm of actions is the same
With individual heating everything is simple. The heating unit is turned off and water is drained from the system. This is done in different ways, the method depends on what type of boiler it is and what opportunities are available for draining the coolant.
But most often you need to understand how to remove an old cast-iron battery clogged with scale in an apartment. With central heating, the easiest way is to shut off the coolant using shut-off valves.
After this, you can start working with connections. Be sure to place a container to drain water from the radiator. This method is suitable when a jumper is installed between the supply and return pipes. If not, the coolant circulation will stop throughout the entire riser. This means that the neighbors’ radiators will become cold.
Bottom filling method
If the building has a bottom filling method, proceed as follows:
- block the riser of their apartment and two neighboring ones;
- unscrew the plug a couple of turns;
- alternately open the valves on adjacent risers to find out which one is connected to the apartment where the radiator needs to be disconnected;
- completely open the unnecessary valve;
- the riser, which is in a pair, is blocked;
- turn out the plugs on the apartment riser and the riser connected to it.
There are simpler options, when there is no plug, and it is replaced by a regular “dump”.
Dismantling process
After preparatory work has been carried out to block the flow of coolant, the water remaining inside the pipes of the blocked section is drained. Then you can proceed directly to dismantling, which is carried out in the following order:
- In the lower part of the radiator, in the place where the pipes are connected, 2 plugs are completely screwed in using a Phillips screwdriver.
- Using an adjustable wrench, unscrew the fastener connecting the supply pipe to the battery. You will have to put in some effort, but the work should be done carefully so as not to damage the thread.
- The locknut is first unscrewed by hand approximately halfway, controlling the release of water with your hand. It is necessary to ensure that the coolant flows in a small stream and does not gushing out in all directions.
- A container is placed under the water, and the previously tightened plugs are unscrewed.
- The radiator is slightly raised on one side, ensuring maximum water drainage from it.
- The battery is removed from the mounting brackets on the wall, for which it gradually rises up and moves towards itself.
- All battery mounting parts are dismantled.
When carrying out dismantling work, the following important nuances should be taken into account:
- Inside the radiator after shutting off there is a sufficient volume of water that can flood the neighbors below. Work must be carried out carefully, preventing it from spilling on the floor.
- It is advisable to dismantle the battery during the summer period, when heating is not required, so as not to cause disturbance to neighbors, and all work should be carried out slowly and carefully.
- To avoid damage to the taps and threads, it is recommended to place a wooden block under the battery before starting dismantling, eliminating the risk of it falling.
It's easy to remove the old heating battery with your own hands
It is important that a specialist ensures that the system is turned off, and that the dismantling itself is carried out carefully, in compliance with recommendations and safety measures.
This article is about how to remove a heating radiator. Depending on the method of connecting it to the connections and the type of fittings, different tools and technical solutions may be needed. We have to get to know them.
How to prepare a circulation pump for the heating season
Before the start of the heating season, in order not to subsequently encounter failure of the circulation pump and its repair, it is necessary to properly prepare the device for a long period of intensive operation.
- You should check that the pump is inserted correctly into the pipeline, focusing on the arrow on the body and the impeller rotation indicator. When installing a new pipeline for installing a circulating hydraulic machine, it is better to choose an area immediately in front of the boiler, where the risk of air pockets is minimized.
- The gaskets and pipes of the pump must be lubricated to prevent them from drying out.
- It is necessary to check the condition of the strainer on the suction pipe and, if it is clogged, clean it thoroughly.
- It is also necessary to evaluate the correct connection of the pump to the power supply network, for which a tester is used.
- You should check the tightness and reliability of the hydraulic machine connecting units.
- You need to perform a test run, the results of which will show whether your equipment is ready for the heating season.
Tools
Be sure to acquire the following materials:
- Torque wrenches;
- Bypass;
- Bulgarian:
- Adjustable wrench;
- Gas key;
- Roulette;
- Drill;
- Pencil;
- Soldering iron;
- Level;
- Lever pipe wrench.
In addition, it would not hurt to have a Mayevsky tap, without which no plumbing work can be done. It is imperative to have plugs that are suitable in size for the junction of batteries and radiators, as well as for installing additional taps. In addition to the plugs, it is recommended to immediately stock up on gaskets.
If, in addition to dismantling, you plan to replace batteries and pipes, then you need to stock up on new sections of pipes; it won’t hurt to buy Rifar bimetallic heating batteries, or some other analogues. In this case, you will need American cranes or simpler options. A polypropylene tap is very useful; with its help it will be easy to ensure that the heating is working when the radiator is removed. The PPR limit switch will be necessary for carrying out work in the neighbors’ area. If communication with them is unsuccessful, you will also need a clerk.
Among other things, the cost of cast iron batteries is much lower than their analogues, while the heat dissipation can be envied by these same analogues. Cast iron batteries also have low hydraulic pressure. Such batteries are very reliable and do not require any specific skills to operate.
The only drawback of these units is their extremely unpresentable appearance. However, manufacturers today know a lot about the style of radiators and try to give their cast-iron counterparts the most attractive appearance, especially since modern technologies make it possible to do this.
Replacing a cast iron battery cannot be done without a lever pipe wrench, which is used to remove locknuts and flanges. If this work is not possible, you have to use a pipe cutter. In this case, cutting must be done in front of the same nut. The following dismantling steps include:
- Disconnecting the heater from the system;
- Removing the heater from the fasteners;
- Heater disassembly and cleaning.
Very often, removal is carried out not only for replacement, but also for cleaning the radiator. Thus, cast iron radiators are very difficult to disassemble, but it is simply necessary to clean them of rust so that they work as if they were newly purchased. Before you start disassembling the battery, you need to prepare the tools:
- Blowtorch;
- Tow;
- Pipe wrench;
- Brush;
- Gaskets;
- Chisel;
- Bulgarian;
- Nipples;
- Hammer;
- Battery key.
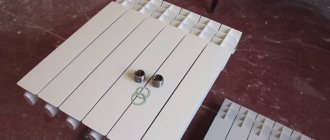
You need to start disassembling the battery by heating the plugs with a blowtorch, after which they can be easily removed. After this, the nipple is cut between the sections using a grinder, so it becomes possible to disconnect the sections. Next, these nipples are removed with a hammer, and the battery is cleaned.
The reverse process is much more difficult - it’s no longer the same as unscrewing the heating battery with a wrench. First, you need to assemble the sections and group them, then the sections are connected using a set of gaskets, silicone and nipples, the latter being selected relative to the direction of the thread - this must be taken into account. Don’t forget about flushing the newly assembled radiator.
When the assembly process is completed, it is necessary to secure the removed radiator. This procedure involves either fastening to previously installed brackets or to new ones, especially when they were previously poorly installed. In this case, the first holes must be covered and puttied. New holes are drilled according to the measurements taken. Again, the holes are filled with nipples and brackets.
The best sealing can be achieved by securing all joints with tow. Moreover, cast iron batteries are connected to the pipes by means of bends. Be sure to ensure that the plugs are turned out. This is the algorithm for dismantling a cast iron battery. For convenience, it is recommended to purchase 300 mm heating radiators.
Features and installation procedure of the electric pump
To find out how to properly install a circulation pump, it is recommended to use the heating project. It is usually developed during the design stage of the house. If the heating circuit of a building is being modernized, then in this situation the best place to install the device is the bypass.
The presence of a jumper with an electric pump, filter and shut-off valves allows the heating network to function if the building loses power or an electrical appliance breaks down. Thanks to the bypass, it will be possible to switch the system to circulate the medium naturally. This will prevent you from being left completely without heat in the event of an emergency.
The bypass jumper can have almost any configuration. Often there is not enough space for installation. Therefore, non-standard solutions are being implemented. However, more often the installation is still carried out according to standard schemes.
One of the options for a bypass jumper for an electric heating pump Source e.allegroimg.com
If there is free space, a ready-made bypass assembly is usually installed. This design is manufactured in production shops. It is equipped with taps or valves are built into it. The finished bypass unit can be mounted by welding or connected via thread. Any such structure has a free area intended for installing an electric pump using flanges or couplings.
Thermal circuits in houses are often created from polypropylene pipes. This option simplifies the process of installing a circulation device for pumping coolant. The master usually spends about 1 hour on the work. More time is required if installation is carried out on metal pipes. It is necessary to use not only welding, but also packing of threaded connections.
During installation of the circulation pump, the technician carries out the following actions:
- prepares components - filter, shut-off valves, threaded pipes, drains;
- connects all threaded elements of the assembly using a special sealing tow and paste;
- assembles the loop together with the pump without carefully tightening the union nuts;
An assembled loop with a pump and a unit that is mounted underneath it Source 1-teplodom.ru
- outlines and cuts out an area on the return line for installing the tap;
- carries out welding work - first tacks the metal elements of the assembly, then removes the pump to prevent it from being damaged by welding splashes and completes the operations started;
- assembles the unit under the pump and carries out its installation;
- the circulation device is installed in place;
- carries out the final tightening of the American electrical appliance.
Important! On the electric pump, the direction of the arrow must coincide with the actual movement of the working medium in the heating pipeline.
At the end of the work, the master connects the wires. They are connected to the terminals located in the mounting box of the circulation device.
Results
Dismantling heating radiators is not such a difficult process if you know the theory of how to do it correctly. In any case, scheduled work must be performed outside the heating season. Touching the heating system in the middle of winter is a necessary necessity.
To ensure that the performance of the heating system does not suffer, all necessary preventive measures must be taken in a timely manner. Therefore, it is better to take care of new radiators or clean old ones before the heating season begins. This applies to any work related to heating, both in private households and in apartments.
It goes without saying that replacing batteries in an apartment or house cannot be done without dismantling the old heaters. This difficult work must be done, otherwise the installation of new radiators will not be possible. There is a lot of information on how to remove a heating radiator, however, first of all, it is worth thinking about the people around you, especially if we are talking about an apartment building. You cannot replace radiators out of the blue. To do this, it is necessary to obtain destruction, as well as coordinate the procedure with utility services.
In addition, replacing heating batteries, or rather its preparatory stage, cannot be carried out independently, since the shutdown of central heating must be carried out exclusively by utility service specialists. However, not only the Gorvodokanal should be aware of the work being carried out; other housing offices should also be notified. Silence can lead to far from happy consequences. Independently turning off central heating, information about which will not be available in housing offices, will lead to a fine, the payment of which will fall on the shoulders of the violator.
Successful negotiations with neighbors will allow us to achieve the best option for carrying out the work, since their consent will allow for a complete replacement of pipes from the junction of the neighbors below to the junction of the neighbors above. This outcome of the negotiations will save time and also allow the work to be completed as quickly as possible. However, if the negotiations have a negative outcome, there will be nothing left to do but cut the pipes directly at the risers. In a word, dismantling batteries is an excellent opportunity to replace old pipes with polypropylene analogues. Among their advantages are ease of installation and dismantling, as well as low weight but high strength.
After all the preliminary work has been carried out and the services have shut off the heating, the old battery can be dismantled. However, this applies to an apartment building. In a private house, things are different and much simpler. In this case, it is necessary to carry out the shutdown without notifying anyone about it, and you can begin to remove the batteries and then replace them with Global heating batteries, or some other brand.
Calculation of power, number of sections
Before choosing a heating radiator for an apartment, you need to calculate how many sections should be installed in each specific room and determine the power and pressure rating of this device. This is done as follows:
Selecting radiator power
In this case, the following points must be taken into account:
- Type of building (brick or panels).
- The area of the heated room.
- Number of windows.
- Presence of external walls.
- Type of glazing in the apartment (double glazing or wooden windows).
According to the standard, in a room with a ceiling height of 3 m, having one window with a wooden frame and one door, a radiator with a power of 90-125 W per 1 m2 is usually installed.
Useful information: To select a battery of optimal power for a room, for ease of calculation, you need to multiply its area by 100 W.
If there is one window and two external walls, this figure must be increased by 20%.
If there are two windows and two external walls - by 30%.
When the window is located on the north or northeast side: + 10%.
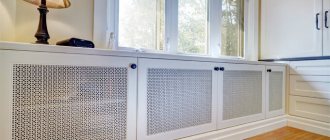
When placing the radiator in a niche: + 5%.
If there is a continuous screen on the battery: + 15%.
Deciding on the number of sections
Average power of a radiator section of various types:
There is another option for calculating how to choose the number of sections of a heating battery so that it is comfortable in a heated room, which is considered more accurate. This calculation is also made taking into account their heat transfer. In this case, the unit of space is not the area of the room, but its “cubic capacity”, that is, the volume of air mass that is to be heated. Each room is calculated separately: first, the power of the heating device is selected, and then the number of its sections is calculated.
Considering that to heat 1 m 3 of air space in a living room, 39-41 W of energy is needed, in order to heat a room of 10 m 2 with a ceiling height of 3.0 m, 1230 W are needed.
- We calculate the cubic capacity: 3 x 10 = 30 m3.
- We determine energy consumption: 41 x 30 = 1230 W.
Let's agree that each section of a modern heating battery produces approximately 200 W of energy. That is, to calculate the optimal number of sections you need 1230:200 = 6.15 sections. Round up. It turns out that in a room with a cubic capacity of 30 m 3 you need to install a radiator with 7 sections.
Useful information: When installing a battery in a corner-type room, a heat loss coefficient (1.1-1.3) is added to the formula for calculating the number of sections, the value of which must correspond to the climatic zone. The result will be: 1230·1.3:200=7.995. That is, for such a room a radiator of 8 sections is suitable.
Understanding working pressure
When purchasing heating radiators, you need to take into account their operating pressure, which should be higher than the pressure of the heating system at home
This is especially important when conducting hydraulic tests, when the load on the system is especially intense. For different types of batteries it has its own meaning:
- For cast iron - 6-12 atm.
- For aluminum ones - 16-20 atm.
- For bimetallic ones - 35 atm.
- For steel ones - 6-10 atm.
We have a separate article about the need for an expansion tank in the heating systems of private houses, as well as about its installation.