Dutch heating method
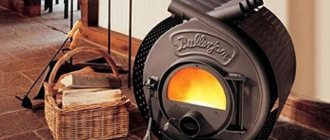
The brick stove is Dutch. Often the stove is used to heat a private house in the suburbs or in rural areas where other heating methods cannot be used. Heating a house in this way is in most cases considered the most suitable option for heating a country house, both when people are continuously in the room, and during periods of rare visits. This heating method uses hot air as a heat carrier. Almost all of these stoves heat the house with their own walls; there are projects where air flows along the walls from the inside, during the process of moving it it becomes hot and goes outside. And if the air is heated only from the surface of the fireplace, then the area of the heat generator should be enough to warm the room.
Principle of operation
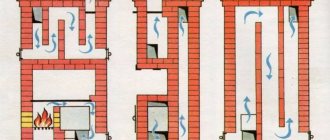
The special feature of the Dutch oven is its six-channel chimney, inside which heated gas circulates. When smoke comes out of the firebox, it goes up, warming up the walls. It goes through all the channels in stages and goes out into the street through the chimney pipe. Heat is distributed evenly over the entire surface of the furnace walls.
The main design elements are as follows:
- combustion chamber;
- chimney pipe;
- six chimney channels.
Regardless of the dimensions of the furnace, the fuel chamber is always large and rectangular in shape. The appearance of the stove can be anything: semicircular, triangular, square.
Since the stove always has a large combustion chamber, it can be connected to a water heating circuit.
The chimney is connected on one side to the chimney; a steel pipe acts as a connecting link. The heating level of the oven is controlled using a conventional damper.
Dutch oven projects
Dutch oven 002
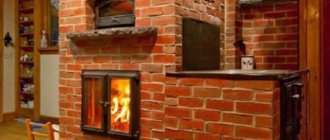
This stove design is characterized by high efficiency. The main function of a Dutch oven is heating. This heating stove is made from solid ceramic bricks. Its design consists of: Firebox, chimney system, adjustment of the speed of smoke emitted. Being small in size, this stove simply fits into the design of any room.
OP- Dutch 003
The classic design of a Dutch oven is a rectangular structure, laid out in one brick, which has extended smoke channels above the firebox. The main purpose of the Dutch oven is exclusively the heating function. This stove design is characterized by high efficiency. The main function of a Dutch oven is heating
Dutch oven 004
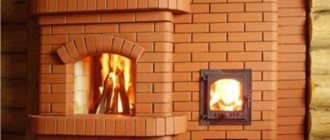
The main purpose of the Dutch oven is exclusively the heating function. This stove design is characterized by high efficiency. The main function of a Dutch oven is heating. This heating stove is made from solid ceramic bricks. Its design consists of: a firebox, a chimney system, and adjustment of the speed of smoke emitted. Being small in size, this stove simply fits into the design of any room.
Dutch oven 005
Designed for a room with an area of 20 to 40 square meters. The classic design of a Dutch oven is a rectangular structure, laid out in one brick, which has extended smoke channels above the firebox. The main purpose of the Dutch oven is exclusively the heating function.
Dutch for home 006
Designed for a room with an area of 30 to 60 square meters. The classic design of a Dutch oven is a rectangular structure, laid out in one brick, which has extended smoke channels above the firebox. The main purpose of the Dutch oven is exclusively the heating function. This stove design is characterized by high efficiency. The main function of a Dutch oven is heating. This heating stove is made from solid ceramic bricks. Being small in size, this stove simply fits into the design of any room.
Heating Dutchwoman 007
The main purpose of the stove is exclusively the heating function. This stove design is characterized by high efficiency. The main function of the stove is heating. This heating stove is made from solid ceramic bricks. Its design consists of: a firebox, a chimney system, and adjustment of the speed of smoke produced. Being small in size, this stove simply fits into the design of any room.
Dutch oven 008
Designed for premises with an area of 20 to 40 square meters. The classic design of such a stove is a rectangular structure, laid out in one brick, which has extended smoke channels above the firebox. The main purpose of the device is exclusively the heating function. This design is characterized by high efficiency.
Dutch oven 009
The main purpose of this design is exclusively the heating function. Tests of the stove are characterized by high efficiency. This heating stove is made from solid ceramic bricks. Its design consists of: Fuel tank, ash pan, damper. Being small in size, this stove simply fits into the design of any room.
Dutch heating stove 010
Small design for a room with an area of 18 to 24 sq.m.
The appearance is a rectangular structure, laid out in one brick, which has extensive smoke channels above the firebox. It has a narrowing above the firebox. Dimensions 750x750 cm. Being small in size, this stove simply fits into the design of any room.
The indisputable positive aspect of the operation of the furnaces themselves is that in this situation the heat conductor is air, which has enormous penetrating ability and a very short heating period.
Of course, heaters have been used by mankind since time immemorial, and over time, certain changes have been gradually made to them. Absolutely all stove heating systems are divided into heat-intensive and non-heat-intensive. Heat-intensive are storage devices that are able to maintain a certain temperature for 3-12 hours. It also depends on what type of design the heat accumulator has. As a rule, in order to increase efficiency, water heating is connected to furnaces. This technique is becoming more common over time. In addition, it fits perfectly in design, perfectly decorating the room.
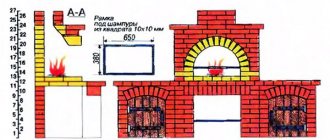
| Dutch (01) 4x3 bricks For heating residential premises up to 60 sq.m. Installation both interior and island. The location of the doors on any side of the structure. It is possible to install a steam heating boiler. Designed for year-round use. |
Detailed order diagram
Before starting laying, you need to immerse a batch of bricks in water. This measure will further prevent moisture from being drawn out of the solution and provide better adhesion. The first two rows, which are laid out to the level of the finished floor, are not included in the diagram.
Description of the arrangement of a Dutch oven with a stove:
- 1 row is laid in a continuous layer, at the level of the floor surface. You should fold it as carefully as possible so that the entire further structure comes out smooth.
- Rows 2 and 3 are also laid out in a continuous layer, and the masonry is checked horizontally.
- In the 4th row, a blower is laid, maintaining a gap of 0.5 cm, and an asbestos cord is placed in it. It is needed to ensure that the metal element does not split the bricks during thermal expansion. To strengthen the door between the bricks, rods are placed in the mortar. Laying is done from right to left. The suture dressing is performed in half a brick.
- In rows 5 and 6, part of the blower and ash pan should be covered. For this purpose, the brick is sawed lengthwise and a metal plate measuring 0.35 x 0.4 cm is passed under the masonry.
- In the 7th row, a firebox is formed from refractory bricks and a firebox door is installed. The grate is laid, the gap at the seam is left at 0.3-05 cm. The brick of the rear wall of the firebox is laid at an angle. The gap must be filled with sand.
- In the 8th row, the blower door is closed, forming an ash pit.
- From rows 9 to 14, the fuel chamber is lined with refractory bricks.
- In the 10th row, the combustion chamber is covered with bricks. The next step will be to lay the hob; to do this, prepare the bricks. 0.5 cm grooves are cut into them, which will allow the metal to expand and not destroy the oven. The edges of the hob are secured with a steel corner.
- Rows 11-13 - lay out the area above the stove.
- The 14th row is laid out like 13th, but grooves are cut in the bricks into which a steel corner is inserted. It will be necessary to place bricks of the next row on it.
- The 16th and 17th rows are laid out like the 15th, but a door is installed in it for cleaning the chimney. They also provide gaps and lay asbestos.
- Rows 18-22 - laying the smoke return channel and covering it.
- In row 23, a damper is installed in the chimney. The bricks are adjusted to size, and asbestos is laid between the metal and the brick.
- In rows 24 and 25, the lowering and lifting channels are combined.
- In row 26, the formation of the chimney begins. At this stage, it is important that the surface inside the chimney is as smooth as possible. The solution is immediately cleaned off so that it does not worsen traction in the future.
- In rows 27 and 28, the chimney is being laid; the brick is moved by 40 mm to narrow the structure.
- Rows 29-30 continue laying the chimney and install a slide damper to adjust the draft. A gap of 0.5 cm leaves room for metal expansion. Laying asbestos.
- In row 31, the size of the chimney is reduced to the original size.
- From the 32nd row the chimney is being laid. Not reaching the 3rd row to the roof, the pipes are “fluffed” to protect the wooden structure from fire. The thickness of the pipe is one and a half bricks.
Cons and pros
The main disadvantages of heating using a Dutch oven:
- require a lot of space indoors;
- the heat transfer rate of air is less than that of water, and therefore more of it is needed;
— there are problems with the distribution of heated air throughout the rooms;
- this is a very expensive pleasure.
It is important to note that heating furnaces are much more difficult to maintain than steam heating, for which you simply need to perform the correct debugging, after which you simply need to monitor the correct functioning of the system. When using the stove, it is necessary to constantly take care of the fuel and maintain the structure, and the room in which it is located must be periodically cleaned, since it quickly becomes dirty. It is important to note that the stove takes up quite a lot of space, so you need to choose a suitable place for it, and you also need to constantly care for it and check that it is functioning correctly, since without this work, a fire or carbon monoxide poisoning may occur. However, despite all the above-mentioned disadvantages of stoves, they have high efficiency, quickly heat rooms, are cheap to install and operate, and are also multifunctional, since with their help you can cook food that has a pleasant and unusual taste and rich aroma.
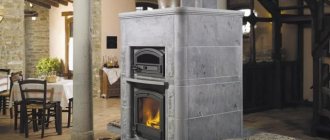
| Dutch (02) 0.75m by 1m Heating. 3 kW. |
Foundation arrangement
Despite the relatively light weight for a brick oven, the Dutch oven still needs a high-quality and reliable foundation. An excellent option is a monolithic slab. An important nuance: the foundation must be reinforced both in area and in volume, i.e. deep down. The dimensions of such a foundation must be at least 1.2 x 1.2 m. The Dutch foundation cannot be connected to the base of the main building.
How to make a foundation
Foundation for a brick oven
The procedure for arranging the foundation is as follows.
First step. We outline the boundaries of the foundation being developed.
Second step. We dig a pit about 60 cm deep.
Pit for casting the foundation
Third step. We fill the bottom of the pit with a 15-centimeter layer of crushed stone. Carefully level and compact the backfill.
Crushed stone
Fourth step. We lay a mesh of reinforcing bars. The recommended cell size of such a mesh is 100-120 mm.
Foundation pit with formwork and reinforcement
Fifth step. We install vertical reinforcement at the intersection of the rods. We tie all the joints of the elements of the support system with wire.
Sixth step. We install the formwork for pouring the foundation. We cover each wall of the formwork with roofing felt or treat it with resin for waterproofing.
Seventh step. We pour concrete.
Poured concrete
Eighth step. We “iron” the surface of the base. To do this, sprinkle the fill with a small amount of dry cement.
Let the foundation gain strength. It is better to leave it for a month, but many craftsmen begin laying it within a week. At this point the decision is yours.
Oven space
Before directly installing the structure, it is important to decide on the location of the furnace, since this issue is considered extremely important and relevant. Many people think that the best solution is to place the structure in the middle of the room, and in this case the smoke ducts should be laid along the wall, thus reducing the heads and improving draft. However, with this arrangement, constant air circulation is formed, in which it cools near the outer walls and returns to the stove, forming a stove draft. Cold air above the floor, which moves from the walls to the stove, creates discomfort for people who live or are simply in the room, so good health cannot be achieved in this way.
Therefore, the best solution is to place the Dutch oven near the outer walls, however, even in this case there are certain disadvantages. A problem arises with smoke ducts because condensation appears on the internal walls and draft deteriorates, so the room will become dirty very quickly.
A compromise and the most optimal option is to locate the stove in the middle of the house, and the surfaces that give off heat should go into the living rooms, and the parts that are exposed to a lot of pollution, such as the firebox and stove, should be in the kitchen.
This stove is well suited for a summer residence
Video - Dutch oven
Tools and materials used in the construction of a Dutch oven with stove
A prerequisite for a good stove is high-quality masonry mortar, which is recommended to be mixed from red clay and brick. The main composition for Dutch masonry is sand, red clay and water.
In this case, the ratio of proportions for each type of clay will be different. The less sand is present in natural clay, the correspondingly less is needed for the solution.
Clay
For oily clay we take the proportion: 1 part clay and 2.5 sand.
For medium clay - 1 part to 1.5 sand.
For skinny ones you will need 1 to 1.
Materials for laying a Dutch oven with a stove:
- Fireclay refractory brick for combustion chamber.
- Red ceramic brick.
- Foundation mortar (cement, sand, gravel and water).
- Mortar for laying bricks.
- Roofing felt for foundation waterproofing.
- Boards for the construction of formwork.
- Grate.
- Blower.
- Metal door.
- Damper.
- Metal rods and wire for reinforcement.
- Metal wire 0.8 mm for dressing.
- Asbestos cord.
- Hob.
Prepare the following tools:
- Trowel for laying bricks.
- Building level, protractor and plumb line.
- Construction stapler.
- Tape measure and marker.
- Rule.
- Grinder for turning bricks.
- Shovel and bayonet shovel.
- Bucket for solution.
- Construction mixer or drill with attachment.
- Rubber hammer for laying bricks.
- Construction hammer for erecting formwork.
Note
In accordance with SNiP 1991, stoves in log buildings are permissible only when the number of storeys of the building does not exceed two floors. Taking this into account, the temperature of the walls of the Dutch oven should be no more than 60 degrees.
These units are designed to heat, as a rule, one or two rooms. Their sizes vary depending on the heated area. For example, for a room with an area of 20 m2, a stove with dimensions of 750 x 750 x 2000 mm is quite sufficient, provided that the house is well insulated. Such a stove, stacked in the corner of the room, takes up very little space, and lined with ceramic tiles, and even with a glass fire door, can become a real interior decoration. For two rooms, the heated surface of the oven is doubled. Such a stove is placed on the border of adjacent rooms, and in this case it makes sense to think about making it a heating and cooking stove. These are the so-called “Swedish women”. Being multifunctional, they are ideal for summer residents who like to make preparations, dry mushrooms and berries, etc. Some stoves have two operating modes: summer and winter. Summer mode allows you to use the hob without heating the entire oven. This often comes in handy during long power outages. And now we move on to the fun part. These are combined stove-fireplaces, universal heating devices that combine the practicality of stoves and the aesthetics of fireplaces. The inclusion of a fireplace in the stove design is almost always associated with the need to develop a project. The increased cross-section of the chimney pipe of the stove-fireplace allows you to connect additional heating devices to it on the top floor of the house (metal stoves and factory-made fireplaces).
Results
It is quite possible to build a compact and effective Dutch oven with your own hands. You need to strictly follow the order, take your time, and take the necessary technical breaks. Comfort and warmth in a house with such a stove are guaranteed.
Dutch ovens are almost the only heating devices that can be used by home craftsmen who do not have the skill to build ovens.
Large material costs for the construction of a Dutch house are not required. It can be built from a small number of bricks, and this will not affect its heating function.
When constructing a furnace, you can use hollow bricks or its halves. Fireclay brick is needed only for the firebox.
The main thing in this work is to make a clay solution of good quality and not make mistakes in the order. Such a stove will immediately begin to release thermal energy and will not create problems in the future.
In order not to doubt the quality of the solution, you can use ready-made oven mixtures. The cost of such building material is small and will hardly increase the cost of constructing a furnace.
DIY Dutch oven construction
The construction of the stove is carried out in the following sequence:
- preparatory work (arrangement of the foundation and preparation of materials for masonry);
- furnace masonry;
- chimney masonry;
- cladding of the structure.
Now let's take a closer look at each item separately.
Preparation
At the preparatory stage, the foundation is constructed and the walls are protected from heat. Since the oven is heavy, formwork will be needed.
When cooking, it is important to maintain the proportion of ingredients
Execution of the foundation
Work at this stage is carried out according to the following step-by-step instructions:
- mark the floor taking into account the location of window and door openings;
- using a grinder, cut and dismantle the boards at the marked place;
- build a foundation and fill the mortar;
- lay roofing felt.
After this, a short break is taken until the solution completely hardens.
Substrate preparation and waterproofing
The height of the foundation is such that it is possible to lay two rows of bricks. He lies down side by side. At the same time, do not forget about bandaging. Waterproofing is laid on top, which consists of several layers. It is securely attached to the base.
Since most of the heat goes down, you need to approach waterproofing very carefully. Experts additionally recommend laying a layer of thermal insulation. Basalt cardboard can be used together with roofing felt.
Before starting laying, you need to pull plumb lines from a strong thread. Thanks to such plumbs, it is possible to prevent the rows from moving during laying. Otherwise, you need to periodically check the evenness of the structure. Any deviations will cause the stove to work ineffectively.
Several continuous rows of bricks are laid in the base
View tab
After the smoke circulation is completed, several reinforcing rows are laid in which the view is laid. You can continue with a brick chimney, with an elbow and additional support on the ceiling. It is less preferable to continue with a steel sandwich, which will inevitably produce condensation and has different thermodynamic characteristics.
In any case, continuing the chimney at the intersection with the ceiling, you should increase its cross-section and the thickness of the heat-insulating layer. It is imperative to use fire-resistant insulation, and treat the wooden ceiling elements with a fire retardant. The inner surface of the channels should be smooth. During the process, it is mopped with a damp cloth in the same way as the chimney. A light test fire can be carried out no earlier than 10 days later to check the draft.
A little history
There are several versions of the appearance of the Dutch woman in Russia. But they all agree on one thing - the laying of such stoves began in the 18th century, when Peter I issued a decree on the construction of stoves like the Dutch ones. The decree did not prescribe specific instructions for construction, so ordinary Russian stoves were often only lined with tiles or tiles imported from Holland. This is where its other name arose - gallanca. Some scientists are of the opinion that a stove was called a gallanka if it had a chimney structure typical of a Dutch stove.
Interesting: The tall chimney is a Dutch heritage. In order to save space, buildings in Holland were built tall. In order to avoid paying high taxes on chimneys and to heat more rooms, the Dutch began to build stoves with a chimney of several floors.
In encyclopedias, the concept of a “Dutch stove” is defined as a rectangular-shaped heating device that has a channel system of vertical smoke circulation and a side exit to a chimney lined with tiles.
Required Tools
For easy and quick installation, you need to prepare in advance a certain list of tools that will be useful to you in the construction of the Dutch oven:
- Pickaxe or guillotine;
- Measuring tools: level, tape measure, square;
- A basin for diluting the solution;
- Bucket and shovel for convenience;
- Mason's trowel.
If you make a metal casing yourself, then you will also need tools to assemble it: metal scissors, rivets and a riveting device, or a welding machine.
Small dacha
A small Dutch country stove is suitable for heating a room of 16-20 square meters. m. firewood or coal. The order is shown in Fig. By repeating the belt from rows 17,19, 21 and 18, 20, 22, the stove can be increased in height according to the height of the room. The compactness of the stove is achieved by sort of folding the smoke circulation into a ring. The dimensions of a small country stove-column in plan are only 520x520 mm.
Ordering a small country Dutch stove
More about tiles
Glazed painted ceramics with baked-in designs (majolica) have been known since prehistoric times. Already in Sumer and pre-dynastic Egypt, highly artistic works of art were made from it.
Ancient Greek, Arabic and Turkish tiles
The ancient Greeks were the first to produce standard size majolica tiles (pictured on the left). In Byzantium, this art received further development, and from the Greeks it was adopted by the Arabs, who called the tiles rumi al-Zulaish (rumi means Greek) in the east of the Arab world, and in the west, in the Maghreb - az-zillij.
Tiled decoration in the harem
The Arabs also had contact with the Chinese, and from them they learned about the excellent qualities of white clay - kaolin. By the 8th century. the Arabic tile acquired its final form (in the middle in the figure), and by the 14th-15th centuries. Turkish tiles became widespread, on the right in Fig. Their design was softer, but still, the Koran strictly prohibited images of people and animals as idols. In both cases, cool tones, mainly blue, dominated. The sun-baked sons of the desert valued coolness above all else.
It seems surprising that Europeans learned almost nothing about tiles during the Crusades; they are not mentioned in the Book of Marco Polo. In fact, the Arabs used tiles, as a particularly refined and elegant decoration, primarily to decorate the harems of the highest nobility (see figure), where not only the damned Ferengi, but even their own access was strictly prohibited under pain of painful, shameful execution. Individual tiles, of course, fell into the hands of the “Franks,” but it was useless to talk about technology with the rude, ignorant crusaders.
Portuguese azulejo tile panel
Europeans became thoroughly acquainted with tiles on the Iberian Peninsula during the reconquista of Moorish Spain. The local Muslim rulers of the Baghdad caliphs considered their overlords no more than Benjamin Franklin and George Washington did King George and did not keep az-zillij behind seven castles; on the contrary, they traded tiles briskly, and the az-zillij masters willingly hired conscientious Christian apprentices.
The Portuguese were the first to adopt and improve the tile technique and began to create their azulejos - large artistic panels from tile fragments, see fig. higher. Courtiers of Spanish monarchs of Dutch origin in the 15th-16th centuries. became more interested in piece tiles and brought them home. The neat Dutch az-zillij, which they called kahel in the German (more precisely, Upper Dutch) manner, really liked it, and the Netherlands very soon established its own production, see next. rice. The technique remained almost the same, only the plots were taken on their own.
Dutch tiles
Kakhel, which was quickly renamed tiles here, was brought to Russia, as already mentioned, by Peter I, but mass production of world-class products was established only under Catherine II in Gzhel, using Arab-Dutch technology, on the left on the trail. rice. In the 19th century They tried to make tiles of this type in St. Petersburg (in the middle in the figure), but by that time a national school of tiles of world cultural significance had already developed (on the right in the figure), and in terms of artistic level, St. Petersburg tiles were inferior to Gzhel ones, and the enterprise was not successful. Nowadays, the old Pereburg tile is a desirable exhibit for the connoisseur collector.
Russian tiles
Something for dessert
As a child, the author of this article saw a stone rural house in the Russian wilderness, which was famous throughout the entire district not only for the level of improvement unheard of in the Soviet hinterland of those years, but also for the fact that the whole thing was heated with just one large one (“Five-turn!” - the owner proudly reported, with its who created all this splendor with his own hands) with a classic Dutch oven. There was also a stove for cooking in the kitchen, and a stove-stove in the bathhouse.
House plan with heating with a large Dutch oven
The house was designed in Russian, from the stove, albeit Dutch, so the layout turned out to be unusual, see fig. But the kids liked it. The village children never suffered from a lack of appetite, and the place where you can always grab something is close by.
And it was convenient for the housewife from the kitchen, on the door of which there was an inscription: “Men - away except to the bathhouse!”, to look after her tomboys and serve dishes both in the upper room and to the same men on the veranda. In general, both in the stove and in any other business, the main thing is your head and hands.
Brickwork
To prevent the heating structure from absorbing large amounts of moisture, each brick must be moistened before laying. To do this, you need to lower it into water for a couple of seconds. If you keep it in liquid for a long time, there will be poor adhesion. and the seams will be too thick. In addition, stains will appear on the stove and it will have a dirty color.
da91dcda8337a49af6f734ab62d7d122.jpe 44e036f049319ecb34e1d5ae284724f0.jpg:large
- It is assumed that the foundation has already been prepared. To prevent moisture from entering, you need to fold the roofing felt in two layers and lay it on the foundation.
- A layer of sand is poured on top, the thickness of which should be no more than 50 millimeters. To do this, it is recommended to use a building level.
- After this, you can lay out the first row of bricks without using the prepared mixture. The total number of rows should be eleven. The order will allow you to make the layout correctly. The solution must be applied in a small layer to the first row.
- For laying the next two rows, prepared mortar and red brick are used.
- Then the brick must be laid edgewise. The seam should not exceed 5 millimeters. In the remaining rows, the thickness should not be more than 8 millimeters; ordering will help to check. Excess mixture can be removed with a regular trowel.
- To make a Dutch oven easy, the back wall must be collapsible. Therefore there is no need to use a solution. Another way is to install a small door, but in this case, heat loss will increase.
- The door is secured with steel wire. It also needs to be finished with fire-resistant material. Asbestos may be suitable for this purpose.
- Until the door is completely lined, you need to continue laying bricks edgewise. From about the eighth row, the brick is laid flat again; the order and building level will help you avoid mistakes in size.
- Subsequent rows are laid out flat, only the brick is also laid edgewise at the back.
- The eighth row completely covers the firebox. This level needs to be laid out askew, order will help with this.
- The ninth row needs to be moved back a little, and asbestos for the hob should be laid on top.
- At the next level, the base for the chimney is prepared.
- On the last row you need to make a flap and exit.
- The Dutch oven is finished with tiles. it can also be whitewashed or painted.
- The gap between the floor surface and the structure is closed with skirting boards.
Before using the oven, it must be completely dry. This will take two weeks. In this case, you need to open the doors of the structure. At home, you need to open all the windows to speed up drying. You can use a stove for heating a room only if there are no damp places on it. If the brick structure was built in the winter season, then it can be dried by lighting a small fire.
A self-built stove will heat a country house or country cottage for a long time
It is important to note that a Dutch oven can be combined with any interior style and can become the highlight of the room’s design. If these instructions are not enough, then you can watch a video on building a structure for a private house
Malyutka stove How to cover a metal stove with bricks in a house Garden stove: selection and installation Swedish stove: features and manufacture