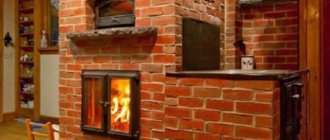
The Dutch oven was first built in the 15th century.
If we talk about its classic look, you need to imagine a rectangle decorated with tiles. This decorative finish first appeared on the Dutch. The home of the Dutch at that time was very small and cramped. Therefore, a miniature design was invented that perfectly heated the house. Its main function has always been heating. But years have passed, and this simple scheme has received a lot of improvements and changes corresponding to the 21st century.
It was not in vain that we started with a historical fact, because many do not know where the name came from and mistakenly call this stove Galanka. Of course, this spelling is easier to write, but things should be called by their proper names.
What does a Dutch oven look like and why is it so popular?
Appearance of a Dutch woman
This seemingly simple structure has many advantages:
- “Dutch” is capable of quickly heating up from the smallest portion of fuel. At the same time, its excess consumption during heating after a long period of inactivity is very small.
- The design of this furnace involves the use of a relatively small amount of material, so it is relatively light. For comparison: a large Dutch oven is built from 650 bricks, while a large Russian one is built from 2500. Moreover, the heated area for a “Dutch oven” is 60 m2, while for a Russian one it is only 45 m2. In addition, the “Dutch” design principle makes it possible to significantly reduce the original dimensions - down to 0.5x0.5 m in plan. This advantage allows you to safely place the “Dutch” on the interfloor ceiling.
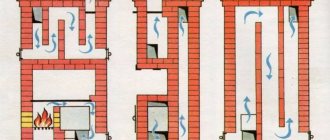
- The channel labyrinth in the body of the stove provides great resistance to reverse draft, so smoke almost never occurs when wind blows into the pipe.
- Although the Dutch oven was originally created as a purely heating oven, it can easily be equipped with a hob - the combustion mode will not be disturbed.
- The channel part of the furnace can be extended up to 2 floors (and some extend up to 4), while its efficiency will remain at the same level.
- The design features, combined with the small thickness of the walls, eliminate the development of significant temperature deformations in the masonry, so the Dutch is undemanding to the quality of materials. A good brick (fire-resistant) will only be needed to construct the firebox. The rest is sometimes even laid out from burnt or hollow bricks.
- In the duct part you can easily find an area with the optimal temperature for installing an oven or water heat exchanger.
- Irregular use does not cause any harm to the oven. At the same time, it can be heated without passing the accelerating phase - this will not cause the masonry to crack.
As you can see, the list of advantages of this stove is very impressive. But despite this, it cannot be called ideal. Here is the price at which these benefits were achieved:
- "Dutch" has a very low efficiency - within 40%. For comparison: a Russian stove absorbs more than 80% of the thermal energy contained in the fuel.
- If you hesitate even a little in closing the view after heating, the stove will immediately be chilled by cold air. It is drawn through the chimney by a channel labyrinth, which acts like a siphon.
- “Dutch” is not designed for the use of waste fuel, which burns completely in a short time. It should not be heated, for example, with reeds, straw, brushwood and similar materials: the lion's share of the heat produced will evaporate through the chimney. With maximum effect, the stove operates on long-lasting fuel (wood, coal, peat), and in smoldering mode.
- When using inexpensive fuels with high ash content, the chimney quickly becomes overgrown with soot.
If the fire is too intense, a Dutch oven can release carbon monoxide into the room.
See also our material with step-by-step instructions and ordering of a brick stove-fireplace:.
Positive sides
The key advantages of gallanka are indicated by the following characteristics:
- Multifunctionality. In addition to providing heating and an aesthetically attractive decorative side, the device can fully serve as a stove when arranging a hob.
In addition, you can familiarize yourself with the material on how to make a sauna stove with your own hands.
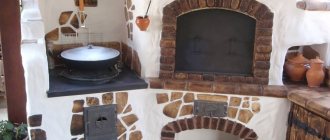
Photo 2 Dutch, equipped with a hob.
- Various sizes. The stove is available in a wide variety of sizes. Even small samples of 0.25 m2 cope with the heating task quite adequately. Due to the increased overhead part, its efficiency increases significantly. The furnace can also be built on several floors. In most cases, one- and two-story models are used, less often three and four.
- Economical consumption of building materials. It takes half as much brick to build as compared to building a standard Russian stove. For example, if 800 bricks are used to build a gallanka, then 1600 are used for a small Russian one. In addition, for such a compact and stable structure, a hollow type of brick can be used. Only the firebox is lined with high-quality heat-resistant material.
- An increased heat transfer coefficient with low consumption of fuel materials, slow cooling and rapid ignition after complete cooling are also design features.
- A stove to which a water circuit is connected can heat both the house and provide hot water supply.
Construction device
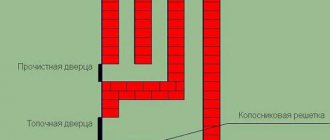
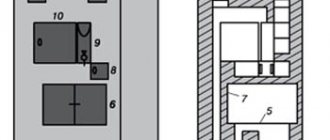
The design of the Dutch oven can rightfully be called simple-minded. The main feature is that the firebox communicates with the chimney not directly, but through a labyrinth of channels (that’s why stoves of this type are called duct stoves), passing through which the flue gases manage to give off more heat to the brickwork. A classic Dutch oven is shown in cross-section in the figure.
Dutch oven design diagram
No complex calculations are required when designing a “Dutch” and it is almost impossible to significantly disturb anything in it. Therefore, there is no specific order that must be strictly followed. It is enough to maintain the ratio of the main dimensions within certain limits.
The rapid heating of the furnace is due to a combination of two factors:
- the area of the internal surface of the flue has been increased (due to the installation of a channel labyrinth);
- the material consumption of the furnace has been reduced.
Note that the volume of materials used is reduced within reasonable limits - the heat capacity of the furnace is quite sufficient. However, it will not be enough for a whole day - the stove will have to be heated at least twice.
The smoke outlet channel is not directed upward, like many other stoves, but to the side, that is, the presence of a mounted pipe is not provided. This feature makes it possible to connect several stoves to one attached (main) chimney. For ancient Holland this was fundamentally important, since the tax there was levied precisely on the number of chimneys.
The arch of the firebox is not arched, but flat, which makes the stove even easier to manufacture.
This is interesting. In Russia under Peter the Great, there were frequent fires due to the burning of Russian stoves in black. Intending to prevent such incidents, the king, by a special decree, demanded that stoves be built in the Dutch manner. But stove makers often carried out the royal decree only partially, building stoves only externally similar to Dutch ones. The emphasis was on decorating with tiles, which was typical of the “Dutch”. As a result, confusion arose that continues to this day: stoves with a design that is not at all typical for them are often called “Dutch”, for example, bell-type stoves and even some varieties of Russian stoves.
Some inventors modified the Dutch oven for one purpose or another. For example, I. G. Utermark gave it a round shape.
Utermarkovka
The diagram shows a simplified smoke circulation consisting of 3 channels, but in some types of utermarks their number could reach 12. The oven is equipped with a steel casing, which makes it possible to reduce the wall thickness to ¼ brick. This has sharply reduced the cost of unmarking, which is why it has firmly established itself in the “budget” segment. But at the same time, the heat capacity has also decreased significantly - such a stove has to be fired quite often. In addition, due to the design features, it has low efficiency, smokes heavily and quickly becomes overgrown with soot.
The Dutchwoman of the Soviet inventor V. E. Grum-Grzhimailo has higher technical characteristics. Unlike the utermarking, it is equipped with a grate, and there is a cap in the firebox part. The bell-type version turned out to be very economical - in terms of efficiency it was almost equal to the Russian stove (over 80%).
Grum-Grzhimailo stove
In accordance with the needs of owners of houses in garden plots, a large Dutch oven was transformed into a small country oven, and there are several varieties of such ovens.
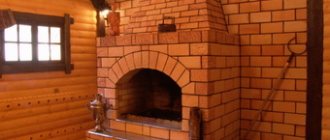
An example of a country Dutch oven with a hob
We will learn how to build one of them - equipped with a hob - ourselves.
Historical facts
Historians have mixed opinions about the appearance of the Dutch stove device in Rus'. However, they are all sure that their installation began in the 18th century, when Peter I issued a decree on the use of Dutch technology in the construction of the furnace. Since the document did not contain specific instructions on how to build this heating system, the craftsmen simply began to cover it with tiled material brought from Holland. Then they began to call her – Gallanka. Some scientists claim that this was the name of the stove, with a chimney structure similar to the Dutch ones.
Photo 1 Dutch oven.
Interesting to know! The high smoke exhaust system is a legacy of the Dutch. To solve the heating problem and at the same time not use up a lot of free space in Holland, the stove was built almost to the ceiling. During the Middle Ages, the Dutch woman began to be associated with original tiles depicting paintings by famous artists. Today, this decorative effect is not significant and is practically not used.
If you look at the encyclopedia, the definition of a Dutch oven is listed as a device intended for heating. Built in the shape of a rectangle, with a vertical type channel smoke circulation system and a side exit into the chimney. The sample is covered with painted tiles.
Calculation of parameters
The main parameters of the stove are the heat transfer power and the dimensions of the chimney.
To calculate power, you need to know the specific calorific value of the fuel.
Table: wood calorific value indicators
| Wood | Value (kW*h/m3) | ||
| At 12% humidity | At 25% humidity | At 50% humidity | |
| Poplar | 1856 | 1448 | 636 |
| Fir | 1902 | 1484 | 652 |
| Spruce | 2088 | 1629 | 715 |
| Birch | 3016 | 2352 | 1033 |
| Oak | 3758 | 2932 | 1287 |
| Aspen | 2181 | 1701 | 747 |
During flaming combustion, a portion of fuel burns in about 1 hour, so the power of a stove operating in this mode will be:
W = Vt x Eu x 0.63 x 0.4 x 0.8, where:
- W is the heat transfer power of the furnace, kW;
- Vt—furnace volume, m3;
- 0.63 — combustion chamber load factor;
- 0.4 - furnace efficiency;
- 0.8 is a coefficient showing what part of the fuel is burned in full.
Let's assume that the furnace firebox has dimensions of 400x300x400 mm. Then, in the case of using birch logs of average humidity (25%) as fuel, we obtain the following power:
W = 0.4 x 0.3 x 0.4 x 2352 x 0.63 x 0.4 x 0.8 = 22.76 kW.
In accordance with the calculated power, the chimney cross-section is selected:
- with thermal power less than 3.5 kW: 140x140 mm;
- between 3.5 and 5.2 kW: 140x200 mm;
- between 5.2 and 7.2 kW: 140x270 mm;
- between 7.2 and 10.5 kW: 200x200 mm;
- between 10.5 and 14 kW: 200x270 mm;
- more than 14 kW: 270x270 mm.
If the chimney used has a circular cross-section (it can be made from sections of steel pipe or concrete blocks with round holes), then it must have the same area as the specified rectangular sections.
It should be noted that when operating the furnace in smoldering mode, its power ranges from 10 to 30% of that calculated for flame combustion. But the cross-section of the chimney should be selected according to maximum power.
After laying
Drying
Drying a brick heating device is one of the mandatory measures that is carried out before the active operation of the device begins. Dry the oven in two stages:
- in natural conditions. The period for this type of oven drying after completion of masonry work is approximately 6 - 8 days. At this time, all doors and valves must be open to ensure natural circulation of air flow, which, passing through the channels of the device, removes moist vapor through the chimney to the street. This ensures only drying of the surface of the masonry layers;
- forced drying. It is carried out using dry small firewood every day for a week during the warm season. In the autumn-winter season, the time for forced drying should be extended by 1 - 2 weeks.
The end of drying can be signaled by the absence of condensation products on the doors and valves of a closed device.
Finishing and cladding
The finishing of a Dutch oven can be done in different ways: covered with a layer of decorative plaster and whitewashed, faced with tiles, tiles or flat stones.
Expert opinion Pavel Kruglov Stove maker with 25 years of experience
In order to increase fire safety, heat-insulating material must be placed on the floor covering in front of the blower door and covered on top with sheet steel, the width of which must be at least 0.6 m.
First test firebox
When all parts of the stove and the chimney are completely dry, you need to test fire the stove.
Basic moments:
- It is better to carry out short-term ignition in the late evening, when the temperature outside is lower than inside the room. The fuel load during the first fire should be minimal. If the ignition was successful, you need to add some damp wood, which smokes more.
- If the chimney is of sufficient height and well insulated, then smoke will not penetrate into the room. If the opposite situation occurs, then you need to check the channels for inaccurate installation and damage.
- The last stage of the first combustion is the maximum heating of the unit for several hours. During this period, check whether cracks have appeared in the seams on the front surface of the device.
Required materials and tools
The oven is lined with two types of bricks.
Firebox walls - fireclay bricks
It is yellow in color and can withstand temperatures up to 1600 degrees.
Fireclay brick
Note! Externally, fireclay bricks look like acid-resistant bricks, which is sometimes used by unscrupulous sellers. When purchasing, ask to see a certificate.
The dimensions of fireclay bricks may vary depending on the brand. Thus, ShB-8 brand brick has the same dimensions as ordinary building bricks - 250x124x65 mm. Fireclay brick grade Sh-5 is slightly reduced: 230x114x40 (65) mm.
Signs of high-quality fireclay bricks are:
- fine-grained structure;
- absence of visible pores and inclusions;
- clear ringing sound when tapped with a hammer;
- when dropped, it breaks into large pieces (low-quality ones crumble into small crumbs).
When it comes to the appearance of the brick, darker color does not always mean higher quality. It all depends on the clay deposit: it also happens that lighter fireclay bricks have better characteristics.
It should be noted that since the thermal regime of a Dutch oven is not stressful, its combustion chamber can be lined with M150 ceramic oven bricks, capable of withstanding temperatures up to 800 degrees (not to be confused with ordinary building bricks).
The walls of the firebox can be laid out of clinker bricks, which have high strength and heat resistance. It is much more affordable in cost than fireclay.
Furnace body
The remaining parts of the stove, except the firebox, can be lined with ceramic stove bricks, or with medium-quality bricks with slight cracking.
Ceramic stove brick
Use of used material is allowed.
Materials for clay mortar
Sand
You can use river sand with grains 1 mm in size, preferably angular. But if you want to get a durable stove that can last more than 10 years, you should use sand without organic impurities. Previously, only very expensive mountain sand had this quality, but today, more affordable brick sand can be used instead. It is ground fireclay or ceramic brick.
The first option is used in mortars for fireclay masonry, the second - for ceramic masonry.
Clay
Mortars for laying fireclay bricks are best prepared using white kaolin or fireclay marl. Ceramic bricks can be laid on a mortar of any ground clay with fire-resistant properties; Cambrian clay (blue or gray) and gray kaolin are considered the most suitable.
Advice. Before buying, you need to smell the clay. If you can clearly hear any smell, even a pleasant one, it means that the material contains a large amount of organic impurities and you should not purchase it: such a solution will very soon begin to crumble.
Clay varieties with medium fat content are preferred.
Tools
Among the tools, it is worth noting the order - a flat strip with a cross-section of 50x50 mm, on which marks are applied corresponding to the rows of bricks. Four rows are fixed in the corners in a strictly vertical position (nails are driven into them, which need to be inserted into the seams), after which it will be very easy to make the masonry even.
Tools
Other tools are the usual builder's kit: a hammer-pick, a trowel, a level and a plumb line.
You may also find this article useful on how to properly make a brick chimney:.
Step by Step Guide
Before starting work, it is worth making a diagram and a detailed drawing to avoid serious mistakes. To build a Dutch house, the technology necessarily requires a solid foundation and it should not come into contact with the foundation of the house. In terms of dimensions, it is 20 cm larger than the stove. They install it with their own hands, either from brick, or in the same way as the base for a building - by pouring concrete mortar with reinforcement. The second option is preferable for the Dutch, as it is more reliable and can withstand heavy loads. In any case, before laying a brick stove, you must wait for it to dry completely.
After this, the foundation is covered with a layer of waterproofing (tar paper, glassine, roofing felt, mastic, bitumen). Next, the mortar for laying the bricks is prepared. Mix clay, sand and water in a ratio of 1:1:4, the consistency should be similar to thick sour cream. Then sand up to 5 cm thick is poured and watered. Solid ceramic and fireclay (fireproof) bricks are used to build the stove. The latter is necessarily used to form a firebox and places exposed to significant heat and fire, since the usual one is not able to withstand high temperatures.
Detailed step-by-step instructions for arranging a Dutch oven with a hob and oven located on the side:
1. The 1st, 2nd and 3rd rows of the stove are laid in a continuous layer using ordinary bricks. You should always check the evenness of the order and the verticality of the corners. To do this, according to the technology for installing a heating furnace, it is recommended to use a building level and a plumb line together.
2. In the 4th and 5th rows there is a door for the blower, in the 6th it is laid with a brick sawn lengthwise. At the same stage of the Dutch ordering, a place for the grate is prepared. To do this, a recess is cut into the blocks 5 mm longer than the grate so that there is space for thermal expansion of the metal.
3. In the 7th row, the Dutch firebox door with stove is installed. On the 8th and 9th they continue to put everything in the same way as before.
4. In the 10th, the furnace door of the Dutch oven is blocked and recesses are made in the bricks for the stove. After installation, its edges must be covered with a metal corner. Thanks to it, the blocks will not be subject to any damage.
5. From the 11th to the 14th stage of the order, the Dutch women form a zone above the hob. Moreover, in the latter, the second corner is mounted in the same way as the first. The following rows will be placed on it.
6. On the 16th and 17th, a door for cleaning the Dutch chimney ducts is being installed, and bricks for the oven are also being installed. On the 18th it overlaps.
7. In the 21st, it is recommended to put metal strips to make it easier to lay the brick over the oven. At the 22nd stage of the order, it overlaps.
8. In the 23rd, a damper for the Dutch chimney is installed; for this, the bricks should be cut depending on its size.
9. The 24th row of the heating stove with a hob is made larger than the rest (should protrude no less than 3 cm). The next stage is laid as standard.
10. From the 26th row, the construction of the chimney begins.
Preparatory work
Furnaces with a volume of up to 500 bricks can be laid without a foundation, as long as the floors in the room are strong enough (capable of bearing a load of up to 250 kg/m2). A small country Dutch oven with a hob, the construction of which we will further consider in detail, satisfies this condition.
But if the floor in the room clearly does not have the required strength, then it must be installed on a reinforced concrete foundation.
Scheme of the foundation for a heavy furnace
Its depth is usually 400–600 mm, and the edges should extend beyond the outline of the stove by at least 100 mm on each side. It is impossible to connect the structure to the foundation of the building - due to different shrinkage, distortion may occur.
After pouring the foundation, it must be ironed - sprinkled with cement.
Concrete foundation
When the concrete has matured - this takes about 1 month - it needs to be covered with two layers of waterproofing (roofing felt or roofing felt), after which it will be possible to begin building the furnace.
Foundation waterproofing
Before proceeding directly to installing the bricks in place, you need to prepare a clay-sand mortar. The correct ratio of sand and clay depends on the fat content of the latter. To determine it, proceed as follows:
- After soaking the clay for a day, stir it until it forms a dough, after which 5 portions of a solution are prepared with different sand contents: 10, 25, 50, 75 and 100% of the clay volume.
- After twisting each portion into a 30-centimeter sausage with a diameter of 10–15 mm, it is wrapped around a blank with a diameter of 40–50 mm and left to dry at room temperature for 2 weeks.
One way to determine the quality of clay
In the presence of:
- a fine network of cracks or their complete absence, the solution is considered suitable for any part of the furnace;
- large cracks, but not exceeding 2 mm in depth: the solution is suitable for furnace elements with a temperature not exceeding 300 degrees;
- For deeper cracks and breaks, the solution is considered unsuitable.
Having determined the optimal ratio of sand and clay, prepare a solution in the required volume. The clay is also soaked for a day, only after that it is further ground through a sieve. The sand is sifted and washed. The finished solution should have the consistency of sour cream.
Stage 2. Construction of the foundation
First, it is worth noting that from a structural point of view, the foundation being built should not be connected to the main foundation of the house. The further sequence of actions should be as follows.
Foundation for a brick oven
First you need to outline the outline of the future foundation
It is important that the width and depth of the base be 8-10 cm larger than the planned dimensions of the stove. At the same time, you need to check whether the foundation coincides with the location of the chimney pipe
A hole of appropriate dimensions is dug; its depth should be approximately 60 cm.
The bottom of the pit is covered with a 15-centimeter “cushion” of crushed stone. The crushed stone is carefully compacted, its surface is leveled using a mounting level.
8d842bcd869c90ef558187c4ba7d36bb.jpe 44803aff01781fa7a7abafcc9c8d1c74.jpe 183ab32f4531b623bc4a6915cb324607.jpe
Then you need to build the formwork for the furnace foundation. For this you can use wood, chipboard and even thick cardboard.
Attention! If the material chosen for the construction of formwork absorbs moisture, then the inside must be lined with roofing felt (although any other waterproofing material is suitable for this). Concrete solution is mixed
To do this, dry cement is mixed with sand in a ratio of 1:3 and filled with the required amount of water. The solution is thoroughly mixed
The concrete solution is mixed. To do this, dry cement is mixed with sand in a ratio of 1:3 and filled with the required amount of water. The solution is thoroughly mixed.
The formwork must be filled with mortar and wait until it dries completely. This often takes a maximum of a week.
Step-by-step instructions with order
The oven is laid out row by row according to the order.
Layout diagram of a small Dutch oven with a hob
Particularly high demands are placed on row No. 1, since errors in its installation will lead to distortion of the entire structure. The bricks must form a perfectly regular rectangle, a sign of which is the equality of the diagonals. The top edges of all blocks must lie in a strictly horizontal plane - this is checked using a building level.
Row one
Advice. It will be easier to give row No. 1 the correct shape if, before laying it, chalk the outline of the future stove onto the waterproofing coating.
A beginner-level stove maker is advised to first lay out a row without mortar to check how well the bricks fit together. After adjustment, you can lay the blocks on the mortar.
Another trick is to start each row with corner bricks. Once they are level, it will be easier to lay the remaining blocks correctly.
In the Dutch version, the blower door is installed directly on the 1st row. The frame must first be placed in a winding of asbestos cord. It will allow the cast iron to expand freely when heated and will eliminate parasitic air suction through the gap between the frame and the brick, that is, it will act as a seal.
Oven doors
In brickwork, the door will be fixed with wire. It needs to be inserted into the box, folded in half and twisted. Next, this wire is placed in a specially cut groove in the brick (at the upper edge), bent and intertwined with the masonry.
Before continuing work, you should establish vertical guidelines along which it will be convenient to lay out the corners of the oven. This can be the order described above, or 4 nylon cords stretched plumb between nails driven into the ceiling and masonry seams.
According to the established guidelines, the corner bricks of the 2nd row are laid, and then the entire row.
Row two
Row No. 3 and some others in the order are indicated in yellow. This means that they are made of refractory bricks.
Row three
A grate measuring 300x200 mm must be laid on top of the bricks of the 3rd row.
Bricks of row No. 4 should be laid on a spoon (long end or edge). The blocks indicated in the order diagram in red are supporting for the internal partition of the chimney (see above).
One of the bricks on the back side should be laid without mortar and pulled out slightly - it will replace the cleaning door. This brick is called a knockout brick. To access the smoke exhaust duct, it will need to be removed from the masonry, and after cleaning, it will need to be replaced.
Method for cleaning a stove using a blowout brick
It is necessary to install a firebox door on the front of the 4th row. It is equipped with a seal and is fixed in exactly the same way as the blower.
Installation of the combustion door
Note. The wire securing the combustion door quickly burns out from close contact with the flame. In order not to resort to repairing this element too often, use a steel or tin strip instead of wire.
Rows No. 5 and 6 do not need comments - you just need to lay out the bricks according to the order. Just pay attention to the fact that in the 5th row the blocks are placed on the bed (flat), and in the 6th row, as in the 4th row, on a spoon.
Row six
Row No. 7 is mostly laid out on the bed, but the back wall is laid out on the spoon. In subsequent rows, bricks are laid only on the bed.
Row seven
The front bricks of row No. 8 need to block the fire door. Blocks hanging over the firebox must be cut at an angle, as shown in the diagram. Due to the presence of an inclined surface, the fire will lean back when the fire door is open. This will allow the user to admire the flames while using the Dutch oven as a fireplace.
Row No. 9 needs to be moved back slightly. This creates sufficient counterweight for the heavy cast iron firebox door when it is open.
On top of the 9th row you need to lay a mineral lining under the hob. You can use strips of asbestos, basalt or kaolin cardboard. A hob is installed on top of the lining. Installing it on a mortar is unacceptable - due to the significant difference in the coefficients of thermal expansion of cast iron and clay. An asbestos cord should be placed in the gap between the slab and the brick.
Asbestos cord
Note! Some models of cookers have stiffening ribs on the underside. In this case, grooves should be cut in the bricks into which these ribs will be recessed. If such a slab is laid without grooves, it may crack along a line running between the ribs and parallel to them.
Row No. 10 represents the source of the chimney. But we will not build the pipe itself from brick, otherwise the Dutch oven will not be able to be made light. We will install a stainless steel chimney, especially since a brick chimney under a Dutch oven, which is characterized by abundant condensation, would still have to be lined.
A valve should be installed on top of the bricks of the 11th row. Just like the doors, it should be wrapped with asbestos cord.
Gate valve installation
On the 12th row, it is necessary to make a transition from the rectangular section of the brickwork to the round section of the steel chimney. The chimney should be carefully insulated - this is a prerequisite for good draft.
Advice. If you have available funds, you can purchase a prefabricated smoke removal system - the so-called sandwich chimney. The kit contains all the necessary parts - from a tee to an umbrella, which are ideally sized and equipped with effective insulation.
The chimney is vented to the street through the ceiling and roof.
The height of its head relative to the grate must be at least 5 m. At the intersection of the ceiling and the roof, it is necessary to arrange fireproof cuts - fireproof heat-insulating gaskets are installed between the pipe and the wooden elements. The gap between the chimney and the roofing must be carefully sealed.
Note. Factory-made sandwich chimney kits include both cutting and a special apron to bridge the gap between the pipe and the roofing. Installation of the elements is not difficult, as the kit comes with detailed instructions.
If the floor in the room where the Dutch oven is built is made of wood, it must be protected with a fireproof coating near the firebox. Typically, a steel sheet with a thickness of 1.5 mm is placed on top of the asbestos lining. The dimensions of the covering must be such that it protects the floor within a radius of 1.2 m from the center of the fire door.
A steel sheet is strengthened in front of the firebox
Foundation arrangement
Despite the relatively light weight for a brick oven, the Dutch oven still needs a high-quality and reliable foundation. An excellent option is a monolithic slab. An important nuance: the foundation must be reinforced both in area and in volume, i.e. deep down. The dimensions of such a foundation must be at least 1.2 x 1.2 m. The Dutch foundation cannot be connected to the base of the main building.
How to make a foundationFoundation for a brick oven
The procedure for arranging the foundation is as follows.
First step. We outline the boundaries of the foundation being developed.
Second step. We dig a pit about 60 cm deep.
Pit for casting the foundation
Third step. We fill the bottom of the pit with a 15-centimeter layer of crushed stone. Carefully level and compact the backfill.
Crushed stone
Fourth step. We lay a mesh of reinforcing bars. The recommended cell size of such a mesh is 100-120 mm.
4dcea99db3f3602135ea3504b9c812d5.jpe 7b0d81e1200f1b1fcb273b87a5c7c53b.jpe 2a7b8137d64e2e40f0cc3440dc3714d7.jpe
Foundation pit with formwork and reinforcement
Fifth step. We install vertical reinforcement at the intersection of the rods. We tie all the joints of the elements of the support system with wire.
Sixth step. We install the formwork for pouring the foundation. We cover each wall of the formwork with roofing felt or treat it with resin for waterproofing.
Seventh step. We pour concrete.
Poured concrete
Eighth step. We “iron” the surface of the base. To do this, sprinkle the fill with a small amount of dry cement.
Let the foundation gain strength. It is better to leave it for a month, but many craftsmen begin laying it within a week. At this point the decision is yours.
Large Dutch oven - how to build
All elements - valve, doors, grate - are mounted in the same way as in the version just described. But the design, of course, will be somewhat different: there is already a smoke circulation (channel labyrinth) in which the flue gases give off their heat. The order of a large Dutch oven, as well as its diagram, are shown in the figure.
Arranging a large Dutch oven
Negative characteristics
Like other representatives of the heating segment, the review device also has disadvantages:
- The efficiency of the Dutch model does not exceed 40%, so the heat transfer rates here are low in comparison with the Russian analogue;
- Only long-smoldering materials are used as combustible materials. For example, small brushwood quickly burns out and all the heat simply goes out into the chimney.
- If you leave the view not closed, the device will quickly cool down, because The duct type of chimney operates on the exhaust principle.
- The use of high-ash materials is not recommended, because Excessive ash accumulation increases the fire hazard level.
Decorating a Dutch oven
It has long been customary to decorate a Dutch oven with tiles.
Examples of decorating a stove with tiles
If this method of decoration is not available, a more familiar one will do - the stove can be plastered and whitewashed.
One way or another, if the interior of the room is at all important to the owner of the stove, the Dutch oven definitely needs to be refined.
Round Dutchman's finishing
In a purely brick design, it looks stingy and uninteresting.
Possible difficulties
Despite the simplicity of the device, the construction of a Dutch oven requires theoretical and practical skills in this area. An inexperienced master can make a mistake at any stage - from choosing a suitable scheme to purchasing materials and installation itself. The price of an error can be either minor external defects or improper functioning of the finished Dutch oven.
Stoves are sources of increased danger. Any mistakes made during construction are fraught with risks to the health and life of household members. The key to high efficiency and safe operation of Dutch ovens is design and installation work performed by qualified specialists.
Features of operation
A characteristic feature of Dutch stoves is that due to the considerable length of the flue, during reheating, flue gases are not completely removed through the chimney and some of them, including poisonous carbon monoxide, can enter the room. To avoid such phenomena, during operation it is necessary to monitor the temperature in the middle of the front surface (forehead) - it should not exceed 60 degrees. This is a temperature that is tolerable for the palm, but not for the back of the hand.
Dutch utermark round shape
In the 19th century, the German stove maker Utermark invented another type of Dutch oven. Its key difference is the solid firebox without a grate or ash pan. Often this type of stove is wrapped in a steel casing.
For unmarking, the method of laying bricks on an edge is used. This principle is financially beneficial and also reduces the weight of the finished structure. The device is made with three channels.
Photo 3 Utermark furnace: diagram-drawing.
Among the shortcomings, strong fumes were noted due to the blind combustion compartment. The metal casing prevents the chimney from being cleaned, and the accumulation of soot significantly reduces the fire safety of the structure. The presented three-turn principle of circulation of hot masses in a round housing does not have good heat transfer properties.
In addition to the article, it is recommended that you familiarize yourself with the drawings of furnaces with a boiler-water heater.
Do-it-yourself Swedish stove with three firing modes
Swedish stoves differ from other heating and cooking stoves by the presence of a heating panel in the rear part. This brick panel has a system of gas ducts: vertical or horizontal. The smoke passing through them heats up the structure, and from it the rooms are already heated. The system turns out to be efficient and economical: the heat that went into the chimney in a traditional Russian stove is used to heat the premises. But both shield construction systems (vertical and horizontal) have disadvantages.
With a horizontal arrangement of gas ducts, the entire shield is heated evenly. But such a system requires a large number of cleaning holes and, accordingly, doors on them. Considering that furnace casting is not cheap today, these doors significantly affect the final cost.
Heating panel of a Swedish stove with horizontal and vertical flue channels
If the gas ducts in the swedish are arranged vertically, there can be only one cleaning hatch. But there is another problem: while the stove is heating, in the first channel, on the side where the hot gases from the furnace enter, the shield will be noticeably hotter than in the third - at the exit. Since the shield is usually located in two rooms, one of them will be much warmer than the other.
There is also a third type of shield device: bell-type. It combines the advantages of both systems: one cleaning window is required, the entire surface is heated evenly, and less bricks are required for construction. Moreover, with this design, the oven cools down more slowly: the warmest air stays in the tops of the hoods for a long time, and the “draft” from the doors passes only through the center.
When using the bell-type principle of constructing the shield, heat is retained longer
From all that has been said above, it follows that the most economical and effective are Swedes with shields built on the bell-type principle. They are also easier to manage: it is possible to organize “summer” and “winter” operating modes, in which only a small part of the panel is switched on (in summer) or the entire heating power is turned on: in winter. There is even a version of a Swedish stove with three combustion modes: an “autumn” mode is added, in which a little more than half of the chimney channels are involved in the smoke circulation.
Door installation
During installation, the main door is lined with asbestos cord. It will allow the temperature expansion of materials to be absorbed without harm and will ensure tightness around the perimeter. The same as for the bottom door, wire fasteners are placed in the seams, and if the wire harness is thick, grooves are cut into the bricks. When covering the door, half a brick is laid over it or a locking connection is made by cutting the bricks with a wedge.
The subsequent number of rows depends on the estimated volume of the firebox. There can be 3 or 4 of them, based on the required height. As a result, when the fuel chamber is formed, a ceiling is laid on metal supports, with an opening for a continuing chimney.
Formation process
You can make such a design yourself using prepared drawings. The material used is fire-resistant ceramic brick of high standard. All drawings and diagrams are completed in advance. Having completed the order. you can determine the required number of bricks. We suggest watching how to develop a plan for building a stove in the video presented.
Foundation and foundation
The mixture for the mortar can be bought ready-made in bags or you can mix the mortar with your own hands from cement, sand and clay. In accordance with the design, a cast-iron cooking plate, doors for the firebox, valves, and a grate are purchased in advance.
Like all furnaces, the unit requires a separate foundation. after all, the total weight reaches 10 tons. You can do it yourself by calculating the depth of the pit, provided that every 5 cm corresponds to 1 ton of weight, and the area of the foundation should be 15 percent larger than the base of the furnace. A layer of sand is poured into the bottom of the pit, compacted, a layer of crushed stone is installed, reinforcement is installed and concrete is poured below floor level. The foundation takes at least two weeks to harden, after which waterproofing is done to prevent moisture from entering the oven. A clear example of creating a foundation in the video instructions.
Based on the developed order, the base of the stove is laid out first. It should be made of several rows of bricks, horizontally aligned, with right angles. The distance from the masonry to the wall must be at least 15 cm. In the next row, a vent and air ducts are laid.
Main design elements
Due to the serpentine winding duct, the air heated in the firebox rises, passes through the entire body of the stove and heats the stove bench. On the eighth - ninth row, an overlap is made on the bed and firebox. Then the rows for the oven and hob are laid out, as well as the row separating the hob from the wall. Afterwards, the jumpers are laid out. Above the oven, simple or figured masonry is used (arch, wedge), and metal corners are used above the stove casing, and a decorative shelf is made.
The following rows combine all chimneys into one. and windows are made on the walls, next to the oven there is a “letnik” to maintain combustion in the warm season, and those located above are for stronger heating of the room in the cold season. The pipe is laid higher, has a square cross-section, the best masonry size is 2.5 bricks. The ceilings through which the chimney passes are insulated with basalt slabs in several layers.
Shutdown
It is better to lay out the outer part of the chimney from sand-lime brick. it is more resistant to temperature fluctuations and precipitation. After the chimney is built, all cast iron and other fittings are installed. For accuracy of work, each layer of brick is checked against the drawings of the order, which can be hung near the construction site. An example of creating a simple stove with a stove bench with your own hands is presented in the video.
If you are planning simple brickwork, then it will be enough to simply clean the surface of the stove with a stiff brush and level the seams. The brick oven can be painted with heat-resistant paint in the desired color and you can add Russian traditional ornaments and designs made by yourself.
A stove with a stove bench decorated with tiles has a very rich appearance and will become the main decoration of the house. The cost of such finishing depends on the quality of the tiles. In addition to their decorative function, tiles retain heat well and are easier to care for than other coatings.
The stove has a high level of efficiency (up to 60 percent), it evenly heats one or more rooms, is safe to use, has a long service life, and produces a healing effect.
When starting work, you need to assess your strengths. after all, building a stove with a stove bench is not cheap. A good home craftsman can complete many stages of construction with his own hands, but a professional stove maker will correct the work or, based on his experience, help correct mistakes.
Kuznetsov's sauna stoves: drawings and ordering Arrangement of a 3 by 3 brick stove and other options Ordering, diagrams and drawings of a Russian stove Heater stoves for a bath. Order
A few secrets for DIYers
Partly because the laying of a Dutch stove is quite simple, partly because stove makers price their services quite expensively, many owners of country real estate under construction take the stove laying into their own hands.
There is enough information on how to fold a Dutch oven, but we want to share with you a few secrets of mastery from people who, thanks to this heating device, turned from beginners to pros in a few days:
- create a drawing (despite the simplicity of the masonry, it is impossible to lay out the Dutch “by eye”);
- Practice in the literal sense of the word: outside the house, lay out a copy of it from bricks prepared for your future stove, without using cement mortar. Just lay out the rows and critically examine the “constructor” - perhaps during the work you will need to correct something, align somewhere. So adjust and straighten now;
- If the training version of the stove you created suits you, number the bricks in rows - you will save time and effort during the main work.