Employees of automobile workshops or motor transport enterprises, where vehicles are constantly serviced, including changing the oil in the engine or gearbox, are well aware of the problem of waste disposal. A lot of oil products accumulate, and to get rid of it, you need to contact specialized organizations that have the appropriate license.
However, there are ways not only not to pay for the disposal of technical oil that has served its useful life, but also to save a lot of money by using it correctly.
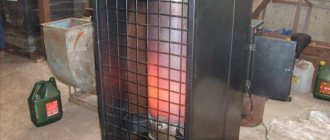
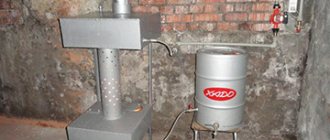
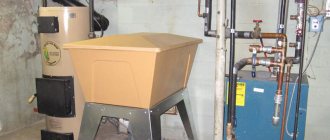
One of the most effective uses of mining is to use it for heating rooms. First of all, we are talking about industrial buildings, workshops, etc. By using such fuel for heating, you can significantly reduce the cost of more conventional energy sources. In fact, waste oil furnaces can completely replace traditional heating systems. In addition, they can be used in conjunction with existing boilers, reducing gas or solid fuel consumption. The advantage of these stoves is that they are able to quickly heat a room.
These types of heating devices have different designs, but drip-type furnaces are considered the most effective. This name is explained by the fact that oil enters the combustion chamber in strictly small doses (droplets).
Features of the design of dropper furnaces
Such units consist of a rectangular or cylindrical body. Inside there is a combustion chamber, in the lower part of which there is a container intended for waste oil and holes that provide air flow.
After heating, the fuel evaporates, and then the vapors combine with the air in the chamber. The resulting mixture as a result of convection is directed upward through the firebox, where, when burned, it releases a significant amount of heat.
If desired, a water or air heat exchanger is built into the upper part of the drip furnace during processing, as a result of which it becomes possible to heat the room more evenly and better or to arrange a circuit for supplying hot water.
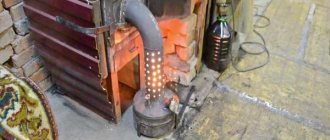
Drip supply occurs through a metal tube, which is connected to an oil evaporator. Its second end is brought out and connected to the tank with a flexible hose. In the upper compartment of the drip-type furnace during exhaust there is a smoke pipe, which is connected to the chimney.
The temperature in the upper part of the unit, even with a heat exchanger, is not low, so the chimney system must be installed in accordance with fire safety regulations. Experts do not recommend making such a design in an open version, since the oil can ignite.
Increasing the number of pipe bends
Increasing the bends of the potbelly stove chimney
The tank at the outlet of washing machines will retain a certain amount of heat, but it will not be able to retain all the heat. A large amount of heat will continue to escape into the chimney.
Therefore, one of the improvements that provides additional heat retention is to increase the length of the outlet pipe. A long pipe running through the room, but with good exhaust, ensures the transfer of heat from its surface, which was previously lost.
Materials and tools
- several elbows that can be easily placed in the room after the potbelly stove,
- brackets for fastening pipe elbows,
- welding machine and metal processing tools.
Instructions
First you need to mark the location of the pipe. It can pass with a large number of bends and zigzags, thereby ensuring maximum heat retention, without forgetting about the loss of exhaust draft. After marking the pipe laying location, it is necessary to install pipe mounting brackets
Particular attention should be paid to the joints of pipe elbows and corners. Brackets must be made of heat-resistant materials
Lay the pipes to ensure a tight, hermetically sealed connection, and, if necessary, modify the elbows to ensure the pipe is laid along the marked route. Firmly secure the elbows in the brackets, check the working draft (burn newspaper in front of the pipe), check the tightness of the connections, connect the inlet elbow to the stove.
What are dropper stoves made of?
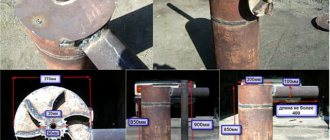
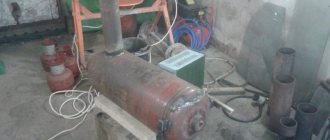
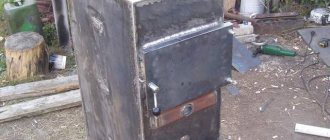
Due to the fact that this type of unit has a simple structure, you can assemble a drip-type stove with your own hands from a sheet of iron, a gas cylinder and a used barrel. The only requirement for them is the presence of a wall with a thickness of at least 4 millimeters, otherwise the body will move during operation. A proven drawing of a furnace using a gas cylinder will help you assemble the furnace correctly and quickly.
The simplest and at the same time reliable way is to assemble a stove from a gas cylinder, since it has a durable body and can withstand high pressure and heat to high temperatures.
In addition, its dimensions are suitable for a unit capable of heating a garage, workshop or small country house. If you carefully weld such a stove, it will turn out to be safe, it can be easily cleaned and heated.
Manufacturing options
Attention: Before manufacturing a drip-type furnace for mining, you should decide in advance on its design. Quite often its basis is a gas cylinder.
During manufacturing, it should be taken into account that its burner is characterized by poor sensitivity to all impurities that are part of used oil. At the same time, the sensitivity of the drip mechanism is very high and should be reduced to the required level. To achieve this, you need to put a filter on the hose, for example, a car filter.
A pump will also be required. A high-pressure fuel pump or a car pump is suitable for this purpose. It will be necessary to make a return flow, since otherwise more oil will flow into the tank than required. This is where a dropper, for example a medical one, comes in handy. Since it has a clamp, it will be possible to regulate the intensity of the fuel supply.
Materials
To assemble a drip furnace with your own hands, you need to prepare:
- used 50-liter gas cylinder with a whole body;
- a two-meter metal pipe with a diameter of 100 millimeters with a wall thickness of at least 3.5 millimeters;
- for the heat exchanger and other small parts - the remains of an equal-flange metal corner with a thickness of 40–50 millimeters;
- a sheet of 4 mm steel or its trim of the required size;
- cast iron brake disc from a car, can be used;
- a regular-sized freon bottle with a needle valve;
- half-meter half-inch metal pipe;
- a hose of the required size, which is suitable for attaching to a ½-inch pipe and clamps;
- half-inch ball valve;
- door hinges and fire door latch.
In addition, pipes of a certain cross-section and a duct fan are needed to assemble an air heat exchanger. You can use a corrugated pipe or components for the chimney. To ensure a high-quality result, you should use drawings of a stove from a gas cylinder during testing.
Work on preparing the cylinder
Even after prolonged ventilation, condensation remains in the gas cylinder. To remove it, you need to remove the valve and gearbox and leave it in fresh air for several days.
Then a hole is drilled in the bottom of the cylinder. To prevent sparking, the drill is moistened with oil. Since it is not easy to make a hole in thick metal, it is better to start the work with a small diameter drill, and then it can be increased to 10–16 millimeters.
Next, the balloon is filled with water and drained after 24 hours. Since condensate has an unpleasant, pungent odor, it should be carefully poured away from your home. The procedure is repeated if necessary.
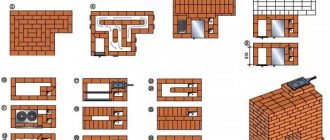
Stove body
A drawing will help you create a furnace using a gas cylinder.
The work is performed in a certain sequence:
- The balloon is visually divided into two parts, the upper one should be 2/3 of the height, and the lower one should be 1/3. Openings are cut out in each, the width of which is approximately equal to 1/4 of the circle.
- To make holes, use a grinder. You need to make the cut as even as possible. Subsequently, pieces of metal are used to make doors.
- To remove any remaining condensation, the cylinder is additionally washed from a hose with water under pressure.
- The dropper furnace compartments are separated during processing using a metal insert. It is cut to the size of the cylinder from sheet steel.
- The resulting circle will serve as the bottom for the exhaust vapor combustion chamber. It will be large in volume, which will allow you to use firewood or briquettes to fire the unit and, if necessary, burn household waste in it. The bottom is tried on and adjusted to the desired size.
- To make the burner, a 20-centimeter piece of pipe with a cross-section of 100 millimeters is used. Holes with a diameter of 10 millimeters are made in it using a drill and a metal drill. They need to be staggered around the entire circumference to the middle of the burner. The inside of the pipe is polished without leaving burrs.
- The burner is placed in the bottom of the upper part, having welded the joint with a welding machine.
- The completed part is mounted in the unit body between the chambers with the perforated part downwards. The holes are needed for air suction.
- To make a working tray that serves as the bottom of the lower chamber, use a brake disc of the required size. A plug cut from a 4-mm sheet of metal is welded to its bottom to close the hole.
- The top cover with an opening is made from the same sheet. Its shape should allow the counterpart of the burner to be welded, providing air access.
- When assembling a drip-type furnace with your own hands, the bottom of the burner from a piece of 100 mm pipe 10 centimeters long is connected to the lid by welding.
- To connect the parts of the burner, use a coupling, which you can make yourself from a 100 mm pipe, cut lengthwise and slightly bent. The coupling allows you to make the burner detachable. It will be possible to lift it, remove the pan, clean it of oil and remove soot from the top of the chamber and burner.
Safety regulations
A potbelly stove with additional accessories requires careful attention.
In order not to damage the equipment or cause damage to the premises, you need to remember a few rules:
- Do not leave the device unattended for long periods of time, for example overnight.
- Before using it, it is better to concrete the area under the stove.
- Cover the walls with non-flammable materials.
- Do not place the device in a draft to prevent the fire from spreading to flammable materials. At the moment of ignition, the flame burns strongly and breaks through the holes in the pipe.
- Until oil vapors begin to burn, you cannot add it.
Instructions for using the oven
Before the first test, you need to make sure that the unit is stable. Sequencing:
- fill the lower container with fuel to 2/3 of the volume;
- add a little gasoline on top;
- open the damper;
- light a match and set fire to the wick, newspaper;
- wait until the gasoline heats the oil and the vapors begin to burn;
- close the damper when the room warms up.
Oil consumption with low combustion will be about 0.5 liters per hour. With strong combustion - 1.5 liters per hour.
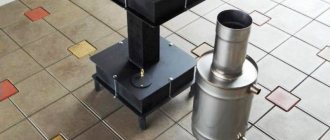
Waste oil supply
Fuel is supplied to the self-assembled drip furnace during production from an external tank using an adjustable dropper. In this case, it is used as a used freon cylinder, which must have a working needle valve.
The sequence of the process of how to make a drip for a stove is as follows:
- In the freon cylinder, in the lower compartment, a hole is made of such a size that it is convenient to pour waste into the structure from any container. If desired, a coarse mesh is placed on it. The tank must be located above the unit, so a special bracket is welded to its body. The hose is connected to the cylinder valve with a clamp.
- A hole is cut out in the housing on the mounting side of the oil tank; its diameter should correspond to a half-inch pipe for feeding waste, which will need to be fixed.
- Having cut a piece of pipe of a certain length, a thread is cut at one end, and the other is cut off under such a knot so that a stream of oil falls directly into the opening of the pan.
- The pipe is welded to the body, and the resulting seam is cleaned.
- A ball valve is screwed onto the end of the threaded tube. During the assembly process, a squeegee with an oil hose is connected to it.
Cleanable
It is definitely worth remembering that the chamber where the oil is burned must be made so that it can be disassembled during operation; this is the only way to make cleaning easier. The chimney does not need horizontal sections, since they can impair draft; in addition, there should be a minimum number of inclined sections. It is preferable to make the pipe vertical.
Heat exchanger
For a drip-type furnace, this element is not mandatory. When the room is small and without partitions, then the heat coming from its walls is sufficient for heating. If it is necessary to achieve greater efficiency of the unit, an air or water type heat exchanger is made. It is placed in the upper chamber.
A heat exchanger is made from a section of 100 mm pipe. Its length should be such that the ends protrude beyond the walls of the housing by 10–20 centimeters on both sides. Two holes are created at opposite ends of the cylinder, a pipe is passed through them and fixed by welding.
A flame divider made of a sheet of iron must be welded above the heat exchanger so that it divides the flame into tongues, increasing heat transfer.
A swirler is placed inside the air heat exchanger, accelerating the air flow. It is made from a strip of steel or a corner divided into bent blades.
Then air ducts made from an uninsulated chimney pipe and corners are connected to the heat exchanger pipe. A duct fan is installed on one side of the air duct. It is connected to the network directly or through the contacts of a thermal relay installed on the fan housing, or by adjusting the temperature mode.
Ignition and operation
It is not easy to light a cold drip stove during testing. The fact is that oil vapors can only burn when heated, so the unit is ignited using other flammable substances - alcohol or gasoline. They need to be poured into a pan in a thin layer on top of the oil and then set on fire.
When burning, the substance heats up the top layer of waste, and it evaporates. After this, the oven begins to function. Then open the valve on the waste supply hose and adjust its flow into the furnace. To stop the unit, close the valve.
To clean the structure from soot and soot, use metal brushes or fine gravel, which is thrown into the chimney. He, touching the walls of the chimney, knocks off the soot and it settles inside the firebox. After opening the door, sweep it out with a brush. The pan is removed and dirt is cleaned from it.
How to properly make such a hearth can be seen in the drawing of a drip furnace during development, which must be prepared before starting work.
Heating oil
As we have already said, any type of fuel can be used as fuel for waste furnaces. The easiest option is to purchase used machine oil. Its cost is from 25 rubles per liter. If you try hard, you can find oil at more affordable prices. In this regard, car oil change shops are lucky - they can get it from customer cars (usually no one takes it).
We suggest you read: Construction of a turnkey bathhouse with a swimming pool at a low price
Vegetable oil ignites quickly if heated thoroughly. It even causes fires.
- Vegetable - the most common sunflower oil burns well, releasing a large amount of thermal energy;
- Gear oil - if you are lucky enough to get a barrel of this oil, you can use it to run your stove;
- Synthetic oils are excellent liquid fuels for waste furnaces.
The use of gasoline and solvents to ignite stoves is strictly prohibited - they are highly volatile and ignite with pops and explosions. The same kerosene is ignited softly and safely.