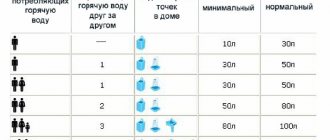
High-quality Italian products have been in deserved demand in many countries around the world for more than 70 years; they have been sold in Russia for more than 20 years. TM “Ariston” supplies water heaters of various types to Russia: instantaneous and storage, gas and electric. Installation of a gas water heater is carried out only by gas service specialists; an electric one can be installed independently.
Ariston water heaters are of very high quality, which is why they are popular among consumers.
How to connect an Ariston water heater
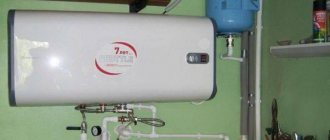
Water heater connection diagram:
The water heater is connected to the water supply pipe through the lower pipe, and a water outlet hose is connected to the outlet pipe. Safety valves are installed at the inlet and outlet; they are open if the water heater is turned on and closed if the device is turned off.
After connecting to the water supply, the tank of the device is filled with cold water. The cold water supply tap must always be open. The tap on the hot water outlet pipe opens, when water flows through it, it is closed.
Electrical diagram for connecting the boiler
Connecting power to the water heating apparatus begins with isolating a cable that is routed from the switchboard to the installation site of the boiler. The cable must be three-core copper with a cross-section of at least 2.5 mm. The distribution board must be equipped with an RCD device to protect people from electric shock in case of leakage onto the device body.
The water heater is connected to electric current through a moisture-resistant three-pole socket, since it must be grounded. This type of connection is only suitable for low-power devices. You can connect the water heater to the electrical network yourself, but it is better to entrust this to specialists.
For high-power devices, a special distribution board is allocated; the cable is connected to the boiler without an outlet. The distribution board is installed in rooms with low humidity. The device is turned on and off by an automatic switch. The current strength for which the machine is designed is 16 A.
Checking for correct operation
It’s great if the water heater is connected to a separate machine. If problems arise in its operation, this will not affect the power supply to other appliances in the house.
If after starting the heater the circuit breaker is knocked out, you can turn it on again. If the situation repeats itself, then there is a serious problem. The unit must be de-energized and a technician must be called.
Here are a few more details that need to be checked after putting the boiler into operation:
- Inspect the hot water pipe to see if there is a leak. The fact is that a water heater can create more pressure than in risers. And if the gaskets are already worn out somewhere, but withstood the load from the central water supply, now they can give up.
- Make sure that the light indicating the supply of voltage to the heating element comes on.
- Take readings of how many degrees the meter shows at the very beginning of operation of the device, and then look at the temperature again after 20 minutes. If the data has increased, the heating element has successfully survived the rest period and is heating properly.
Due to their compact size and ease of use, instantaneous water heaters are in great demand. But you need to correctly assess your capabilities before deciding to install such a device yourself, because this process requires compliance with a number of rules. How to connect an instantaneous water heater: installation tips. read carefully.
You may be interested in the following information: how to drain water from a water heater and when it is necessary, read here.
Read about connecting the water heater to the water supply and to the electrical network here: https://microklimat.pro/otopitelnoe-oborudovanie/vodonagrevateli/ustanovka-svoimi-rukami.html. And also everything about choosing a place for the boiler.
Connection to the water supply system
Do-it-yourself storage water heater installation step-by-step guide technical standards
Hoses and other connection elements used to connect to the water supply must withstand a temperature of at least 80°C and the design pressure.
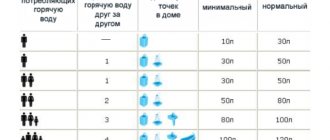
Table for determining the volume of a water heater.
Avoid directly joining two different metals, such as steel (in water pipes) and copper. Use a dielectric adapter.
Connect the water supply to the boiler through shut-off valves and then through flexible wiring. The cold water inlet pipe is marked with a blue mark. A valve must be mounted on it to relieve excess pressure in the system.
You can also install a tee valve with a drain valve attached to it in front of the shut-off valve. When carrying out repairs or maintenance, this will make it possible to quickly drain the water from the boiler. Seal the places of threaded connections with tow or FUM tape. Attach a flexible line to the outlet pipe that directs the heated water. After connecting, open the water and check the system for leaks, then connect to the power supply.
- Connect the power supply wires of the Ariston water heater to the screw terminals of the thermostat.
- When connecting, observe the phases - L, A or P1 - phase wire, N, B or P2 - neutral.
- Connect the ground wire to the clamp on the water heater body.
- Connect the test lamp terminals to the contacts.
- Press the thermostat button.
- Close the lid.
- Before connecting to the network, check that the boiler is filled with water.
The electrical wire must be hidden in a corrugated material made of non-flammable material or in the wall. Installation of the boiler requires grounding, which cannot be done to metal objects or pipes: for example, water supply, sewerage, etc.
Why are Ariston water heaters created?
Household water heating appliances that run on electricity are most often used during hot water outages. As a rule, compact models are purchased. When professionally installed, the water heater provides warm water for daily household needs: washing, cleaning or showering.
In private sectors, larger volume gas and electric heaters with storage are used with all communications. In this case, household appliances from the famous Italian company are used all year round.
Useful tips
Connecting a water heater yourself
Be sure to take into account the advice of professionals:
- Determine in advance the number of places to which water will be distributed from the boiler.
- Before starting work, purchase all the missing materials so that during the process you do not have to urgently run to the store for individual parts.
- Be sure to follow the instructions for your model.
- All water connections must be carefully sealed.
- If it is not possible to install a protective drain into the sewer, place a protective pan under the device.
- If you do not provide tap water, the storage heater can be supplied from a separate container. It is mounted at a height of about 5 meters from the top of the device.
- Do not forget about preventive procedures - be sure to change the magnesium anode at least once a year.
- If you are leaving for a long time, drain the water from the heater after unplugging it.
- Until the tank is completely filled with water, you cannot turn it on and set the heating mode.
- Do not operate the device while electricity is connected to it.
- Use only those parts that are compatible with your model and recommended by the manufacturer.
Let's consider the main advantages and disadvantages of storage water heaters.
Installation
Installing an Ariston water heater with your own hands is not difficult if you carefully read the instructions and follow its instructions. Of course, you can invite specialists who will do everything quickly and efficiently. The only “but” is the price of this service. For example, in Moscow it ranges from $100. Meanwhile, having minimal skills in working with plumbing, you can cope with this task in just 2-3 hours. Considering that you will spend some money on supplies, the net savings will be approximately $60.
Water heater connection diagram.
When assessing the pros and cons of installing a water heater with your own hands, take into account the risk of flooding your neighbors below; if something goes wrong, balance your strengths. The advantages of solving this problem yourself include:
- saving time and money;
- acquiring the skills you will need while operating the water heater.
Access to the storage water heater (boiler) must be absolutely free, and the wall for mounting must be strong, capable of supporting double weight (for a unit capacity of 50 liters, calculate the load of 100 kg). Determine the condition of your electrical wiring: is it capable of handling the significant additional load? For example, for a 2000 W water heater the copper wire cross-section should be 2.5 mm². Keep in mind that if there are old water pipes in the apartment, sometimes you have to first replace them and only then connect the boiler. Find out what amperage your electric meter is designed for. If it is less than 40 A, you will have to replace it too.
Sequencing
Installing a septic tank with your own hands: step-by-step instructions
It’s worth mentioning right away that the startup sequence below is correct for both flow-through and storage heaters. A couple of nuances - in the case of the first type, you do not have to wait for the tank to be filled with water and close the tap at the 2nd point.
- You should start by turning off the hot water supply that comes from the city supply system. If you skip this step, the water heated by the boiler will go into the common riser, despite the check valve.
- Open the hot water tap. We wait until the remaining liquid drains from the pipes. Close the tap.
- Two pipes go to the bottom of the boiler. One, marked with a blue ring, is underwater, the other, with a red marker, serves to supply hot water to the pipes.
- Open the valve on the underwater pipe. Water begins to flow into the device’s storage tank.
- Next, unscrew the second valve on the boiler. Allowing the water to escape into the pipes.
- Turn on the hot water on the mixer. We wait until the air leaves the system and a steady stream of water flows. We turn off the water.
- We connect the heater to the electrical network and set the desired temperature.
In a house where there is no hot water supply, the first step must be skipped. Subsequent switching on of the heater will follow the same pattern. The only difference is in point 6. Then not air, but stagnant water will begin to come out of the heater tank.
Heating mode selection
Set the heating mode. The main thing in this matter is to set the water temperature that is comfortable for the user. However, here are a few tips, the implementation of which will significantly extend the service life of the device. This will save you money on future repairs.
- Set the temperature to 30–40 degrees as little as possible. Under such conditions, bacteria will quickly develop inside the storage tank. This will result in an unpleasant musty odor. The walls will become covered with fungus, which is difficult to remove.
- Optimal operating mode, 55–60 degrees. In this temperature range, less scale will form on the heating element. The risk of mold will be reduced. It is comfortable for human skin.
- Once a week the boiler must be set to 90 degrees. Wait a couple of hours and return to the previous mode. This is done to completely destroy bacteria in the storage tank.
- Some devices have an economical operating mode. In this case, the heater does not consume less electricity. The settings will be set as in point 2 and we are talking about reducing the risk of breakdown.
- In the case of a flow-type heater, the temperature is also adjusted by water pressure.
Rules for using the device
You can use the storage type device immediately after the first start. To do this, you need to turn it on and select the operating mode. Throughout operation you will have to follow some rules. They will help increase the service life of the boiler.
- Before turning on, check the presence of water in the tank. This will prevent the heating elements from failing.
- It is recommended to install a filter on the pipe supplying water to the boiler. It will protect against dirt and reduce water hardness.
- During the year, descale the drive at least once.
- Periodically monitor the performance of the protective anode, change if necessary.
Read how to choose pipes for water supply in a private house.
PVC pipes and fittings for water supply are the key to quality water in the house, read about the benefits.
To make the water tastier and healthier, take care of filters for your private home, read about it at https://klimatlab.com/vodosnabzhenie/filtraciya/filtry-dlya-ochistki-vodyv-chastnii-dom.html
Flow-type devices require compliance with several other rules.
- Check the water pressure before turning on the power. A weak stream will not allow the device to function normally.
- If the temperature is uncomfortable, adjust it using the buttons on the body or by rotating the mixer tap.
- If the heater is installed in a bathroom, provide splash protection.
- Hot water is no longer needed - be sure to turn off the device.
Both devices are not recommended for installation in rooms where temperatures may drop below zero. This will cause the water inside the device to freeze and cause it to break.
Equipment reliability depends not only on product quality. Also important: correct installation, switching on and use of equipment. Compliance with the recommendations given in the article will significantly increase the uninterrupted operation of the boiler.
Storage heater operating principle
Any model of Ariston storage heater is equipped with instructions for operating the device.
Scheme of a storage water heater.
The instructions contain a description of the device, its configuration and a detailed description of its operation, a diagram for connecting the device to the water supply and the electrical diagram of the device, rules for the safe operation of an Ariston water heater or boiler.
Apparatuses used to heat water consist of such parts.
The main elements of the Ariston water heater:
- A metal or plastic body, coated with white enamel, in which an internal tank made of metal is mounted. It is covered with a layer of porcelain glass or enamel, or the tank is made of stainless steel.
- The water heater has an insulating layer to retain heat and avoid a rapid drop in the temperature of the heated water. It is located between the surface of the body and the internal tank.
- There are two pipes in the tank: hot water is taken out through one, cold water is supplied through the second, since hot water is always at the top of the tank, the tube for its intake is longer than for supplying cold water.
- An anode is located inside the tank to protect the heating element from scale. Heating is performed by an element that includes a heating element and a thermostat.
- The thermostat is designed to disconnect the water heater from the electric current when heating the water to a set temperature. A heating temperature regulator is installed externally on the housing; it can be mechanical or electronic. A protective decorative cover is installed at the bottom.
- The device operates on the following principle: water from the water supply is supplied under pressure inside and falls to the bottom of the tank, where it is heated using a heating element. Heated water rises and mixes with cold water as it moves. When the set heating temperature is reached, the thermostat turns off the heating element. When the water temperature drops below the set temperature, the thermostat is activated and the heating element is automatically turned on.
- An indicator is displayed on the protective cover of the case, allowing you to monitor the operation of the device. When the indicator light is on, it indicates that the water is heating up.
- A check valve is installed on the water supply pipe near the entrance to the tank; it prevents water from flowing back.
Models and displacement
Due to the popularity of the product, the manufacturer produces a large number of models with different characteristics. Models with electric heating elements differ in volume and the presence of a storage tank, power, and water temperature limit. The higher the power of the heating element, the higher the maximum heating temperature.
There are also differences in dimensions, weight and installation methods (vertical, horizontal).
The list below shows the most popular Ariston brand water heater models on the market and its brief characteristics:
- ABS VLS (VELIS) EVO PW 50 – electric storage water heater. Volume - 50 l, equipped with a fast heating function, an electronic thermometer for monitoring the water temperature, and a safety device to prevent it from being turned on if the storage tank is empty.
- NTS 80V 1.5K SU 3700366 – electric storage water heater. Volume - 80 l. Equipped with an external temperature regulator in the form of a round scale.
- ABS VLS EVO INOX PW 80 D - electric storage water heater. Volume - 80 l. The tank consists of 2 40-liter compartments. Has the ability to accelerate heating, there are 2 heating elements.
- ABS PRO R 100 V - electric storage water heater. Volume - 100 l. The model is equipped with overheating protection (ABS safety system). Energy savings are ensured by polyurethane foam thermal insulation. Vertical installation is provided.
- ABS ANDRIS LUX 30 - electric storage water heater. Volume - 30 l. The model has a bottom connection for water pipes. The tank is made of steel, the internal coating is Ag+.
There are also small models with 15 and 10 liter tanks. All mentioned products in Tyumen can be purchased in the online store of the KVANTA+ company.
Typical boiler diagram Ariston 50
Components for electric storage water heater Ariston.
Ariston electric storage water heater consists of:
- outer body;
- bracket;
- internal tank;
- hot water outlet;
- magnesium anode;
- cold water inlet;
- heat insulator;
- thermostat sleeves;
- heating element (heater);
- flange;
- thermostat;
- power cable;
- regulator knobs.
Assembly and installation of the water heater at the mounting location
This work is done in reverse order:
- a gasket is installed and the flange is mounted on it;
- The magnesium electrode and heating element must be fixed into the corresponding sockets and pressed with brackets;
- a thermostat is placed on the terminals;
- lift the tank and install it - fix it on the wall;
- connect pipes or flexible hoses to hot and cold water pipes;
- fill the water heater with water and check the operation of all components.
Materials and tools used:
- spanners;
- tester;
- pliers, screwdriver;
- rag and bucket;
- new heating elements, gasket and magnesium electrode (replacement if necessary).
You can disassemble and clean the Ariston water heater yourself, without calling professionals. This can be done with minimal financial costs if you carry out preventive and repair work on time.
Water supply
Next comes the connection to the water supply. A diagram is thought out, first drawn on a sheet of paper, and then transferred to the walls with real dimensions. Holes are drilled along the lines where the pipes will pass and clips are installed.
We close the valve at the water inlet and install a tee on the branch closest to the boiler. A pipe runs from it to the water heater. A valve is installed on it to make it convenient to repair the device, a strainer and a check valve.
We lead a flexible hose to the boiler and connect it to the pipe. Typically the input is indicated in blue. We draw a branch to the watershed point in the same way. It is not recommended to connect without flexible hoses. On the one hand, it looks better and more reliable, but if there are sudden changes in pressure, the tank takes the brunt.
The inlet to the boiler is marked in blue
After connecting all components, the valves are opened and all connections are checked for leaks. If they are detected, reconnections are made or more tow is added to the threads.
Connection to the water supply system
The drain hole for this type of heater, regardless of the model, is usually located at the bottom. First, you should assemble and install a so-called security group. This is a set of valves and fittings designed to prevent various emergency situations that may arise during operation of the device.
An adapter is installed at the top, which is often called “American”. Next, screw on the bronze tee. A check valve is attached to its lower part, which prevents water from flowing back into the plumbing system. Another tee is connected to the side branch of the tee.
The diagram shows in detail the connection of a storage water heater: hot and cold water risers, water taps (1 and 2); shut-off valves (3 and 4); check valve (5); drain valve (6)
A 6 bar safety valve is attached to it to provide the ability to automatically reduce the pressure inside the container if it has reached a critical level.
A special compression fitting for the water pipe is attached to the same tee. If there is excess pressure, it will drain some of the water from the storage tank into the sewer system.
Storage water heater safety group diagram. This set of devices prevents dangerous emptying of the device’s container and removes excess water if the pressure inside exceeds the norm
After installing the device, be sure to make sure that the pressure valve hole remains open, otherwise the device simply will not work.
All threaded connections should be sealed and sealed. Experts recommend allowing the sealant to dry for at least four hours.
The photo clearly shows and labels the elements of the storage water heater safety group
When installing the device, it is important to strictly follow the sequence of their connections
. To connect the device to the cold water riser, you can use steel, copper, plastic or metal-plastic pipes
When doing the installation yourself, they are most often used, since soldering them is relatively easy.
To connect the device to the cold water riser, you can use steel, copper, plastic or metal-plastic pipes. When doing the installation yourself, they are most often used, since soldering them is relatively easy.
Some use flexible hoses for these purposes, but this solution does not justify itself. As practice has shown, such elements wear out quickly.
The individual elements of the storage water heater safety group are connected using threads. In accordance with the standards, these places should be sealed and treated with sealant
It is clear that before inserting pipes, hot and cold water entering the apartment should be turned off. A shut-off valve should be installed between the cold water riser and the heater so that, if necessary, you can turn off the water flowing to the device. All connections are carefully sealed.
Now you need to install another pipe that will connect the heater to the hot water supply system in the apartment. In this area you will need another shut-off valve: between the hot water riser and the heater.
This tap must always be turned off so that the heated water from the boiler does not enter the common hot riser of the house. Again, you need to ensure that all connections are sealed and sealed.
The shut-off valve for cold water between the heating device and the risers must be installed in such a way that, when closed, it does not impede the flow of water to other consumers, cutting off only the heater.
And the connection to the hot water supply system must be made in such a way that, if necessary, the supply of hot water from the common riser to the system in the apartment can be restored.
At this point, the connection to the water supply system can be considered complete. Some experts at this stage recommend performing a preliminary check: fill the container with water, then drain it and see if there is a leak. This check can only be done after the sealant has completely dried on all connections.
Turning off the boiler at night
If you use hot water in the morning, it will, of course, not be convenient for you to get up 2 hours in advance to heat it, so whether you need to turn off the boiler is up to you, but it would be more logical to leave it in operating mode. If there is no urgent need for it in the morning, then turn off the power to the device to save electricity.
Let's look at how to do this using the following models as an example: Termex, Ariston, Electrolux. On mechanically controlled units, you will need to move the water heating adjustment toggle switch to the extreme left position, turn off the power button, and, of course, unplug from the outlet.
If you have an electronically controlled device, everything is still much simpler. Just press the OFF button on the control panel and disconnect from the power supply, and if you have a separate automatic machine installed on the heating device, turn it off.
If you have a storage water heater with a timer, you can set the time in the evening and receive heated water in the morning. The most popular model with this function is Thermex 1D 50V.
However, in this model, users are faced with the problem of “demo mode”: the heating device is turned on, the temperature is set, however, cold liquid still flows from the tap. Disabling demo mode is very simple - you need to simultaneously press the up and down arrows on the display and hold them for about two to three seconds.
Types of electric water heaters
Two types of devices are most popular among buyers: storage-type devices, also called boilers, and instantaneous water heaters.
Water boilers: a necessary modern attribute in the bathroom
The first ones function as follows: cold water enters a special tank equipped with a heating element.
There it is heated to the required temperature and then supplied to the water supply system. In a flow-through heater, there is no storage tank; the water is heated as it passes through a special flask in which the heating element is located.
Therefore, the procedure for connecting different types of devices to the water supply system varies significantly.
Boilers are easier to install, they are usually cheaper than flow-through heaters and are less demanding on the quality of the electrical network than flow-through devices.
Therefore, storage units are much more popular. Flow-through heaters are installed as close as possible to the point of hot water collection, for example, directly on the water tap.
The device allows you to get hot water almost instantly, but heating costs will be quite high.
Possible breakdowns
with an increased degree of reliability
According to the repair service employees, the most “popular” breakdown is the failure of the electronic display. There is no need to panic, nervously leafing through the instructions; this does not affect the overall operation of the water heater. Experts also recommend using not the maximum temperature, but within 60C.
Heating elements for Ariston 80 liter boilers need to be changed from time to time. No matter how powerful the anti-scale protection is, the quality of our water still does not improve. Therefore, after two to three years, your heating element will turn into a small pebble. If you do not open the water heater, you can determine the presence of this unpleasant feature by increasing the heating time.
The water heater instructions indicate the markings of frequently generated errors:
- E2 – attempt to turn on the boiler with an empty tank;
- E3 – the temperature sensor has become depressurized and a short circuit has occurred;
- E4 – in case of heating water to 90C.
If you see any of the above on the water heater control panel, you need to contact a service center.
So, we looked at the main characteristics of one of the popular models represented by Ariston 80 liter water heaters. With proper use and compliance with all instructions, this reliable device will serve you for many years. And a wide network of official service centers will reduce discomfort to zero in the event of a breakdown.
Installation and connection of the boiler to the network
Important!
If the pressure in the system can exceed 6 bar, a special regulator must be installed. It is installed on the cold water supply together with pressure relief valves, a ball valve, and a filter.
Ariston boilers are supplied with safety valves and brackets. Additionally, you need to purchase ball valves (for cold and hot water), as well as a pressure reducer and filter. As for the eclectic system, a connection option is offered that ensures maximum security. To do this, you need to purchase a 3-wire cable and a 16-amp fuse.
It is important to choose the right place where the Ariston boiler will be installed; the connection consists of 3 stages:
- Wall mounting or floor mounting.
- Piping and connection to the pipeline.
- Connecting electrical wiring.
Installation of the device
Non-permanent walls cannot be used as a supporting surface: wooden, plasterboard or hollow. 2 overhead strikers are mounted on the wall, to which the boiler mounting brackets are secured. When calculating the mounting height of the slats, you take into account the height to which you need to raise the device in order to hook it onto the brackets.
Boiler piping
The equipment is connected to cold and hot pipeline systems. The schematic diagram of the cold water supply consists of a number of protective components; depending on the characteristics of the installation, they can be made of different materials, and the elements can be distributed in different rooms. The main thing is to maintain the sequence and take into account the equipment:
- A tee is inserted into the common water supply pipe, from where the connection is supposed to begin, and the wiring to the boiler extends from its free flange. It begins with the installation of a ball valve, which shuts off the water supply to the heater.
- Next, a coarse filter is installed.
- If the water pressure in the pipeline is not constant or rises above 6 bar, install a water pressure regulator in the system.
- The remaining elements begin to be attached from the joint on the boiler.
- A ball valve and a tee with an outlet for an emergency water drain hose are connected to the equipment.
- Even lower there should be a safety valve, which has 2 functions: to prevent water from draining from the tank if it is turned off in the general water supply system, and to bleed water when the pressure in the boiler increases.
The final stage is connection to the “hot” circuit: only a ball valve is installed on it.
Wiring
The power range in which the boiler operates is 2.5-3.5 kW, therefore, to avoid overheating of the network, a separate line is allocated (3-core cable 2.5-3 mm). For high-power appliances, it is recommended to use a direct connection instead of the usual plug-to-socket connection. Schematically it looks like this:
We carry out dismantling
Every owner of Ariston water heaters should know that when replacing the thermostat, relay and safety valve, dismantling the tank is not required. Draining the water and completely disassembling the boiler is carried out only during maintenance work and when replacing a burnt-out heating element.
Disassembly of the product is divided into standard stages:
- Disconnect the water heater from the home electrical network.
- Drain the water from the tank.
- Remove the flanges and gain access to the inside of the water heater.
Before disassembling the product, you need to make sure that it is disconnected from the network: if the heater is powered by a separate line, then you need to turn off the circuit breaker, but if it’s just through a cord, then simply pull out the plug from the socket.
Some readers may wonder: why emphasize these points so often? But statistics say that during home repairs or when replacing burnt out parts, very often craftsmen who neglect safety precautions receive electrical injuries of varying severity.
Only after turning off the power can you begin dismantling the Ariston boiler with your own hands:
unscrew the cover, which is secured with screws; before starting dismantling, take a photo of the location so as not to confuse anything during assembly; disconnect the three-wire cable, the first two wires - phase and neutral were connected to the thermostat, so you can carefully remove it.
All electrical work has been successfully completed, and you can begin draining the water from the tank.
Removing water
If the initial installation of the water heater was carried out by a service technician, then he had to install a special tee with a drain tap and screw a fitting into it. Quite a convenient device - the user easily connects the hose, as shown in the photo, and drains the water into the bathroom. In the absence of a special device, water is removed by connecting a hose directly to the nozzle of the product.
Draining the water can take several minutes if the heater capacity is up to 50 liters, and when you have an 80-liter Ariston, the wait will last up to 30 minutes or more.
Hose with fitting
Opening access inside
All modifications of products under the Ariston brand have an oval flange on which heaters, a magnesium anode and a tube with a thermostat inside are installed. An elastic rubber gasket is placed on the flange body from below to ensure tightness. The flange is secured with a U-shaped strip, which is secured with a nut.
We unscrew the nut, carefully push the flange in, turn it and pull it out. Next, the failed parts are replaced and the surfaces are cleaned of salt and lime deposits.
Remove excess debris at the bottom of the tank, visually inspect the rubber seal, if everything is in order, then do not change it - it is very expensive, and it is very difficult to get a new one. Dismantling and subsequent assembly can be done independently by any user without special training. We attach this video to help:
The operation statistics of similar heaters allows us to conclude: regular inspections of the wear of the magnesium anode, cleaning of the heating elements, and preventive maintenance of the internal coating of the tank must be done regularly and by doing this you will significantly extend the service life of the product.
What are the consequences of excess moisture in the soil?
You can see the results of this phenomenon yourself - trees and shrubs die. Why is this happening?
- the oxygen content in the soil decreases and the carbon dioxide content increases, which leads to disruption of air exchange processes, water regime and nutritional regime in the soil;
- oxygen starvation of the root-forming layer occurs, which leads to the death of plant roots;
- the supply of macro and microelements by plants (nitrogen, phosphorus, potassium, etc.) is disrupted, because excess water washes out mobile forms of elements from the soil, and they become unavailable for absorption;
- intensive breakdown of proteins occurs and, accordingly, the processes of decay are activated.
Plants can tell you at what level groundwater lies
Take a close look at the flora of your area. The species inhabiting it will tell you at what depth the groundwater layers are located:
- perched water - it is best to dig a reservoir in this place;
- at a depth of up to 0.5 m - marigold, horsetails, varieties of sedges grow - bladderwrack, holly, foxtail, Langsdorff's reed;
- at a depth of 0.5 m to 1 m - meadowsweet, canary grass, ;
- from 1 m to 1.5 m – favorable conditions for meadow fescue, bluegrass, mouse peas, rank;
- from 1.5 m - wheatgrass, clover, wormwood, plantain.
What is important to know when planning site drainage
Each group of plants has its own moisture needs:
- with a groundwater depth of 0.5 to 1 m, vegetables and annual flowers can grow in high beds;
- depth of water layer up to 1.5 m is well tolerated by vegetables, grains, annuals and perennials (flowers), ornamental and fruit shrubs, trees on a dwarf rootstock;
- if the groundwater is more than 2 m deep, fruit trees can be grown;
- The optimal depth of groundwater for agriculture is from 3.5 m.
Is site drainage necessary?
Record your observations for at least some time. You yourself can understand how much drainage is needed.
Maybe it makes sense to simply redirect melt and sediment water along the bypass channel, rather than allowing it to flow through your site?
Perhaps it is necessary to design and equip a storm drain and improve the composition of the soil and this will be enough?
Or is it worth making a drainage system only for fruit and ornamental trees?
How it works?
Electric storage water heaters are designed quite simply. Typically, such a device is a container, inside of which a heating element is installed - a powerful heating element. Since the device is designed to store hot water, it must be insulated.
There are two pipes built inside: through one of them, cold water is taken from the water supply system, through the second, a flow heated to a certain temperature is supplied to the hot water circuit. An automatic control unit is used to regulate the operation of the device.
This set of devices controls the water intake, the temperature of its heating, and turns the heating element on and off as needed. The control unit is also equipped with an automatic power supply shutdown module in case there is no water inside the container.
It is unacceptable to turn on the heater if the heating element is not covered with water, this situation will lead to rapid breakdown of the device.
You can read about how to choose a storage water heater and not make a bad choice in this article.
Draining water from the boiler
Boiler piping with drain valve
Since we need to get to the internal parts of the boiler, the next step is to drain the water from it.
If the installation of the boiler was carried out strictly in accordance with the instructions supplied with the water heater, then a tee with a ½-inch tap must be cut into the cold water supply system between the safety valve and the tank.
If a prudent installer has screwed in a fitting on the outside of the faucet, then all we have to do is connect the hose to this fitting. The second end of the hose is lowered into the bathtub or toilet and you can open the drain valve.
Only first you need to open the hot water tap on the mixer to balance the pressure outside and inside the boiler. Depending on the capacity of the boiler, the process of draining the water can take from several minutes to half an hour.
If you are unlucky and there is neither a tee nor a drain valve, you need to disconnect the cold water supply pipe along with the safety valve. Then put the hose directly onto the pipe in the boiler. After all the water has drained, you can begin to dismantle the flange.
Device and technical characteristics
Extending the life of an Ariston brand storage heater is not difficult; you just need to install it according to the instructions and strictly follow the rules for operating the device:
- The presence of water in the boiler should be checked every time the device is turned on and off. Switching on is possible only when the tank is filled with water.
- If the power cord is damaged, it must be replaced with material of the same brand, which is best purchased at a specialized retail outlet.
- If the heater will not be used for a long period, especially in the cold season, then the water from the boiler must be drained, following all the rules prescribed in the instructions. After this, the cold water supply tap is closed. After these steps are completed, the heater is disconnected from the electricity supply.
- Over time, the heater requires cleaning from dirt. To carry out this work, it is better to use the services of specialists.
Water heater operation - Photo 08
Convenient connection of water heating equipment involves the use of a special autoclave flange mechanism from the manufacturer. The basic principle of operation of such a mechanism is based on pressing the gasket under the influence of water pressure. As a result, it is possible to completely eliminate not only the leakage of liquid, but also the formation of watery smudges.
Boiler diagram
Technical features of connecting the boiler
If a diagram of the correct connection of the boiler to the water supply has been drawn up, it’s time to start implementing it. In this matter, much depends on what pipes were used to create the water supply system.
In older houses you can often find steel pipes, although they are often replaced with more fashionable polypropylene or metal-plastic. When installing a boiler, you should take into account the peculiarities of working with pipes of various types.
There are no special requirements for the material of structures connecting the boiler and water supply system. They can even be connected with a fairly strong hose of suitable diameter and length.
Regardless of the type of pipes, before starting any work on connecting equipment to the water supply, be sure to turn off the water supply in the risers.
How to connect a heater to steel pipes
To do this, it is not necessary to use a welding machine, since the connection can be made using special tees, the so-called “vampires”.
The design of such a tee resembles a regular tightening clamp, on the sides of which there are pipes. Their ends are already threaded.
To install a vampire tee, first install it in a suitable location and tighten it with screws.
Between the metal part of the tee and the pipe, place the gasket that comes with the device
It is important that the gaps in the gasket and the tee intended for mounting the hole match exactly.
Then you need to use a metal drill to make a hole in the pipe through a special gap in the pipe and rubber gasket. After this, a pipe or hose is screwed onto the opening of the pipe, with the help of which water will be supplied to the heater.
To connect a storage water heater to a steel water supply, use a metal coupling with special pipes equipped with threads onto which you can screw a stopcock, hose or piece of pipe
The most important point when connecting a water heater is to seal all connections. To seal the thread, use FUM tape, linen thread or another similar sealant. There should be enough such material, but not too much.
It is believed that if the seal protrudes slightly from under the thread, this will provide a sufficiently tight connection.
Working with polypropylene pipes
If the boiler is supposed to be connected to a polypropylene water supply, you should immediately stock up on stopcocks, tees and couplings designed for them.
In addition, you will need special equipment: a device for cutting such pipes, as well as a device for soldering them.
To connect a boiler to a polypropylene water supply, the following procedure is usually followed:
- Shut off the water in the riser (sometimes you need to contact the housing office for this).
- Use a cutter to make cuts on polypropylene pipes.
- Solder tees at the outlet points.
- Connect the pipes intended to connect the boiler to the water supply.
- Install couplings and taps.
- Connect the boiler to the tap using a hose.
If the water pipes are hidden in the wall, you will have to dismantle the finish to gain free access to them.
It happens that access to pipes laid in grooves is still significantly limited. In this case, you can use a special split-type repair coupling.
The polypropylene side of such a device is soldered onto a tee, and the threaded part is connected to the water supply. After this, the removable part of the coupling is removed from the structure.
To connect a water supply from PVC pipes to a storage water heater, you can use a special adapter, part of which is soldered to the pipe, and a hose can be screwed onto the other part
Boiler installation
Storage water heaters heat water for a certain time in special tanks from 10 to 150 liters or more. In small city apartments, boilers of 50 or 80 liters are most often installed. Fastening to a weak wall (for example, plasterboard) is excluded. There is no fundamental difference in installing a small or large tank, except that the larger the unit, the more powerful the fastening elements should be.
Scheme of a storage water heater.
Break the work into several stages. The main and most important stage is attaching the boiler to the wall. If the container is horizontal, it is advisable to attach it higher, under the ceiling, if vertical - at the level of the person’s head or chest. The floors under the boiler must be waterproofed in case of leakage.
You need to work carefully, avoiding scratches and damage to the outer surface of the unit from tools. It should also be borne in mind that the electronic control unit of the boiler does not have an autonomous power supply; if there is any failure in the power supply, the settings will be lost and a restart will be required.
Use bolts, hooks, and screws with a diameter of at least 10 mm. Using a tape measure and level, mark the fastening locations. Make sure that all points on the back of the unit intended for installation are engaged and do not allow distortions. Drill holes with a drill, then attach brackets and holders to them on which the boiler is hung.
Electrical connection
The scheme is also thought out in detail here. To connect less powerful models, you can use moisture-resistant sockets; powerful devices are connected with a separate cable, which is output to the machine.
It is important to use three-core copper wires with a cross-section of at least 2.5 mm. Additionally, for safety reasons, an RCD is installed on the cable to protect users from breakdowns. Remove the protective plastic cover from the bottom of the water heater and connect the wire in accordance with the markings on the device.
Next, the cable is led out in plastic boxes to the electrical panel and placed on the machine with the corresponding current rating. At the very end, the functionality of the connected Ariston boiler is checked. The taps open and the electricity turns on.
We invite you to watch a video about installing a water heater: