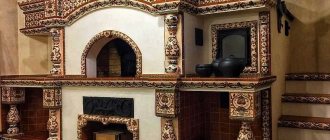
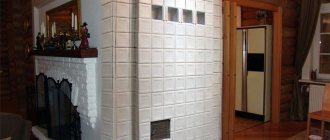
The stove in the house acts not only as a source of heat, but is also an original element of the interior. A carefully executed stove lining will create a bright accent of style in the decoration of the entire room. Let's consider various options for lining furnaces, the materials used, their advantages and disadvantages, and also reveal the secrets of cladding technology. After reading to the end, you will definitely form an opinion on which cladding is suitable for your stove.
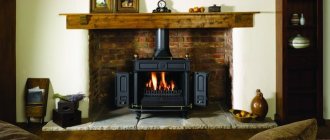
Furnace lining Source pinimg.com
Types of facing tiles
Finishing the stove with plaster is gradually becoming a thing of the past, and lining various types of stoves with tiles is becoming increasingly popular. Manufacturers offer various types of facing tiles. They differ in composition, production technology and design ideas.
- Clay based tiles . The most common type. It includes classic tiles, durable fireclay, exquisite terracotta and other types of tiles.
- Tiles based on natural stone . Marble tiles take pride of place in this category. Even the most severe critic will appreciate the marble-lined stove.
- Tiles based on artificial stone . The main component of the sample is cement. On its basis, with the help of various additives, a durable facing material is formed.
Variety of cladding Source kamin-spb.ru
When determining the type of tile for finishing a stove, it is necessary to consider the requirements for it. Let's take a closer look.
Alternative finishing methods
The stove can be painted
If you lack money and resources, you can choose inexpensive but effective finishing methods.
The options are as follows:
- Coating with paint or varnish. Heat-resistant solutions that are resistant to temperature changes are used.
- Upholstery with slats. The lamellas are located on insulators 10-15 mm from the walls and at intervals of 3-5 cm. This way the surface is masked, heat transfer is not disturbed.
In past times, stoves were whitewashed with lime, but this method is rarely used now, as there are many more practical and effective options.
Requirements for facing materials
The facing tiles for the stove will be used in difficult temperature conditions, so the following requirements must be met:
- Naturalness . The tiles should not contain toxic substances; as a rule, when heated, they are released into the environment, which is unacceptable from an environmental point of view.
- Fire resistance . The material must work at temperatures up to 10000C.
- Good thermal conductivity . The material should not interfere with the heating of the room, but prolong it.
- Moisture resistance . With low water resistance of the tiles, the oven may become damp.
- Durability . The thickness of the sample is assumed to be at least 6-8 cm.
- Attractiveness . The appearance of the lined stove should match the interior, be attractive and elegant.
Attractiveness of cladding Source tulikivi72.ru
Installation location
When deciding how to arrange a kitchen with a stove, designers advise following the following rules:
- if there is one room in the house, the structure must be installed between the living room and the kitchen so that heat passes into the room and the cooking surface is in the kitchen;
- in small houses the stove is usually placed between the rooms so that they are all heated;
- If the house is built of brick and will be heated by a stove, you need to think about a chimney system or install a steam boiler into the structure, assembling a heating system that passes through all the rooms, otherwise the home will not warm up well.
Many designers also advise placing the stove in the hallway in front of the kitchen. In this case, you need to decide in advance where the fuel will be stored.
Types of facing tiles
Today, on the construction market, tiles for stoves and fireplaces are presented in a wide range. Choosing the best one is not at all easy, but by studying the main options used in cladding, you can understand what is right for you.
Fireclay tiles
The most worthy option for cladding. It is made on the basis of refractory clay interspersed with stone flour, which significantly increases the strength of the sample.
Significant advantages include:
- Maximum fire resistance and heat resistance.
- Resistance to low and high temperatures.
- Neutrality to any aggressive environment.
- High strength.
- Excellent load resistance (due to composition and significant thickness).
- Does not rub, does not slip, does not crack.
- Durability. From experience, fireclay tiles are laid once and for all.
The severity of fireclay tiles Source strojdvor.ru
Cladding with fireclay sample in a combined version Source feeder.kiev.ua
Disadvantages: high cost of the material and little variety in the design of the tiles.
Terracotta
Terracotta is a relatively inexpensive cladding option with a wide range of artistic designs. Terracotta tiles are known for their rough surface and are an imitation of natural stones or brickwork.
Made from kaolin dense, pre-compressed clays. The firing temperature is above 10000C. Terracotta tiles for the stove have a natural surface, but can also be presented with a glazed decorative glossy layer.
Significant advantages include:
- Durability, mechanical strength.
- Stability at different temperatures.
- Fire resistance, high thermal conductivity and excellent heat transfer performance.
Nice terracotta Source postila.ru
Disadvantages: low strength under mechanical stress, and if the cladding is often subjected to mechanical and dynamic loads, it will begin to crumble.
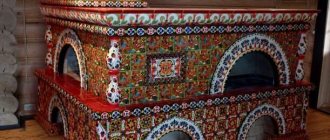
Majolica
It is considered an improved version of glazed terracotta. Made from refractory clay characterized by high porosity. Majolica has its own characteristics, thanks to which it is easy to recognize:
- The shapes are smooth, the edges are rounded.
- It is decorated with white glazed paint, onto which a design is applied manually. Shiny surface.
- Floral motifs in the ornament.
- The predominance of green-blue and brown-yellow shades.
Exquisite majolica Source kamin-keramik.ru
The cladding has all the characteristics of heat resistance. The disadvantage is that it is expensive, but decorating the stove with majolica is worth the money.
Metlach
An interesting option for oven cladding. Metlakh fire-resistant tiles are folded into intricate mosaics, creating unique patterns in the interior. The sizes are small. Brooms are not difficult to stack. It is not demanding in operation.
Distinctive features of the broom:
- not covered with glaze;
- heterogeneous in color scheme;
- manufactured under high-temperature firing conditions (maximum heat resistance);
- durable (comparable to porcelain stoneware).
Amazing broom Source iz-kirpicha.su
Recommends itself well in places with high humidity and works in conditions of maximum temperatures.
Tiles
Tiled tiles for cladding stoves and fireplaces will be the ideal solution. A distinctive feature of the tiles is its unusual geometric shape. Along the perimeter, the tile has “sides”, thanks to which its shape resembles an open box.
Fact! By using tiles in the cladding, the efficiency of the stove can be increased by 10-15%; the heat-saving qualities of this material are very high!
Tiles are durable and environmentally friendly. The choice of colors is very wide. The design is applied by hand, so the products are very expensive. There are dimensional errors, so installation may be difficult.
Stove decorated with tiles Source stroyland.biz
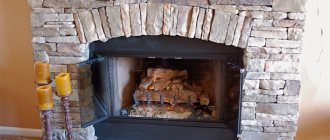
Clinker tiles
An ideal option for cladding fireplaces in a matte version, although products can also have a glazed front side. It is made by mixing several types of clay with the addition of special mineral dyes to give color.
Clear advantages include:
- durability (does not crack);
- color fastness (does not fade, does not fade, does not fade);
- good density indicator (in comparison with terracotta and its varieties);
- resistance to temperature differences.
Unusual clinker Source rusolymp.ru
Clinker tiles for a fireplace are good, but have the disadvantage of lack of calibration during manufacturing, so an error in the size of the samples can create difficulties in installation.
Marble tiles
Marble is good for its majestic ornamentation and chic finish. Stoves are rarely lined with this material, but marble tiles on fireplaces are not the last place in the choice of cladding.
The advantages of marble are determined by durability, color and texture fastness, environmental friendliness and aesthetics. Disadvantages: high cost of products.
Furnace in marble Source mramoroff.com
See also: Catalog of companies that specialize in the design and installation of fireplaces and stoves.
Luxurious marble fireplace decoration Source 2gis.com
Faience
Earthenware is made by dry pressing several types of refractory clays with an admixture of quartz sand. Much stronger than, for example, majolica, so you can use thinner tiles, only 4-5 mm thick, for cladding.
The material is inexpensive. Aesthetically, it is classic faience: white tiles with blue ornaments, no worse than expensive tiles or broomsticks.
Lightness of earthenware Source msk-kamin.ru
Tile
The product has good heat resistance, but the tile is very sensitive to temperature changes.
Fact! If the room is constantly kept warm, finishing the stove with tiles will be an excellent cladding option.
When freezing (no firebox in winter), the tiles will peel off and the glazed surface will crack. The strength is low, the service life is short.
The advantages include ease of care, variety in color and inexpensive cost of products.
Classic tiles in the stove lining Source kitchenremont.ru
Porcelain tiles
It is characterized by a practically zero coefficient of water absorption, due to the monolithic structure. It is produced by mixing several types of clay with quartz sand and marble chips. The coloring is created by adding salts of various metals.
This is interesting! Porcelain tiles are often represented by imitation of marble, granite tiles and even majolica, that is, for a relatively low cost you can line the stove with imitation in expensive shapes and colors.
The advantages include high heat resistance, resistance and durability. Strength is ensured by a tile thickness of 9-12 mm.
Brutal porcelain tile Source yandex.net
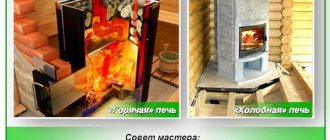
Fake diamond
The product made from cement mortars is presented as an imitation of various types of stones, bricks, and other types of finishing. Tinted with various pigments.
The stone is durable and not difficult to use. In terms of technical characteristics, it fully corresponds to natural stone.
An interesting solution - artificial stone Source yandex.net
Furnace painting process
The basis for painting a stove in a private house can be either a plastered surface or natural brickwork, provided that its integrity is not compromised. There are many options for paints and whitewashes. You can choose the appropriate option for painting the stove surface, taking into account the level of complexity of the work, the financial base and the overall design of the kitchen.
Painting the stove with lime
There are also a number of heat-resistant paints that are easy to apply and come in a wide range of colors. The most common types among them are:
- alkyd;
- organo-silicate;
- silicon-organic.
Painting the oven after preliminary preparation
With their help, you can paint the surface of the stove in any color, as well as create a unique painting with your own hands
The painting process itself is not complicated, it is only important to carry out preliminary preparation of the surface. To do this you need:
- remove the remnants of the previous finish (if any);
- wash the surface thoroughly;
- If there are greasy stains, remove them with a soda solution.
It is best to paint the stove with your own hands in several layers, at intervals for complete drying.
Tips for choosing cladding
Today, finishing a stove with tiles in a private home is not a luxury. A stove, as an element of the interior, having a special function of heat, can become a real decoration of the room. The choice of cladding is huge; when choosing, you should focus on the following:
- Budget . You can line a stove, for example, with terracotta tiles relatively inexpensively, but when choosing majolica or marble, you need to understand that the price will be many times higher.
- Style . The stove cladding is carried out in the same style as the interior of the room.
- Space . If the area of the room and the ceiling height are small, a large product will look ridiculous, it is worth choosing small-sized ceramic mosaics. On the contrary, a large stove or tall fireplace should be lined with natural stones, marble or porcelain stoneware.
- Quantity : it is worth purchasing with a 10% reserve.
- Tinting . In a calm interior, plain tiles would be appropriate; in a bright and modern interior, chic majolica or tiles would be perfect.
Choosing a strict aesthetic Source cloudfront.net
Tiles and majolica Source puzzleit.ru
The choice of cladding is associated with its technical characteristics specified in the product labeling from the manufacturer.
Marking
Marking allows you to evaluate the quality of the cladding:
- Water absorption coefficient. For finishing the stove, no more than 3% is allowed. Designated "E". Granite tiles have the best water resistance of 0.5%.
- Porosity. It is designated “PEI”, followed by numbers from I to V. For stoves, you should choose material marked PEIIV-PEIV.
- Dimensional accuracy. Marked "A" and "B". This stands for computer-aided design of the pattern. The highest accuracy is marked “A”. This product is much easier to install.
- Chemical resistance. Designated “EN122” with letters from A to D. For stoves it is better to choose “A”.
Labeling symbols Source kuhnyamy.ru
- Variety 1st grade is declared by the manufacturer to be of high quality, defects in the batch are up to 5%, 2nd grade allows 5-25% of defects, 3rd grade – more than 25% of defects.
- Environmental standards. The designation “ECO” or “Eurostandard” on the packaging will guarantee the environmental safety of the product.
- Linear dimensions. The optimal dimensions are no higher than 250x250 mm on the sides. The optimal thickness is 6-8 mm.
Design
Classic stove tiling is characterized by the absence of geometric shapes and a deep richness of complex ornaments, made mainly on the basis of plant patterns. Design solutions determine their place in the interiors of premises:
- In a village house, the cladding is supposed to be natural stone.
- The classic interior will be emphasized by porcelain tiles.
- In modern-style rooms, cozy terracotta in a matte finish would be appropriate.
- Interiors in a modern style will flourish with a stove lined with majolica or tile patterns.
Furnace design Source yandex.net
Colors
The color range of cladding is very diverse. It is selected to match the given tone of the entire interior of the room.
- Marble is presented in the most unusual colors: from soft white to strict black.
- Granite in natural colors is less varied. The tiles are gray, brown or black.
- Ceramics are not limited in the choice of colors. The samples delight with a variety of shades and colors: from the most delicate light colors to the most saturated colored and dark tones.
Multicolor in decoration Source repairblog.ru
Last wishes
In Europe there are several different approaches to creating interior images. You can, for example, build a modern house and stylize it as an old building. This is what we often do here too.
But there is another method. When an old building - very likely for industrial purposes - is adapted for housing.
Something similar can be done here - from an old house to create comfortable and modern housing. Just don’t be afraid of your own ideas and pay less attention to other people’s opinions. The most convenient and comfortable home for a person is the one in which he is comfortable and comfortable.
Stove in the interior of a private house
Watch this video on YouTube
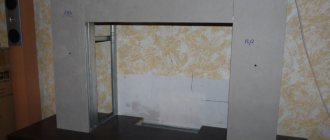
Cladding technology
Furnace cladding can be done in two ways: with glue or with metal profiles without glue. Before cladding, it is necessary to carry out comprehensive preparation.
How to prepare for cladding
Before tiling the stove, you must:
- Clean the stove from plaster. To facilitate the process, you can use a spray bottle. Once the surface is wet, removing the plaster with a spatula is not difficult.
- Remove remaining particles with a brush. To do this, re-wet the surface of the oven, then clean it. The seams are deepened. Cleaning is done with hand tools, or you can use a grinding machine.
Cleaning with a grinder Source rems-info.ru
Cleaning by hand and with a drill with attachments Source gidpokraske.ru
Important! If you plan to line a new stove, then after finishing the masonry you need to wait six months for the stove to settle!
- Prime the surface of the oven. This will ensure adhesion and additional protection. It is advisable to prime two layers. Before applying the second coat, you need to make sure that the first coat of primer is dry.
Wall priming Source vse-otoplenie.ru
- Level the surface using a 10 mm thick clay mortar. Differences in the wall are unacceptable. The clay mixture is applied to the surface with a spatula and leveled using the rule. The corners are secured with metal corners.
- Lay the reinforcing mesh, pressing it into the solution before it dries, then leave the walls to dry.
- After drying, apply final priming and leave the oven until completely dry.
With smooth walls, the mesh can be stretched without leveling. Source stroyfora.ru
Preparatory stage
To ensure that the ceramic tiles used for tiling do not fall off and serve for a long time and with high quality, the working surface must be prepared. The preliminary stage consists of removing any old coating of the stove - whitewash, plaster, varnish, etc.
If the stove masonry is old, then it is worth carefully inspecting it and eliminating possible defects. All cracks, holes, and crevices must be covered, wait until completely dry, and then sand the surface. You will have to resort to leveling the walls if the device is askew. A curved surface is unlikely to serve as a good “platform” for strengthening the cladding. For leveling, it is necessary to use a sand-cement mixture (at a ratio of 3:1), cement with a grade of at least M400 is suitable. To keep the walls smooth and beautiful, do not forget to pick up a plumb line or building level more often.
In the process of leveling furnace walls, you cannot do without special equipment.
The seams between bricks should not be thick or protruding. It is best to deepen them using a grinder with a special attachment. 10 mm will be quite enough. If there are no such devices, then you will have to use the “old-fashioned” method - a chisel with a hammer. After this procedure, use a wire brush to clean the edges of the recesses.
A chain-link mesh placed between the brickwork and the ceramic surface will help avoid various troubles that appear from temperature changes (cracks, chips, distortions, voids, etc.). To ensure that the metal mesh holds firmly on the brickwork, use dowels (or nails 70–100 mm) in brick joints with a fastening pitch of 50 cm. The caps of the fasteners should protrude from the surface to a height of ten millimeters.
To give the working surface greater adhesion (adhesive properties), a deep penetration primer layer is applied over the chain-link. Wait for the layer to dry completely, clean it and start laying ceramic tiles.
The stage of attaching the chain-link mesh will help in the future to better join the ceramic plates
Video description
Watch the video on how to attach the reinforcing mesh to the wall of the stove, if the solution is not applied.
After carrying out a set of preparatory work, you can proceed directly to the installation of the facing tiles.
Cladding with glue
Before starting installation, you must prepare the correct adhesive solution. The main components are PVA glue and cement compounds. You can add salt. The main thing is to maintain the proportions correctly.
For a person who does not have experience in preparing the solution, preparing the glue can be quite a difficult task. There is another option - buying a ready-made adhesive solution at a hardware store.
Ready-made glue Source stroyfora.ru
Classic finishing of the stove in the house with facing tiles begins with cutting the tiles. This is a complex process, but with all the necessary tools, the cutting process can only take a couple of hours.
When the glue is prepared and the tiles are cut, proceed directly to installation:
- Work begins with laying the first row. This is done using a building level and a horizontal marking cord.
- The adhesive is applied to the tiles and leveled using a notched trowel.
- A tile with an adhesive composition is applied to the furnace wall and pressed with force. The first tile must be aligned not only vertically, but also horizontally. Subsequent ones are aligned relative to the first.
Attention! The glue begins to set within 7-10 minutes. The position of the tiles must be adjusted immediately during installation.
Applying cladding to glue Source standart40.ru
Design development
Finishing a stove is a long and rather painstaking job. Don’t be scared, you can do it yourself, the main thing is to follow all the rules and take your time.
Before delving directly into the question of how to veneer a stove, you need to think a little about what the room as a whole will look like. The fact is that such coating is made for many years. Accordingly, this must be taken into account when arranging the entire house.
For example, the stove is often made of brick. For this purpose, special fire-resistant material is used. In principle, it itself can act as a decorative element. But this doesn't happen so often. I would like to achieve a certain combination - to preserve the flavor of a Russian stove and add a touch of modernity to it.
The finish of the stove should be in harmony with the interior details
Therefore, they immediately decide on the material that will act as finishing. Its combinations with other decorative elements are thought through. Perhaps zoning of the room is arranged, which allows you to combine many options.
Video description
This video shows the combined lining of the stove with artificial stone
Cladding without glue
The installation method without glue is more labor-intensive, but has advantages over the adhesive method. If it is necessary to replace one or more tiles, there is no need to disassemble the entire surface; it is enough to dismantle the damaged ones and put new ones in their place. The cladding in this case is a “constructor”.
An example of dry cladding Source ytimg.com
With this method, tiles for cladding stoves are installed using a dry method. The design is more durable and heat-intensive. It does not require a large complex of preparatory work: the stages of removing old plaster and cleaning can be eliminated in this case.
- Using a building level and a cord, the future frame is marked. The surface of the oven is lined relative to the width of the tiles with a margin of 2 mm for seams.
- A metal frame is mounted. Aluminum profiles and corners are attached to the anchors. The result is a frame structure.
- The frame is checked by running the tiles along the guides. The element must move freely without difficulty or jumping out of the frame.
- The frame is filled with tiles.
- The structure of vertical corner profiles and corners is secured to the self-tapping screws.
This is what a stove lined with the dry method looks like Source ytimg.com
In conclusion, we note that lining a stove with ceramic tiles will visually ennoble any stove. The lined stove will become a bright element of the interior, continuing to fulfill its main purpose of heating the room.
Decor
We must not forget about additional decor and harmonious coverage. A stove arch often turns black from smoke, regardless of the quality of the brick coating. To cover this part of the stove, you can use metal elements or decorative stone overlays.
The color scheme is also important, which should be in harmony with the room and furniture. It is better to choose a color based on the shades of the floor, ceiling or walls. Remember, if clear enamel is used for painting, it will still have the tint of the wall.
If you decide to install additional decorative elements, then it is important to choose the right adhesive composition for them. Not all substances can hold elements on a painted wall for a long time
You can create an unusual design using different paint colors. For example, paint all the bricks in different colors.
Combination of paint, lime and metal elements Source gidkaminov.ru
Briefly about the main thing
There are several types of facing tiles: based on clay, natural or artificial stone. The material must be fireproof, heat-resistant, durable, not absorb moisture, conduct heat well and at the same time have an attractive appearance.
The building materials market offers models for every taste and budget: pretty terracotta and harsh fireclay tiles, amazing majolica and delicate faience, majestic marble and modest tiles, strict porcelain tiles and luxurious brooms.
There are two cladding technologies: glue and metal frame. The choice of tiles is made according to technical characteristics, taking into account markings, design and colors, and cladding technology according to the expected operating conditions.
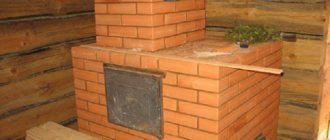
Specification of masonry and finishing
As you already understand, experts recommend that any stone buildings that will subsequently be exposed to high temperatures be built from fireclay bricks using a special refractory mixture. Select bricks for the fireplace of the same dimensions, so as not to later compensate for the distance between them with mortar.
It is necessary to use a mixture that is close to the composition of the material itself. The solution is created directly at the construction site using: dry refractory powder, liquid glass and water, mixing thoroughly. To make the mixture more plastic, add clay or soda with a high calcium content. The intensity of the kneading will directly affect the masonry and the height of the seam.
If all the rules are followed and the masonry is done correctly, then such a stove will last a long time. All that remains is to decorate it to match the interior of the house, using cladding. And this is not so difficult to do; the materials you will need are:
- the brick you decide to use;
- mixture;
- asbestos cardboard;
- steel corner.
Tools: trowel, spatula, plumb line and level.
First you need to make a base for the cladding - a supporting surface, which is needed with a huge mass of brick finishing. Some craftsmen manage to finish the fireplace in such a way that its weight increases to half a ton. Therefore, make sure that the floor can withstand the construction work you have in mind. If your flooring is made of concrete, then to strengthen it you will need a sheet of metal on which asbestos cardboard, approximately 5-10 mm thick, is laid. Then you need to prepare a solution, it is advisable to use tips for strengthening: add a little clay or soda. The mixture should not be greasy or liquid. When you finish mixing, be sure to check it the old way: roll the mortar into a cord and roll it into a ring; if the clay does not fall apart and does not give strong cracks, the mixed mortar is excellent for finishing a brick oven with your own hands.
When everything is ready, you can start. The cladding begins with fitting, lay the first row in half a brick, leaving two holes on three sides for air intake, the width should be the same, half a brick. On the free upper part of the building material it is necessary to lay a couple of metal corners, which will create support for the upper rows of bricks. You can also hang a door on them, but this is more an aesthetic issue than a necessary one.
Then you need to bring the height of the finishing masonry to the level of your fireplace so that the gap left between it and the lining guarantees good ventilation. If, due to the small size of the room or some other reason, this gap cannot be achieved, you need to install an outlet hole in the top row, the same as in the lower parts of the stove.
We have described the most reliable and budget-friendly type of facing work for a fireplace. In general, there are a large number of methods on how to decorate a brick oven with your own hands.
Beauty majolica
The tiles, painted with bright fiery colors and covered with a durable layer of glaze, came from the Mediterranean.
Ancient Roman traders brought it from Mallorca. The area was famous for its tin-lead painting on ceramic tiles and pottery.
Glazing serves as another layer that retains heat inside the finishing material, so majolica was in demand as an excellent type of cladding.
Only wealthy people could decorate their stoves with such beauty.
Tiles
Tiles are a classic version of cladding a Russian stove, making it a harmonious and sophisticated element of any interior. Tiles look solid and expensive; they not only improve the aesthetics of the stove, but also improve the heat transfer of the structure and contribute to better heating of the room.
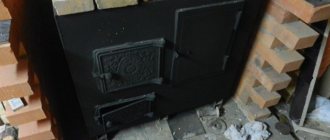
Tile
The tile, unlike classic tiles, has rumps on the reverse side, that is, open boxes designed for fastening to the wall. Tiles can be terracotta and majolica, have a relief or smooth pattern in any style.
Materials and tools
For tiling you will need:
- tiles of the selected type;
- steel pins for fastening (wire with a diameter of 5 mm);
- soft burnt wire;
- rosary;
- staples;
- clay (used to fill the pump);
- filler for the tiller (used together with clay, these are gravel, pebbles, broken stove bricks);
- gypsum grout;
- level;
- square;
- plumb line;
- Bulgarian;
- putty knife;
- rasp.
When calculating the number of tiles, you can use a similar diagram or create your own based on it.
Scheme of finishing a Russian stove with tiles
The work will require the following types of tiles:
- straight;
- corner on external, internal corners;
- cornices (corner and straight);
- vault cornices;
- regular tiles without a pattern;
- shelf (corner, straight).
For the base of the stove, massive tiles with a large thickness are used, for the rest - lighter and thinner ones. The pattern and color may vary, but traditionally the central part is highlighted, and the base and top are made lighter or white. But this rule is not mandatory and the type of tiled covering is chosen in accordance with the interior and personal preferences.
Instructions
Before cladding begins, the surface must be cleaned, primed, after which a mesh is attached to the seams of the brickwork. Maximum attention should be paid to the layout of the first row; it is also called “hooves” and sets the tone for the entire structure. Step-by-step instructions include the following steps:
- A layout diagram is drawn up, the tiles are carefully laid out on a horizontal surface (on the floor), each element must be numbered in accordance with the diagram;
- The tile is soaked;
- After removal from the water, each pump is carefully filled with solutions of clay and filler (you can use a mixture of clay, quartz sand, broken brick in a ratio of 1:2:2);
- The laying should begin from the bottom corner, while a metal pin is pulled through the special holes of the tiller and bent upward;
- The next row will be connected to the bottom one using this wire and staples, creating a strong fastening; the tiles are attached to the wall of the furnace with soft wire in the form of a loop inserted into the brickwork;
- The subsequent surface is finished in a similar way, with wire fasteners and loops being formed as the tiles are attached.
A day after completion of work, the seams are filled with grout, all excess mortar is removed with a damp sponge.
Work example 1
Example of work 2