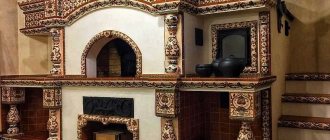
Of the existing heating options, the Kuznetsov stove for a bath can be considered the most successful solution for any room size. Unlike most existing projects with intricate interweaving of channels and heating surfaces, Kuznetsov’s sauna stove looks quite simple and easy to build with your own hands. True, in order to achieve high performance from the bell-type furnace of the Kuznetsov scheme, it is not enough to build the brick furnace box well, you also need to at least understand the principle of its operation.
Kuznetsov’s brick stove takes up minimal space in the bathhouse
Brick sauna stoves Kuznetsov
By design, these are classic wood-burning fireboxes with direct combustion of fuel on cast iron grates; the main part of the heat is released through the front surface and side pockets called hoods. There may be one or two such cavities in the oven. The design of a brick stove for a bathhouse with a built-in hood was invented quite a long time ago; Kuznetsov only refined the principle and came up with an original design.
In the classic version, the hood cavity is located next to or on top of the firebox
Is this real - do-it-yourself blacksmithing?
It must be said that laying a blacksmith requires not so much skills as the presence of good diagrams and drawings, as well as extreme care. Even a non-stove maker, but a skilled house owner can master this task. On the website of the author I.V. Kuznetsov has many freely available ideas and diagrams for the Kuznetsov stove, drawings and clear instructions that are allowed to be taken for personal use.
It will be easier for those who already have valuable experience in bricklaying, then the only thing you will need to do is quietly and peacefully lay the rows, following the pattern. But there are several secrets that are not described in the diagrams, however, in this article you will find most of them.
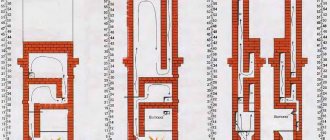
Kuznetsov furnace diagram
Thanks to Kuznetsov’s innovations, it was possible to solve two rather serious problems:
- Reduce the dimensions of the brick stove, which made it possible to install it even in small steam rooms of the bathhouse;
- Achieve complete combustion of firewood with a minimum amount of soot and water condensation released.
Important! In general, the brick box turns out to be compact and light, so very often the Kuznetsov brick stove for a bathhouse is placed on a simple rubble foundation or even on wooden floors.
On average, the height of the Kuznetsov stove, taking into account the cavity for the heater, does not exceed 110-120 cm, the width and length at the base are 80x90 cm. This is the best option for a steam room and heating a bath. With such dimensions, it is equally convenient for an adult to manage both watering the backfill in the heater and cleaning the firebox and ash pan.
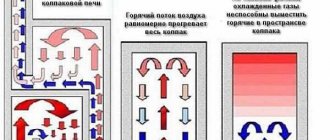
The main element of the Kuznetsov furnace is the hood. Most of the hot combustion products are not thrown out through the roof of the firebox into the chimney pipe, but additionally enter the side cavity, where they give off heat, cool, and only then are thrown up through the smoke channel to the roof.
The auxiliary cavity can be used for installing a heat exchanger for hot water in a bathhouse
Preparatory work
Before starting construction, select a location and determine the design and location of the chimney (both indoors and on the roof). After this, you can begin work on arranging the base of the furnace. If the heating unit is being built together with the house, then a common foundation is poured. In the case when the stove is placed in a living room, it is necessary to remove the part of the floor that falls on the “blacksmithing”. In this case, the outer contour of the stove base should be 10–15 cm larger than its dimensions.
To arrange the foundation, make a depression of 20–25 cm, at the bottom of which a sand cushion 10 cm thick is poured, which is spilled with water and compacted. After this, a reinforcing mesh is laid at a height of 5 cm, formwork is installed along the outer perimeter and the structure is filled with concrete. You can start laying immediately after it has completely set, which, depending on the temperature, occurs in about 2–3 days.
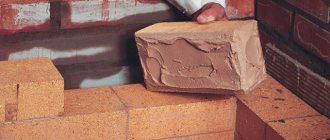
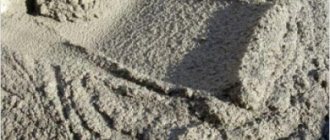
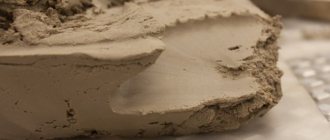
In addition to pouring the base, you will need to prepare a solution before starting masonry. To do this, take clean clay and sifted river sand. The clay is poured into a large metal container, kneaded and soaked in a small amount of water. After it has liquefied well, add sand and bring the consistency of the solution to the state of very thick sour cream. Most often, stove makers use a proportion of 3 parts clay to 1 part sand, but the correct ratio of components depends on the type of clay - the higher its fat content, the more sand will need to be added (up to a 2:1 ratio).
When starting work, it is better to print out the orders on paper, crossing out each laid row during the construction process
Particular attention is paid to the installation locations of the lining layer - on the diagrams they are highlighted with a dotted line or a different color. Please note that if ordinary brick is used instead of refractory material, then such a stove will not only be short-lived, but also ineffective
Types of furnaces
The cap has been used as an element of the channel system for quite some time. In different versions, from a brick vault in a furnace to a cast iron slab or backfilled with stone. The simplest bell-type sauna stove may have a built-in steel or copper vault, which significantly improves the conditions for the movement of hot gases.
An additional cavity can be built over the firebox for better heating of stones or a built-in water tank.
Kuznetsov’s brick sauna stoves differ from the classic versions of fireboxes with a hood in three conditions:
- In the design of the hood, the afterburning of unburnt gases necessarily occurs, so Kuznetsov bathhouse stoves always have a high, too elongated body shape;
- The cap in the Kuznetsov stove creates minimal resistance to the passage of gases, therefore the draft in the chimney is higher than that of classic models of fireboxes and sauna heaters;
- For Kuznetsov, an additional pocket inside the stove body is always designed as a separate cavity; it can be made next to the firebox or moved to the upper part.
A bell-type stove - a heater operating according to the Kuznetsov scheme - can be easily distinguished by the presence of an additional window with a door located next to the ash pan.
Important! It is believed that the additional cavity of the hood not only improves the burning conditions for firewood, but also compensates for the pulsations of hot gases inside the chimney.
This means that with the correct ordering of the Kuznetsov sauna stove, you can completely avoid such unpleasant phenomena as the appearance of backdraft in the pipe and the throwing of soot from the chimney onto the roof of the sauna.
More about round ones
Round stoves theoretically have a lot of advantages, but they are not very convenient in the house. However, there is also a significant demand for compact mobile ovens, and here the extremely high efficiency of round multi-caps can be a decisive factor, because when the size of the oven decreases, its efficiency drops sharply due to the square-cube law.
Such furnaces, of course, would have to be made of metal. This solves the problem of cleaning; the stove can be made collapsible. But the choice of metals suitable for the ratio of heat capacity and thermal conductivity is extremely limited. The only inexpensive ones are cast iron, but it is heavy and fragile.
However, there is a lighter and stronger metal material with similar properties. These are products of powder metallurgy. In relation to scissor knives, “powdered crap” is quite justified, but for a stove in which nothing works for shear, powdered parts can be a godsend.
The second problem, which has already been mentioned, is the heat-resistant lining on the arch of the first cap. If it can be solved, then perhaps the works and efforts of Igor Viktorovich Kuznetsov will bear fruit that is more extensive and significant than it now seems.
Below you can share your thoughts and results with our readers and regular visitors.
You can also ask questions to the author*, he will try to answer them.
Advantages
The main advantages of the Kuznetsov stove are not only the absence of soot stains on the roof of the bathhouse or protection from smoke escaping into the steam room. The Kuznetsov system has quite a lot of advantages; only the most important ones can be listed:
- The presence in the hood of a grate made of fireclay bricks, on which gases and soot are burned in hot water vapor. As a result, only non-condensable and volatile substances enter the chimney of the Kuznetsov stove. Simply put, the chimney does not become clogged with soot and does not sweat with condensation;
- High efficiency of the firebox, approximately 95%, which is 15-20% higher than that of a conventional brick stove built in a bathhouse with direct smoke exhaust into the chimney;
- The high temperature of the arch in the bell ensures heating of the backfill up to 400°C; the stones will never be cold, even with a small load of firewood on the firebox.
A feature of Kuznetsov’s design is that during the afterburning of gases under the arch of the firebox, a very high temperature develops in the upper part of the bell. This promotes deep combustion of gases and wood thermolysis products. At first glance, it’s a trifle, but if it occurs to someone to heat the stove in a bathhouse with pine wood or chopped logs from wooden sleepers, nothing terrible will happen. Nothing but a foreign odor will appear.
Kuznetsov, while developing his version of a wood-burning sauna stove in the last century, came up with an interesting device known as a dry seam. Essentially, this is a vertical gap or gap of 1.5-2 cm between the wall and the end of the partition separating the hood space from the firebox. Through the upper part of the gap, hot gases flow from the furnace into the bell space.
Through the lower edge of the seam, colder ballast gases that do not support combustion are sent directly into the chimney, without taking away precious heat from the combustion products. It was thanks to this device that the Kuznetsov stove became widespread as the most economical for heating baths, living quarters, drying food and baking bread.
Features of cooking fish in an autoclave
When working with an autoclave, you should take into account some nuances that will help you avoid troubles when working with the device and prepare delicious homemade canned fish:
Cooking canned food in an autoclave occurs under high pressure and at high temperatures.
That is why you should take all precautions when working with it. Before lighting a fire under the apparatus, first build up the pressure and check the tightness of the autoclave. You can open the device only when the temperature inside drops to 30 degrees. Canned fish in an autoclave is prepared at a temperature of 100-120 degrees. The cooking time depends on how you want the final result: boiled stew or whole pieces with soft bones. You should not put raw materials in jars to the top; you need to leave a couple of centimeters from the edge
Otherwise, the lid of the jar may come off. The jars in the autoclave are filled completely with water, even 2 cm above the lids.
For most recipes, it is enough to place raw, cleaned fish in jars - it will be cooked during the sterilization process until fully cooked, including softening the bones. The temperature regime will ensure the destruction of all microorganisms. Autoclaving allows you to preserve the taste and beneficial properties of canned fish. In addition, there are a lot of recipes available: you can cook fish in oil and tomato, make stew and pate from it.
Small fish can be preserved in an autoclave by simply gutting them - you don’t even need to cut off the fins, because they will also get boiled. If you can preserve fish in pieces in oil, it is better to lightly fry it without breading - this will help maintain its shape. For the same purpose, you can add a little sugar to each jar. To make the taste more rich, standard seasonings - bay leaf and pepper - can be varied with coriander or cumin.
Drawing and order
Below is a universal version of the heater with base dimensions of 630x1020 mm. The height of the oven is only 1050 mm.
Among the advantages of this scheme, one can note the simple layout of the partitions inside the oven. The negative aspects include the presence of a fireplace tooth. Without it, the oven will be uneconomical. Typically, such heaters are used in small baths, where the heater simultaneously heats both the steam room and the sink with a dressing room.
Order for the classical Kuznetsov system with two caps
A simple version of the Kuznetsov furnace
A more accessible and at the same time economical version of the oven for making it yourself is shown in the diagram below. In fact, the simplest Kuznetsov stove is a box-shaped body made of red brick, inside of which there are three cavities. The first is reserved for arranging the firebox. The second and third are respectively used for the afterburning hood and the exhaust lift duct.
The partition and the inner surface of the firebox must be lined with fireclay bricks, which avoids burnouts and cracking of the partitions and outer walls of the furnace.
If desired, the Kuznetsov furnace can be made with a cavity for heating the air or limited to the simplest solution, but with the installation of an afterburning catalyst grate made of fireclay stone.
What materials are needed
For laying out the outer walls of the Kuznetsov furnace, it is recommended to use red ceramic stone of the M150 brand measuring 250x120x65 mm, without lightening edges and cavities. On average, one stove will require at least 200 pieces. bricks As a masonry mortar, you can use a mixture of clay and low-quality cement, but it is better to buy good glue for fireplace and brick sauna stoves.
The same applies to laying the refractory; according to Kuznetsov’s recommendations, we line the firebox with ShB8 fireclay, and the remaining parts, including the cap and the cavity under the dry joint, with Sh5 brick. Glue for fireclay needs to be purchased; any homemade solutions crumble within a month, even with a light bath load.
You will also need asbestos fiber in cords, basalt cardboard 5 mm thick, metal, preferably cast iron inserts in the furnace portal, as well as accompanying shut-off valves, cast iron grate, doors and valves.
In addition, to arrange the foundation of the Kuznetsov stove in the bathhouse you will need rubble stone, sand, crushed stone, a small amount of roofing felt and a metal mesh to reinforce the base.
We build a sauna heater from solid red and fireclay bricks
Required Tools
To build a Kuznetsov stove, the same set of devices is used as for any brick heater for a regular bathhouse. In addition to the entrenching tool, to dig a mini pit you will need:
- Caliper, tape measure, building level, carpenter's corner;
- Container for diluting glue or masonry mortar;
- Trowel, mason's hammer;
- A grinder with a set of stone discs, a couple of diamond-coated circles for cutting fireclay;
- Wire, fittings, tools for cutting them.
We pay special attention to cutting and cutting bricks for laying the stove. If red ceramic is cut more or less tolerably even with an angle machine, then fireclay has to be cut in several passes, under light load, avoiding overheating and thermal shocks. Fireclay stone easily chips in unexpected places. You will have to cut bricks for the Kuznetsov system oven a lot and often.
Foundation preparation
First of all, you need to calculate the total weight of the Kuznetsov furnace; we separately calculate the amount of red and fireclay bricks. To this we add the weight of the chimney and stone backfill. If the weight turns out to be more than 400 kg, then you will need to make an individual foundation.
Usually the base inside the bathhouse is poured in the form of a concrete slab. A pit is dug in the ground, the dimensions of which should be at least 1.2-1.5 times larger than the dimensions of the furnace. Sand and fine gravel fall to the bottom. Next, rubble stone is laid, on top of which a concrete pad is poured. It’s better not to place the bathhouse on a wooden floor; Kuznetsov’s firebox gets too hot.
The last step is to fuse roofing material onto the concrete and lay thermal insulation basalt cardboard. In this case, the base plane should be at least 40-50 mm above the floor level in the bathhouse, and the resulting gap along the perimeter of the foundation should be sealed with a heat-resistant sealant.
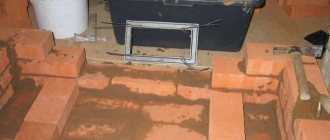
Brickwork
The construction of a Kuznetsov heater begins with laying out the first row, usually a platform or a pile of ceramic stone in two layers with overlapping seams.
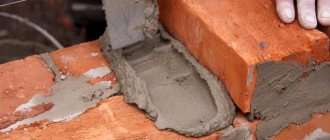
Next, you need to lay out the bottom and chute of the ash pan from fireclay, lay a cast-iron grate and form outer walls and a partition from red brick that separates the firebox from the space of the hood and the chimney duct. The thickness of the seam should not be more than 7 mm.
The walls will need to be laid out to the height of the fuel chamber, after which we will make the main parts of the Kuznetsov furnace - a fireclay grate and a dry seam. We cover the walls inside the furnace with basalt cardboard and seal them with thin fireclay tiles.
Next, we install the door into the combustion chamber, be sure to tie it with wire, and loosely seal the seams and joints with asbestos cord. The sealing procedure will need to be repeated after the first heating and cooling without washing in the bathhouse.
We fill the upper plane with bricks, and install a cast-iron valve with a rod drive in the ceiling vault of the heater.
Computer
Computer wires really spoil the interior of a room, and if you get a little creative, you can hide them quite beautifully.
The first idea is to disguise all the cords from the monitor, system unit and modem under the table cover, securing them with clips on self-tapping screws or double-sided tape. This idea is clearly shown in the photo example:
You can see another simple way to hide everything unnecessary under the table cover in this video lesson:
How to remove unnecessary cords from the “computer”?
Don't want to spoil the table? You can hide the wires from your computer equipment in a shoebox, decorating it in an original way to match your bedroom interior.
You can find out how to make such a box with your own hands by watching this video:
How can a shoe box be useful?
In addition, an original idea is to buy a special cover for the extension cord, which is quite simply attached to the desk lid.
If the cord from the speakers bothers you, you can easily hide it in an appropriate case that is attached to the back of the table.
All unnecessary cords, including charging, can be beautifully removed from the table using ordinary clips, as in the picture below:
Another idea is to thread the whole bunch of wires through a hose. In this case, the chaos under the table will hide in one single shell, which will not spoil the interior of the room or even the office so much.
Using all these tips, you can disguise electrical wires and make your workspace more tidy. There's nothing complicated about simply placing cords and cables in a box or securing them under a table! In addition to the fact that you will put order on your computer desk in this way, the disguise also allows you to protect the cords from dogs and cats that like to chew on chargers, headphones, etc.
1
Capital measures - hidden wiring in the wall
Many people try to resolve such issues even at the stage of initial renovation of the premises.
After all, it is necessary to hide the wires from the TV on the wall in such a way that they not only do not attract attention, but are also reliably protected. Neither a cat nor a small child will then be able to reach and damage the cord
For this reason, hidden wiring is one of the most popular solutions to the problem, although this method is very complex in terms of execution and costly in terms of finances.
To achieve the maximum level of security for the location of wires, it is recommended to hide them in specially made grooves
This method is the most technologically advanced and accurate; all work is carried out at the repair stage, so in the future all that remains is to carefully place the cord from the receiver into the drilled holes. Another important advantage is the fact that there is no need to chisel the entire wall
The TV is usually installed at a height of a maximum of two meters, so you will need to cut a segment of approximately this length.
Actions to implement the plan can be carried out in the following order:
First, you need to accurately determine the location of the TV and, as a result, the bracket on which this device will be located. An important point is the bracket itself. There are quite a few different options for this mounting device, although the world standard is the VESA type bracket. This equipment includes the necessary mounting points
Much attention should be paid to the size and shape of the fasteners. Otherwise, the bracket may turn out to be too large for your TV or even interfere with the routing of connections. It is recommended to buy the TV in advance in order to be able to measure everything clearly and without errors. Next, you should mark with dots on the wall the places where the electrical sockets will be located. Now you can proceed directly for drilling walls
Using an angle grinder, better known as an angle grinder, we make two strips from the bracket to the future sockets. The distance between the strips is in the range of 2 to 3 centimeters. To obtain a groove, you should use an impact drill or hammer drill to knock out the inner part between the strips made. Now all that remains is to make a few holes using diamond bits for the television socket. If other household appliances will be connected to this output, it is recommended to immediately install the required number of power points.
The gating process is not the most difficult, but you still have to spend a little time. At the end of all the work, all that remains is to hide the wires from the TV on the wall
To do this, carefully place them in the hole made and secure them with brackets so that they do not fall out and interfere with the finishing of the walls. The grooves are treated with gypsum plaster, after which further finishing of the walls can begin.
We recommend
How to hide TV wires on the wall - original solutions. Part 2Fireplace in the interior: interesting solutions for your homeFireplace in the interior: interesting solutions for your home
Possible difficulties
Most problematic situations with the Kuznetsov system arise due to improper operation. At first, you should not heat the sauna room at full power. The torch inside the Kuznetsov firebox is almost three times higher than that of a conventional furnace, so the walls and especially the vault heat up very quickly. As a result, cracks appear and the masonry adhesive crumbles.
In addition, all metal parts inside the firebox must have a loose fit to prevent thermal expansion of the metal from tearing the seam or pushing out the stone.
Another problem may arise in a situation where the firebox door frame is in close contact with the hot chamotte; over time, the refractory stone will squeeze out the metal base, and Kuznetsov’s apparatus will begin to smoke inside the bathhouse for no apparent reason.
Types
Stove equipment for baths can be divided into groups depending on various factors - the type of fuel used, the material from which the unit is made.
By material
Depending on the material, there are two types of structures:
- Brick. Standard stoves for Russian baths. They retain heat for a long time, but take a long time to heat up.
- Metal. The structures can be purchased in specialized stores or assembled yourself. Allows you to quickly warm up bath rooms. Metal burns out over time due to exposure to high temperatures.
The choice of stove depends on the amount of free space in the bathhouse, financial capabilities, the presence of a separate base, and the necessary technical characteristics.
By fuel type
Depending on the type of fuel, there are 3 types of designs:
- Gas. The least popular models, since connection to the central gas supply system is not always available. Using cylinders is inconvenient; only specialists with certain permits can connect gas equipment.
- Electrical. When using such equipment, there is no need to arrange and clean the chimney. You can precisely regulate the temperature.
- Wood-burning. They work from any type of firewood or briquettes made from compressed sawdust.