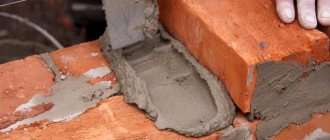
In order to avoid the formation of cracks, it is best to plaster the stove with fireclay clay, but not in its pure form, but with sand and cement. The principle of the work itself in this case does not change - this is done to level the surface and apply a top layer to it (paint, tiles, decorative stone, lime whitening).
Below we will look at some of the nuances of both the material itself and the method of its application, and in addition, as a supplement, we will demonstrate a thematic video in this article.
What is fireclay clay
Most often, even experienced salespeople in large construction supermarkets will not be able to clearly explain what kind of refractory composition you need to take for this or that type of work, and in pursuit of sales figures they will not delve into your problems much. You will understand why there is such a high probability of error a little later, but now – the definitions.
Surface preparation
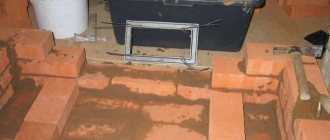
Before the main work, the new and old stove should be prepared.
Finishing of a new product can only be done after the final hardening and shrinkage of the masonry mixture. Otherwise, the applied plaster will crack very quickly. In addition, it is important to heat the stove several times, even if this happens in the summer. The walls should warm up well and condensation should disappear. It is recommended to unstitch the seams to a depth of 0.5 cm and brush over the metal. It is worth making notches on the concrete surface (for better adhesion of the plaster to the walls).
If the stove is old, pieces of chipped mortar, plaster, whitewash or paint are removed. If necessary, the walls are cleaned entirely. Cracked bricks are replaced with new ones and re-laid. The remains of the loose solution are swept away with a broom.
In both types of furnaces, soot and soot are removed from the surface, and the ash is cleaned. Oil stains are removed with a degreaser.
Next, use a brush to thoroughly prime the entire surface to be plastered.
Rules for choosing fireclay clay in a store
What can be said with absolute confidence when choosing this material is that with an increase in the numerical value in the marking of mortars, the fire resistance of the composition increases, but other indicators can vary significantly.
Thus, most often the shrinkage of masonry mortars based on fireclay clay varies from 5 to 18%, but if there is a large amount of quartz sand in the mortar, the composition may even swell - increase in volume when exposed to temperature.
Therefore, no matter what the sellers tell you, carefully read what is written on the packaging of the mixture. In most cases, it describes in detail what it should be used for and even what kind of bricks to lay on it.
Fireclay bricks also differ in composition and the finished mixture must be selected based on this.
Otherwise, you may get undesired results.
Fireclay bricks can often live more than one life, that is, they can be used in more than one stove or fireplace due to their special strength and durability. If you deal with these, then most likely they are oriented at temperatures of 1100 - 1300 ° C, due to the age of their manufacturing technology.
How to make fireclay?
You can often hear that fireclay is cracked, plaster is crumbling, and so on. The reason may be material that was stored in unsuitable conditions, the expiration date has expired, or (the most common option) an incorrectly mixed composition. So how to properly make a mortar for laying brick and plaster?
Fireclay mortar for bricklaying
In this case, the first material you come across will not work. The fact is that the quality of fireclay powder depends on its fraction and production method. Like cement, fireclay clay has its own brands. If you see the letter “U” on the bag, this means that defective kaolin brick was used in production. It is cheaper, but it is not worth using it for important work.
Most often, the following types of solution are used:
- A solution of 1 part kaolin and 2 parts fireclay sand (fraction up to 0.5 mm).
- A solution of 1 part kaolin and blue clay, 4 parts fireclay sand.
Higher strength of the solution can be achieved by adding Portland cement to the composition. It should be understood that this will reduce the fireproof qualities of fireclay.
To dilute clay for laying a stove, you need:
- Select a container of the required size (the solution should be mixed without splashing out).
- Pour out the required composition (choose from those described above) and fill with water.
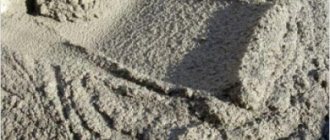
- Mix the solution so that there are no lumps in it. It should be thick.
- Leave it for three days.
- Add water; the consistency should resemble sour cream. If the solution turns out to be too liquid, add powder.
If the mass is thick, without lumps, it can be used. Don't rush to add water a second time; if you don't let the solution sit long enough, the clay will crack.
There are compositions for instant mixing that do not need to be kept for three days, but they are much more expensive. In addition, PVA glue is added to the solution and reinforced with fiberglass.
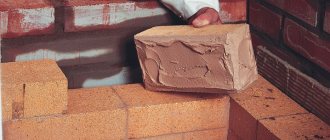
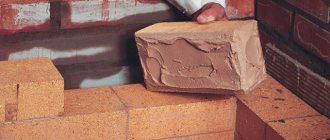
A special refractory brick is placed on such a solution; it is not used for laying ordinary red bricks due to the difference in the coefficients of thermal expansion.
Chamotte mortar for putty
In this case, the mixture is prepared with the following composition:
- Portland cement – 1 part;
- fireclay clay - 2 parts;
- quarry sand - 7 parts.
You need to mix the solution in the same way as for masonry.
To strengthen chamotte plaster, a special metal mesh is used.
Plaster on metal mesh
Supplements
To enhance any properties of the solution, the following components are added to the composition:
- PVA glue;
- table salt;
- liquid glass.
Table salt is added in an amount of about 100 grams per bucket of solution, and glass - up to 3% of the total mass of the mixture. Additives are an excellent way to improve the characteristics of fireclay.
Fireclay clay is a safe material, but you should not allow it to come into contact with your face or eyes. Also, if you are mixing the solution indoors, ensure proper ventilation.
Use Cases
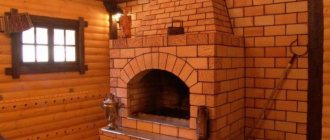
Kaolin can be used for furnace masonry. It is also used as plaster and for making decorative items.
In addition to being used for decorative purposes, chamotte clay is actively used when laying stoves and fireplaces
When building stoves, they look at the markings applied to the surface of the products. Usually the letter "Ш" is indicated. The material most often used is for masonry of the firebox, since its cost is high, so it is impractical to use it for the rest of the work. They lay it on special clay. Its characteristics are the same as those of brick.
For use in plaster, large and medium spatulas are used. It is necessary to apply the material in a layer of no more than 2 mm. As soon as it dries, you can begin finishing work.
Fireclay fireclay has a unique texture and composition. That is why designers paid attention to it and began to use it to produce unique blanks. These can be ceramic dishes, original figurines. To ensure greater plasticity, various impurities are added. The finished products look beautiful, and they are absolutely safe. Most often, fireclay chips are used as additives in the production of decorative objects. It is added to plastic clay.
Mortar
The clay mixture is not suitable for the construction of a chimney and stove foundation. Condensation collects in the part of the chimney that is located above the roof. Because of it, the clay can crack. When building a foundation, clay mortar is not strong enough. It is best to use lime paste as a base for such purposes.
This dough is made by mixing water and quicklime in a 3:1 ratio. It is not recommended to make it yourself, as this can lead to injury to the skin and respiratory tract. It is better to purchase ready-made lime dough at any hardware store.
To prepare the solution, you need to sift the sand and rub the dough through a sieve. Then you need to mix one part of the dough with three parts of sand. Add water to obtain the required consistency.
To increase the strength of brickwork, you can use lime-cement mortar. To prepare it, we take one part of cement, two parts of lime paste, and ten parts of sand. First, mix sand and cement. Dilute the dough with water until it becomes viscous. Then add a mixture of sand and cement to the milk of lime and mix. If necessary, add water again in small portions.
Fireclay clay - instructions for use
The most famous area of application of fireclay clay - in construction - has already been mentioned by us: this is the production of fireclay bricks and the production of masonry compositions for it, but this is not limited to this. Thanks to its unique properties, fireclay is even used for the manufacture of step elements.
And also facing tiles.
Obviously, the use of just such tiles in the lining of stoves and fireplaces is one of the best solutions, but the unique color and texture of fireclay products does not limit its use only to this area. Due to the properties of the material, it adheres perfectly to most stone and concrete surfaces, which makes it very attractive in outdoor decoration.
Instructions for use in the manufacture of such products from fireclay clay are quite simple:
- Fireclay is mixed with fireclay in certain proportions.
- Products are being molded.
- Drying.
- Primary (low temperature) firing.
- Covering the product with glaze.
- Secondary (high temperature) firing.
Most products made from fireclay are also made using a similar recipe, because in addition to construction, fireclay clay is used in many other areas.
Refractory compounds are also widely used in ceramics. In particular, flower pots made of fireclay have a number of advantages over ordinary clay or plastic ones. Flower growers claim that this is the best container for plants.
The main role here is apparently played by the absence of harmful impurities in fireclay. And the durability of such pots is sometimes not limited to half a century.
Obviously, these same qualities make fireclay applicable in household ceramics, in particular in the manufacture of tableware.
Fireclay clay has also found wide application in such a specific form of decorative art as garden sculpture. The unique properties of fireclay make it possible to make even huge sculptures with enviable indicators in terms of durability, precision of detailing and environmental friendliness.
And finally, another interesting area of application for fireclay clay is cooking.
Fireclay stone (culinary fireclay) allows you to obtain the highest quality baked goods, due to the fact that it makes a gas or electric oven something like a natural stone oven or tandoor.
Required Tools
For plastering you will need:
- Master OK. For application, uniform distribution of the solution over the surface.
- Metal scissors. Needed for cutting reinforcing mesh.
- Spatulas of different sizes. Used for distributing and smoothing the mixture in corners and in narrow places.
- Grater, ironer. The first tool is taken for rough grouting. The second has the same shape, but the coating is not mesh, but rubber - for sanding before painting.
- Chisel. It will be needed to apply notches to the cement coating. Suitable if you have to cover a stove without reinforcement.
- Hammer, metal brush.
- Brushes for applying primer and paint.
- Construction mixer. Speeds up mixing of the solution.
- Plumb line, level, tape measure, pencil.
- Plastic film to cover the floor and wall corners from particles of the mixture and paint.
If the walls of the furnace are uneven, then you will have to install a beacon, and more than one. By plastering taking into account the beacons, it will be possible to achieve alignment of the walls and corners of the stove.
Description and characteristics of the material
Chamotte is kaolin clay that is subjected to heat treatment during the production process. It is fired in a kiln at a temperature of about 1500 degrees, eliminating water and plasticity. Thus, the material resembles stone. It can be observed in the form of a powder, which is mixed into mortars, or in the form of bricks. Depending on the manufacturing process, kaolin can be gray-brown or white with creamy shades.
Compound
The basis of chamotte is clay, which contains highly dispersed hydroaluminosilicates. Briquettes or some other shapes are made from this clay and sent to the oven. The firing temperature and time are different. Next, the fireclay clay is crushed into small or large grains.
The composition of the material includes: quartz, oxides of calcium, sodium, iron, magnesium and potassium.
Specifications
When buying fireclay clay, make sure that the expiration date has not expired and that the material was in appropriate conditions. Long-term storage, humid air and water can worsen the properties of fireclay clay. The shelf life of fireclay is up to 3 years if it was in the original packaging and in a dry place.
According to GOST, the material has the following parameters:
- grain size – about 2 millimeters;
- moisture absorption - up to 25% for low-burnt fireclay, 2-10% for high-burnt fireclay;
- humidity – up to 5%;
- fireproof characteristics - 1550-1850 degrees.
Advantages and disadvantages
Why use fireclay fireclay? Among the advantages of the material, the following factors can be noted:
- fire resistance;
- high adhesion characteristics;
- vapor permeability;
- reliability and long service life;
- environmental friendliness.
The disadvantages of fireclay include its higher cost when compared with traditional types of clay.
Step-by-step process for plastering a stove
- Heat the stove. The walls of the furnace must warm up well before starting work. This step is mandatory even in the hot summer season.
- Surface preparation.
- Applying the first layer. You need to moisten the surface to be plastered with water (with a brush or a spray bottle), and then apply a thin layer of liquid clay (for this you use a wash brush). Before the next stage, this plastered layer should dry out a little.
- Reinforcement.
The specifics of this step depend on the material chosen: Burlap. The material must be cut and soaked in a solution of liquid clay. After this, it needs to be distributed throughout the oven: the laying process is carried out in the direction from top to bottom, the overlap should be about 50 mm. If such material is used for reinforcement, the stove must be protected from overheating during operation; - Plastering. The solution is applied from top to bottom, each layer must be even - its thickness should not be more than 5 mm. After the solution has set, it should be rubbed in using a grater in a circular motion. If the plaster has hardened too much, it can be moistened with water. Some home craftsmen recommend, after applying the plaster solution, to smooth it with a rag (it must first be moistened in the same solution).
After finishing applying the plaster, it needs to be allowed to dry. If cracks appear, they can be widened using a regular knife, then moistened with water and covered with a solution (if a clay-based solution was used, for these purposes you can use the remains of the plaster, which can be stored in an airtight container).
At this stage, the surfaces are completely cleaned of old mortar, dirt and dust. The seams between bricks or stone are cleared with a trowel and hammer to a depth of 150 mm. This will ensure reliable adhesion of the surface to the plaster composition.
Important! Plastering of a new stove is carried out 3 weeks after completion of masonry work and complete drying of the stove mortar. Failure to comply with the established deadlines may result in the decorative layer beginning to crack and deform. After dismantling the old cladding, the surfaces are cleaned with a wire brush and a clean dry rag to avoid dirty stains that may appear through the fresh plaster layer.
After dismantling the old cladding, the surfaces are cleaned with a wire brush and a clean dry rag to avoid dirty stains that may appear through the fresh plaster layer.
The prepared surfaces are treated with an antifungal primer. 10 cm nails are driven into the cleaned seams at an angle with the heads raised above the surface up to 0.5 cm. The horizontal step between nails should be 15 cm, the vertical step - every 2 rows. A wire is fixed to the nails, and a metal mesh is placed on top. The reinforced base will ensure good adhesion of the plaster to the surface being treated.
You can plaster the stove with ready-made store-bought or homemade solutions.
If a ready-made dry composition is used for work, then the kneading is carried out according to the instructions:
- Water is poured into the container. Next, dry mass is added in the proportions indicated on the package.
- Kneading is carried out with a construction mixer until a viscous homogeneous mass is obtained.
- The finished mixture is kept for a quarter of an hour, mixed again, and then used for surface treatment.
To independently mix a solution for plastering surfaces, traditional components are used, which are mixed in the required proportions. Recipes for homemade compositions are given above.
The finished solution should be plastic and viscous, without air bubbles, lumps and dry inclusions.
Depending on the condition of the surfaces, the stove structure can be plastered in one of two ways.
Basic rules for preparing the mixture: composition, proportions
In rural conditions, stove makers do not buy ready-made compositions in the store, but prepare them themselves.
The most popular recipe is a clay-sand mortar with the addition of lime and asbestos:
- 2-3 days before use, the clay should be soaked in water. In this case, all floating debris is immediately removed and refilled with clean water.
- It is better to pass the settled clay through a sieve. Stir until smooth.
Even small lumps should not remain in the clay, otherwise this will be the first reason for the formation of cracks in the coating.
- The clay is combined with dry sifted river sand. You can use wet sand, but then you will need more water to mix the solution. The proportion is 1:2, where one part clay goes to two parts sand.
- When adding lime, it is soaked in water overnight.
- The asbestos will need to be fluffed up.
- For one part of clay there is a tenth of asbestos and lime.
To enhance the plasticity of the solution, add 200 g of kitchen salt to the bucket of plaster. This protects well from cracks and guarantees uniform drying of the treated surface.
Another factor that is worth taking into account is how you will have to heat the stove. If the fuel is coal or peat briquettes, which give off intense heat, then it is recommended to add fireclay powder to the mixture. This will increase the resistance of the coating to high thermal loads.
For a wood-burning stove there is no need for such an additive.
Methods for checking the quality of the resulting substance
The consistency of well-prepared clay paste resembles sour cream. The plasticity of the finished mixture is checked in one or more ways.
- The solution is taken with a trowel or spatula and tilted at an angle of 45 degrees. A normal solution does not flow from the trowel, does not fall from it in lumps, but remains on the working surface of the tool.
- The solution is applied to the brick in an even layer (5 mm) and dried. If the composition is “lean” (contains excess sand), then after drying the paste crumbles off the brick with light mechanical stress. After drying, the greasy solution will become covered with cracks; it contains a lot of clay and little sand. Normal paste hardens in an even layer without cracks. It does not crumble, does not crumble, does not crack.
Photo 1. Method for checking the quality of the mortar: on the first brick the dried mixture crumbles, on the third it cracks, the best consistency is on the second.
- The plasticity of the finished mixture is checked with a flagellum. A “sausage” with a diameter of 1.5-2 cm and a length of up to 20-22 cm is rolled out of the solution. The flagellum is slowly stretched and wrapped around a cylindrical object. A less flexible strand of thin clay will immediately break. A flagellum made from a fatty mixture will stretch strongly and stick to the surface. A bundle of a solution of normal composition will break when stretched when its diameter decreases by approximately 20%.
If the solution is too thick (the consistency is thicker than sour cream), add water to it and stir thoroughly.
If the solution is liquid (drains from the spatula), all the ingredients (clay, sand) are added to it in the previously selected proportions and also mixed.
The mixture, without adhesive additives and cement, retains its qualities after drying. It needs to be filled with water and soaked. If the paste is completely dry, soaking will last several days.
If the solution contains chemical additives, cement and adhesives, then the dried solution cannot be soaked (like, for example, mortar). The manufacturer indicates this information on the packaging.
Advantages of refractory
Heat-resistant, fire-resistant fireclay clay has been known to man for several thousand years. Since then, its scope has changed little. Among other natural materials with the same properties, this refractory was chosen due to the following advantages:
- coatings and products made from it do not collapse, do not crack, retain their original shape, and are characterized by a long service life;
- environmentally friendly natural sedimentary rock does not harm human health and the environment;
- clay has high adhesive qualities, it adheres perfectly to metal, stone, brick and other surfaces;
- products and coatings are able to withstand heat stably and for a long time;
- the material is vapor permeable.
Varieties
Reinforcement
Reinforcement is a necessary stage of construction aimed at increasing the strength of the plaster. Prevents peeling and falling off of finish.
It is customary to add to the mixture (optional):
- asbestos fiber;
- hemp;
- slag wool;
- small fiberglass;
- chaff
Before applying the solution, it is recommended to reinforce the product with metal mesh.
Reinforcement fasteners for stoves with curved walls, where the plaster layer is more than 1.5 cm, are required.
A steel mesh with a cell size of up to 20 mm is suitable for this.
Mounting to the wall is carried out in two ways:
- Nails that are driven into masonry joints at a slightly angled angle. The length of the nails is 10–11 cm. The vertical fixation step is every 2–3 brick rows, and horizontally every 15 cm. You don’t need to hammer it all the way in, but so that the head remains 5 mm on the surface.
- The wire that was laid during laying. Wire material – copper, stainless steel, annealed nichrome. It is tied tightly to the reinforcing mesh.
There is also an old-fashioned way of reinforcing with burlap or gauze. The burlap is dipped into a semi-liquid solution so that it is well saturated. You need to cover the walls on top of the mortar. It is important to smooth it thoroughly so that there are no bubbles or dents.
But this method is unacceptable if heating is carried out with coal.
Applying plaster
Performed in the following sequence:
- Heat the oven well.
- We prepare two types of solution. One has a liquid consistency, like sour cream, the other is viscous, denser. Mix the viscous solution right before plastering.
- We check the quality of the reinforcement. We cover holes and chips in the masonry with putty.
- Moisten the brickwork with water.
- We plaster with a liquid mixture with a layer of up to 5 mm. It is convenient to do this with a wash brush.
- Let's give it time to set. Mix the viscous solution.
- We distribute the plaster evenly over the surface from top to bottom.
- Once the mixture has set, you can begin grouting.
- When drying, we repeatedly moisten the walls with water so that the solution does not dry out or crack.
You can wrap the oven with burlap soaked in water. It perfectly retains moisture and promotes uniform drying.
The cladding of an unevenly laid stove requires proper leveling. This is done using special beacons, which are attached to the walls and aligned with them during plastering. In this case, the layer of solution can reach a thickness of up to 8 cm.
Difficulties may also arise when finishing corners. An angled spatula will help with leveling.
The popular method of removal is to fix the corner of a wooden slat on one side. It is necessary to apply the solution, and as it dries, move the strip to the other side of the corner.
It is not recommended to leave corners sharp. This increases the risk of injury to children and adults during operation and repairs in the house. When rearranging furniture, a corner can be chipped or damaged. Therefore, it is better to round the edges using a corner spatula.