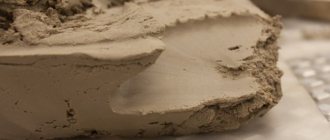
Special putty is what you need to coat the oven with to prevent it from cracking
You can buy this mixture for eliminating cracks or make it yourself.
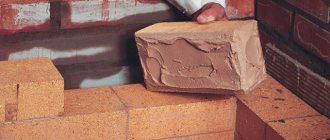
Fireproof putty for stoves and fireplaces purchased at a building materials store is ideal for repairs. It perfectly withstands temperatures of 1000 degrees. Before applying it, the stove and cracks should be treated with water. You can do the grouting yourself, following the instructions:
- Pour clay into a container and break up the lumps.
- Fill it with water and leave for 12 hours.
- Pour sand into the clay and knead the mixture.
- Finely chopped straw is added in small portions.
- Add one pack of salt.
Sand and clay are mixed in a ratio of 1:4. For 4 buckets of clay you will need about 50 kilograms of straw.
Production of material
It is important to store the dry fireclay clay mixture in a dry place
To make a solution of fireclay clay for laying out a stove with your own hands, you need to follow certain instructions and use the main components in certain proportions.
Fireclay powder has the properties that it acquired depending on the production method. The fraction of the material also matters. Fireclay clay has its own special marking. If the letter “U” is indicated on the packaging, this indicates the use of defective kaolin in production. It is cheaper, but you should not use it in important work. Options for diluting fireclay clay:
- 2 parts of fireclay sand with a fraction of no more than 0.5 mm to 1 part of kaolin;
- 4 parts fireclay sand to 1 part kaolin and the same amount of blue clay.
For the durability of the treated surface, the solution with clay must be mixed correctly
Ordinary sand should not be used when preparing such a solution. When heated, it will expand greatly. River water should also not be used, as it will not provide the necessary adhesion. If the solution needs to be more durable, Portland cement is added to it. But this ingredient will reduce the fire resistance characteristics. If you take into account all these features, working with this material will be easy and simple.
It is important to keep the solution and not rush to add water to it. Patience is key here, otherwise the clay will crack.
There are special compositions for quick mixing. They are convenient because you don’t have to wait for several days. True, they cost more. PVA glue is added to this mixture. Fiberglass is used for reinforcement.
Technical specifications
When purchasing fireclay clay, you need to pay attention to the shelf life of the material. It is also important that the seller stores it in suitable conditions. Deteriorate the properties of the material:
- wet air;
- long-term storage;
- water access.
The shelf life of the material is 3 years if it is stored in a dry place and the integrity of the original packaging has not been compromised. What parameters should high-quality clay have:
- inclusion sizes are around 2 mm;
- moisture absorption rates - from 2 to 10% for high-burnt, and up to 20% for low-burnt;
- humidity - no more than 5%;
- fireproof rating - up to 1850 degrees.
The main advantages of clay with refractory properties include its ability to withstand high temperatures. It also has good adhesion characteristics and vapor permeability. Other advantages include:
- long service life;
- environmental friendliness;
- reliability.
The downside is the high cost when compared with similar types of clays.
Advantages and disadvantages
This material does not cause controversy both among professional builders and among those who like to do household work with their own hands, since it is practically indispensable in the manufacture of stoves and various fireboxes. Fireclay clay does not have any obvious disadvantages, but this does not exclude its negative properties. The advantages of the material include:
- Excellent heat resistance;
- Reliability and long-term durability during professional masonry;
- Environmental friendliness of the material;
- The presence of micropores for the passage of steam, which also prevents the expansion of the masonry and its destruction;
- High level of adhesion.
There are fewer disadvantages, and besides, they are typical for many high-quality materials:
- High cost, since the production of such clay is technologically more complex and dangerous than the production of ordinary building clay;
- Fireclay dust enters the respiratory tract, so it is necessary to use a respirator when working.
Checking the properties of the main ingredient of the refractory mixture
There are several proven methods for checking the quality of clay:
Determining the readiness of the solution.
- Take about 1 kg of dry clay (0.5 l) and pour water into it portionwise, mixing it with your hands. The clay should completely absorb water and be a solution with a thick consistency. The next step is to roll balls with a diameter of 4-5 cm. A flat cake with a diameter of 9-10 cm is made from the resulting ball. All this is dried naturally for 3-4 days. Next, inspect for surface cracks. Identification of cracks on the ball and cake indicates increased fat content of the material. If no cracks are found on the ball and cake, then it is necessary to drop the ball from a height of no more than 1 m. The preservation of the integrity of the ball after the fall indicates the quality of the clay, and destruction shows that the clay is thin.
- Take approximately 3.6-5.4 kg of clay (2-3 l) and pour it into a container, thoroughly mixing with a wooden spatula and kneading the lumps. If the clay sticks to the shovel quite well, it means it has a high fat content. You need to add a little sand to this solution. If the clay remains partially on the blade, then such material is considered high quality and suitable for use. Poor adhesion of the mixture indicates that the mixture is lean and requires the addition of fatty clay.
- Take up to 1 kg of dry clay (about 0.5 l) and prepare a thick solution, mixing thoroughly with your hands. Balls with a diameter of 4-5 cm are prepared from the resulting composition. Next, take two smooth plates of chipboard or wood, place the ball on one of them, cover with the other and squeeze until cracks appear on the ball. Test control:
- if the ball collapses at the slightest pressure, it means the clay is thin;
- if cracks appear when squeezing up to 1/4-1/5 of the diameter of the ball, then the clay has a low fat content;
- if cracks appear when compressed to 0.3 of the ball diameter, then the mixture is normal and suitable for further use;
- Oily clay cracks when compressed to 0.5 times the diameter of the ball.
- A ball is made from the resulting steep solution and rolled out until sausages with a diameter of 1-1.5 cm and a length of 160-200 mm are formed. Next, they are stretched until they break. A sample made of lean clay practically does not stretch and gives a rather uneven break. Normal clay is characterized by smooth stretching and breaks when thinned to 20% of the original sample. Oily clay, on the contrary, stretches out gradually and gives a smooth break with the formation of sharp ends at the point of break.
Making your own mixture - all options
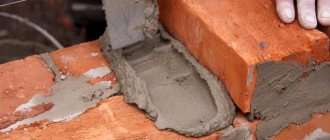
Having understood the principle of determining the plasticity of a masonry mortar, you can begin mixing it. This operation can be done with your own hands using different methods. A very simple technique that we, in fact, have already considered. You need to soak the clay in a small volume of water 24 hours before the planned procedure for laying the stove. Then (a day later) add liquid to the soaked material and mix the composition with a shovel until it becomes creamy. After this, you need to strain the resulting mixture and add sand to it (remember the proportions indicated above).
Mortar on brick
In cases where impeccably clean clay is used (without foreign inclusions and small stones), the mixture for stoves can be prepared with your own hands using the second method. Its essence is this. Add fine sifted sand to clean clay and fill the resulting composition with water (a quarter of the total volume of the mixture). Mix the mixture thoroughly until it reaches a creamy consistency. At the exit, it should slide off the shovel without difficulty, but under no circumstances should it spread. The next step is to add cement and salt to the resulting composition. These components will increase the strength characteristics of the clay mortar for the oven. For 10 liters of mixture take 750 mg of cement, about 200 g of salt.
The third method involves the use of fireclay and chamotte sand. These components should be mixed with each other in the same ratio. Then add water to the mixture. Its amount is 25% of the volume of clay. Mix the composition. That's all. This is perhaps the most basic way to prepare mortar for laying stoves. There is another method for preparing the mixture we are interested in with your own hands. It is made from loam. You will have to mix 10 small portions of different solutions. The first mixture has proportions - part cement + part sand + 10 parts loam, the second - 2 hours sand + 1 hour cement + 9 hours clay and so on. The latter composition will thus contain 1 hour of cement, 10 hours of sand and 1 hour of loam.
All mixed solutions should be placed in small boxes and left until completely dry in the fresh air (6-7 days). After a week, you begin to inspect the resulting mixtures. For masonry, choose the composition that contains the maximum amount of clay and completely eliminates the phenomenon of cracking. Believe me, it will be ideal - it will be able to withstand oven heating temperatures of up to 500–600 °C without deformation or crumbling. Choose your own option for preparing clay mortar!
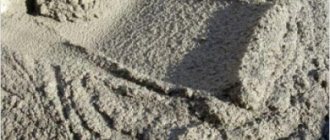
Fireclay sand
Fireclay is called sintered clay completely devoid of moisture. Refractory sand is usually obtained by grinding fireclay bricks, that is, from scrap. Bulk material is considered more resistant to fire than ordinary sand. It is recommended to add it to the solution for laying the combustion chamber. In addition, it interacts well with the heat-resistant brick from which it was obtained, which allows you to create a particularly strong bond. You should not skimp on this component. It is required in small quantities, but provides the longest service life, which is especially important for the combustion chamber.
How to dilute and what to mix fireclay clay with - step-by-step diagram
Step 1: Infuse the powder in water
To prepare a mortar from fireclay clay for plaster, we need a pack of fireclay powder. Pour the powder into the container, gradually adding water until the powder is completely covered with water. Before diluting the final solution, the fireclay clay must sit for at least three days.
Step 2: Making the final batch
After we have waited the required time, we will stir the resulting mixture again, adding a little quartz sand and water if necessary. If the solution turns out to be liquid, you can sprinkle in more powder; if it is too thick, dilute with additional water. The consistency of the ready-to-use solution should resemble sour cream - with such a thickness it will not drain from the surface and will stick well to the wall.
Of course, you can also purchase a composition for instant mixing - it does not require steeping for three days, but it also costs more. In any case, PVA construction adhesive should be added to the resulting composition; it would not hurt to reinforce such a solution with crushed fiberglass. Plastering with this solution does not require any special skills - just prepare large and small spatulas in advance and apply the solution evenly to the surface.
Step 3: Prepare the surface
Based on the reduced plastic properties of fireclay, it is imperative that the surface you want to plaster be provided with a mesh, and to improve adhesion, it must be treated with a good primer. Since we are most often talking about plastering stoves and fireplaces, the primer should be heat-resistant and the mesh should be metal. In this case, you will compensate for the plasticity of fireclay and achieve the highest fire resistance of the plaster.
How long does it take for fireclay to dry?
According to experts, there may be a huge amount of liquid on the stove; it is contained in fastening compounds. Almost all seams of any design are sealed with a solution containing water. Therefore, it is so important that the fireclay composition dries completely and becomes a highly reliable thermal system. To achieve this, it is not enough to wait - you need to heat the stove slowly, not until it gets hot, using a small amount of fuel. Thanks to this, the water will gradually evaporate.
It is very important not to forget about the external temperature. If it is below -10 degrees, then the moisture will evaporate longer.
The external temperature should be between 18 and 20 degrees. The stove is heated at least 2 times a day, ideally with firewood, but no more than 4 logs per firebox. This mode should be maintained for 1 to 1.5 weeks in the summer, the time varies depending on the thickness of the masonry and the dimensions of the stove. In winter, drying time increases to 14-20 days.
For more information on how to prepare a solution from fireclay clay, see the following video.
Source
What is included in the process of preparing the solution?
The process of preparing the solution occurs according to the following algorithm:
- Dry clay is poured into a pre-prepared trough.
- If the clay can be classified as a fatty type, add river sand at the rate of 1 part clay to 2 parts sand.
- Then add water at the rate of 1 part water to 4 parts clay solution.
Determination of the plasticity of clay mortar.
The masonry mortar is ready. You can check it in a simple way: by making a round ball of small volume from the solution and throwing it with force on a hard surface. The ball will collapse if there is excess sand, if not, the solution is normal. You can also determine the quality of the clay before preparing the mixture. Taking half a liter of clay, mix it, gradually adding water, mix by hand until the clay solution sticks to your hands. At the end of the manipulations, roll a ball with a diameter of 40-50 mm, place it and let it dry for three days.
If there are cracks, it is necessary to add river sand to the mixture, after sifting it on a special sieve. If the ball is not damaged and does not collapse when dropped from a height of 1 meter, then the clay composition is suitable for construction.
The following method of testing clay is one of the most optimal. You need to beat 0.5 liters of clay by hand, like dough. From the specified mixture, prepare a spherical object with a diameter of 50 mm and, placing it between two parallel wooden planks and applying mechanical force, deform the ball until it cracks. Let's look at the result:
- the presence of skinny clay - the ball disintegrated;
- average presence of fatty parts in clay - deformation of 1/5 of the ball;
- normal clay - cracks when compressing 13 balls;
- greasy - the appearance of small cracks when deformed by half.
How to dilute clay to putty a stove
Despite the sea of modern technologies for laying stoves, fireplaces, fireplace complexes and all kinds of heating and decorative innovations, stoves are still laid using clay mortar. They also use it to repair, plaster, and correct defects in masonry. Ready-made clay stove mixtures have appeared in building materials stores. Unfortunately, it is only suitable for working with fireclay bricks, where ordinary clay will not work. In other cases, to prepare a masonry or coating mixture, you will have to look for clay yourself.
How to make a clay mixture
It is necessary to distinguish between the process of plastering a stove for whitewashing and the process of sealing cracks in masonry joints. Accordingly, the solution will require different thicknesses and compositions. The ideal clay for coating and repair is the same clay from which bricks are made. Unfortunately, they stopped making bricks on their own long ago, preferring to buy them, and therefore it’s impossible to find a “deposit” for them.
You should choose low-fat red clay, and if necessary, additionally deplete it with sand. The mixture for sealing cracks in seams is prepared as follows:
- We take a clay-sand mixture and experimentally determine the required proportions of the components. To do this, prepare a plasticine-like solution and roll small balls from it (no more than 2 mm in diameter).
- We stretch our hand with the clay ball forward and drop it on the floor. If the ball does not crack or smear with a blot, then this is an ideal mixture for repairing stove seams.
- Add finely chopped straw for reinforcement and 1 kg of salt per bucket of the mixture. You can start working.
The solution for plastering the stove is prepared in a similar way, only its consistency is creamy.
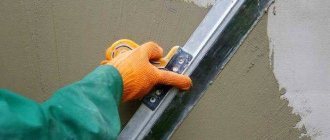
How to coat a stove
When starting repairs, you should warm up the stove a little before work. The procedure for sealing cracks in the furnace is as follows:
- remove all the crumbling layer and all the lime whitewash (clay will not fall on it);
- spray or wet the repair areas with a brush so that the dry areas bond better with the repair solution and do not draw moisture from it;
- seal the seams tightly with a plasticine-like mixture, and plaster the surface with a liquid solution.
You can coat the oven by hand or use a spatula and trowel.
After the solution has dried, additionally coat small cracks. Date: September 25, 2022
Instructions for use
The approximate consumption of fireclay clay during masonry is 25 bricks per 20 kg of dry mixture or 100 kg of mortar per 1 m 3 of masonry. You can prepare the solution yourself using a relatively small list of materials and tools. It is very important to perform all actions consistently, since otherwise the composition will be of poor quality, which will lead to rapid destruction of the masonry, which is especially dangerous in conditions of open fire.
How to dilute fireclay clay for laying a stove
It is impossible to use only fireclay sand for the composition due to poor ductility. It must be diluted with another suitable material: for example, ordinary clay or purified kaolin. In the first case, the ratio of products should be 2:1 (the first number is fireclay sand), and in the second - 4:1. There is no particular difference, other than the consumption of materials, between the options for adding either ordinary clay or kaolin.
It is very important to understand that ordinary sand cannot be used to prepare fireclay composition, since it expands when exposed to heat and exposes the masonry to gradual destruction. In addition, sand does not combine well with the components of the composition, which significantly reduces the service life of the masonry and reduces its reliability. Portland cement can be found as a special additive in fireclay mixtures. If the temperature in the furnace firebox does not reach high temperatures - above 700-800 C o, then its use is advisable, since Portland cement increases the strength of the mixture, but reduces the fire-resistant properties. In addition, a small amount of fiberglass chips can be added to the composition to give it strength.
It is necessary to dilute the mixture in limited quantities, since after 48 hours the solution will harden
The approximate procedure for preparing a mixture using kaolin is as follows:
- From the above ratio, the required amount of kaolin sand is derived. It is sold in exactly the same bags as fireclay sand, only it is not brown, but white. It is kaolin sand that will serve as the basis for the mixture along with fireclay.
- Fireclay sand is mixed in the same container with kaolin sand and gradually diluted with water. At this time, it is important to stir the mixture to distribute the water molecules between the molecules of the substance. At this stage, the mixture is prepared according to the approximate ratio. Water should be added in small portions so as not to spoil the composition. When the required amount of water has been added, the mixture must be left for three days so that it can absorb all the moisture and acquire the desired consistency, which should be similar to the consistency of sour cream.
- After the period has passed, you need to check the quality of the resulting composition and its thickness. If it is too liquid, then a mixture of kaolin and fireclay sand is added to it in the same ratio - 2:1, but if it is too thick, then water is added in small portions.
- The surface on which work is planned must be treated. For this, a special plastic construction mesh and a small spatula with fire-resistant putty are used. The surface to be treated is covered last: a layer (or several layers) of mesh is placed on top, after which another layer of fire-resistant putty is applied to the surface. When the surface preparation work is completed, you need to wait for the putty to dry.