Today there are many options for heating a dacha: centralized gas, boilers, electric heaters.
Stove for a summer residence
But if it is not possible to implement all this due to the area’s remoteness from civilization, a do-it-yourself brick stove for a summer cottage will be an excellent solution.
Reliable and durable - it will gather around itself more than one generation of household members, providing the house with warmth and filling it with comfort.
The services of a good stove maker are not a cheap pleasure. Therefore, if you decide to implement a brick stove project at your dacha, it will be useful for you to read this article, in which we will tell you about the operating principle, features and layout of the stove structure.
A brick stove can become not only a functional device, but also the main highlight of the interior if it is used correctly. Today there are many ways to beautifully veneer and decorate a stone stove.
Types of furnace designs
No matter how much time has passed since the appearance of the first stove designs and no matter how far home heating technologies have come, the stone stove still does not lose its relevance. Compared to other types of heating (electricity, gas), it is more economical. At the same time, thick stone walls allow you to retain heat for another day after the firewood burns out.
According to their purpose, furnaces are divided into the following types:
- heating;
- cooking;
- multifunctional;
- combined.
- The heating design is perhaps the simplest and most common. As the name implies, the function of such a stove is aimed only at heating.
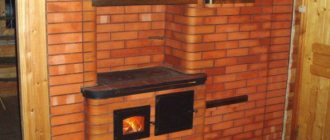
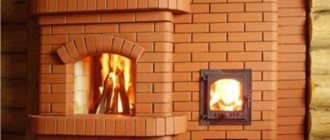
Oven with hob
Basically, such a stove is chosen for dachas where there is electricity and a stove is used for cooking. Or home owners want to create a special country coziness with the help of a fireplace stove. The design of such a furnace consists of:
- combustion chamber, which is purchased ready-made or lined with fireclay bricks;
- an ash pit where ashes are collected;
- chimney.
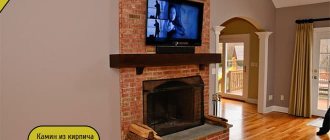
This type of design also includes a fireplace with an open or closed firebox. It is used not only for decorative purposes, but also allows you to effectively heat a room of 15-20 square meters. meters.
Depending on the selected material, wall thickness, masonry scheme, heating stoves may have different heat output.
The most popular type of stove is the one-brick design. This allows the walls to be heated up to 600C. The famous Dutch ovens are laid out according to this pattern.
In terms of dimensions, the heating stove can be wide and flat, or it can have an elongated rectangular shape. It all depends on the area of the room, the style of the interior and the personal preferences of the owners.
For cladding such a stove, tiles, decorative plaster, and decorative stone are usually used.
Brick heating stoves in the form of a three-sided prism look very stylish and original, but a beginner cannot implement this option, since it requires a lot of experience. The greatest difficulty is in cutting bricks and the requirements for maintaining an angle strictly at 600.
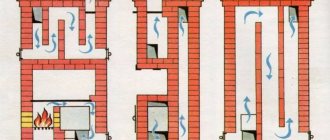
Round stoves, which are laid out according to the design of the famous Russian furnace engineer V.E. Grum-Grizhimailo, also look beautiful and unusual. The furnace operates on the principle of free movement of gases. To ensure tightness, the outside of the structure is covered with sheet metal. Such a stove can heat a large country mansion and will become a real decoration for any home.
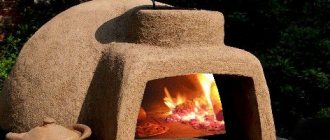
- Cooking stove. It is advisable to choose this option for a dacha where the owners visit only in the summer. In this case, heating the house is not needed, and if you equip the structure with an additional water tank, it will serve not only for cooking, but will also create comfortable living conditions.
Cooking ovenOften this option is installed in country cottages where gas and electric heating are provided, but in order to save resources, owners sometimes use a brick oven.
The design of the stove consists of a brick body, inside of which there is a combustion chamber, an ash pan, and a chimney. There is a metal plate on top (an oven can be built in).
- A heating and cooking stove is already a multifunctional design.
This is a more difficult project to implement, as it consists of:
- combustion chamber;
- chimney;
- ash pan;
- hob;
- oven.
The stove looks massive and is usually chosen for dachas where there is no other heating option.
In our country, heating and cooking stoves are the most popular, allowing you to heat the house and prepare a delicious dinner for the whole family.
It can be additionally equipped with a drying chamber, where you can make preparations for the summer: mushrooms, berries, fruits. In cold and damp weather, you can quickly and safely dry clothes and shoes in this chamber.
Oven with drying chamber
By the way, ovens with drying chambers were first invented in the countries of Northern Scandinavia, where hunters and fishermen needed to dry clothes and boots in one night.
Many schemes of heating and cooking stoves have additional devices in the form of a comfortable bench, drying for firewood, an oven, and a water-heating tank.
Swede
Refer to compact options. Length and width – 1 meter. The main function is to heat the room, but you can also cook food on it. The unusual thing about such a stove is that the stove is built in the kitchen, and the rest of the stove will be in another part of the house.
This design is fire hazardous. But the risk of fire is reduced with the help of dampers.
Construction of a stove for a summer residence and its features
The main elements of any brick stove for a summer residence are:
- Foundation. For any stove it is necessary to build a separate foundation, not connected to the main foundation of the house.
The foundation is built separately
- Furnace body. Consists of a combustion chamber and a chimney. If the stove design requires additional elements, then it may include a hob, oven, and water heating tank.
- Combustion chamber. The dimensions of the firebox depend on the area of the room and the required power. If the stove is planned to be heated with wood, then the height of the firebox must be at least 40 cm. The thickness of the firebox must be at least 1/2 of a brick. The firebox can be made of fireclay (heat-resistant) bricks or purchased in ready-made cast iron.
- Ash pit (ash chamber). This element of the furnace is designed to collect products during fuel combustion. Oxygen is also taken in through the ash pan, which is necessary for the combustion process.
Ash pan
The ash pan is located below the combustion chamber and is always equipped with a metal door through which cleaning takes place. A grate is laid between the ash pan and the combustion chamber. Typically, the ash chamber is 3 bricks high.
- Chimney. The main element of the furnace through which combustion products are removed. The chimney can be made of brick or made of steel pipes. This does not affect functionality or efficiency in any way. The chimney is discharged from the stove either directly through the roof or through the wall to the street. When constructing a chimney, you must avoid multiple branches and horizontal sections, as this negatively affects draft and can reduce the efficiency of heating the room.
Masonry process
The masonry mixture is prepared from sifted sand and clay. The clay is left in water for a couple of hours, after which it is sifted through a sieve. Currently, there is no need to prepare this mixture yourself. A number of companies offer ready-made masonry mixtures in various packaging. Using such masonry mixtures is preferable to making them yourself.
Industrial sieves sift a finer fraction of sand and clay, which makes it possible to obtain a more plastic and homogeneous mixture. This mixture will eliminate the formation of voids and air bubbles in the seams during laying.
First, the outer layer, which consists of bricks, is assembled, and then the middle. There should be no voids in the seams, so fill them with a clay mixture.
The first rows are built using solid bricks. The first row of stitches requires dressing. After the first rows are ready, the brick will have to be cut.
The chopped side of the brick should be inside the masonry. This rule is also used when constructing smoke ducts. The chimney is built from red burnt brick. And the opening of the firebox is created using a metal corner, a “lock” layout.
Before the first fire, it is recommended to wait 3 weeks.
Which brick stove to choose for your dacha?
The choice of stove design determines the size and type of room. Large cottages will require a massive stove structure with thick walls, which will take a long time to heat up, but at the same time be able to maintain the temperature for a long time. Building such a stove is not an easy task. This will require some experience and knowledge.
But even a beginner can handle a small stove for heating a small dacha if you strictly follow the diagram and do not change the laying rules.
small ovens
The first place in the popularity of heating and cooking stoves is worthily taken by the Swede, which enjoys well-deserved love and respect among Russian stove makers.
This design is a compact, ergonomic shape with a small cooking surface and a three-channel chamber. It is ideal for a small cottage, the length ranges from 880 to 1250 mm.
For the location of such a stove, the place most often chosen is between the kitchen and the living room. Thus, the stove performs a double function: it serves for cooking and decorates the living room with a fireplace.
Today you can find hundreds of different layouts for laying a Swedish stove with a hob on the Internet, so it won’t be difficult to implement it for your dacha. Many stove makers have added additional options to the standard masonry scheme, so each design is called by the name of its creator: the Buslaev, Kuznetsov stove, etc. But the principle of operation in them is the same.
Traditionally, a Russian stove can be called a bulky, massive structure, which is decorated not only with a hob with an oven, but also with a spacious bench.
Stove with bench
This stove is not only a functional device for cooking, but also a place for relaxation. It allows you to warm up the room well, retaining heat for a long time, and has a beneficial effect on the human body, thanks to which the owners of such stoves are less susceptible to colds.
The building usually has two fireboxes (main and additional). Thanks to the special design of the oven, heating is carried out evenly, from bottom to top. Any solid fuel is suitable for kindling, and there are no particularly strict requirements for the materials for laying a Russian stove.
A special place among small heating and cooking stoves is occupied by the little V.A. Potapova, created by a famous engineer at the beginning of the 20th century. To lay it, you need only 211 bricks, and the dimensions of the stove are only 630 * 510 mm.
Moreover, this little thing contains a single-burner stove, a small oven for baking and a hood. This type of stove would be an excellent solution for a small garden house or one-room cottage.
In this article, we invite you to study the rules and main points of laying a small heating and cooking stove.
Cooking oven order
Do-it-yourself potbelly stove (step-by-step instructions)
To make a reliable brick stove with your own hands, you need to take fire safety into account.
After choosing a place for production, two layers of waterproofing are laid. Above, 10 mm of sand is added.
Laying stages:
- The first row is laid without mortar. A level is used for control;
- The blower door is installed. Fastened with wire and insulated with asbestos cord;
- Now fireclay bricks are used. Grate bars are mounted on top of it above the ash pit;
- A new row is placed using a spoon. The rear wall is laid without mortar;
- The door for the firebox is installed. Fastened with wire and bricks;
- New row on the bed, thanks to the 4th level contour;
- We use spoons again, but add 2 bricks at the back;
- The top row covers the firebox door. It ends 130 mm above its base;
- The masonry continues with the bricks moving backwards. But before this technique starts, an asbestos cord is added, and a hob is mounted on it;
- The chimney is made from a new row. We will install a tin or aluminum corrugated pipe. It is important that it is not too massive, as there is a risk of shifting the center of gravity;
- On the 11th row, a valve is added to regulate the air flow. It is compacted with asbestos cord and covered with a clay coating;
- The chimney is laid in a quadruple. For reliability, it is closed with 3 rows of bricks;
- It is necessary to remove the knockout bricks allowed on the 4th row. The chimney is cleared of debris;
- The stove needs to be whitewashed. Any lime composition with the addition of blue and milk is allowed. This will protect the coating from darkening and rapid destruction;
- We add a metal sheet in front of the firebox and install a plinth.
We deliberately reviewed the process with a very detailed description, so that it would be as clear as possible what to do and how to do it.
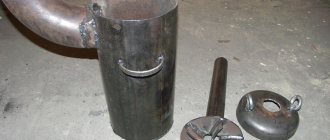
Metal stove-stove (instructions)
A do-it-yourself metal stove is much more difficult to manufacture. But, thanks to engineering thinking, any design can be significantly simplified during operation.
What you will need:
- Detailed drawing indicating the size of the structure;
- Sheet metal with a thickness of 4 - 5 mm;
- Steel corners;
- Steel tubes with a diameter of 15 - 20 mm, but replacement with fittings of 10 - 12 mm is allowed. Used for making grate;
- Metal pipe with a diameter of 180 mm;
- Arc welding and electrodes;
- Angle grinder based on a cutting wheel;
- Reliable hammer;
- Roulette;
- Pencil or marker.
Step-by-step instruction:
- The body is mounted with rectangular sheets by welding at the joints. Use 5 rectangles of appropriate sizes. Cut with a grinder.
- The sides are welded to the bottom. They are placed to the bottom one by one and welded. The angle is controlled by the square. After checking, the joints are completely connected by welding.
- The rear wall is welded to the sides and bottom. Inside, markings for the future are applied to the side walls: firebox, ash pit. We take into account that a grate will be used between these zones. It is on its surface that the fuel is placed. To securely fasten it, previously welded corners are used on the base of the side part at a height of no more than 10 - 15 cm from the bottom.
- We create a grate. It is not completely welded at the corners. This is necessary to clean the oven.
- Now you need to check the reflector. It is located between the firebox, chimney and afterburner, and is also removable.
- We move on to burning a hole for the chimney. After this, cut out 2 jumpers. The narrow one is needed on the grate to separate the firebox and the ash pan, the wide one will be located on the sidewall and lid.
- It is beneficial to create a large door for the firebox to simplify the loading of firewood. The ash pan should be made a little narrower.
- Now you can make a support for the stove.
- For the chimney, a pipe with a diameter of 15 - 20 cm is used. Its end is brought out beyond the area of the room. To do this, use a hole in the wall or roof. It is important to install the pipe based on a 45 degree angle. A damper is installed at the lower level to regulate the rotation angle. For its manufacture, sheet steel with a diameter smaller than the pipe itself is used. It is necessary to create a hole for mounting the adjustment damper handle.
- Now you need to install the potbelly stove at your workplace and check its functionality.
This is not the easiest manufacturing method, since not everyone knows how to work with a welding machine. But in reality, everything is simpler than it may seem at first glance.