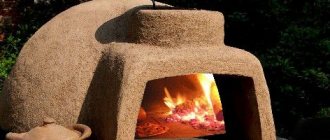
A Dutch oven with a stove is one of the most popular types of heating structures all over the world. Compact, highly efficient and economical - it not only allows you to heat the house well in harsh winters, but also helps the housewife prepare dinner for the whole family.
Dutch oven
In this article, let's look in detail at how to make a Dutch oven with a stove with your own hands. Order and basic rules will help you cope with this difficult task.
The history of the Dutch oven dates back to the 15th century and since then it has undergone many modifications and improvements. Over these six centuries, the shape of the Dutchwoman and its size have changed slightly. But what really remains unchanged is its efficiency and compactness.
Type of Dutch oven
The small size of the Dutch oven is partly explained by the cramped houses in the Netherlands and the need to fit the heating and cooking structure into a room, the dimensions of which sometimes did not exceed 10 square meters.
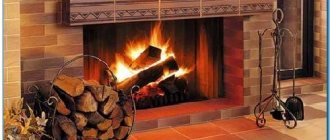
Tiled stove
Cities in northern Holland have always been densely populated, and local residents needed to somehow adapt to urban conditions. And given the rather harsh climate and cold winters, it was impossible to do without high-quality heating of the home.
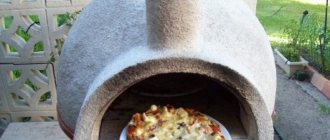
Round oven
In addition, in the Netherlands in the Middle Ages there was a very high tax on area, so local residents had to contrive to build the house high. Agree that not every stove is suitable for a multi-story structure.
The Dutch oven is easy to recognize among other heating device designs precisely by its shape: they are elongated and have a large height. In this case, one stove can be enough to heat two or three floors of a house at once.
The first Dutch models were not equipped with a grate and a blower, and the housewives knew nothing about the hob. However, over time, stove makers and engineers added these minor elements to the layout of the Dutch stove, which made it possible to significantly increase its efficiency.
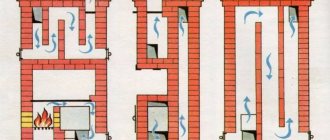
The movement of hot gas in a Dutch oven traditionally occurs through 6 channels: 3 rising channels and 3 descending channels. And the bell system allows you to accumulate hot gas and increase the efficiency of heat transfer.
Also, another difference between the first models is the presence of an arched vault, which over time, for technical reasons, was replaced by a rectangular firebox.
Today on the Internet you can find many different designs of Dutch women equipped with an oven for baking bread, beds, a water heating tank, etc. We will dwell in detail on the layout of a Dutch oven with a stove.
Little Dutchwoman
How the Dutchwoman works
A distinctive feature of the Dutch oven is a six-channel chimney system through which heated gas circulates.
Coming out of the combustion chamber, the smoke rises upward along the upward flow. During his journey, he manages to heat the walls of the furnace. Then it cools down and goes down to the firebox. When heated, it rises through the second channel, etc. The sixth channel already removes smoke outside through the chimney.
Dutch woman's work system
The six-channel system allows the oven to heat up evenly, without sudden changes, and retain heat for a long time.
If we talk about the design of the Dutch woman, the main elements here are:
- large firebox;
- chimney;
- 6 smoke channels.
Whatever the dimensions of a Dutch oven, its firebox is always large and has a rectangular shape, while the design of the Dutch oven itself can be semicircular, triangular, etc.
Dutch oven elements
A large firebox significantly increases efficiency and makes it possible to later supplement the design with a water heating system.
The Dutch chimney is connected at the side to the chimney, and their connecting link is a metal pipe.
If the oven needs to be cooled quickly, just open the damper.
Standard furnace diagram
Other tips
The living room with the kitchen can be combined and decorated with various shortcomings
It is important to calculate and anticipate everything in advance. Decorators and craftsmen share tips that will help avoid problems during repairs and furnishings:
The result depends on how detailed the project is drawn up. Oddly enough, it is worth taking into account the growth of loved ones and relatives. It is also recommended to calculate the approximate number of possible guests. You can get rid of food smells by installing a strong hood or ventilation system.
Small models are more suitable for housewives who do little cooking. If you plan to have a sleeping place in the living room, then it is important that the ringing of appliances and other kitchen utensils is not heard. Silent dishwashers and other appliances will come in handy.
In addition, you can install a sliding door and install a soundproof partition. If there is sensitivity to ultraviolet radiation, the owners hang thick curtains made of light-proof fabric. If household appliances do not match the direction of the interior, they are hidden behind furniture or put away in kitchen cabinets. When installing luminaires and lamps, they are guided by several criteria
It is important that the light falls evenly throughout the entire space. Especially bright lighting is preferable in the kitchen area and where the dining table is installed
In the living room, designers create a subdued atmosphere using wall sconces and table lamps. Multi-level stretch ceilings with LED strip also look good in this room. Moisture-resistant finishing materials are more durable and easy to clean. Thus, they retain their appearance for a long time.
The kitchen combined with the living room combines:
- personal tastes of the owners;
- reliable finishing materials;
- current design ideas;
- convenience;
- trends. The best photos of kitchen living room design
Dutch design features
- Lack of grate.
- The presence of several smoke channels.
- There is no ash vent, which is why the fuel does not burn intensely, but allows the wood to burn slowly, releasing heat into the room.
- Long elongated shape.
- The Dutch oven can be classified as a long-burning structure, since due to the lack of a blower, the firewood slowly smolderes. But at the same time, if you do not close the view, the oven will instantly cool down. Only the firebox door allows oxygen to pass through.
- The firebox is rectangular in shape.
- The classic version involves only a heating function. Over time, craftsmen supplemented and modified the standard type of stove, adding the necessary elements in the form of a stove, oven, stove bench, etc.
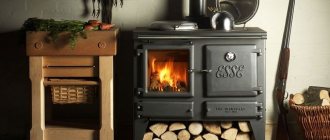
Stove is an optional feature
- The thin walls of the oven are only ½ brick, thanks to which the oven heats up quickly.
Advantages and disadvantages of a Dutch oven
Like every oven, the Dutch oven has its own advantages and disadvantages.
If we compare the design of a Dutch oven with a stove with the traditional design of a Russian oven, then the advantage will be with the former. It warms up much faster due to the small walls, and its dimensions allow it to be placed even in a small dacha or in a country house.
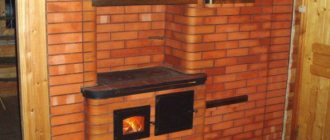
Dutchwoman with a stove
In addition, if it will take you 1200-1300 bricks to build a small Russian stove, then for a Dutch stove of impressive size you will need only 650-700 bricks. This factor alone makes the Dutch oven attractive, especially during times of economic crisis.
Another advantage of the Dutch woman will be especially attractive for dacha owners who visit their country house from time to time. If a Russian stove needs to be heated for several hours before it starts giving off heat, then lighting a Dutch stove will take you no more than half an hour. It can be immediately loaded tightly and given maximum heat.
So, the advantages include:
- Possibility of modifying the stove with various functional additions in the form of a water heating tank, stove bench, oven, fireplace, etc.
- Compact and small in size. If you wish, you can build a good quality stove measuring 50*50 cm.
- Fast heating of the room.
- The efficiency of the furnace does not decrease depending on its height.
- Low construction costs. Only the firebox can be made from expensive refractory bricks, while even used material is suitable for arranging the rest of the structure.
Disadvantages of the Dutch woman:
But it would be unfair not to mention the disadvantages of the Dutch oven.
- Low efficiency compared to a Russian stove. Only 40-45%, subject to proper use.
- The channels are designed in such a way that they can partially draw in cold air from the street.
- Frequent firing of the stove is required - at least twice a day.
- Not the most economical fuel consumption.
- You need to constantly monitor the oven view. If you leave it open, the oven will instantly cool down.
- You should not set the maximum temperature for a Dutch oven. If you overheat it, carbon monoxide will be released, which can penetrate into the room.
Today there are many models of Dutch women:
- with fireplace;
- with oven and heating and hob;
- with water heating tank;
- with a sun lounger.
But basically, this type of design is chosen for its compact size and the ability to place it in a small house. If the room has a large area and many windows, then it is better to give preference to other types of heating structures: a Russian stove, a bell-type stove or a Swedish one.
On wall decoration issues, photos
We have already mentioned that along with the Dutch women, the traditions of tiled architecture came to our world. And although the stove copes well with its duties even without being plastered, previously the “naked” brick gallanka was more or less appropriate only in the kitchen or in auxiliary rooms. If the stove was part of the interior of a living room or large hall, then its unlined walls indicated a complete lack of taste on the part of the owner.
Nowadays, a neatly folded Dutch oven serves as a decoration for any home, regardless of how its walls are decorated. Not only those tiled or plastered with decorative compounds look great, but also “bare” stoves built from red facing bricks with rounded edges. If you plan to cover a Dutch house built according to all the canons with real tiles, then thoroughly study this type of finishing or entrust the work to a specialist. Please note that ceramic tiles of this type must be laid using a special technology. Compliance with it will not only make the coating more aesthetically pleasing, but also increase the heat transfer of the heating device.
Finishing with Gzhel tiles is an option suitable for a private home
Such a stove wouldn’t hurt in an apartment either.
Option for a private house
Minimalistic finishing will not prevent the stove from standing out among the interior
An option for those who maintain a home style in brown tones
This stove would look good in an apartment.
It’s not a shame to install such a structure in a wooden house
The design option of brick or stone will allow the stove to look more natural
A small selection of photographs, of course, will not be able to show all the splendor and versatility of the finishing of Dutch ovens. However, we hope that the examples provided will give you new ideas and stimulate your personal creativity.
Basic rules for arranging a Dutch oven with a stove
Whatever option for arranging the furnace, size and dimensions you choose, the construction principle remains the same:
- The stove is installed on a separate foundation.
Of course, it is best to think about it at the stage of building a house. This will make it easier to correctly determine the location for the chimney so that it does not fall on the beams and roofing. Separate foundation for the furnace
If the idea of building a Dutch house came to you already in a residential building, then you will have to remove part of the floor covering and build a solid foundation that is not connected to the main one. This rule should not be neglected, since, despite its small size, the Dutch oven has quite impressive dimensions.
It will create a lot of pressure on the foundation. As you know, a house undergoes a certain shrinkage during operation, and if the stove is built on a common foundation with the house, then there is a risk of deformation, displacement of the chimney, etc.
As a result of this, the sealing of the seams may be broken and carbon monoxide smoke will penetrate into the room.
- The foundation must be covered with waterproofing material.
- When arranging a firebox, you need to use only high-quality fireclay (fireclay) bricks, which in no case should be combined with ordinary ones.
- To lay the stove you need to purchase a heat-resistant clay mortar. You can, of course, do it yourself.
- The thickness of the seam when laying the combustion chamber should not exceed 3-5 mm. Beginners may find it difficult to stick to the same seam size.
- The entire Dutch oven must be laid with a joint thickness of 5-8 mm.
Advice! To ensure that the seams are equally even, use wooden slats between the masonry.
Despite the fact that the Dutch woman is highly fire resistant, when arranging it
It is necessary to adhere to basic fire safety measures when constructing a Dutch oven:
Fire safety standards
- Before the stove you need to leave a sheet of asbestos board to prevent accidental fire from sparks or coals.
- It is necessary to systematically clean the chimney channels from accumulated soot.
- It is also necessary to lay a sheet of fire-resistant material between the stove and the wooden walls.
- Nothing should stand at a distance of 50-55 cm from the stove: furniture, decor, other objects, etc.
- The fewer metal parts you use to build the Dutchman, the better. But when making hanging masonry that closes the opening under the cooking zone, you cannot do without metal corners.
Remember that nothing should be done against the iron or on bare brick. In all places where it is planned to join metal parts with brick, it is necessary to lay a 5 mm layer of mortar and lay an asbestos cord.
Dutch woman with stove
- When laying the hob on a brick, it is necessary to lay a layer of clay mortar on it. This will protect the brick from heating.
How many bricks should I hang in grams?
Let's consider one of the simple and popular calculation methods that allows you to quickly find out how much brick is needed to build a Dutch oven.
Formula
The following formula is used for calculation:
This formula uses the following parameters:
- B – planned furnace height;
- P – height of one row;
- O – the number of bricks in the first row.
Let's look at a clear example.
Let's say it is planned to build a Dutch house 2.4 m high, at the base of which there are 24 bricks. The height of one row is 7 cm (the thickness of one brick).
- Subtract 0.3 m from the planned oven height for cutting. Thus, after subtraction, 2.1 m remains.
- The resulting number should be divided by the height of one row, resulting in 30 rows.
- We multiply the resulting value by 2/3, that is, we subtract 10 rows.
- 20 rows remain.
- We multiply the resulting number of rows by the number of bricks in the base (24 pieces).
- We get 480 bricks.
- Let's add 50 bricks for cutting.
Arithmetically it looks like this:
The result is 530 bricks - the required number to build a thirty-row Dutch oven.
The number of bricks for the construction of the chimney is calculated separately. It is determined by the height and cross-section of the chimney. Therefore, the formula should be used:
The following parameters are used:
- Chd – number of rows in the chimney;
- N – the number of bricks in one row of the chimney.
These simple calculations will allow you to determine how many bricks will be needed to build a Dutch oven.
Tools and materials used in the construction of a Dutch oven with stove
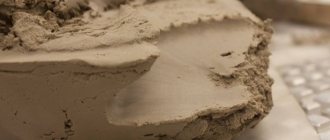
A prerequisite for a good stove is high-quality masonry mortar, which is recommended to be mixed from red clay and brick. The main composition for Dutch masonry is sand, red clay and water.
In this case, the ratio of proportions for each type of clay will be different. The less sand is present in natural clay, the correspondingly less is needed for the solution.
Clay
For oily clay we take the proportion: 1 part clay and 2.5 sand.
For medium clay - 1 part to 1.5 sand.
For skinny ones you will need 1 to 1.
Materials for laying a Dutch oven with a stove:
- Fireclay refractory brick for combustion chamber.
- Red ceramic brick.
- Foundation mortar (cement, sand, gravel and water).
- Mortar for laying bricks.
- Roofing felt for foundation waterproofing.
- Boards for the construction of formwork.
- Grate.
- Blower.
- Metal door.
- Damper.
- Metal rods and wire for reinforcement.
- Metal wire 0.8 mm for dressing.
- Asbestos cord.
- Hob.
Prepare the following tools:
- Trowel for laying bricks.
- Building level, protractor and plumb line.
- Construction stapler.
- Tape measure and marker.
- Rule.
- Grinder for turning bricks.
- Shovel and bayonet shovel.
- Bucket for solution.
- Construction mixer or drill with attachment.
- Rubber hammer for laying bricks.
- Construction hammer for erecting formwork.
A little history
We know about the existence of the Dutch heating stove from Columbus, but it reached the peak of its popularity only in the 16th century - the period when the Netherlands gained independence. With the onset of the 18th century, Dutch stoves no longer surprised anyone, and during the 19th century, this stove gained such popularity that it became the main heating device.
In the Middle Ages, stoves were decorated with tiles with paintings by famous artists, so since that time the Dutch stove and tiles have been considered inseparable concepts. Today, such decoration is no longer relevant, however, it remains an important part of history.
Do-it-yourself Dutch oven with stove, order and masonry diagram
Diagram of a Dutch oven with a hob
Step 1. Preparatory work.
Preparatory work includes pouring the foundation and insulating the walls.
Considering the large weight of the stone oven, it is recommended to use the classic option of constructing a concrete foundation with the construction of formwork.
Foundation diagram for a brick kiln
Completing the foundation.
- Mark the floor where the stove will be located. It is preferable that the door and window are not in a straight line. Also consider the construction of a chimney, which can be done through the roof or through the wall. Also keep in mind that the size of the foundation should exceed the dimensions of the stove by 15-20 cm on each side.
- Using a grinder, we cut out the boards in the wooden floor and put them aside.
- We build the foundation, fill it with mortar and cover it with roofing felt. We take a technological break of 20-25 days until the base completely hardens.
The base for the stove and waterproofing.
- The foundation is made to the floor, not reaching two rows of bricks.
The upper part of the base should be made of brick, which is laid in a continuous row, with a dressing. Furnace base - We make the base of the furnace. Before this, you need to perform waterproofing using roofing felt. Measure the required size on a sheet of roofing felt and cut it with a knife. Take 2-3 layers of roofing felt and connect them together using a construction stapler. We attach it to the base.
The technical feature of the Dutch oven is that it gives off most of the heat to the floor, so the waterproofing stage is very important if you do not want the heat to go to the floor.
Waterproofing the base under the stove
If the house is located in northern latitudes and soil freezing reaches 1-1.5 meters, experts recommend using, in addition to roofing felt, an additional layer of basalt cardboard. This is an inexpensive and reliable material that will create good insulation.
- In order to be sure that the stove is laid correctly, experienced stove makers advise pulling vertical plumbs.
Plumb lines for oven verticality
Stretch a rope or thread from each corner, which will serve as a beacon, preventing it from moving to the side during laying. If you are not going to do this, then after each row you need to check not only the masonry with a horizontal level, but also use a protractor with a vertical plumb line. Otherwise, your furnace may be tilted to the side, resulting in reduced efficiency and poor draft.
Preparing bricks for laying and mortar.
- We select the bricks that we will need for laying the stove and do the dry laying.
- Mix the clay solution. Make exactly as much solution as you can handle at one time. The next day, this clay-sand solution will no longer be suitable.
Place clay in a trough, add a little water and let it sit for 2 days. Do not forget to stir the material during this time so that no hard lumps form. Bring to the desired consistency with sand and mix well again with a construction mixer.
Important! If you started building a stove in cold weather, prepare the brick in a securely sheltered place. For each row, immediately prepare the required number of bricks, adjust according to the diagram.
Step 2. Laying the stove.
Ordering an oven with a hob
We present a standard diagram for laying a Dutch oven with a stove. To practice folding it, stove makers recommend laying out the bricks on a dry surface, according to the diagram. This way you will see whether you have enough material and those points that you should pay special attention to.
It is recommended to immediately lay it out to dry.
Before you begin laying, immerse the bricks you need for this stage of laying in water so that they do not draw moisture from the mortar.
- Now we proceed to laying the stove, with the first row being the one that starts from the level of the finished floor.
Detailed masonry of a Dutch oven
We make the 1st row continuous. We put it with a bandage. This row will serve as a guide for the entire structure, so it is very important to make it level. You can use a protractor for this.
Rows 2-3 are also made continuous, maintaining horizontality.
2 rows of bricks up to the finished floor level
4th row - in this row we install a blower with a gap of 5 mm. We fill the gap with asbestos cord. When heated, the metal will expand. To prevent it from deforming the brick, we will lay an asbestos cord where metal-to-brick contact is expected.
4 row
Please note how the figure shows a diagram of laying metal wire into the mortar between the bricks.
Correctly attaching the metal door and vent
Row 5 is performed similarly to the fourth. Carry out laying from right to left. Consider here the dressing of the seam in 1/2 brick.
5 row
Row 6 - here it is necessary to partially block the ashpit and ash pan. To do this, we cut the brick lengthwise and lay a steel strip measuring 35 mm * 4 mm under the brickwork.
Row 7 – we begin to form the combustion chamber from fireclay bricks. Here, in this row, we install the combustion door.
7 row
We lay the grate, while making a seam gap of 3-5 mm. We bevel the bricks for the back wall according to the order. The gap can be filled with sand or ash.
Installation of the combustion door
Row 8 - Also in this row, the blower door is closed, which finally forms the ash chamber.
Rows 9-14 – the firebox is laid out in a similar pattern, laid out with fireclay bricks.
The combustion chamber is formed
10 row. Cover the firebox with bricks. In the same row it is necessary to place prepared bricks for installing a metal plate.
Fuel chamber
This row should be given special attention, since it is on it that the metal hob will lie.
In the same way as the bricks were prepared for the installation of the grate, we make grooves on the bricks for the slab. The notch should be 5 mm. This will allow the metal to expand freely when heated.
We lay an asbestos cord into the resulting gap, which we protect with paper cardboard. During operation, this cardboard will gradually burn out, and the cord will constantly compensate for the sharp temperature change.
Plate
We carefully lay the metal plate. For reliable fixation, we secure its edges with metal corners.
Rows 11-13, we begin to form a zone above the slab, laying out bricks according to the diagram.
The 14th row is laid out similarly to the previous one, but here we already place bricks in which we make small grooves. We insert metal corners into them, on which the bricks of the 15th row will rest.
15 row. We cover the space above the surface of the slab.
Cleaning installation
16, 17 row. We lay out a row similar to the 15th, but here we install a door for a cleaning hole. In the same way as in the row with the blower, we make a gap for expansion and lay an asbestos cord.
Rows 18-22. We lay out the rear smoke return channel.
Blocking the smoke channel
23 row. Here you need to install a valve under the smoke duct. For this, the bricks need to be adjusted, and an asbestos cord must be laid between the metal element and the brick.
Gate valve installation
24.25 row. They are laid out in order. Here we combine 2 channels: lowering and lifting.
26 row. We begin to form the chimney. Here you need to ensure that no solution remains on the inner surface of the chimney. To do this, it must be cleaned off immediately, otherwise during operation, the dried solution will interfere with normal traction.
27,28 row. We continue to form the chimney, moving all the bricks by 4 cm, thus narrowing the chimney.
Smoke channels are under construction
29-30 – We are laying smoke channels and installing a valve here to regulate draft. We take into account a gap of 5 mm for the expansion of the metal into which we lay the asbestos cord.
31 row. We reduce the size to the original form.
Step 3. Laying the chimney
From the 32nd row, the laying of the chimney begins.
Chimney laying
Here the masonry comes with a continuous bandage in several rows.
3 rows before the roofing, we “fluff” the pipe. This will protect the wooden structure from fire. Stick to one pipe thickness of 1.5 bricks.
Chimney exit through the roof
Ideally, the design of the stove and, accordingly, the chimney, should be laid out at the stage of building a house or during a major renovation. Then you will not have any special difficulties with the construction of a smoke well.
Chimney laying
If the Dutch oven is being built in an already finished house, then you will have to cut a hole in the roof for the passage of the chimney.
- It is necessary to remove the roof covering in the place where the pipe will be installed (slate, tiles, corrugated sheets, etc.).
- We install jumpers at a distance from the ventilation pipes.
- If the coating is a continuous coating that cannot be partially dismantled, then we measure the hole of the required size and cut it out using a grinder or jigsaw.
- We lay a thermal insulation layer between the chimney and the wooden floors with asbestos sheets, which we fasten to the rafters with self-tapping screws or a construction stapler.
- We lay the chimney through this hole.
It is very important to carry out all fire safety measures when constructing a chimney. Namely, maintain a distance of 38 cm between the chimney and the nearest ceilings.
In order to maximize traction, we round the corners of the brick. If you don't cut corners, the eddies will weaken that pull.
In addition, the fluff prevents the wind from penetrating the chimney, which will also protect the draft.
We extend the chimney above the roof to a distance of 60 cm.
Removing the chimney
The penultimate 2-3 rows come with expansion. This is called "otter" and protects the roof from water penetration. On the last row we narrow the chimney to its original appearance.
We install a metal cap on top that prevents precipitation from getting inside the pipe.
To correctly calculate the height of the pipe outlet above the roof, focus on the location of the ridge.
If you are making a hole in the attic, which is well insulated, it is enough to use an electric jigsaw or grinder to carefully cut out the opening in the sheathing and the insulation.
After you have brought the chimney duct through the roof, you need to carefully close the opening between the pipe and the ceiling. To do this, you can fill the entire space with thermal insulation material. Pack the insulation tightly. It is best to use stone wool or foam glass for this.
Step 4. Finishing work and lining the furnace.
Finishing work includes lining the stove and the first kindling.
The facing material can be clinker tiles, tiles, decorative plaster, etc.
If you have chosen high-quality red ceramic bricks for construction, then you don’t have to line the top with anything.
Dutch facing
After completely lining the furnace, you need to take a technological break for 10-14 days until the structure is completely dried. To do this, leave the combustion chamber door open. If the stove was laid in cold weather and the house is damp, you can put a lamp inside the stove, which will help speed up the drying process.
Step 5. First test firing of the furnace.
Only after the masonry mortar and cladding have completely dried can you begin the first heating of the furnace. Take your time and do not ignore this point, as premature lighting of a damp stove can lead to its cracking and disruption of technical properties.
For a test fire, use 1/5 of the usual amount of firewood. There is no need to immediately lay large logs. Use wood chips and shavings. This kindling will help dry the stove efficiently. Open all latches and dampers.
Dutch woman burning
Fire the stove in this mode for the first week, and the maximum temperature should not exceed 600C.
As you can see, building an efficient and compact Dutch oven with a stove with your own hands is not at all difficult. The main thing is to be patient and follow our advice exactly.
But after finishing the work, you will experience the incomparable pleasure of a warm stove of your own production and the cozy atmosphere in the house that it gives.