Today there are many options for heating a dacha: centralized gas, boilers, electric heaters.
Stove for a summer residence
But if it is not possible to implement all this due to the area’s remoteness from civilization, a do-it-yourself brick stove for a summer cottage will be an excellent solution.
Reliable and durable - it will gather around itself more than one generation of household members, providing the house with warmth and filling it with comfort.
The services of a good stove maker are not a cheap pleasure. Therefore, if you decide to implement a brick stove project at your dacha, it will be useful for you to read this article, in which we will tell you about the operating principle, features and layout of the stove structure.
A brick stove can become not only a functional device, but also the main highlight of the interior if it is used correctly. Today there are many ways to beautifully veneer and decorate a stone stove.
Types of furnace designs
No matter how much time has passed since the appearance of the first stove designs and no matter how far home heating technologies have come, the stone stove still does not lose its relevance. Compared to other types of heating (electricity, gas), it is more economical. At the same time, thick stone walls allow you to retain heat for another day after the firewood burns out.
According to their purpose, furnaces are divided into the following types:
- heating;
- cooking;
- multifunctional;
- combined.
- The heating design is perhaps the simplest and most common. As the name implies, the function of such a stove is aimed only at heating.
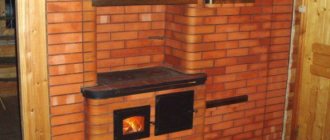
Oven with hob
Basically, such a stove is chosen for dachas where there is electricity and a stove is used for cooking. Or home owners want to create a special country coziness with the help of a fireplace stove. The design of such a furnace consists of:
- combustion chamber, which is purchased ready-made or lined with fireclay bricks;
- an ash pit where ashes are collected;
- chimney.
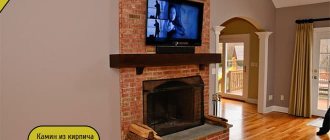
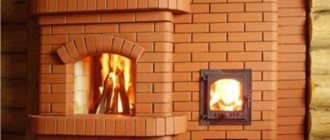
This type of design also includes a fireplace with an open or closed firebox. It is used not only for decorative purposes, but also allows you to effectively heat a room of 15-20 square meters. meters.
Depending on the selected material, wall thickness, masonry scheme, heating stoves may have different heat output.
The most popular type of stove is the one-brick design. This allows the walls to be heated up to 600C. The famous Dutch ovens are laid out according to this pattern.
In terms of dimensions, the heating stove can be wide and flat, or it can have an elongated rectangular shape. It all depends on the area of the room, the style of the interior and the personal preferences of the owners.
For cladding such a stove, tiles, decorative plaster, and decorative stone are usually used.
Brick heating stoves in the form of a three-sided prism look very stylish and original, but a beginner cannot implement this option, since it requires a lot of experience. The greatest difficulty is in cutting bricks and the requirements for maintaining an angle strictly at 600.
Round stoves, which are laid out according to the design of the famous Russian furnace engineer V.E. Grum-Grizhimailo, also look beautiful and unusual. The furnace operates on the principle of free movement of gases. To ensure tightness, the outside of the structure is covered with sheet metal. Such a stove can heat a large country mansion and will become a real decoration for any home.
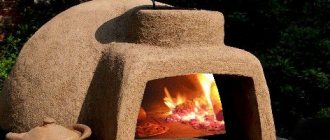
- Cooking stove. It is advisable to choose this option for a dacha where the owners visit only in the summer. In this case, heating the house is not needed, and if you equip the structure with an additional water tank, it will serve not only for cooking, but will also create comfortable living conditions.
Cooking ovenOften this option is installed in country cottages where gas and electric heating are provided, but in order to save resources, owners sometimes use a brick oven.
The design of the stove consists of a brick body, inside of which there is a combustion chamber, an ash pan, and a chimney. There is a metal plate on top (an oven can be built in).
- A heating and cooking stove is already a multifunctional design.
This is a more difficult project to implement, as it consists of:
- combustion chamber;
- chimney;
- ash pan;
- hob;
- oven.
The stove looks massive and is usually chosen for dachas where there is no other heating option.
In our country, heating and cooking stoves are the most popular, allowing you to heat the house and prepare a delicious dinner for the whole family.
It can be additionally equipped with a drying chamber, where you can make preparations for the summer: mushrooms, berries, fruits. In cold and damp weather, you can quickly and safely dry clothes and shoes in this chamber.
Oven with drying chamber
By the way, ovens with drying chambers were first invented in the countries of Northern Scandinavia, where hunters and fishermen needed to dry clothes and boots in one night.
Many schemes of heating and cooking stoves have additional devices in the form of a comfortable bench, drying for firewood, an oven, and a water-heating tank.
Preparatory activities
Before starting construction, it is necessary to go through the preparatory stage. It is worth taking it seriously - the more scrupulous the approach, the better the result. Making a brick stove with your own hands from scratch is a very real task.
Preparation for construction occurs in several stages.
- Buy building materials.
- Determine the location of the building in a residential building.
- Pouring the foundation.
- Prepare a solution for working with bricks.
These are the basic preparation steps before building a brick kiln.
Required materials and tools
To make a brick stove with your own hands, you need to select high-quality materials. To build the structure you need to take:
brick. Individual quantity calculations are carried out for each project; doors: for the blower and firebox; clay for mortar; lattice; soot cleaner; flap; grates; valve; cast iron hob.
It is forbidden to use sand-lime bricks to build a furnace - even the double variety is not suitable.
Refractory bricks are optimal for furnaces; ceramic bricks are rarely used.
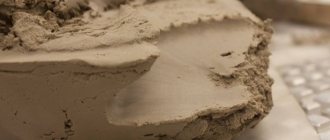
The basis for the solution will be clay. Red is suitable for red brick, fireclay - for fireclay. There are also special mixtures for sale for the construction of stoves; to work with the solution, it is enough to prepare it as written in the instructions.
To build a furnace, take the following tools:
- putty knife;
- Master OK;
- tape measure;
- plumb line;
- mop broom;
- level for construction;
- knitting wire;
- containers for preparing cement and clay mortar;
- grinder;
- metal strips and corners;
- bushhammer.
The foundation under the structure must be strong and reliable. To do this, you need to prepare a stable foundation. The following materials and tools will be useful:
- sand;
- crushed stone;
- reinforcing mesh;
- cement;
- boards and nails;
- waterproofing material.
If external wall finishing work is planned, then you need to buy material for this.
Features of choosing a place to install a heating device
Usually the location of the furnace is designated even before the construction of the house in the project. This is necessary in order to install heating equipment in a place from where warm air currents will be evenly distributed throughout the rooms. The foundation for the stove must be separate from the general foundation of the house. The distance between their walls must be at least 150 mm.
Failure to comply with the rules regarding foundation construction will lead to deformation of nearby walls.
A properly installed stove should heat several rooms located across the wall at once. If there are several rooms in the house, it is worth installing the grub at the crossroads of the walls. Since the foundations must be separate, it is better to make the internal walls light.
There are cases when the stove is installed next to the front door. This is how a thermal curtain is made to protect rooms from the penetration of cold air masses.
It is better not to place the edges of the stove close to the walls of the house. This is due to the fact that it is necessary to ensure full access to the rough. Owners are advised to regularly inspect heating equipment to comply with safety regulations. If the stove is part of the wall of a residential building, then a layer of heat insulation is laid between it and the end part of the partition.
If the stove is installed in a built room, then it is necessary to ensure that the chimney is not located too close to the beams. The distance is more than 15 cm, taking into account the thermal insulation gasket.
The area in front of the firebox is covered with fireproof material. Typically, metal sheets or ceramic tiles are chosen.
Construction of the foundation
In order for the stove to operate safely and efficiently, the foundation must be properly equipped. It must be separate from the common house.
Before starting to construct and lay the foundation, you should pay attention to the fact that the distance of the chimney from the roof slab should be more than 15 cm. Markings are applied where the grout will be located.
If the house has wooden floors, they are cut out at the location of the stove. 15 cm retreat from the outer edge. A pit is dug in the resulting hole. Its depth depends on the climatic conditions of the region and the degree of soil freezing, usually 0.7 - 0.8 m is sufficient.
15 cm of sand is gradually poured into the bottom of the hole. It needs to be watered to compact it. Crushed stone is poured on top in a layer of up to 15 cm. It is compacted tightly and evenly. Wooden pegs are driven into the corners of the resulting pit, and cladding boards are attached to them. The walls are covered with a polyethylene wall to prevent cement mortar from seeping into it.
A reinforcing mesh is installed 5-10 cm from the floor. It is placed on metal rods or broken bricks nailed to the bottom.
Concrete is prepared to pour the foundation. To do this, mix cement (M-400), sand and crushed stone in a ratio of 1:3:4. Pour in a small amount of water: the consistency should be medium fluid. If you overdo it, the base will turn out to be fragile and will begin to quickly collapse under the load of rough material.
The prepared mixture is filled into the formwork and leveled using the rule. After a few hours, when the composition “sets”, it needs to be covered with film. The prepared site for the structure is left for several weeks until the solution dries.
The upper base of the stove should be located 15-20 cm below floor level.
Preparation of the solution
For laying stoves in a private home, clay and sand mortars are used. Kaolin and fireclay marl are suitable for fireclay. For ceramic bricks, use ground gray and blue Cambrian clay with fire-resistant characteristics.
For 100 bricks you will need about 40 kg of clay.
Before preparing the solution, the clay is checked for fat content. This is necessary in order to determine in what proportion it should be mixed with sand.
To test, 1 kg of clay powder is filled with water to the top edge and left for 24 hours. If marl is used in construction, it only needs to stand for 2 hours. After souring, the clay is diluted with water; the consistency should resemble thick dough.
The resulting wet clay is divided into 5 equal parts. Sand is added to each in different percentages: 10%, 30%, 50%, 70%, 100%. After this, the resulting composition is dried for 4 hours. From each mass, roll small sausages (diameter - 1.5 cm, length - 30 cm), roll them into a circle.
- If there are no cracks in the mortar, it is suitable for any construction.
- There is a dry crust and minimal damage - it can be used.
- The cracks are about 1 mm deep - suitable only for low-power heating equipment.
- If there are kinks or deep damage, the solution must not be used.
The solution can be prepared using an identical algorithm.
- Pour the required amount of clay with water for a day.
- Knead it to the consistency of dough, sift through a 3x3 mm sieve - this will remove lumps.
- Add sand in the proportion that testing has shown to be optimal.
- Pour in water and stir until the consistency resembles thick sour cream.
If the fat content is not enough, you need to add sand or clay. It is checked with a trowel - the trowel is soaked in the solution and the result is assessed. With a normal ratio of components, 1-2 mm of the composition will stick, no more and no less.
Construction of a stove for a summer residence and its features
The main elements of any brick stove for a summer residence are:
- Foundation. For any stove it is necessary to build a separate foundation, not connected to the main foundation of the house.
The foundation is built separately
- Furnace body. Consists of a combustion chamber and a chimney. If the stove design requires additional elements, then it may include a hob, oven, and water heating tank.
- Combustion chamber. The dimensions of the firebox depend on the area of the room and the required power. If the stove is planned to be heated with wood, then the height of the firebox must be at least 40 cm. The thickness of the firebox must be at least 1/2 of a brick. The firebox can be made of fireclay (heat-resistant) bricks or purchased in ready-made cast iron.
- Ash pit (ash chamber). This element of the furnace is designed to collect products during fuel combustion. Oxygen is also taken in through the ash pan, which is necessary for the combustion process.
Ash pan
The ash pan is located below the combustion chamber and is always equipped with a metal door through which cleaning takes place. A grate is laid between the ash pan and the combustion chamber. Typically, the ash chamber is 3 bricks high.
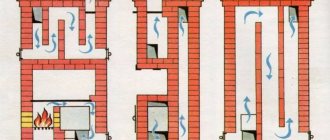
- Chimney. The main element of the furnace through which combustion products are removed. The chimney can be made of brick or made of steel pipes. This does not affect functionality or efficiency in any way. The chimney is discharged from the stove either directly through the roof or through the wall to the street. When constructing a chimney, you must avoid multiple branches and horizontal sections, as this negatively affects draft and can reduce the efficiency of heating the room.
Rules for laying the furnace vaults of an outdoor stove
When laying furnace vaults, it is necessary to block the combustion openings, fireboxes, and chambers using simple and complex shaped lintels. The ceiling in a wall is called an arch or arched lintel, and the ceiling between the walls is called a vault.
To cover large spans, an arched ceiling is used.
Vaults can be steep, flat or gentle. The semicircular arch is equal to half a circle. A gentle vault is less steep. The three-center arch is even flatter; thanks to its design, heating occurs evenly over the entire surface. This is important when baking pies. The number of bricks in the arch and rows in the vault should be odd. The middle odd brick is called a castle brick. The bricks on which the lintel or arch rests are called heels. To give them the desired shape, such bricks have to be trimmed. The space covered by any jumper is called a span. The lifting height of a vault or arch is the lifting boom.
The construction of any lintel must begin with the laying of bricks on which it will rest. They should be hewn out according to a template. Since the height of the arch or vault can be different, the angle of the heel changes. You cannot use one heel shape for all arches and vaults.
The laying of the furnace firebox begins with the preparation of circles and foot templates; for this, on a sheet of paper, cardboard or plywood, it is necessary to draw a vault of the desired shape so that an odd number of rows of masonry can fit in it.
You can easily and quickly build a vault on two boards. An axis should be drawn in the middle of the narrow board so that it intersects the wide board. At a distance of 3-5 cm from the bottom edge of the wide board, you need to draw a straight line A-B, marking the width of the firebox on it. The axis should run in the middle of the firebox, between points B and D. On the axis from line A-B, the height of the arch lifting boom should be measured upward. The resulting point can be designated by the letter D. After this, you need to select the center O in such a way that the circle passing from it, forming the arch, runs through points B, D and the upper point of the arch lifting arrow.
The rules for laying a furnace recommend using formwork for the arch, which is laid on prepared circles.
After installing and securing the formwork, a nail should be driven into the central point O, from which the circle was drawn, and strong twine should be attached to it, which is necessary for checking the rows of the vault and marking the bricks to be laid. The brick for laying the vaults must be hewn, giving it a wedge-shaped shape.
In this case, the seams have the same thickness. When using regular brick, the seams will be thinner at the bottom and thicker at the top. They must be completely filled with solution.
The heels should be trimmed and laid very carefully, since filling large voids with mortar and crushed stone can lead to settlement of the vault or arch and their destruction.
The laying of the vault should begin from the edges, from both heels at the same time, moving towards the middle of the vault or towards the castle. The bricks need to be fitted tightly, so that they almost touch each other on the side of the firebox.
The seams between them must be directed to one point or to the center from which the curve of the arch or vault is described.
The last thing to be inserted into the row of masonry of a vault or arch is a castle brick, greased on both sides with clay mortar. It is advisable to strike only with a log or a mallet, since an ordinary hammer can split the brick.
Master's advice. During work, the accuracy of the formwork installation must be constantly checked and adjusted by driving wedges between it and the furnace walls. The finished vault should be left in the formwork for several days, after which it can be disassembled, gradually removing the wedges. The circles are taken out last.
Which brick stove to choose for your dacha?
The choice of stove design determines the size and type of room. Large cottages will require a massive stove structure with thick walls, which will take a long time to heat up, but at the same time be able to maintain the temperature for a long time. Building such a stove is not an easy task. This will require some experience and knowledge.
But even a beginner can handle a small stove for heating a small dacha if you strictly follow the diagram and do not change the laying rules.
small ovens
The first place in the popularity of heating and cooking stoves is worthily taken by the Swede, which enjoys well-deserved love and respect among Russian stove makers.
This design is a compact, ergonomic shape with a small cooking surface and a three-channel chamber. It is ideal for a small cottage, the length ranges from 880 to 1250 mm.
For the location of such a stove, the place most often chosen is between the kitchen and the living room. Thus, the stove performs a double function: it serves for cooking and decorates the living room with a fireplace.
Today you can find hundreds of different layouts for laying a Swedish stove with a hob on the Internet, so it won’t be difficult to implement it for your dacha. Many stove makers have added additional options to the standard masonry scheme, so each design is called by the name of its creator: the Buslaev, Kuznetsov stove, etc. But the principle of operation in them is the same.
Traditionally, a Russian stove can be called a bulky, massive structure, which is decorated not only with a hob with an oven, but also with a spacious bench.
Stove with bench
This stove is not only a functional device for cooking, but also a place for relaxation. It allows you to warm up the room well, retaining heat for a long time, and has a beneficial effect on the human body, thanks to which the owners of such stoves are less susceptible to colds.
The building usually has two fireboxes (main and additional). Thanks to the special design of the oven, heating is carried out evenly, from bottom to top. Any solid fuel is suitable for kindling, and there are no particularly strict requirements for the materials for laying a Russian stove.
A special place among small heating and cooking stoves is occupied by the little V.A. Potapova, created by a famous engineer at the beginning of the 20th century. To lay it, you need only 211 bricks, and the dimensions of the stove are only 630 * 510 mm.
Moreover, this little thing contains a single-burner stove, a small oven for baking and a hood. This type of stove would be an excellent solution for a small garden house or one-room cottage.
In this article, we invite you to study the rules and main points of laying a small heating and cooking stove.
Cooking oven order
Conclusions and useful video on the topic
A visual demonstration of laying a brick stove will help you get familiar with the essence of the process:
Building a brick stove can hardly be called an easy task, but it is quite accessible for DIY. Guided by the manual and procedures we presented, you can build a perfectly functioning stove with your own hands. Information about the general rules for the construction of heating and cooking units will help control the work of hired stove builders.
If you have experience in laying brick ovens, please share it with our readers. Perhaps you know some subtleties that we did not mention in this material? Leave your comments in the contact block below.
Preparation for work
For laying a stove with a stove, different types of brick are used. Usually they take solid red for the outer masonry and fireclay for the inner lining of the firebox, as well as the smoke well.
The foundation is poured with concrete mortar. To prepare it, you will need cement of at least M400, preferably M500. The sand can be river or from a quarry, but it must first be sifted to prevent the ingress of impurities. Clean water should also be used. For the solution, you should also take granite crushed stone about 30 mm.
The foundation is backfilled using rubble granite, a suitable fraction is approximately 300 mm. In addition, you will need to prepare a solution of red clay and sand.
Instead of clay, you can purchase clay powder; the instructions for using it are indicated on the package. All components must be of good quality; the integrity and service life of the future stove depends on this. To seal the joints, you need to prepare a high-temperature sealant.
The work is carried out using ordinary construction tools.
You may need:
- containers for mixing the solution;
- Master OK;
- Bulgarian;
- plumb line;
- level;
- roulette;
- rule;
- mallet;
- furnace hammer;
- other devices for processing and laying bricks.
To make a high-quality solution, it is better to use a hammer drill or drill with the appropriate characteristics, as well as an attachment designed for these purposes. A shovel and a sieve will come in handy.
Schemes of stoves for the home with preferential bottom heating
If the heating structure has a predominant bottom heating, its size, as a rule, is 115x56x231 centimeters with a heat transfer of 2640 kcal/hour. In accordance with the smoke circulation system, this stove is classified as a combined duct heating unit with bottom heating.
When a stove heating scheme for a private house is created using such a design, it is assumed that the flue gases from the firebox will first descend and then rise along the riser to the ceiling (
Possible complications for the stove maker
In a country house built according to a standard design, the location of the stove, the chimney outlet, and convenient places for maintenance and operation are usually provided in advance. It is much more difficult to install a heating and cooking unit in a house built according to an individual idea. It is even more difficult if the house has already been built.
It happens that after choosing what the owner thinks is a good location for the stove, and even after building the foundation, they suddenly discover that the chimney will cross the floor beam or rafter. What to do in such a situation?
The way out in this case involves two difficult and rather expensive options. In the first of them, you will have to sort out the ceiling and change the position of the beams and rafters, in the second, you will have to demolish and rebuild the foundation of the stove.
In order to eliminate such troubles, before marking and building the foundation in a built house, it is necessary to determine whether the chimney will not violate the integrity of existing structures. If it is possible and has access to beams that have not yet been sheathed, you need to use a plumb line to check the exact position of the components of the marked furnace.
If in a house you are building with your own hands, it is most convenient to place a brick oven in a place whose projection intersects the elements of the roofing system, it is better to move them. In general, of all the options, it is advisable to choose the one that will be easier and cheaper to implement.
When designing a stove and selecting a suitable model, the following rules should be taken into account:
Do-it-yourself iron country stove - step-by-step instructions
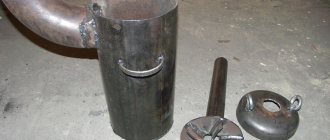
The simplest version of an iron stove is the well-known potbelly stove , which is absolutely undemanding in terms of fuel. Improved factory versions can be made of steel and cast iron, have decorative trim and a glass door, and be installed on bent legs. But for self-production, something else is important: simplicity, reliability, straight lines of the design.
Table 2. Characteristics of popular Butakov iron stoves.
| Model | High school student | Student | Engineer | Assistant professor | Professor |
| Room volume, cubic meters m | 100 | 150 | 250 | 500 | 1000 |
| power, kWt | 6 | 9 | 15 | 25 | 40 |
| Dimensions, cm | 37*66*78 | 37*66*78 | 44*76*89 | 57*97*115 | 67*111*125 |
| Weight, kg | 55 | 77 | 113 | 182 | 235 |
| Chimney diameter, mm | 120 | 120 | 120 | 150 | 200 |
| Min. height of the chimney from the grate, m | 5 | 5 | 5 | 6 | 8 |
A good option for self-production is the Loginov . It is distinguished from a conventional stove by the presence of two shelves at the top of the firebox, which more than double the path of burnt gases, increase efficiency and heat output.
Step 1. Cutting the material . Having drawn a diagram of the potbelly stove on paper, estimate all the dimensions. The best option: 80 * 45 * 45 cm. In addition to the box itself, inside you will need to place a grate and two reflective shelves. It is better to make all elements removable. The cutting can be done with a grinder, and the chamfer can be removed from the edges with a grinding wheel.
Drawing of Loginov's potbelly stove
Step 2. First, the side and rear walls are welded together , pointwise. They are tapped with a hammer for leveling, placed on the bottom, which is also welded, now along the entire seam to make the parallelepiped rigid. The grate can be made from a sheet of steel with a thickness of at least 4 mm , in which longitudinal holes can be cut. 4 pieces of reinforcement are welded along the inner walls, on which the grate will rest. The upper reflectors are installed in the same way, but always with an offset - the lower one is closer to the front wall, the upper one is closer to the rear.
Prices for popular models of welding machines
Welders
The side and back walls are grabbed first
Step 3. To hang the door, the hinges are first welded onto it, and then onto the front wall. The firebox door is larger than the vent. The easiest way to make latches is from bolt-mounted strips that will fit behind hooks welded to the front wall. The front wall is welded last, after the top sheet with a hole for the chimney.
Door version
Step 4. The box is ready . For convenience, legs from pieces of metal corner are welded from below. A section of pipe is welded to the chimney opening, onto which the rest of the pipe is then placed. In this section you need to make a gate, that is, a damper, by adjusting which you can turn an ordinary potbelly stove into a long-burning stove. The principle is simple: if you shut off the damper and close the doors of the firebox and the blower, the air will flow very slowly, and the wood will smolder rather than burn.
By laying a lot of wood, you can stretch one firebox for 8 – 10 hours – just enough to sleep comfortably. Two coaxial holes are drilled in the pipe, a pin is inserted into the bottom, and the outer end is bent 90 degrees . Inside the pipe section, an iron round slightly smaller than the diameter of the pipe is welded to the stud. By turning the pin around its axis, you can adjust the width of the open chimney channel.
The gate allows for slow combustion
Step 5. The height of the vertical pipe is about 1.2 - 1.5 meters . Next comes an inclined part from one and a half to two meters . It is called a hog and also participates in heating the room, because hot gases heat it up greatly. It is better to take it outside through the wall, covering the exit with glass wool or mineral wool.
Well-organized chimney
Place the finished potbelly stove on a steel sheet. Sometimes a screen is hung on the sides. It performs a dual role: protects against contact with hot walls; heating itself, it serves as a plane that releases a lot of heat into the room. With these simple measures you can turn a simple iron stove into a work of engineering art.
Our separate detailed article on the topic - Mixture for laying a brick stove, where we analyzed in detail the correct proportions, as well as tips for mixing it yourself, will be very useful.