Improving a homemade heater
If you plan to use a similar design of an oil heater in another place, for example, in a country house, then some changes will have to be made to it.
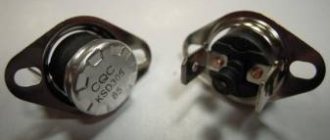
They will only affect the electrical part. The fact is that you are in the garage temporarily, but in the country house, compared to the garage, you are permanently. Therefore, the requirements for room temperature will be different. To achieve comfortable heating conditions for a country house, the electrical circuit of the heater must be slightly changed. To do this, a relay is introduced into the heating element circuit, which will control the heating of the element and maintain the specified temperature of the coolant. And again, an old electric iron, or rather its bimetallic plate, can play a positive role. In the iron it served as a regulator of its heating; here its purpose will be the same - to maintain the specified oil temperature. In addition to the direct effect, there will be an additional effect - energy savings. The relationship is direct - the lower the temperature, the less electricity is consumed.
Bimetallic iron plate
A homemade designed oil heater completely replaces a purchased one, and in some respects even surpasses it. This is, firstly, manufacturing to the required dimensions. Secondly, tangible savings in material resources
Of no small importance will be the fact that the garage will be cleared a little of unnecessary rubbish (pipes, cutting corners, profiles), from which a useful and necessary thing will be made
The video shows the making of a slightly different model of oil heater.
Rarely does anyone provide for heating when building a garage. Therefore, during operation, the premises have to be heated independently. Agree, buying heating devices for periodic use is sometimes costly and impractical.
Some craftsmen make the unit themselves, using inexpensive materials. We invite you to familiarize yourself with the three most popular solutions for organizing individual heating.
Before you make a homemade garage heater, you need to understand the operating principle of each unit, its structure and study the assembly procedure.
Wood stove
The good old solid fuel stove is a classic that will never lose its relevance. We offer detailed instructions for making such a homemade stove for the garage.
The first thing you need is a pipe. It will become the basis for the future oven.
In the fragment used, cut a hole for the grate - without it, heating the lower layers of firewood will be problematic.
Place the ash box exactly on the cut hole.
Turn the workpiece over and make holes for the chimney.
To increase heat transfer during kindling, it is recommended to use horizontal partitions in the chimney.
The heat exchanger can be made from thin pipes.
The stove will stand on legs - they can be easily made from any available material. In the photo, for example, a bumper amplifier is used.
We assemble the structure and install the chimney correctly.
We add refractory bricks inside - this will make the potbelly stove work much more productive!
To speed up the process, we offer you ready-made drawings - using them you can quickly and, most importantly, correctly assemble a wood-burning stove for your garage and be satisfied.
Heating cables
Laying a heated floor in a garage is not always advisable, but in one situation such a design will be more than justified. We are talking about starting a car in cold weather - often a lot of problems are associated with this, and the presence of a heating cable will significantly simplify the task. In addition, you can lay the cable only under the car and turn it on only if you have problems starting the engine.
The machine must first be covered with a cover that will cover it completely - this will allow the thermal energy to be concentrated in one zone. The air will not move into the garage itself, so the level of heat loss will be minimized. This technique will allow you to quickly warm up the car even in severe frost.
Autonomous heating device
This heater is designed for 12 volt current. Thanks to this, it can be connected to a battery. It can be used in rooms where there is no heating and where renovations are being carried out, as well as in the garage or any room in the house. Its power is not enough to heat the entire room. It does not create infrared rays. It only heats the air.
To make it you need to take:
- Metal can. It could be a coffee can. Its height and diameter should be 20 and 10 cm, respectively. These values may deviate upward or downward. You should not use a jar made of plastic, cardboard or any other material. This is because they are poor conductors of heat.
- Bracket. It can be a U-shaped part of a children's metal construction set.
- Bayonet cartridge.
- Car brake light lamp. It is designed for 12 volts. Its power is 25 W.
- 2 A fuse.
- Sleeve made of insulating material.
- Cable. The cross-sectional area of one wire must exceed 1 mm².
Sequence of manufacturing an autonomous heater
A 12 volt device is made as follows:
- Drill 20-30 holes in the side wall of the can. Their diameter should be 3 mm.
- Make a hole in the bottom of the jar. It is drilled in the center of the bottom. The diameter should be equal to the diameter of the bolt that will secure the bracket.
- Fix the bracket at the bottom of the can.
- A cartridge is secured to the top of the bracket. This element must be positioned so that the lamp does not touch the walls of the container.
- A hole is drilled in the side wall of the can at the level of the top of the bracket so that the bushing for the cable fits in it.
- A sleeve is inserted into this hole and an electrical wire is pushed through it, through which a current of 12 volts will flow. The cable will be connected to the socket.
- Screw in the lamp and close the jar with a lid.
- A fuse is connected to the cable break.
The 12 volt heater is ready. Now all you have to do is connect it to the battery and wait 10 minutes. During this time, the homemade garage heater will warm up. When using a device with an operating voltage of 12 volts, you need to monitor the battery voltage. It should not fall below 10 volts. Otherwise, the current source cannot be restored.
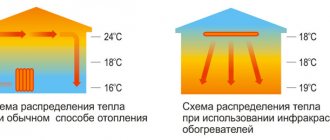
Infrared heaters and their features
The operation of infrared heaters is based on the principle of wave radiation, due to which objects and surfaces located in the path of the rays are heated. This is the key difference between infrared devices and other types of heaters, which primarily heat the air.
The main element of the type of heaters under consideration is the emitter. In household devices, the operating temperature of the emitter can reach 600 degrees. In addition to electric IR heaters, there are also gas devices, but using them in rooms without good ventilation (and most garages fit this definition) is prohibited.
There are the following types of infrared emitters:
Metal. Low-temperature heating elements made of stainless steel, equipped with aluminum radiating plates, are the simplest and most reliable elements available. When heating and cooling, such devices crackle slightly.
Ceramic. These emitters consist of a ceramic panel, which is heated by a metal spiral. Such devices are characterized by relatively low efficiency.
Micathermic. The emitter plate of this type is covered with mica and heated to a temperature of 60 degrees. Devices with micathermic emitters are more expensive than the two previous options.
Quartz. The heating element is a tungsten filament, hermetically sealed in a vacuum tube made of quartz glass.
Such devices must be handled with care due to their fragility.
Halogen. Such an emitter is structurally similar to a quartz emitter, but the tube contains an inert gas
The thread heats up to a higher temperature and glows during the heating process.
Carbon. Another representative of tube emitters. The vacuum quartz tube contains a carbon filament, which ensures maximum efficiency compared to halogen and quartz devices. The cost of carbon emitters is the highest compared to analogues.
In garages, IR heaters with aluminum emitters are usually used - they are cheaper, more reliable, and much more durable, which is important when using the device in a garage. Aluminum heaters usually operate at temperatures no higher than 300 degrees
At this temperature, flammable materials (paper and wood) do not ignite, so such heaters meet fire safety requirements. Such devices are also supported by the fact that they do not burn oxygen, and a person can stay in a heated room for a long time without any problems.
Aluminum heaters usually operate at temperatures no higher than 300 degrees. At this temperature, flammable materials (paper and wood) do not ignite, so such heaters meet fire safety requirements. Such devices are also supported by the fact that they do not burn oxygen, and a person can stay in a heated room for a long time without any problems.
When choosing a heater with a plate emitter, you must find out what the thickness of the anode layer is - for normal and long-term operation of the device, this figure must exceed 25 microns. The heating element must be located in a stainless steel housing that will not rust in high humidity in the room.
Infrared heaters for garages have the following number of advantages:
- Possibility of uniform heating of the entire room or creating local heating in a specific area;
- The ability to warm up any area of the garage, including even the most inaccessible ones.
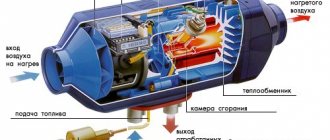
Common types
Forced air heating devices are widely used. Thermal energy in them is created due to the combustion of diesel fuel. This heat is used to heat the metal or ceramic element, and when the fan is turned on, warm air begins to circulate and warm up the room. They are best used in large rooms, without air flow and drafts. Such heaters are very effective and inexpensive.
Infrared diesel heaters. Infrared radiation is similar to solar radiation; it warms up objects and people first, and then the air. Infrared heaters using diesel fuel are also available.
An important advantage of this type of heating is the instant heating of objects located close to it. The devices are well suited for drafty rooms
Due to the fact that diesel fuel burns completely, such devices do not require smoke removal. They are often installed outdoors and in street cafes. The disadvantage of such heat sources is their inability to warm large rooms.
Diesel heating boilers operate on the same principle as turbocharged gas appliances. Their similarity is also in easy control using electronics in automatic mode.
Compact appliances – a kind of potbelly stove with a fan – are very popular on the market. They come in 2 types:
- with direct heating (without chimney);
- with indirect heating.
The operating principle of a potbelly stove with indirect heating is very simple. Liquid fuel enters the combustion chamber, where it is burned thanks to the air supplied by the fan. Passing the heat exchanger, warm air rushes into the room, heating it throughout the entire area. This heating device is very often used in garages. The design of heating devices allows you to: control the fuel consumed and regulate the temperature.
Design and features of convector heaters
Convection is a working principle in which heating occurs due to the different densities of cold and heated air. Cold air from below enters the heater through special holes, heats up, its specific gravity becomes less, and the heated air exits through holes located in the upper part of the device.
In heating convectors, everything happens in strict accordance with this principle - i.e. the air moves naturally, heating up in the inside of the heater. Increasing the intensity of cold air intake significantly increases the heat transfer of the convector.
Typically, convection heaters are installed on walls - this allows the device to draw air from below and release heat through the top panel. The holes in the upper part of the convector are equipped with special elements that allow you to regulate the direction of movement of heated air.
There are several types of convectors:
- Electrical. They are easy to install and operate.
- Gas. The main distinguishing feature of these devices is their high power. When installing gas heaters, you need to provide a high-quality chimney for supplying air and removing combustion products. In small spaces, only devices with a closed combustion chamber can be used.
- Mermen.
Among the advantages of convector heaters it is worth noting:
- Low temperature of the device, which eliminates the possibility of burns upon contact with it;
- Limit degree of fire safety of electrical devices;
- Simplicity of design and minimal likelihood of breakdown.
Portable tile heater
Small rooms, a garage, a greenhouse, a tent can be conveniently heated with a portable tabletop gas heater. Such a device is constructed from a quadrangular flat tile equipped with a metal grid.
Assembling this device involves attaching part of the gas stove to a metal casing. Due to the installed combustion chamber, the air is heated to the desired temperature, and several or one fan ensures the supply of warm air and its circulation throughout the room. The assembly of such a device consists of several stages and does not require special technical knowledge.
A gas heater made according to this design is more powerful than the previous version. With the help of such a device it will be possible to heat small rooms even in winter.
The first stage is working with measuring tools. You need to use a ruler or tape measure to take accurate measurements from the quadrangular tile. This will be required to determine the parameters of the heater housing. After taking measurements, you need to cut out blanks from a tin sheet using scissors. Next, the blanks are fastened with rivets into a casing.
Then the casing is fixed with hook strips on the tile. In order for it to be quickly removed and mounted back, you need to make a movable bar. Such a bar can be easily made using a small spring, which is connected to a lifting lever.
Thanks to this solution, in the future it will be possible to easily remove the casing for cleaning or transportation. The homemade scheme under consideration assumes the presence of a special ventilation system. To install it you will need a simple fan without any additional complex devices or materials.
Instead of tiles, you can also purchase a ceramic infrared burner. The infrared heating system provides heat distribution similar to solar radiation. Such heating does not heat the air, but objects, which then radiate heat
A small fan from any home device is suitable for installing ventilation. You can use scissors to adjust the size. Trimming and giving the desired shape and size to the fan blades takes about half an hour. After carrying out these steps, you need to install a ready-made fan behind the heater housing so that there is draft inside the housing.
You also need to install a metal combustion chamber. The combustion chamber body must be studded with many small holes. They can be made using an electric drill and a metal drill or using a hammer and nail. The holes should be a short distance from each other.
You also need to purchase a rubber hose with an adapter to connect the flat tile to a gas pipe or gas cylinder. A fan installed at the rear of the casing ensures the supply and distribution of warm air over a fairly wide range in the heated space.
The gas flows through the hose to the burner. The burner burns the resource and heats the heat emitter, which releases thermal energy to the room. At night, such a heater illuminates a small area around itself
Such a homemade gas heater copes well with the task of heating a room not only in the autumn-spring period, but even in winter. Also, such a device consumes gas economically and has a high efficiency.
What is needed to make a heater?
In every garage you can find a lot of useful things that at first glance do not seem to be of much value, but in the hands of a skilled owner they can turn into useful devices or devices. In its design, a homemade heater resembles factory analogs, where the operating principle is based on the fact that the heating element, in this case a nichrome spiral, is hermetically sealed between sheets of fiberglass, as a result of which the sheet heats up and heats the surrounding air.
To make a homemade heater you will need:
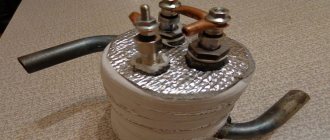
Nichrome wire heating element
- Fiberglass.
- Glue Monolith.
- Nichrome wire.
- Electrical wire.
- Metal rivets.
- Electric drill.
- Matches.
Fiberglass will require two sheets, each 50x50 cm in size and no more than 1.5 cm thick. Although the sizes may be different, the sheets must be the same in thickness and geometric dimensions. A garage heater can be square or rectangular in shape, but the perimeter of its sides should not be more than two meters.
Fiberglass parts are necessary to secure the main heating element in our homemade device - a nichrome spiral, which is made from 24 m of wire. Two pieces of electrical wire length, based on the location of the heater and the electrical outlet. Metal rivets can be replaced with bolts and nuts.
For a similar model of a homemade heater, the power of which will be 100 W, nichrome wire is used with a cross-section of no more than 0.3 mm.
Homemade product #1 - based on the “Good Warmth” heater
Many heating devices operate according to the so-called “thermal film principle.” For example, the well-known “Kind Warmth”. Assembling its analogue at home will not be difficult. For this you will need:
- Laminated paper plastic. Two sheets of equal size with an area of about 1 square. m.
- Graphite powder. You can grind graphite yourself, for example, old graphite trolleybus brushes.
- Epoxy adhesive.
- A piece of good wire with a plug at the end.
Heater Good Warmth - a prototype for many homemade devices
The work is carried out in stages:
- Mix the glue with graphite powder and stir the resulting mixture thoroughly. Thus, we get not just an adhesive composition, but a graphite conductor with high resistance. The amount of graphite in the glue directly affects the maximum temperature of the future heater. On average it is about 65 °C.
- Apply the prepared composition onto a sheet of plastic using zigzag wide strokes. For processing we use the rougher side of the sheet.
- We connect the plastic sheets together using epoxy glue.
- For greater structural strength, we construct a wooden frame that securely fixes the sheets.
- We attach copper terminals to the graphite conductors on different sides of the structure. As an option, you can also connect a simple thermostat, which will allow you to set the most comfortable heating mode. However, this is not necessary.
- Dry the structure thoroughly. Even slight humidity will damage the homemade heater the first time you try to turn it on.
- We carry out tests and measure the resistance of the device. Based on the obtained value, we calculate the power and determine whether the heater can be safely connected to the network.
The device is ready for use. It can be placed on the floor or on the wall, does not take up much space, is quite effective and safe, provided it is well insulated.
Graphite is crushed and mixed with epoxy glue to create a graphite conductor.
Diagram of the future heating device
Making a tabletop fan heater
This type of device is a heater and fan rolled into one. If desired, a homemade fan heater can be used as an improvised air conditioner.
This type of heater is convenient because it allows you to regulate the heating temperature and the rotation speed of the cooler.
Selection of required materials
To create a fan heater you will need the following materials:
- rheostat;
- switch;
- power connector;
- electrical wire;
- LED Strip Light;
- 12 Volt computer cooler;
- three-amp 12-volt power supply;
To fix the heating element, you will also need two ten-centimeter rods of copper wiring with a cross-section of 1.5 sq. mm.
The tools you need to prepare are:
- jigsaw;
- hammer drill or drill;
- soldering iron;
- hole saw;
- glue for woodworking;
- “moment” or superglue;
To clean wooden workpieces, removing burrs along the edges, you will also need fine-grained sandpaper.
Assembly of body parts
The future heater will have the shape of a cube. The body of the device is assembled from wooden boards 9 mm thick.
- two square blanks measuring 12*12 cm;
- 3 parts measuring 10.2*10.2 cm;
- two rectangular blanks 12*10.2 cm;
- four small rectangles measuring 1*1.5 cm.
To make the legs of the structure, 2 pieces, each 3 cm long, are sawn off from a wooden stick D12 mm.
To simplify your task, make paper patterns, the dimensions of which correspond to the dimensions of the blanks 12x12 cm. Marking the location of the holes is applied directly to the patterns. They are applied to each side and drilled through.
In a workpiece 10.2*10.2 cm, maintaining a distance of 2.5 cm from the edge, make a hole D7 mm. On the second similar workpiece, two similar holes are made, maintaining a distance of 2.5 cm between them. On the third workpiece, 10.2 * 10.2 cm, a through hole of D9 cm is made in the center.
In each of the four rectangular blanks measuring 1 * 1.5 mm, holes D5 mm are made.
On the long side of a rectangle measuring 12*10.2 cm, moving 1.2 cm from the edge, make two holes D12 mm, maintaining a distance of 7 cm between them.
A square blank with a 9 cm drilled hole is installed inside the body. After this, the last rectangular part is attached, closing the body of the structure. At the final stage, the legs are glued.
Installation of heating elements
A spring stretched between two copper rods will act as a heating element. To determine whether the spring is suitable, you need to connect it to a 12-volt power source and take measurements using a multimeter.
So, to create a warm flow, it is enough if the multimeter readings are 2.5 A. With such parameters, about 30 V of heat will be generated with a power supply of 12 W.
The selected spring is soldered to copper rods, the ends of which are fixed to blanks measuring 1x1.5 cm. The assembled structure is glued to the corners of the body. The bare “tails” of the electrical cable are soldered to the ends of the rods. After this, a bar equipped with holes is attached.
Having fixed the cooler inside the case, the same manipulations are performed with the rheostat, switch and power connector.
If all structural elements are connected correctly, then when the rheostat is turned on, a blue light will light up on the LED strip. When the switch is turned on, the LED strip will acquire a red tint, which will create a violet color against the background of the main blue. After this, the heater spring will begin to heat up.
The assembled structure from the outside can only be sanded and treated with wood wax, or varnished in 2-3 layers.
Thanks to its presentable appearance, such a heater can be safely used not only for heating a garage, but also when arranging living rooms.
Alternative options for economical garage heating are described in this article.
About the features of heating garages
There are 2 main problems that car owners who want to heat a parking lot usually face:
- “inappropriate” ratio of volume and area of the room;
- lack of external insulation and difficulties with internal installation.
Parameter ratio
There is a law according to which, as the size of a body decreases, the ratio of area to volume increases. Relatively speaking, if in a medium-sized two-story private house there is 0.8 m2 per 1 m3, then in a typical garage there is 1.7 m2 per 1 m3. This means that in a small room the heat loss will be twice as high. To create an 8-degree “microclimate” in the garage, you will need equipment with a power of approximately 1200 W. To maintain a temperature of 16 degrees, you will need a heating device with a power of 1800 W. The cost of heating a unit of area is also approximately twice as much as in the case of a cottage.
Insulation
Figure 2. Thermal insulation lining of the garage
Even powerful and economical furnaces in a typical garage will be ineffective if you do not take care of insulation. Walls, floors and ceilings that are unable to retain heat make the idea of using a heater impractical.
It is best to do external insulation. But most often this results in a considerable burden on the budget. In addition, for many car owners this option is not available at all - garages are sandwiched between others.
The internal thermal insulation remains. But here, too, not everything is so simple. If you perform thermal protection close to the surface of the room, condensation will form between the elements. For some time, such insulation will allow you to heat the garage quite efficiently. But soon the building will fall into disrepair.
In garages, the insulation is installed with a gap of 3-5 cm. A similar distance is also left between the insulator and the floor. This does not prevent condensation from forming, but in this case the latter does not cause significant harm to the garage. The disadvantage of this solution is that with constant heating the room becomes too humid. And this already seriously affects the condition of the car. Owners of such garages still need to think about external insulation or come to terms with additional heat loss.
It is recommended to make the internal lining from materials that conduct heat poorly. Options include chipboard/fibreboard or ondulin. Thermal insulation cannot be made of plastic - in an emergency this will lead to the formation of a large amount of toxic gases.
Before insulation, the walls are additionally protected. Brick walls are plastered (for example, with a vermiculite mixture), and metal walls are primed and painted in two layers.
Thermal cap
Figure 3. Thermal cap
In other words, you need to concentrate the heated air in the center of the garage. And the cold layer will serve as reliable thermal protection. Warm air first rushes upward, without reaching the ceiling - there it collides with cold air currents that extinguish energy. Then the heated air goes to the sides, only slightly touching the garage walls. Thus, almost the entire room becomes warm.
Even the inspection pit heats up. This cannot be achieved without creating a thermal cap. Without convection processes, working in a pit is very uncomfortable - your hands are relatively warm, and your feet get cold in the cold bottom zone.
To achieve this effect, you need to use stoves for heating private garages, which are characterized by low power, but the ability to generate intense low-density air flow.
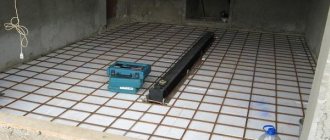
Stages of assembling a homemade heater
After all materials, tools and accessories are prepared, you can begin assembling a homemade heater:
DIY garage heater
- Fiberglass sheets are cleaned from the inside with fine sandpaper.
- Markings are made - a line is drawn in the upper and lower parts, retreating 2 cm. On the right and left sides of the sheet, the indentation will be 3 cm. The heating coil will be attached to one sheet, for which it is necessary to make several holes on both edges of the sheet. Two more holes must be drilled to secure the electrical supply wires. They are located on the edge where a 3 cm indentation is left.
- Before you make a heater with your own hands, you need to turn the wire into a spiral by winding it around a nail or a long knitting needle.
- Matches, toothpicks or other fastening parts are inserted into the lower and upper holes, which can be easily removed after finishing the work.
- The spiral is laid in rows, starting each row by a match in the hole. A distance of 8-12 mm should be maintained between rows. Every 5-7 cm, the spiral is secured with paper centimeter strips, onto which Monolith glue has been previously applied. When the entire spiral is evenly placed on the panel, the matches can be removed, and these places can be further strengthened with paper strips with glue.
- Metal rivets are inserted into the side holes, onto which the stripped ends of the electrical wire are wound. On the outside of the fiberglass plate, a washer is placed on each rivet so that the contact is firmly fixed.
- The next step will be to check how the assembled electric heater works with your own hands, for which you connect the product to an ohmmeter and a power outlet.
- Now you need to glue the second sheet, for which epoxy-based glue is used. You need 150 grams of it. Epoxy resin is applied between the rows of the spiral and a second panel is placed on top. In order for gluing to occur efficiently, a sheet of plywood is placed on top of the second sheet and loaded. The weight of the load must be 40 kg or more, but not less.
- The time for complete curing of epoxy resin is a day. On the second day, you can already use the homemade device. But before that, you need to make a mount on the back wall if you plan to hang it on the wall or legs if it will be located on the floor.
Electric heaters made of wire and spiral: diagram and principle of operation
It’s even easier to assemble a heater from nichrome wire with your own hands. For work you will need materials:
- fiberglass 50*50 cm;
- 24 meters of nichrome wire Ø 0.3 mm;
- epoxy glue 150 g.
The manufacturing principle is as follows: the surface of a square panel made of fiberglass is evenly covered with nichrome wire, the ends of which are brought out to the current supply elements. Then the entire area is filled with epoxy glue and covered with a second textolite panel. After the glue hardens, the finished “sandwich” is connected to a power source and can be used to heat the garage.
Step by step assembly. For fiberglass panels, the inner and outer faces are determined, the inner faces are sanded with sandpaper and cleaned.
Also useful for repairs:
- Laser alarm for children
- How many hoods should there be in the kitchen?
- Sewage diagram in a 5-storey building
Heater power calculation
To calculate the thermal power required to warm up the garage, you need to use the following formula:
- N = V x dT x K, where
- N – heater power (kcal/h),
- V – total volume of the room,
- dT – temperature difference between indoors and outdoors,
- K – heat loss coefficient.
For heat loss calculations, the following values of coefficient K are accepted:
- 0.6-0.9 – the garage is well insulated;
- 1-1.9 – garages have average insulation quality;
- 2-2.9 – the garage has insufficient insulation;
- 3-3.9 – the garage is not insulated.
To convert kcal/h to W, a simple formula is used:
- 1 W = 0.86 kcal/h, or
- 1 kcal/h = 1.163 W.
OCD
Model using IR silicate glass
Since IR silicate glass is used, products of different brands experience sharp changes in thermal conductivity and transparency. For this reason, make and test one emitter. Based on the test results, it may be necessary to vary the diameter of the material.
The following arithmetic principles should be taken into account for quartz installations.
Material parameters
0.5 mm: power – 350 W, current – 1.6 A.
0.6 mm – 420 W and 1.9 A.
0.7 mm: 500 W and 2.27 A.
0.8 mm: 530 W and 2.4 A.
0.9 mm: 570 W and 2.6 A.
Thin wires have a solid radiating surface. When using thick versions, exceed the IR power that glass can transmit.
Testing
The finished product is placed vertically on a non-flammable surface. Supported with a heat-resistant object. A current of 3 A is supplied to the product. A digital tester is used to monitor the current.
We need to check the behavior of the glass. If it quickly heats up and cracks within half an hour, it is not suitable.
After 1.5 hours, the radiation power is checked. Place your palms parallel to the radiating planes. The distance from them is 15-17 cm. You need to hold it for at least 3A min. Then you will feel a soft warmth for 5-10 minutes. If your palms immediately get burned, you need to reduce the diameter of the wire. If after 20 minutes there is not even slight heat, thicker material is needed.
Criteria for choosing a heater
A garage is a non-residential premises used not only for storing vehicles, but also for repairing them. Accordingly, in addition to the four/two-wheeled “friend”, it also stores a considerable amount of all kinds of tools and materials. Most often, it is not possible to provide free access to this room for gas pipes, which means that it can only be heated with the help of heaters powered by electricity.
When thinking about which heater to choose for a garage, it is important, first of all, to determine for yourself the basic criteria that it must meet in its operation:
- compactness is perhaps one of the most important criteria, since there must be enough space to carry out vehicle repairs;
- health safety - despite the fact that the garage is not a residential premises, its owner can often spend a considerable amount of time in it and the type of air he breathes plays an important role;
- ease of operation, installation, etc. - undoubtedly an important criterion, since setting up a heating device is not the purpose for which the garage owner visits it;
- autonomy.
A little later we will look at a wide variety of options for heating devices, but before we begin to familiarize ourselves with them, it is important to determine for ourselves what functions they will perform. This depends, first of all, on the area of the building, the presence of ventilation in it, etc.
Some people note that it is more convenient to work when the room temperature is not very high, and if you are one of those who think so, then a not very powerful compact heater model is quite suitable for you. But first things first.
Permanent heating system
The best way to heat a garage is to connect it to a common circuit. This option makes sense if the garage is attached or is part of a building with common heating. In other cases, you need to make a separate heating and ventilation system.
When the task is to heat the room for a long time, it is better to choose gas and electric boilers. The gas heater is practical and easy to use, the fuel is available and inexpensive. But there is one caveat - you need to allocate space for the boiler room and connect to the gas main. Electric boilers are much safer, but such a heat source cannot be called cheap. It is for these reasons that motorhomes are less and less frequently drowned today.
You also need to remember about wood heating. At the moment, solid fuel is the most economical type. There are different options for such systems: pyrolysis combustion, home-made heaters, or all kinds of potbelly stoves and fireplaces. On sale you can find fully automated pellet boilers with fuel supply without human intervention.
It is difficult to choose which of the permanent heating systems will be more economical - when calculating, you need to take into account not only the price of purchasing and installing the equipment, but also think in advance how much the operation and raw materials will cost. It must be said that different heating systems are suitable for each region of our vast homeland. In places with an abundance of wood, the choice will fall on solid fuel units. In gasified areas, gas boilers and heat guns are most used.
If you don't spend much time in your garage, an electric heater might be the way to go. It does not require special installation skills. Even if such devices are resource-intensive, for heating for a short time this will be the best choice.
Movement
Run to keep warm
Don't know how to keep warm in the car if the methods described above do not work for you? Remember the main character from the film “The Irony of Fate or Enjoy Your Bath”? That shot of him jumping on the spot and jogging to warm up. In fact, this is the most effective way to warm up, but at the same time the simplest. That is why it ended up on one of the lowest lines of the rating.
We can recommend the following: turn on the music (if your mobile phone has enough charge), put on headphones and beat out the rhythm with almost all parts of the body to a catchy melody.
It is also useful to periodically rub your limbs to prevent them from going numb.
If it doesn’t help, then you need to leave the salon. And quickly run around the car for as long as possible. You need to breathe slowly and evenly. After warming up, you should not stay outside. Get back in the car. If you freeze, go out again.
Creation of a prototype and stages of work
As a basis for a homemade heater, you can take the principle of operation of the “Good Warmth” heater, which has become popular due to its ability to very quickly warm up small rooms. It does not consume much electricity, and distributes heat evenly throughout the room.
This heater has a fairly safe and simple design. The main heating element in this device is enclosed in a material that completely eliminates the possibility of fire. In addition, it is quite small in size and takes up little space in the garage.
If you connect a timer to such a homemade heater, its operating mode can be adjusted. In winter, the “one hour on, two off” mode is quite suitable.
The heater is capable of warming up the garage to a comfortable temperature in one hour, and over the next two hours you can safely work on car repairs. When it gets warmer outside, you can change the timer settings.
Thermos seventh place in the ranking
An ordinary thermos, preferably a large one, will help keep you warm inside the car. Or rather, not he himself, but his contents. Hot tea has a good effect on blood circulation and does not constrict blood vessels, such as coffee. It’s best to carry just a thermos with a hot thyme drink. This tea will warm you up very quickly. As is known, the substances contained in this herb growing in the mountains are very beneficial for the human body. Since ancient times, frostbitten travelers were warmed with just such tea, giving it to drink.
To warm up, you can drink a cup of hot tea or coffee
The British would advise drinking a little grog or mulled wine. But in addition to hot water, then you need to take a bottle of semi-sweet wine with you on the road. Ideally, the wine should be boiled, but in road conditions it can simply be mixed with hot water. It will not only help you stay warm in winter, but will also lift your spirits. But it’s better not to get carried away with alcoholic drinks, such as vodka, while sitting in the car. They only provide illusory warmth, but in reality the consequences can be disastrous. “Under alcohol” you can easily fall asleep and freeze.
You can also mix linden honey with hot water, which you can keep in the glove compartment of your car. A spoonful of honey mixed with hot water will warm you better than any other remedy.
Heat gas gun
Modern heat guns for garages allow you to warm up the entire space as quickly as possible. A wide range of models and a variety of designs significantly complicate the choice of such equipment, so experts recommend paying special attention to the following parameters:
- garage area;
- quality characteristics of thermal insulation of a garage room;
- mode of presence of equipment and people in the premises.
Gas heat guns are the optimal choice in terms of power level, space heating speed and efficiency indicators.
Gas heat gun Ballu
At a heating power level of 10-15 kW, approximately 500 ml of gas is consumed per hour of operation.
Such direct heating equipment is not suitable for continuous use if there are people in the room for a long time, which is due to a significant accumulation of combustion products during operation of the device.
There is no point in installing a full-fledged large heater to heat a temporary shed or change house. A miracle diesel stove is a simple and inexpensive way to heat a room.
It’s quite easy to make a homemade sauna stove from a pipe. These tips will help you cope with the task.
Heating with liquid fuel
Do-it-yourself budget heating of a garage can be done using liquid heating units, including homemade ones. In our reviews, we have already described exhaust furnaces that provide cheap, and in some cases, free heat. For example, if you are changing engine oil, then over the spring and summer you can collect several barrels of finished fuel. A properly assembled oil stove will generate a large amount of heat and will delight you with even combustion without soot and soot.
Pyrolysis-type furnaces consisting of several parts, as shown in the figure, give good results. A fire is lit in the oil container, as a result of which oil vapors and pyrolysis products begin to form. They are burned in a vertical pipe with holes, producing a large amount of heat. By regulating the access of oxygen, you can adjust the intensity of combustion.
When using any stove, it is better to allocate a separate corner for it. You also need to think about a reliable foundation and lining the adjacent walls with non-combustible materials.
Using a stove with a plasma bowl to heat your garage, you can achieve maximum heat transfer and minimum fuel consumption. The oil here breaks down into its constituent parts in a hot bowl, after which it burns to form a bluish-white flame, similar to plasma. Of course, there is no trace of plasma here, since it is formed at much higher temperatures. These furnaces are characterized as the most productive.
How to organize air heating
This heating method involves direct heating of the air in the garage from a selected heat source. This can be any of the following units:
- solid fuel stove;
- furnace - dripper in production;
- electric heater - convector, oil radiator or heat gun;
- gas convector.
Such heaters emit diesel combustion products directly into the room
Installation of a wood-burning and exhaust stove
Direct heating of the air in the garage by burning cheap fuel - firewood and various waste - is the most economical heating method. But you need to organize it wisely, otherwise the heater will heat one corner of the room, while the opposite one will remain cold. It is clear that you cannot install a stove in the middle of the room, which means that the issue of heat distribution must be solved differently.
To make effective air heating of a garage or box with your own hands using a wood stove, use our recommendations:
- Order, buy or make an economical potbelly stove yourself, not just an iron box with a pipe. You will find examples of furnaces with drawings, diagrams and assembly instructions in the corresponding publication.
- The heat exchange surface area of the heater walls must correspond to the dimensions of the room. The calculation is as follows: in order to add logs at intervals of 3-4 hours and evenly warm up a 20 m² garage, the heating surface area should be 1 m².
- The part of the housing around the ash pan is not taken into account (it heats up slightly). But the area of convective fins welded to the walls from the outside is taken into account.
- Install the potbelly stove in the chosen location and be sure to organize airflow around the case with any fan - household, for hoods or a computer cooler. Thanks to the forced air movement, heat is more efficiently removed from the walls of the firebox and distributed more evenly throughout the box.
- Before venting to the street, lay the chimney horizontally along the wall, so it will release more heat into the room.
- Raise the chimney pipe to a height of 5 m, counting from the grate, and equip it with a damper to adjust the draft. Provide a condensate collector at the bottom; adjust the cap at your discretion.
There are designs of homemade stoves designed for air heating of workshops, garages and other outbuildings. Below is a diagram of a potbelly stove made from a gas cylinder and equipped with a separate heating chamber through which air is blown by a fan. If necessary, water can also be driven through the heat exchanger.
All of the above applies equally to potbelly stoves using waste oil. The only difference is the placement of the fuel tank that feeds the dropper. Keep the tank away from the stove to prevent fire. Do not use a regular two-chamber miracle heater - it is a fire hazard and consumes up to 2 liters of waste per hour. Use models with a drip burner.
Placement of electric heaters
The first thing you need to do is to choose the right electrical heating appliances based on power. If you want to heat the entire garage, then measure its area and multiply the resulting quadrature by 0.1-0.15 kW. That is, a box of 20 m² will require 20 x 0.15 = 3 kW of thermal power (and it is equal to electrical power), sufficient to maintain positive air temperatures.
Now let's move on to the recommendations:
- If your work in the garage is periodic and short-term, it is better to save money and buy a portable fan heater or infrared panel. It is located in the right place and heats only part of the room. The thermal (also known as electrical) power of the device is 50% of the calculated one.
- Try to use heaters equipped with a turbine or fan to distribute heat better and faster.
- A rational solution for convectors and other wall-mounted appliances is to install several small heaters at different points instead of one large one. Then the garage will warm up evenly, and if necessary, half of the heaters are turned off.
- Do not follow the lead of sellers who are trying to sell a more expensive device under the guise of an innovative and high-tech product. The efficiency of all electric heaters is the same and equal to 98-99%, the difference is in the method of heat transfer.
Different heating methods can be combined. For example, it makes sense to hang an infrared panel above a workbench to provide local heating. Heat the rest of the garage with a stove or a heat gun - whichever is more profitable. Don't forget about garage ventilation - it is necessary when burning any type of fuel.
Autonomous gas burners
Autonomous gas burner
Third place in the ranking is the best method, but since it involves the use of an autonomous heater, and we need methods of dealing with the cold, so to speak, “with our bare hands,” it ended up in third place.
The choice of autonomous heaters for cars today is quite wide. Among the many models, we can highlight a liquid heater, for example, such as Webasto. Such heaters will not only warm the car interior, but will also help start the car engine, as they are pre-heaters for the fluid. Only they are expensive and this heater needs to be installed correctly on the car.
Now about completely autonomous heaters, among which gas heaters come first. They use infrared radiation burners as the main element. Such a heater will not only warm the interior, but also make it possible to boil tea or heat food. But in addition to the heater, you will also have to carry a liquefied gas cylinder with you. So for a passenger car, a five-liter cylinder will do just fine.
The video shows how an autonomous gas burner works:
One kilowatt is the rated power of such a burner and this is quite enough to keep warm. As for consumption, it is unlikely that more than 80 grams of gas will be consumed per hour. This means that you will be able to provide yourself with warmth for a day or even more. The gas burner itself is very convenient, light and compact. Carrying it will not cause any inconvenience, but in addition to the cylinder, as additional equipment you must not forget to take with you a lighter, a hose and a reducer.
You should light a gas burner away from flammable materials and observe fire safety measures in every possible way. In addition, you will need to periodically ventilate the interior so as not to suffocate in smoke. Experts advise placing the gas heater in a special box in order to completely eliminate contact of the burner with the car. Prometheus gas burners have proven themselves to be quite good.
Autonomous heating device
This heater is designed for 12 volt current. Thanks to this, it can be connected to a battery. It can be used in rooms where there is no heating and where renovations are being carried out, as well as in the garage or any room in the house. Its power is not enough to heat the entire room. It does not create infrared rays. It only heats the air.
To make it you need to take:
- Metal can. It could be a coffee can. Its height and diameter should be 20 and 10 cm, respectively. These values may deviate upward or downward. You should not use a jar made of plastic, cardboard or any other material. This is because they are poor conductors of heat.
- Bracket. It can be a U-shaped part of a children's metal construction set.
- Bayonet cartridge.
- Car brake light lamp. It is designed for 12 volts. Its power is 25 W.
- 2 A fuse.
- Sleeve made of insulating material.
- Cable. The cross-sectional area of one wire must exceed 1 mm².
Infrared wall heater
Sequence of manufacturing an autonomous heater
A 12 volt device is made as follows:
- Drill 20-30 holes in the side wall of the can. Their diameter should be 3 mm.
- Make a hole in the bottom of the jar. It is drilled in the center of the bottom. The diameter should be equal to the diameter of the bolt that will secure the bracket.
- Fix the bracket at the bottom of the can.
- A cartridge is secured to the top of the bracket. This element must be positioned so that the lamp does not touch the walls of the container.
- A hole is drilled in the side wall of the can at the level of the top of the bracket so that the bushing for the cable fits in it.
- A sleeve is inserted into this hole and an electrical wire is pushed through it, through which a current of 12 volts will flow. The cable will be connected to the socket.
- Screw in the lamp and close the jar with a lid.
- A fuse is connected to the cable break.
The 12 volt heater is ready. Now all you have to do is connect it to the battery and wait 10 minutes. During this time, the homemade garage heater will warm up. When using a device with an operating voltage of 12 volts, you need to monitor the battery voltage. It should not fall below 10 volts. Otherwise, the current source cannot be restored.
The heating device made will work until the lamp fails. Its functionality can be restored by replacing the lamp. You can even put a halogen lamp in its place.
Making a heater for the garage
To maintain a comfortable temperature in the garage, it is not difficult to make your own heater using waste oil. At the same time, the problem of its disposal will be solved, which is also a pressing issue for car owners. To assemble it, almost all the elements and spare parts can be found in your own garage.
When making a heater you will need:
- metal pipes;
- heating element (heating element);
- used oil;
- wire with plug.
Structurally, the body can be made in any form convenient for placement in the garage. The photo shows one of the possible circuits of the device.
Diagram of a homemade oil heater
Metal pipes are used of any diameter. It must be taken into account that the thinner they are, the more of them will be needed. The temperature of the room will depend on the area giving off heat. The length of the pipes is also arbitrary, it is desirable that it be maximum, but at the same time ideally harmonize with the dimensions of the wall where it will be installed. The metal from which the pipes are made is not significant. The thickness of the pipe walls can be any.
The heating element is selected by power and voltage. Practice shows that 1.5-5 kW of heater is quite enough for heating. Here it is necessary to take into account that the comfortable temperature of the garage and apartment differ significantly. And such a wide power spread is given based on the size of the heater. The voltage for connecting the heating element is taken as standard - 220 V (we do not consider other parameters here).
Used oil. Most car enthusiasts change the oil in their car engines themselves almost twice a year. Therefore, as a rule, everyone has work off. All that remains is to collect the required quantity and begin making the heater.
Fiery
Powerful gas heaters for large rooms with catalytic afterburning are expensive, but record-breakingly economical and efficient. It is impossible to reproduce them under amateur conditions: you need a micro-perforated ceramic plate with platinum coating in the pores and a special burner made of parts made with precision precision. At retail, one or the other will cost more than a new heater with a warranty.
Gas mini camping heaters
Tourists, hunters and fishermen have long come up with low-power afterburner heaters in the form of an attachment to a camp stove. These are also produced on an industrial scale, pos. 1 in Fig. Their efficiency is not so great, but it’s enough to heat the tent until lights out in sleeping bags. The design of the afterburner is quite complex (item 2), which is why factory tent heaters are not cheap. Fans also make a lot of these, from cans or, for example. from automobile oil filters. In this case, the heater can operate both from a gas flame and from a candle, see video:
Video: Portable oil filter heaters
With the advent of heat-resistant and heat-resistant steels in widespread use, lovers of being outdoors are increasingly giving preference to gas camping heaters with afterburning on a grid, pos. 3 and 4 - they are more economical and heat better. And again, amateur creativity combined both options into a combined type mini-heater, pos. 5., capable of working from both a gas burner and a candle.
Drawing of a mini-heater made from scrap materials for a summer residence
A drawing of a homemade mini-heater with afterburning is shown in Fig. on right. If it is used occasionally or temporarily, it can be made entirely from tin cans. For an enlarged version for the garden, cans of tomato paste, etc. will be used. Replacing the perforated mesh cover significantly reduces warm-up time and fuel consumption. A larger and very durable version can be assembled from car wheels, see next. video clip. This is already considered a stove, because... You can cook on it.
Method thirteen, well, this is really for extreme sports enthusiasts
If you often find yourself in situations where you have to fight the cold in the car (for example, you are a traveler), then you can take a regular wood stove with you on the road. If you don't believe me, look:
A real oven in the car
So how? Did you believe it? You can stock up on firewood or brushwood for free, for example, if your forced stop occurred in the forest or next to an old and dilapidated building with a lot of boards.
If your car stalls in winter, don’t despair. Armed with any of the heaters listed above and having studied all the tips described, you will not freeze and survive in harsh weather conditions. Even if you find yourself in a car at night, face to face with a cold and harsh winter, you can create all the conditions in the cabin that are similar to the comfort of home. So, don't worry, motorists!
The best prices and conditions for the purchase of new cars
It has long been known that a comfortable temperature for a driver is the range from +21...23 degrees Celsius. Low temperatures negatively affect concentration and alertness while driving, causing irritability. And safety is affected by driving with limited visibility due to icy windows.
If you have at least once had to get to your car in a parking lot in severe frosts or simply get into an icy car interior after leaving a warm home, then you know firsthand that this feeling is not a pleasant one. And how I would like to warm up at this moment. You can, of course, run around the car or leave the snow while the interior warms up, but there are also less radical methods. As always, there is a solution, and it has long been known among motorists - an autonomous interior heater, which will happily provide comfort.
Potbelly stove from a used cylinder
Potbelly stoves, which were popular a hundred years ago, still hold their ground today, serving as the main source of heat in garages and utility rooms. And their main advantage is that they can work not only on wood, but also on anything that burns.
Potbelly stoves are made from gas cylinders containing propane until empty, with a volume of 40-50 liters, sections of steel pipes and thick-walled barrels with a small volume
The minimum thickness of the walls of such structures should be 2-3 mm, but still the optimal option is 5 cm, thanks to which it will be possible to use any type of fuel. If we compare horizontal and vertical models, the former win in terms of ease of loading logs.
Vertical design
The simplest option for making a potbelly stove involves using a gas cylinder: the body of the heating structure is already ready, all that remains is to equip the compartments for storing fuel and the ash pan. The height of the cylinder is about 850 mm, the diameter in circumference is 300 mm, and sufficient wall thickness allows the use of any type of fuel.
To build a vertically installed structure, the cylinder is divided into two parts unequal in volume:
- upper – occupies 2/3 of the structure and serves as a receiving chamber for laying firewood;
- the lower one - occupies 1/3 of the structure and serves to collect ash.
To make a potbelly stove, holes are cut in the wall of the cylinder to suit the size of each of the two sections for the arrangement of doors. The doors themselves can be constructed from a cut-out piece of a balloon wall or cut from sheet metal.
Grate bars are installed at the border between the upper and lower compartments. But since it is difficult to find a ready-made cast iron grate of a suitable size, thick rods are used to make it.
The basis for the manufacture of grates is steel reinforcement 12-16 mm thick, the cut rods of which are placed at a distance of 2 cm from each other
A hole for the chimney with a diameter of at least 150 mm is cut out in the upper part of the cylinder. This element can be welded from a piece of sheet metal. The main thing is that the diameter of the resulting pipe matches the size of the chimney in order to simplify the joining process.
The doors are equipped with locks and attached to the body by welding. If desired, the loops can be made from several links of a thick steel chain.
Since the potbelly stove is not initially a sealed heating structure, there is no need to use seals
To close the gap formed around the perimeter of the doors, it is better to weld a small side - a strip of metal 1.5-2 cm wide - on the outside along the perimeter of the workpieces. All that remains is to connect the finished structure to the chimney and carry out tests.
Model with horizontal body
When the housing is positioned horizontally, the ash collection compartment is welded to the bottom of the structure. The main compartment is designed for loading fuel and unloading burnt coals. It is equipped with a chimney pipe with a diameter of 10 cm.
It is possible to construct a compartment for collecting ash from a suitable size channel or weld it to specified dimensions from a piece of sheet steel
A hole is made in the side wall of the housing to install the combustion door. Its size should not exceed the diameter of the chimney pipe. The door itself is equipped with a latch and installed on hinges.
Holes are made in the wall of the housing, which will be directed downwards. They will perform the function of a grate.
To improve the heat transfer of a hot potbelly stove, the chimney can be made in the form of an elongated broken structure. The main thing when arranging such a chimney is to avoid horizontal sections. To improve room heating, some craftsmen build casings made of sheet metal around the cylinders.
But do not forget that a potbelly stove carries potential danger. Therefore, the room where it will be installed should be periodically ventilated.
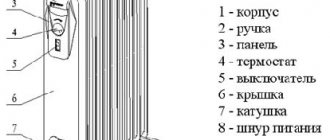
Working with pipes
After the oil heater circuit has been selected, it is necessary to manufacture its body. We make a drawing, determine the dimensions and start working with an angle grinder. The pipes are cut to length in the required quantity. After cleaning the ends, they are carefully and thoroughly welded. The performance of the heater as a whole will depend on the quality of welding. A leaking seam is not only a nuisance, but also a possible cause of fire. When welding the ends of the pipes, leave one (on the lowest pipe) free. Subsequently, a heating element will be inserted into it. This means that the stub will be of a different configuration.
The finished pipes are tied together. The piping is done with pipes, only of a smaller diameter. On the topmost pipe it is necessary to provide a place where the filler plug will be located. Structurally, it can be made in the form of a welded short pipe with a coupling, one side of which will be welded. Using your plumbing and mechanical experience, the heater configuration can be made more aesthetically pleasing, unlike the one in the photo. By the way, the body can be not only tubular. Radiators from cars, old cast-iron radiators and other closed containers are well suited for this purpose.
Oil version
If you decide to make an oil heater strictly with your own hands, then be sure to arrange its reliable grounding. To fill it, use only high-quality transformer oil. The test version is only suitable for an empty concrete room.
To heat a large room, you need an apparatus with catalytic afterburning. It is very expensive.
Different craftsmen have their own way of answering this question. They created a do-it-yourself tent and camping heater with an afterburning function. True, this solution is not optimal for large rooms. But in hiking conditions it is optimal.
Variations of oil heating devices
Such an afterburner interacts with a camp stove. To create it, cans and car filters are used to make it easier to put in a tent. Then the operation of the device is based on gas fire.
A more advanced version of the afterburner has a mesh. This is a device made of steel. It has better efficiency and economy.
It is logical to combine these versions into one. It will work both from a burner and a candle.
Oil device diagram
If the device is rarely used, it can all be made from cans. You just need to put on a mesh cover.
Electric garage heating
The easiest way to heat a garage with electricity is to use a suitable heater, either purchased or homemade. If you don’t have the money to buy factory equipment, you can make it yourself. The simplest heating device is a goat heater, the most affordable, but also the most ineffective. It is done easily and simply - take some kind of non-flammable dielectric, and wrap a nichrome wire around it. Next, connect the electrical cable to the product and plug it into the outlet.
Among all the options for heating a garage, this option is considered the most dangerous - electricity is generally not a joke. Bare nichrome wire is used here, there is no insulation of any kind. Users may be burned or receive electric shock, and there is a risk of fire. It is prohibited to leave such heating unattended. And in general, you should not use such makeshift and extremely dangerous heaters.
Electric heating of the garage can be organized using factory heating devices:
Before you start choosing the type of heating, you should take care of at least minimal thermal insulation of the garage. Otherwise, the heat will simply go outside.
- Heat guns - they are extremely safe and provide quick heat injection into the garage. It only takes a few minutes to warm up the entire volume, after which the room will become warm. Minus – increased noise level;
- Infrared heaters are a modern solution that pleases with high efficiency. Infrared heating of the garage does not dry out the air and is not harmful to health. Simple IR heaters are used here, which heat not the air itself, but the surrounding objects, as a result of which they begin to emit heat;
- Electric convectors are a great way to heat a garage in winter and not have to worry about installing or manufacturing complex equipment;
- Electric boilers - in this case, classic water heating using an electric boiler is organized in the garage. A boiler for a garage is selected according to its area and heat losses, focusing on the formula 1 kW of heat per 10 sq. m. area.
Heating of the garage can also be organized using a homemade boiler - for this you will need an electric heating element of suitable power, which must be built into a metal pipe of one diameter or another. Next, bends are welded to the pipe, to which a water heating system with batteries is connected. By the way, these same batteries (heating registers) can be made independently using pipes with a diameter of 100 mm.
Main stages of heating installation
Ideally, you should think about heating when preparing to build a building for storing equipment. This makes it possible to immediately build a warm garage - for example, it is quite difficult to insulate a hangar with thin metal walls.
A layer of heat insulation on the walls and ceiling of the room will help reduce heat loss. It is recommended to insulate the walls from the outside and cover the thermal insulation layer of mineral wool or foamed polymer with external cladding.
The room is provided with high-quality ventilation. At the same time, it is necessary to eliminate all holes and cracks through which warm air flows out.
Wiring
If electricity is required to operate the circulation pump of a liquid heating system, an electrified building does not require additional wiring. But electric garage heating requires installation of wiring with suitable parameters. It must be grounded, and the cross-section of the wire is selected in accordance with the power of the heating device.
Chimney and heating circuit
The chimney of a real heating boiler is an insulated sandwich pipe - this design lasts longer due to the absence of metal-destroying condensate.
If the room is heated by a potbelly stove, they try to mount a single-layer chimney from several elbows located at an angle in order to increase the heat transfer area. And the water jacket is often mounted not on the stove body, but on the pipe, since a noticeable part of the thermal energy of the burning fuel escapes into the atmosphere with the smoke.
Heating radiators are selected taking into account power and service life. It is enough to install steel panel, tubular or sectional batteries.
Polypropylene pipes are suitable for installing a water heating pipeline. Products of the PN25 brand are designed for an operating temperature of 90°C and can withstand high pressure. Steel pipes are also suitable, but their installation will require the use of a large number of connecting fittings or the use of a pipe bender. When installing heating with your own hands, for a system with a circulation pump it is enough to use a pipe with a cross-section of 20-25 mm.
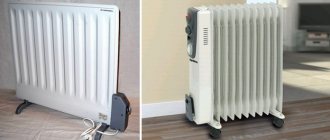
Classic electric heaters
This is a fairly broad area, since there are a lot of heaters that run on electricity. Everyone knows what an electric heater is, since they are the ones we most often use in everyday life. All devices have practically the same operating principle: thanks to electric current, the coil heats up, giving off its heat either to the air or to the coolant (most often oil). It is logical that for heaters of this type to operate, an electrical network is required.
Among the advantages of such devices are:
- Ease of use.
- Mobility and accessibility.
- Good heating level.
- Ability to control temperature.
All you need to do is connect the device to the network and press the button. This is a good choice if you need to use heating occasionally. I would like to note that there are such types of devices that you can buy:
- radiators running on oil;
- heat guns;
- wall convectors;
- fans and thermal curtains.
Each of them has its own positive and negative sides. It is not profitable to use such devices to regularly heat a garage. Such heaters cannot be called energy-saving. Their use is rational for short-term use
When choosing equipment, pay attention to the degree of fire safety of the device and its power. Remember, most often garage fires occur precisely because of a breakdown of the electric heater
We make ventilation with our own hands
To reduce the amount of moisture in the room, you can install one of 3 types of ventilation systems.
Forced
Here you need to use supply and exhaust fans. Requires access to electrical power. The installation algorithm is as follows:
- Creating holes for hoods in the wall surface.
- Installation of fans on inlet/outlet openings.
- Connecting fans to the electrical network.
Natural
The algorithm for installing natural ventilation looks like this:
- Purchase of ventilation pipes.
- Making 2 holes in the wall surface. They must correspond to the radius of the pipe products.
- Installation of pipes. The exhaust pipe should rise above the garage by 150 centimeters. The supply air should be directed towards the earth's surface.
Combined ventilation
It is a combination of forced and natural ventilation. Instead of 2 holes, you need to create 4. 2 of them need to be equipped with fans, and the remaining 2 will work naturally. The supply pipe must be installed at an angle, at a height of at least 0.2 meters from the floor surface.