To prevent the antifreeze in your car from freezing during the cold season, you can use preheating. A description of this device earlier ; it was made using homemade heating elements, the voltage is 12 Volts. However, it is possible to make a more powerful and faster device with your own hands that will heat the antifreeze and protect it from freezing.
In this case, instead of heating elements, glow plugs will be used, preferably from a foreign car, designed for a voltage of 11.5 Volts. Three spark plugs need to be installed in the heat exchanger, in its body. You can buy the simplest candles, for example: 2 pieces SWAG10919223 and 1 piece NipponDenso DG010.
You still need to buy nuts. The total cost will be relatively small. Nuts and candles will cost 1,300 rubles, solder - 600, and two machines - only 100.
Starting the boiler
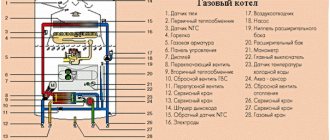
Preparing an electric boiler for startup means that it must be completely checked all connections, the electrical network, and the filling of the system with water. If there are pinched or torn wires in the wiring, they will need to be replaced and carefully insulated. It is prohibited to do otherwise, since in a three-phase network there is voltage with a decent current strength, and the replaced section can break through.
Preparation also involves cleaning the structure from dust and dirt. You should also take care to prevent voltage surges both during the first start-up and during further operation. To prevent this from happening, install a residual current device.
Start:
- First you need to fill the system with water, and do this in such a way that there are no air pockets in it. As a rule, radiators have special taps in their upper part to release accumulated air.
- In the future, all that remains is to turn on the boiler to the electrical network and wait until it warms up.
Reliable electric boilers for home heating at 220 volts
When preparing the rating of the best household electric boilers 220, a considerable number of various factors were taken into account - the company, power, the possibility of simultaneous supply of heat for heating and hot water supply, the highly economical process of obtaining energy.
Among the best cheap 220V wall-mounted boilers are:
- EVAN Warmos-IV-5. A budget device made in Russia, with a wide range of functionality. Despite its low power of 5 kW, the boiler works very well in a “warm floor” system, and the “anti-freeze” function makes it indispensable for private houses with an area of up to 60 m2, which can be heated shortly before the arrival of residents. As of November 1, 2019, the price of the unit is 15,520 rubles.
- RusNIT 209K electric boilers made in Russia, with designs well adapted to rural living conditions. A boiler with 100% automation of the technological process, smooth adjustment of the heating water temperature in the range from 40 C to 80 C, is capable of efficiently and quickly heating a room area of up to 100 m2. As of November 1, 2019, the price of the unit is 12,890 rubles.
- Thermotrust ST 9 is the best price of the Swedish brand with full assembly in Russia. The 9 kW model is designed for connection to a 220 V household power supply and operates with an efficiency above 93.0%. Despite its budget price, the generator is equipped with block stainless heating elements. As of November 1, 2019, the price of the unit is 11,814 rubles.
The best wall-mounted electric boilers according to the “price-quality” criterion
- Protherm slope 9 kr 13 is new for 2022. Slovak device with soft start and fully automatic process safety. A wide range of powers from 6 to 28 kW, which makes it possible to create a different heating system for an individual house or apartment, using them as the main or backup source of heat supply. It is possible to connect various components to them for control, accumulation and exchange of information - electronic temperature sensors, programmers, solenoid valves and devices for using a diphtariff meter in order to use cheap electricity at night. As of November 1, 2019, the price of the unit is RUB 32,340.
- Vaillanteloblockve 9 is a very stylish heat generator from Germany. All control is performed with one button, and the information is sent to a two-segment monitor. Directly under the glossy protective casing, a powerful potential is hidden - a heating output of 9 kW. As of November 1, 2019, the price of the unit is RUB 37,709.
- STOUT SEB-0001-000018. These boilers from a Russian manufacturer provide the best price-function ratio and are capable of heating a house up to 200 m2. It is thanks to the integrated synoptic thermostat that it is possible to optimize the temperature regime, thereby reducing the specific costs of electrical energy consumption. As of November 1, 2019, the price of the unit is 34,900 rubles.
The electric boiler market is slowly, but still increasing its momentum
To date, consumers have been wary of this choice. In addition, there are many rumors that the devices are expensive and often break down. Maybe this was true at the dawn of their development, but today the technology for their production has made great strides forward, leaving many of the shortcomings of the first models behind.
This may have been true at the dawn of their development, but today the technology for their production has made great strides forward, leaving many of the shortcomings of the first models behind.
Do it yourself
diagram of a heating element electric boiler
To work you will have to use some materials and tools
- Angle grinder or grinder.
- Welding machine of any kind. It is best to use an inverter device for this purpose. It is suitable if you have experience in welding. If it is completely absent, then it is best to ask someone to help in this regard. All welding work must be carried out with the highest quality so that there are no leaks anywhere.
- Sander.
- Multimeter.
- Sheet steel, the thickness of which will be at least 2 mm.
- Adapters that are needed to connect the structure to the heating system.
- Tens (it is best to purchase 2 pieces).
- Steel pipe - it is best to buy a pipe with a diameter of 159 mm, its length should be about 50-60 cm.
You can make the following types of boilers yourself:
- single-circuit;
- double-circuit;
- induction;
- wall;
- floor;
- electrode;
- heating elements;
Manufacturing instructions:
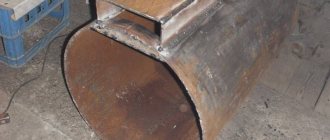
At the first stage, pipes are made to connect the heating boiler to the heating system. In this regard, you first need to cut a certain number of pipes from pipes that were specially prepared for this. You will need 3 pieces in total - one with a diameter of 3 inches and 2 of 1.25 inches.
When all this is done, they are making a container for the tank, that is, the largest pipe where the coolant will be heated
First, markings are made on the pipe, a hole is cut in it, and the edges are carefully processed so that there are no sloppy cuts or metal shavings on them. Prepared pipes are welded to the holes. Now you need to cut two circles from a steel sheet, which will be slightly larger in diameter than the pipe that serves as a heating tank
This will allow them to be welded more accurately. All areas where joints are located are carefully sanded.
A 1.25-inch diameter pipe needs to be welded to the top. Subsequently, another heating element will be welded to it. When all this is done, they begin to prepare the area where the first heating element will be attached. To do this, make 2 holes in the bottom of the structure, then grind the holes and install the heating element.
When all this is done, the boiler is connected directly to the heating system itself. This is done using pipes made at the very beginning of the work.
A separate issue is connecting the structure to the electrical network. If you do not have the skills for such work, then it is better to contact an electrician. Then they install a less powerful heating element, which should have a thermostat. It is attached to the upper pipe.
All work can be considered completed. The main thing is now to check how efficient the design is. Use a multimeter to check the temperature of the coolant, which should be about 70 degrees.
Boiler made of heating element
Making a boiler at home from a heating element is no more difficult than using razor blades. This version of a homemade device, when manufactured correctly, is safer to use.
A heating element is not difficult to “get” from, the malfunction of which is not related to the heating element.
In addition to having a working heating element, you will also need to prepare a two-core wire with a plug, which can also be borrowed from a faulty kettle. Also, to attach wires to the heating element, it is recommended to purchase terminal blocks, the use of which will greatly simplify and speed up the process of self-manufacturing the device. In this case, the assembly process is carried out in the following sequence:
- The ends of the wire are stripped of insulation using a knife or a special device.
- The wires are inserted into the terminals and then fixed to the terminals of the heating element with built-in screws.
- Using a multimeter, the resistance of the heating element is checked, as well as possible leakage to the product body.
Water heating device from a heating element from a kettle
With successful diagnostics, a homemade device can successfully compete with factory-made products, and the quality of the connection between the main wire and the heating element can even be better than that of store-bought household appliances. The absence of solder connections will allow this device to last much longer, but if there are no terminal blocks available, then the above-described option for manufacturing a boiler can be made by soldering wires to the contacts of the heating element.
This version of a homemade boiler can be used without any restrictions. The quality of boiled water prepared in this way allows you to brew tea, coffee or any other drinks without loss of taste.
Difficulties during construction
The design of an electric boiler is simple and mistakes are difficult to make. The main thing is to choose a whole heating element that will be the size of the body. All welded joints must be performed by a professional, otherwise leaks may occur.
It is better to seal the joints with flax tow and a special paste. Winding a lot of flax can damage the joints.
For safe operation of the boiler, a limit thermostat is built into the system - when the coolant temperature reaches a high temperature, this device turns off the heating element.
For more efficient operation, the electric boiler is thermally insulated by placing it in an insulated foam casing.
Design
In essence, a homemade electric boiler is a piece of pipe with built-in electrical accessories. This is very convenient, especially if you make the unit removable: then the care and maintenance of the equipment will be significantly simplified.
If you place the unit not in a pipe, but in a separate housing, you can install additional sensors that will automate the operation of the heating system, increase efficiency and reduce energy consumption. In addition, when you need to replace the boiler with another one, this can be done without violating the integrity of the system circuit.
The main options for modern electric boilers
So, the operation of all electric boilers is based on the same principle, but it is implemented in different ways. There are three types of electric boilers:
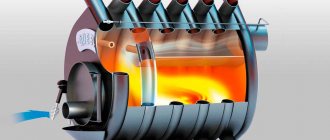
Units with heating elements
The role of the heating element in such a boiler is played by a spiral made of nichrome or other alloy, which, without any tricks, is simply connected to the electrical network. The spiral is placed in a curved metal tube and covered with quartz sand. The entire structure is called a tubular electric heater or abbreviated as a heating element.
Electric boiler with heating element
The heating element is mounted inside the heat exchanger and is in direct contact with the working environment. Therefore, special requirements are imposed on the latter: the water must be desalted (otherwise the heating element will quickly become covered with a “coat” of scale), antifreeze - only special brands can be used.
You cannot turn on such a boiler with an empty heat exchanger (without water) - the heating element will burn out.
Of all electric boilers, heating elements are the most affordable, and therefore the most popular.
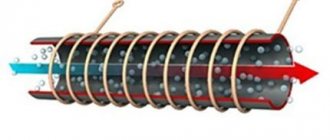
Boilers with inductor
As you know, to generate an electric current in any body it is not at all necessary to connect it to a source - electron oscillations can be caused using a magnetic field with changing parameters. This process is called electromagnetic induction, and the source of the magnetic field is called an inductor.
In an induction boiler, the inductor is a coil of wire wound over a heat exchanger. The latter looks like a regular pipe connected to the heating circuit.
By passing alternating current through the coil, we turn it into an electromagnet - also alternating. This, in turn, excites an electric current (Foucault currents) with a magnetic field in the walls of the heat exchanger, from which they heat up. Thus, the entire heat exchanger pipe becomes a heater, which, in comparison with a heating element, simply has a huge contact area with the coolant.
To increase the power of heat generation, the frequency of the current passed through the electromagnet is increased many times - from 50 Hz to 60 - 80 kHz. This task is performed by a special electronic unit - an inverter.
The advantages of induction boilers include:
- fast heating;
- the ability to work with absolutely any coolant (even the use of untreated water is allowed, since due to the presence of a field and microvibrations, scale does not crystallize on the walls of the heat exchanger);
- practically inexhaustible resource (nothing to break);
- one-piece heat exchanger (without inserts through which coolant can leak);
- When starting without water, only the pipe, which is very cheap, can melt.
But here's what lies on the other side of the scale:
- despite shielding, the electromagnetic field can heat metal objects located near the device;
- The cost of an induction boiler is several times higher than that of a heating element.
Many people believe that electric boilers have no advantages, but in some cases such a device can become indispensable. How to choose an electric heating boiler and when it is advisable to use it, read on our website.
We will consider the design features of combined boilers for wood and electricity here.
And in this topic https://microklimat.pro/otopitelnoe-oborudovanie/kotly/elektricheskij-dvuxkonturnyj.html you will find recommendations for choosing a double-circuit electric heating boiler, and also learn about the advantages of this equipment.
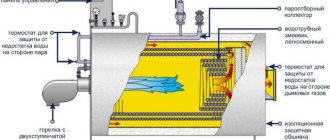
Boilers with electrodes
Everyone knows that water, after dissolving salts in it, acquires the properties of an electrical conductor. The creators of the electrode boiler decided to take advantage of this. In the heat exchanger of such a unit, two electrodes are installed, to which voltage is applied.
If the system is filled with coolant, electric current will flow through it. With the correct salt concentration, the resistance of the working medium remains high and it itself becomes an electric heater.
Electrode boiler in the heating system
Electrode boilers are good because:
- have the simplest design (two wires in a pipe) and do not contain a single expensive part;
- do not deteriorate when turned on without water (no conductor - no electric current).
However, you should be prepared for the fact that such devices:
- Demanding on the composition of the coolant.
- They are capricious in their work (owners of such boilers complain about frequent tripping of the RCD).
Boilers of this type require regular maintenance: relatively often it is necessary to change gradually dissolving electrodes.
Electric boiler on heating elements
The do-it-yourself electric boiler circuit with a heater is the easiest to implement and has been known for quite a long time.
Operating principle of a heating element boiler
The design of all household appliances in which heating elements (heating elements) are installed is the same. When the power is turned on, voltage is applied to the heating element, which gradually heats up and transfers thermal energy to the liquid located around it.
The advantages of such devices:
- a wide range of heating elements of various shapes and power;
- Possibility of use in any heating system with liquid coolants;
- insulation is installed on the boiler body, so that voltage is supplied exclusively to the heating element;
- do not require complex maintenance;
- The heating level is very easy to control, even with a minimal set of automatic controls.
Among the disadvantages of a homemade electric boiler of this type are:
- “gluttony” in electricity consumption, since heating 10 m2 of area requires 1 kW of power;
- impurities in the coolant accumulate on the heating element in the form of scale, so it needs to be cleaned approximately once a year;
- The heating element can only function in the presence of liquid; it is recommended to install an idle speed sensor with it.
Advantages and disadvantages
Despite the fact that such boilers appeared relatively recently, there is enough information on their use. In addition to simplicity of design, ion boilers have other advantages:
- The efficiency reaches a record 99%; other systems have a lower coefficient due to the characteristics of their device;
- More economical than other heating devices by 15–20% with the same output power;
- Does not depend on voltage drops; it will heat even with a strong drop, but with less efficiency;
- They are not afraid of liquid leakage; when switched on “dry”, overheating will not occur due to the impossibility of the heating process without an electrolyte;
- Quiet operation;
- Compact dimensions of the device.
Unfortunately, ion boilers also have disadvantages:
- The heating system is prone to the accumulation of static electricity and electric shock, so high-quality grounding is mandatory;
- The coolant must have certain resistance values; plain tap water is not suitable;
- The need to install an electronic control unit and temperature sensors to monitor a constant temperature;
- Electricity consumption and cost of 1 kcal are higher than that of solid fuel or gas boilers;
- You will need to use special heating radiators.
Safety rules when using a homemade water heater
Remember that a device you built yourself is nevertheless dangerous to use, because it has minimal protection against overheating, boiling over and electric shock. Therefore, you need to protect yourself as much as possible.
Be sure to ground your water heater!
Since such products are most often needed in dachas, it is best to ground the boiler to a plot of land. To do this you will need an iron frame: bury it in the garden. Let a steel ribbon run from it into the house.
The simplest design does not have any protective sensors to prevent overheating. Therefore, when using a homemade water heater, be as careful as possible and monitor the water level yourself!
Anyone can assemble an electric boiler with their own hands - in terms of performance characteristics, prefabricated units are not much inferior to factory products. With a responsible approach, a homemade boiler can be even more reliable and durable than a factory-made machine.
This also applies to electric boilers for heating a private home, known for their efficiency and high performance. Parts for assembling such equipment are widely available, and the manufacturing process itself can be cheaper than buying a finished device.
How to make it yourself
To make a homemade boiler with a tubular electric heater, you need to purchase its main element, a heating element, sold in broiler spare parts stores. Then a piece of pipe suitable for free placement of the heating element is selected. At the lower and upper ends, pipes for the inlet and outlet of the coolant are welded to the side. One end is welded tightly, a metal plate with a nut located in the center is welded to the other. The heating element is screwed into the nut - and the boiler is ready! The heating element is connected to the electrical network through a grounded socket, and the boiler is connected to the pipeline heating system through pipes.
Important! You cannot turn on the heating element boiler if there is no coolant in it, this leads to immediate burnout of the heating elements; it is worth considering
The body of the induction boiler is a half-meter piece of polypropylene pipe. Its ends are covered with a mesh, chopped metal wire is poured inside, heated by eddy currents. Ninety turns of wire are wound onto the outer surface of the pipe. The terminals of the coil made in this way are connected to the inverter from the welding machine. All that remains is to install the fittings for installation in the pipeline network - and the job is done!
Reference. Induction boilers are efficient in operation, since the coolant circulates through the pipe, which is the heating element. The influence of eddy currents prevents the formation of scale on its walls. To make an electrode boiler, one end of a pipe of a suitable diameter is closed tightly, and a plug with electrodes is installed in the other. Fittings are welded on the side near the ends for connection to the pipeline heating system. The electrodes are connected to the network and heat the working fluid.
The most powerful homemade boiler
Nichrome spiral
In order to boil a large volume of water, you can make a powerful portable device from available materials. To manufacture the device you will need the following parts:
- Nichrome spiral with a wire diameter of at least 1 mm.
- Industrial fuse series PN 2.
- Two-core cable made of wire with a cross-section of at least 4 mm 2.
- Screwdriver and wood screws 20 mm.
- The plug is of a collapsible type.
Fuse PN-2
The manufacture of a powerful device for heating water is carried out in the following sequence.
- The PN-2 fuse is disassembled to remove the ceramic body of the product.
- 8 self-tapping screws, which were formed during disassembly of the device, are screwed into holes in the body of the ceramic insulator.
- The end of a nichrome spiral clings to one of the 8 screws.
- Then, inside the body of the electrical insulator, the spiral is pushed through to the opposite end of the round insulator and again fixed around the screw.
- The spiral turns in the opposite direction, but is already fixed to another screw screwed into the insulator.
- In the same way, the spiral and self-tapping screws are connected at 5 more points, after which stripped copper wires are connected to the first and last screws and the screws are completely screwed into the ceramic insulator. Considering the significant power of such a homemade boiler, the cross-section of the connected copper wire must be at least 4 mm 2. A plug is installed on the other end of the wire.
Checking a powerful homemade water heater
The boiler can only be operated in a suspended state. The heating element must be completely immersed in the water and must not touch the walls or bottom of the tank. When using a homemade one, it is strictly forbidden to touch the container and body of the device while heating the water.
Option No. 3. Induction boilers
Of the widely used models, the induction boiler can be considered the latest development.
How do induction heaters work?
Without going into the intricacies of the device, an induction boiler is the same as a microwave; the coolant is heated by a magnetic field.
The heating system design involves operation at a given time interval.
Advantages:
- Safety;
- High efficiency;
- These units can use any coolant; its quality does not matter;
- There is practically no scale formation in induction boilers.
Flaws:
- The cost of induction boilers is quite high;
- These devices have relatively complex control automation. It is problematic for an amateur to assemble it with his own hands.
Assembling a simple induction heater
When I started studying homemade induction heaters, I realized that the instructions were not simple, and the drawings were quite complicated for a home craftsman, but there was an interesting solution, which I will talk about later.
| Illustrations. | Recommendations. |
| What does the boiler consist of? To assemble such a boiler, you need to buy an induction stove with a power of 2.4 kW (costs about 2,000 rubles) and 3 m of profiled pipe with a cross-section of 25x50 mm and a wall thickness of 2.5 mm. | |
| Principle of operation. We need to build a kind of flat container from a profiled pipe through which water will circulate. Then attach an induction stove to this container and turn it on. It's the same as putting a pot of water on the stove. | |
| We cut the pipe. The most difficult thing in this work is to do everything as accurately as possible. I cut the pipe using a miter saw on a bench with a stop. In my case, the pipe was cut into 400 mm sections, after which I cleaned the edges of burrs with a file. | |
| Capacity diagram. As shown in the diagram, water circulates like a snake through this improvised radiator. It was no coincidence that I made exactly 6 registers, so I will have the supply and return on one side and it will be easier to connect the stove to the heating system. | |
| We cut connecting holes. The connecting holes must be clearly opposite each other. In this case, I drilled 2 holes along the edges with a 10mm drill, and then cut out the middle between them with a small grinder. | |
| Numbering of pipes. There is a very important point: profiled pipes are not perfectly symmetrical; on one side they are slightly rounded and on the other they are smooth. If you look closely, you can see this in the photo on the left. So, we first need to fold the sharp edge of the pipes with the blunt one. To avoid confusion later, the pipes are numbered immediately. | |
| We collect the container. Now we need to weld all the seams between the pipes; to do this, we lay them out on a perfectly flat surface and tighten them with a clamp. Further, so that the slab does not move, we first grab all the seams point by point, and then thoroughly weld the seams. | |
| Close the end of the container. To seal one side of the container, I cut a strip. The strip was cut from the same profiled pipe; I simply cut off one of the sides with a grinder. We weld as usual, first we grab it, then we scald it. | |
| We weld the pipes. On the reverse side we do almost the same thing, with the only difference being that the inflow and return pipes are welded to the outer pipes. The contact area of our metal container with the induction stove should be maximum, so the welding seams need to be cleaned with a grinder. | |
| We mount the guides. To hang this entire structure on a vertical wall at the back, we weld 2 corners into which our induction stove will then be inserted, like into a niche. | |
| Painting. After completing the welding work, I painted the entire structure with heat-resistant paint and welded hinges for hanging our induction boiler on the wall. In principle, that’s it, now you can connect the boiler to the heating and use it. |
What tools will you need?
To assemble homemade electric heating and encounter a minimum of difficulties, you must have high-quality tools at your disposal.
To work you will need:
- welding machine - it is most convenient to work with an inverter model;
- cutter – if you don’t know how to use a gas cutter, it’s better to use a plasma cutter;
- grinder - you will even need 2 models - a large one for a disk with a cross-section of 230 mm and a small one for a disk with a cross-section of 125 mm;
- electric drill;
- hammer;
- core;
- tape measure and compass.
Vegetable cutter from a barrel
How to make a root vegetable chopper with your own hands from a tank or barrel:
- If the working container is welded independently, then it is better to use steel 1.5 mm thick,
- The walls are given rigidity by flanging the edges with rubber tubes,
- The bottom is made of 5-6 mm steel sheet,
- A hole is drilled in the center of the bottom to install the motor. For this model, a conventional single-phase motor is suitable,
- An unloading hole is cut out at the bottom of the barrel, under which a tray or box is placed,
- The body is mounted on four legs made from a piece of pipe or angle,
- Two knives are installed inside the working container,
- The upper knife is made double-edged with the edges bent down,
- The lower knife is made in the shape of a propeller with one cutting edge,
- The shaft is connected to the engine using a chain drive.
- The dimensions of a homemade barrel depend on the thickness of the steel used. If you use a 1.5 mm sheet, then the maximum wall height should not exceed 60 cm.
Crusher knives are made from a hand saw blade - the size should be one centimeter smaller than the diameter of the working chamber.
Instructions for assembling a homemade electrode boiler
As a body for an electric heating boiler with our own hands, we use a pipe with an internal cross-section of about 50 mm and a length of 40 cm. In addition, you will need a solid rod with a diameter of 20 mm and a length of 30 cm, as well as two adapters with cut internal threads. At the end of the rod we drill a blind hole with a thread for a Ø10 mm bolt.
We prepare the pipes. We will weld 1 at the end of the pipe, and the other at the side. To ensure that the side pipe fits perfectly to the pipe, it is trimmed with a grinder and then sanded with a round file.
We cut holes for the pipes. If you don’t have a cutter, you can drill many small holes around the circumference. The work is brought to perfection with a needle file and a round file. The hole for the side pipe must be located 10-15 mm from the edge of the pipe.
The next step is to weld the pipes to the pipe. To prevent them from being led away, they first make spot welding in several places, and then apply a continuous seam.
We prepare the platform for the electric boiler. To do this, you can take a sheet of fiberglass 2 cm thick and cut a piece of 120x120 mm using a hacksaw. Then in this platform you need to drill one hole in the center, and four around the perimeter. The cross-section of the holes should be 10-12 mm.
Fastenings of the boiler body will be passed through the holes along the perimeter, and the central hole is intended for fixing the steel electrode.
We proceed to fixing the casing for the boiler to the platform. To ensure a secure fit, four Ø12 mm nuts can be welded on the body on 4 sides. Bolts Ø10 mm will easily pass through them.
Such nuts need to be welded with a slight indentation from the platform. To ensure this, you need to screw nuts of appropriate size onto the bolts, thread them into the wide nuts, and secure them from below again with smaller ones. This will make welding work easier.
At the last stage we perform the final assembly of the boiler. To do this, cut out a rubber gasket with a cross-section slightly larger than the outer diameter of the boiler. We make a hole in its central part and thread an electrode through it. Then we install the body on the platform and screw it on.
Adjusting the water temperature
Besides security, we need one more element. A control element that will periodically turn it on and off to maintain the set water temperature.
This device is a working thermostat.
Don't confuse it with the ultimate. In the limit there is a manually reset button, which, when triggered, prevents the sensor from turning on independently.
That is, when it triggered once, you will need to inspect the entire system and circuit in order to understand the reason for the triggering. And only after that, by pressing this button, the heating can be started again.
This thermostat is installed after the limit, again in an open circuit.
Thus we received a security element and a control element. In principle, this is the most primitive scheme No. 1 for automatic electric heating.
Electric boiler for heated floors: self-assembly and connection
An electric boiler for a warm water floor is the most popular device for heating private homes and commercial buildings that do not have access to central heating. It does not emit harmful substances into the atmosphere during operation, operates silently and does not cause fires. Ease of installation, no need for a chimney or boiler room are the main advantages of the devices.
electric boilers for heated floors
Manufacturers offer a wide selection of products suitable for rooms of different sizes.
Reliable devices with a long service life are:
- RusNIT (Russia);
- Dacon (Czech Republic);
- Protherm and Eleko (Slovakia);
- Ferroli (Italy);
- Viesmann (Germany).
Russian products have a power of up to 100 kW. Despite their low cost, they meet all GOST requirements and have excellent characteristics. Slovak Protherm (from 9 to 24 kW) and Czech Dakon (4 to 60 kW) offer a wide range of models, the price of which is 20% higher than their domestic counterparts. The standard equipment of imported electric boilers for heated floors includes multi-stage pumps and coolant pressure sensors. There are models with safety valves and a built-in expansion tank.
For connoisseurs of famous German quality, the ideal solution would be Viesmann products. These are the most expensive, but also the best representatives of the devices in question.
If you are confident in your engineering abilities and do not want to spend a lot of money, then there is a way to install a heated water floor from an electric boiler in your home with your own hands.
Do-it-yourself production provides several advantages:
- Low cost of consumables;
- Step-by-step assembly is the most convenient option for underfloor heating from an electric boiler, which can be gradually equipped with additional automation to increase convenience and productivity.
Compared to factory-produced budget series products with similar technical characteristics, home-made options often turn out to be more reliable.
Heating scheme for underfloor heating with an electric boiler
Automatic units consist of a start relay actuated by a thermostat. They are sold in any specialized store.
A do-it-yourself underfloor heating boiler with a power of up to 7 kW can be connected using a single-phase circuit. For greater power, three phases are connected. To do this, it is necessary to officially notify Energosbyt.
A separate cable is laid from the input distribution device to the unit, which is connected only through a circuit breaker and an RCD.
Sequence of manufacturing and installation work
There are two main types of homemade electric boilers for heated floors:
- Heating element new. The heating element is placed inside the pipe section. Pipes (40-50 mm) are welded to its sides, and the heating circuit is connected to them. One side of the pipe is closed with a steel disk, the other with a washer. A nut is welded in its center, and a heating element is screwed into it (their threads must match).
- Do-it-yourself induction electric boiler for heated floors. Inside a half-meter piece of polypropylene pipe (with a diameter of 10 cm) shavings of stainless wire are poured. Couplings with fiberglass or nylon mesh are welded on the sides. 90 turns of wire are wound onto the pipe and connected to a conventional 15A inverter (DC-AC converter). Adapters are welded into the connection points to connect the system.
Connecting an electric boiler to the heated floor of a heating element, the coolant of which circulates using a pump, is best placed with the contacts facing up for ease of maintenance. For natural circulation, for uniform heat removal, it is placed with heating elements down.
If you used a 3-phase heating element, then remove the connecting strip from the buttons of the automatic control box. This manipulation will allow you to turn on the device at 1/3 or 2/3 of the intended power, supplying one or two phases.
Experts recommend placing the induction version at a distance of at least 30 cm from the walls and 80 cm from the ceiling or floor in order to prevent heating of the metal structures located on them.
List of necessary tools and stages of installation work
So, for high-quality installation you will need:
- hardware for mounting the boiler on the wall and mounting plate;
- diagram of the correct installation of an electric boiler;
- drill for mounting holes;
- pipes, flanges and couplings that meet the design parameters;
- cable with the required cross-section;
- instructions for the device you are going to install.
Having collected all the necessary tools, you can begin installation.
First make sure that the wall material can support the weight of the boiler. The location is selected so that there is some space on the sides and top of the device. This is necessary to ensure further access to the device if repair work is necessary.
Usually the required distance is specified in the instructions supplied with the heating boiler. The equipment, in turn, must be placed on the wall without any distortions, which is very easy to check using a building level.
A mandatory requirement is the material from which the wall is made. It must be non-flammable. To ensure the correct positioning of the device, a special mounting plate is used. Absolutely all pipelines connected to it must be calculated based on the characteristics of the pump.
There should not be any particular difficulties during the installation process.
However, pay attention to possible nuances. For example, devices with low power can operate from 220 V, but for more powerful analogues it is necessary to connect to a three-phase network
It is very important to correctly calculate the cable cross-section. This is necessary so that it can withstand the power of the unit and pass a current of a certain amount
After installing the boiler, pipelines are connected to it.
What type of electric heating is the best?
What should street lighting devices be like?
The choice of the most economical electric heating depends on the purpose and area of the heated room:
- A water electric heating system is used as electric heating for a house or cottage with an area of 100 square meters;
- To heat apartments in high-rise buildings, more convenient and economical air heating devices are used;
- To heat small living spaces with an area of up to 10-15 square meters, a heated floor system is used.
The specific feasibility of using a particular heating equipment is calculated for each particular case separately.
DIY heating element boiler
Differences between heating elements and induction
For an electric heating boiler, the heating element is the main element. Without it, it is impossible to convert electrical energy into thermal energy. The heating element is placed in the housing and connected to regulators, sensors, control boards and other additional components designed to facilitate the operation of the equipment.
If there is a system in the house with a pipeline with thick walls, the heating element can be installed directly into it. The pipe will act as a housing. This design has a number of disadvantages, but it has a right to exist. Very often, heating elements are installed in the heating system as an emergency source of thermal energy. If the main boiler stops working for any reason, you can simply connect a heating element that will heat the coolant. Depending on the specific situation, the heating element can heat the water to a minimum temperature in order to prevent only the system from defrosting, or it can operate at full capacity, providing heat to the entire house.
Another common design is the option with a removable pipe. In general, it is similar to the previous version, but allows you to quickly remove and replace the heating element in case of failure, the need for repair, etc. This design is more complicated to manufacture, but compared to the previous one, it is universal.
Blade boiler
Making a boiler from razor blades is not at all difficult. To complete the work, you need to prepare the following components:
- 2 blades of the “Sputnik” type.
- 2 matches.
- Two-core wire with plug.
- Threads.
Scheme of an electric boiler made of blades
The process of assembling a homemade boiler is as follows:
- A copper strand of electrical wire is tied to each blade.
- 2 matches are placed between the blades, which will serve as spacers to protect against short circuits.
- The blades are wound with threads to the matches in such a way as to prevent the free movement of metal parts.
Homemade water heating device assembly
A homemade boiler made from blades is completely ready for use!
Testing a homemade device
Now all that remains is to find a tank in which to boil water. The container that will be used with a boiler of this design should not be made of conductive material. You should also exercise extreme caution when turning the device on and off. Before connecting a homemade electrical device to a 220 V network, you must first lower the device into water. While heating water, it is strictly forbidden to touch an electrical device or a container of water.
In addition to the necessary safety measures, it is also necessary to remember that heating water in this way is only possible if it contains conductive metal salts. Distilled water will not be heated by a blade boiler due to the absence of a conductive medium between two metal planes.
In addition, the use of an electrolytic method of heating water has a negative impact on its taste, so this heating option is most suitable for technical liquids.