Induction heating boilers are devices that are characterized by very high efficiency. They can significantly reduce energy costs compared to traditional devices equipped with heating elements.
Industrial production models are not cheap. However, any home craftsman who owns a simple set of tools can make an induction heater with his own hands. To help him, we offer a detailed description of the principle of operation and assembly of an effective heater.
Advantages and disadvantages of the device
There are a lot of “advantages” of a vortex induction heater. This is a simple circuit for self-production, increased reliability, high efficiency, relatively low energy costs, long service life, low probability of breakdowns, etc.
The productivity of the device can be significant; units of this type are successfully used in the metallurgical industry. In terms of heating rate of the coolant, devices of this type confidently compete with traditional electric boilers; the water temperature in the system quickly reaches the required level.
During operation of the induction boiler, the heater vibrates slightly. This vibration shakes off limescale and other possible contaminants from the walls of the metal pipe, so such a device rarely needs to be cleaned. Of course, the heating system should be protected from these contaminants using a mechanical filter.
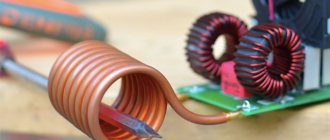
An induction coil heats the metal (pipe or pieces of wire) placed inside it using high frequency eddy currents, no contact required
Constant contact with water minimizes the likelihood of the heater burning out, which is a fairly common problem for traditional boilers with heating elements. Despite the vibration, the boiler operates extremely quietly; additional sound insulation at the installation site is not required.
Another good thing about induction boilers is that they almost never leak, unless the system is installed correctly. This is a very valuable quality for electric heating, as it eliminates or significantly reduces the likelihood of dangerous situations occurring.
The absence of leaks is due to the non-contact method of transferring thermal energy to the heater. Using the technology described above, the coolant can be heated almost to a vapor state.
This provides sufficient thermal convection to encourage efficient movement of coolant through the pipes. In most cases, the heating system will not have to be equipped with a circulation pump, although it all depends on the features and design of the specific heating system.
Sometimes a circulation pump is necessary. Installing the device is relatively easy. Although this will require some skills in installing electrical appliances and heating pipes. But this convenient and reliable device has a number of disadvantages that should also be taken into account.
For example, a boiler heats not only the coolant, but also the entire working space surrounding it. It is necessary to allocate a separate room for such a unit and remove all foreign objects from it. For a person, staying in close proximity to a working boiler for a long time can also be unsafe.
Induction heaters require electric current to operate. Both homemade and factory-made equipment are connected to a household AC network
The device requires electricity to operate. In areas where there is no free access to this benefit of civilization, an induction boiler will be useless. And even where there are frequent power outages, it will demonstrate low efficiency. If the device is handled carelessly, an explosion may occur.
If you overheat the coolant, it will turn into steam. As a result, the pressure in the system will increase sharply, which the pipes simply cannot withstand and will burst. Therefore, for normal operation of the system, the device should be equipped with at least a pressure gauge, and even better - an emergency shutdown device, a thermostat, etc.
All this can significantly increase the cost of a homemade induction boiler. Although the device is considered virtually silent, this is not always the case. Some models may still produce some noise for various reasons. For a device made independently, the likelihood of such an outcome increases.
There are practically no wearing components in the design of both factory-made and home-made induction heaters. They last a long time and work flawlessly
The principle of induction heating technology
The principle of induction heating technology is quite simple from a physical point of view. A coil formed from a current conductor generates a high-frequency magnetic field. In turn, a metal object placed in the inner region of the coil induces eddy currents. As a result, the object becomes very hot.
In parallel with the inductor, a resonant capacitance is usually switched on. This step is taken to compensate for the inductive nature of the coil. The resonant circuit created by the coil-capacitor elements is excited at its own resonant frequency. The value of the excitation current is significantly less than the value of the current flowing through the inductor.
Homemade steps
Making such a device yourself is not that difficult. For this you will need:
- Make a heating element.
- Make an inductor coil from copper wire.
- Take a ready-made alternator.
- Connect the heater with the coil to the heating system.
- Connect the coil to the generator.
- Connect power to the system.
- Make a test run to check the operation of the unit.
In industrial models, a metal pipe with thick walls is used as a heater, but providing sufficient power to a homemade device to heat such an element is very difficult and does not make much sense. The induction coil is capable of heating any metal, so the heater can be modified.
Industrial models of induction boilers are equipped with a heating element made of a thick metal pipe. It is difficult to copy such a unit at home
A piece of plastic pipe is used as a housing for an induction heater from a welding inverter. It should be slightly larger in diameter than the heating pipes. The length of the heater pipe can be approximately one meter, the internal diameter can vary between 50-80 mm.
To connect the heater to the system, adapters should be installed in the lower and upper parts of the housing. The lower part of the pipe must be covered with a grill, then a filler consisting of small metal particles is placed inside the body. You can get the filler, for example, from wire, rod, narrow metal pipe, etc.
The length of the segments can be varied arbitrarily. Most often, steel wire with a diameter of 6-8 mm is used for this, which is simply cut into small pieces. Some craftsmen recommend cutting it into long rods, about 90 cm, i.e. almost along the length of the heater.
For the body of the heating element of an induction boiler, which you made yourself, you will need a wide, about 50 mm in diameter, plastic pipe
The higher the magnetic resistance of the steel from which the wire is made, the better it will heat up. Depending on the size of these pieces, a protective mesh is selected, which is mounted at the bottom of the housing. The filler is poured or placed in the pipe to the very top. After this, the upper part is also covered with a mesh.
The diagram allows you to get an idea of how to connect the induction coil to the boiler heater and to the welding machine
Thus, a homemade heater for an induction boiler looks like a thick plastic pipe stuffed with pieces of metal and closed on both sides with a mesh. The heater has adapters at the top and bottom for connection to the heating circuit. The polymer pipe for the heater must have fairly thick walls.
In addition, any plastic is not suitable for these purposes; the material must withstand the effects of fairly strong heat and at the same time not release any hazardous substances into the atmosphere or coolant. Now you need to make an induction grill. To do this, take copper wire and wind it directly onto the heater body.
Some models of homemade induction heaters use a narrow copper tube instead of a plastic pipe. This is not the best option, since it will not be easy to correctly roll such an element into a spiral.
The more turns of wire, the better. It is believed that the induction coil must have at least 90 turns. The inductor is wound onto the pipe very tightly; there should be no gap between the turns.
A 1-1.5 mm insulated copper wire is suitable for the winding. A thicker cable is not needed here, since it will complicate the winding work and it will be more difficult to position the turns closely.
This diagram will help to correctly connect the inductor coil to the inverter welding machine; if done incorrectly, the coil will turn into an electromagnet (+)
The presence of gaps can lead to noise due to the vibration that accompanies the operation of such a unit. Over time, this situation can lead to the destruction of the insulation, which will cause an interturn short circuit.
In addition to the adapters, shut-off valves should be installed at the top and bottom. They are needed to provide the ability, if necessary, to shut off the water in the heating circuit.
When installing the heater, remember that its lower end must be directed towards the return pipe, a pipe designed to collect cooled coolant in a two-pipe heating system. The easiest way to get an alternating field generator is to take an inverter from a welding machine.
The contacts of the induction coil are connected to the poles of the inverter. As soon as power is supplied to the unit and it is turned on, the homemade induction boiler will begin to work.
To make such a device, even an inexpensive welding machine is suitable, for example, a Chinese-made model, which allows you to regulate the current strength, starting from a level of 10 A. A thermostat sensor should be installed near the adapter at the supply. The welding inverter is connected through this thermostat.
Rectifier diodes must be installed at the outputs. To do this, you will have to open the body of the welding machine and solder the conductors to the output, then connect them to the diodes. If you connect directly without diodes, then a current with a rectified voltage will flow to the winding, and the coil will work as an electromagnet, and not as an inductor.
To create an induction spiral, it is recommended to use copper wire with a cross-section of 1.5 mm in a reliable insulating sheath; you need to make about 90 turns
Some modern welding machines have a touch sensor that starts work the moment the electrode touches the work surface. This point must be taken into account so that the sensor either triggers at the right moment or does not affect the operation of the homemade boiler.
If an inexperienced craftsman has problems with altering a welding machine, it is better for him to seek professional advice.
To make an induction boiler with your own hands, you can take any welding machine with suitable characteristics. If necessary, the device can be used again for welding work.
If everything is done correctly, the welding machine can be used in the future for its intended purpose. It will be necessary to unsolder the conductors with the diodes and reassemble them. When exposed to high frequency alternating current, the induction coil will create a magnetic field.
The metal inside the polymer housing will begin to heat up and transfer heat to the water, which circulates through the heating circuit. The device will only take a few minutes to warm up the coolant.
The location for the induction heater should be chosen correctly. The unit should be located 800 mm below the ceiling level, and should be separated from walls and furniture by at least 300 mm.
Types of heaters
Heaters are widespread throughout our country, and the specific scale of the devices varies from consumer to consumer. It is clear that it is unlikely that you will be able to assemble a high-tech induction heater yourself, so the article offers alternative options.
We make such devices with our own hands as:
- Furnaces for melting metal.
- Electric stoves used for cooking.
- Devices for heating the coolant of a heating system.
Please note that the manufacture of induction heaters must be carried out strictly in accordance with all rules and regulations established by government regulations relating to life safety.
Before starting work on the device, you should familiarize yourself with the State Standards and other documents, and also look through the operating instructions. Remember that a device with voltage escaping from its container is unsafe and prohibited for use.
A few words about safety
Homemade induction boilers are usually not equipped with control and protection systems, which makes them unsafe. Therefore, before turning on the unit, you must make sure that the housing cavity is filled with coolant liquid.
If the polymer body of the heater is subjected to constant heating without being washed with coolant, it will simply melt, sometimes this leads not only to deformation of the heater, but also to its complete damage.
Units of this type are often used for heating and melting metals. The high temperatures generated by an induction heater require careful attention to safety issues
The loss of hot metal filler from the melted body can also be dangerous. In this case, you will have to almost completely dismantle the device and make a new heating element for it.
The connection to the power supply should be made via a separate cable from the panel. Of course, it is necessary to carefully cover all contacts with insulation. The inverter of the welding machine must also be grounded; this is an important point to ensure safety.
In this case, you will need a cable with a cross-section of at least four millimeters. Some experts recommend giving preference to a six-millimeter cable. To prevent overheating of a homemade induction heater due to a lack of water in the system, it is recommended to install an overpressure valve at the inlet of the heater.
An induction heating device takes up relatively little space, but it must be placed at a certain distance from the ceiling, walls, furniture, etc.
A homemade device of this type, not equipped with special protective equipment, is a potentially dangerous object that requires constant monitoring. Therefore, it is worth spending a little more money but purchasing the necessary devices.
At the same time, it doesn’t hurt to estimate the costs; perhaps purchasing a ready-made induction boiler will not cost much more. Industrial devices are usually equipped with all the necessary protection.
Features and step-by-step manufacturing technology of another version of a homemade induction boiler for a heating system are given here.
Electrical circuit diagram
Here is the original circuit of the induction heater generator, and below it is a slightly modified version, according to which the design of the mini HDTV installation was assembled. There is nothing in short supply here - you only have to buy field-effect transistors; you can use BUZ11, IRFP240, IRFP250 or IRFP460. The capacitors are special high-voltage, and the power will be from a 70 A/h car battery - it will hold current very well.
The project turned out to be surprisingly successful - everything worked, although it was assembled “on the knee” in an hour. I was especially pleased that it does not require a 220 V network - car batteries allow you to power it even in the field (by the way, can you make a camp microwave out of it?). You can experiment in the direction of reducing the supply voltage to 4-8 V as from lithium batteries (for miniaturization) while maintaining good heating efficiency. Of course, it won’t be possible to melt massive metal objects, but it will work for small jobs.
The current consumption from the power supply is 11 A, but after warming up it drops to about 7 A, because the metal resistance increases noticeably when heated. And do not forget to use thick wires here that can withstand more than 10 A of current, otherwise the wires will become hot during operation.
Heating a screwdriver to blue HDTV
Heating the knife HDTV
Homemade version of the heating element
Subscribe to the author
Follow the author if you like his publications. Then you will receive notifications about his new posts.
You can always unsubscribe from notifications in the author's profile.
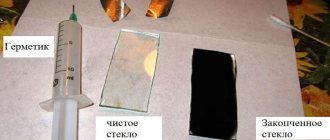
We return to the glass, make notches on the inner surface or use an engraver to achieve surface roughness for better adhesion. We degrease and put a small amount of sealant into the groove, recess the heating element into this sealant, so that all the cavities are filled as much as possible. We check with a multimeter that the spiral does not penetrate the body. There should be room in the glass for a thermocouple or thermistor. While the sealant dries, prepare the thermistor. You can attach wires in different ways. Can be soldered with refractory solder, silver, brass. Weld using arc welding. Just twist it. I use crimp. I couldn’t find such thin cartridges in local village stores; I used scraps of a thick needle from a disposable syringe. Conventional crimping cannot compress stainless steel of such a small radius, so I crimped it in a “nano” vice. You could hit it gently with a hammer. We isolate the conclusions with Kapton tape. And we put our temperature sensor in the remaining space of the glass and fix it with sealant. Let it dry.
Fill the glass with sealant to the top with a small margin. Dry, warm up to operating temperature. Let it cool. Use fine sandpaper to smooth out the resulting end. The sealant sands amazingly. If you need to replace the temperature sensor, you can carefully pick it out and place another one in the hole and seal it back with sealant. But in all my practice, I have never had to change temperature sensors because of the temperature sensors themselves.
Check again to see if anything is shorted. Well, we use it. All of the above is imho of the author. The author does not call for repeating this way. Perhaps something could have been simplified or done differently. Therefore, you are welcome to comment, let’s have some water. =)
Z.Y. There is no point in posting STL models if the sources are needed in solid form. I will post them in a couple of days.
Source
How to make a heater with your own hands: 4 best ideas
Low ambient temperature significantly reduces labor productivity and living comfort. Therefore, heating domestic and industrial premises performs an important function that requires significant financial costs for the purchase of special equipment. To save money on heating appliances, you can assemble a heater yourself. Which is especially important for those rooms and locations where there is no need to care about its aesthetic appearance and design.
Heating element device.
The heating element is an electric heating element made of a thin-walled metal tube (sheath), the material for which is copper, brass, stainless and carbon steel. Inside the tube there is a spiral of nichrome wire, which has a high electrical resistivity. The ends of the spiral are connected to metal leads with which the heater is connected to the supply voltage.
The spiral is insulated from the walls of the tube by a compressed electrically insulating filler, which serves to remove thermal energy from the spiral and securely fixes it in the center of the tube along its entire length. Fused magnesium oxide, corundum or quartz sand is used as filler. To protect the filler from the penetration of moisture from the environment, the ends of the heating element are sealed with thermal and moisture-resistant varnish.
The heater leads are insulated from the walls of the tube and rigidly fixed with ceramic insulators. The supply wires are connected to the threaded ends of the terminals using nuts and washers.
The heating element works as follows: when an electric current passes through a spiral, it heats up and heats the filler and the walls of the tube, through which heat is radiated into the environment.
fins are used to increase heat transfer from heating elements.
, made of material with good thermal conductivity. As a rule, corrugated steel tape is used for fins, wound in a spiral on the outer shell of the heating element.
The use of such a design solution helps to reduce the overall dimensions and current load of the heater.
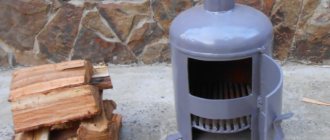
Vortex induction boiler is the best way to reduce heating costs
Vortex heater
Another advantage of using electric heating is the ease of maintenance of heating systems mounted on electric boilers. However, the convenience of using electricity for home heating is becoming an increasingly expensive way to obtain heat in the home - paying the bill for electricity consumption with each heating season becomes unaffordable for many.
Home owners are beginning to look for an alternative to electric boilers, the design of which is based on a standard heating element.
Induction electric boilers are gradually gaining popularity, also converting electricity into heat necessary for heating rooms. However, their design makes it possible to use energy much more economically, which significantly reduces the ongoing costs of maintaining a house during the heating season.
Energy savings occur due to the rapid heating of the heating system coolant. This happens thanks to an induction device that replaced the traditional heating element in the boiler.
In addition to reducing heating costs, these boilers have a significant number of advantages over other electric boilers - high efficiency, long service life (at least 25 years) and lack of scale.