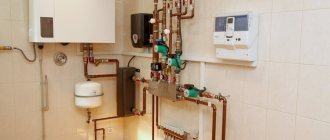
Gas boilers are produced by different companies, which is accompanied by the supply to the market of equipment that requires an individual approach to installation and operation. But you don’t really want to overpay for calling a specialist for installation work, do you? But how to connect an Ariston gas boiler yourself, taking into account the individual characteristics of the purchased equipment?
We will try to help you deal with this problem - our publication will discuss the procedure for installing, connecting and configuring a gas boiler. The order of work when performing the first startup of the equipment is also given. The presented material is supplemented with visual photos and a video.
Characteristic
Ariston gas equipment is produced in two basic versions - floor-mounted and wall-mounted.
In private homes, as a rule, wall-mounted models are used. Depending on the model parameters, the unit may have an open or closed combustion chamber.
In the first case, combustion products are removed from the boiler naturally, in the second, a forced gas exhaust system operates. Typically, closed chamber installations are connected to a coaxial chimney. The coaxial pipeline implies the presence of two structural layers, due to which it is possible to simultaneously remove carbon monoxide and provide a flow of fresh air into the firebox.
In addition, the chamber has a built-in fan, which is responsible for the timely removal of burnt gas and hot air. These models are more secure than devices with an open camera.
Floor-standing boilers have quite high power
, therefore they are used for industrial purposes or in residential buildings with a large area. Usually they are designed only to supply heat to radiators and radiators, so if you need to heat water, you should additionally purchase boilers.
The main element of any boiler equipment is the burner, which is responsible for burning fuel and supplying heat to the heating system. Burners can be conventional or modulating. Modulation ones are more modern and technologically advanced, since they allow you to automatically adjust the power of the device depending on the results of internal control over the temperature level.
Ariston double-circuit boilers have 2 heat exchangers: the first is necessary to provide hot water supply, and the second is directly for heating the main coolant. Their production can be carried out in three versions: they are separate, bithermic or with a boiler.
Two autonomous circuits are simultaneously placed in the common boiler body:
- heating - it is responsible for supplying radiators with heated water;
- water - this mechanism is connected to water pipes.
Water can be heated in several ways:
- flow-through - this option only works when using hot water: after passing through the burner, it reaches the end consumer in heated form;
- boiler - such a device implies the presence of an additional tank in which water heated to a given temperature accumulates and from there it flows into the tap.
Based on the location of the circuits, boilers are divided into 2 types.
- Bithermal - in such installations the water pipe is located inside the heating system. In this case, the heating circuit heats up more actively and transfers part of its heat to the water supply.
- Duothermal - include two tubular heat exchangers that evenly transfer heat to both systems. In this case, energy is used most efficiently, however, the heating rate is significantly reduced. In addition, this operating principle creates the preconditions for the appearance of lime deposits, so such devices require regular cleaning.
Depending on the combustion method, Ariston boilers are conventionally divided into those operating on the principle of turbocharging and natural draft. A turbocharged boiler has a fairly high heating rate, however, gas is also consumed in large volumes. The second type of model heats water rather slowly, but fuel consumption is also more economical.
Installation of a floor-standing unit
Stationary double-circuit heat generators burning natural gas are divided into 2 types - non-volatile and requiring power supply. The latter are connected to heating and electricity in the same way as their wall-mounted “brothers”.
A non-volatile floor-standing boiler heats DHW water using a copper or stainless steel coil built into the main heat exchanger. The heater's equipment is minimal - a burner, automatic safety system and a heat exchanger, nothing else. In addition to the cranes listed in the previous section, for installation you will need to buy:
- safety group with a safety valve designed for the operating pressure of the heat generator (indicated in the passport);
- circulation pump;
- expansion tank of calculated volume (10% of the total amount of coolant).
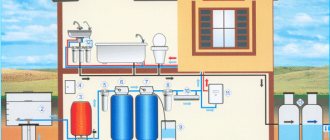
The diagram for connecting a heating unit to a closed-type heating network is shown in the picture.
A few words about how to connect a double-circuit floor-standing boiler to a gravity heating system. Here you will need an open expansion tank with an overflow, but a pump and safety group are not needed. Pipe diameters are at least 40 mm, laying is carried out with a slope of 5 mm per 1 linear meter. highways. The heater is the lowest point of the system, and the open tank is placed at the highest. If electricity is available, forced circulation can be organized using a pump installed on the bypass.
Integration of a dual-circuit heater into a gravity system with the possibility of forced circulation from a pump
How it works
To minimize problems with the device, you should study its structure and operating principles. Typically, private households use storage models rather than flow-through ones, which allow them to use electricity more efficiently. Such a device consists of a heat exchanger tank, inside of which a heating element is installed - a heating element, connected to the power supply.
An important part of the device is the thermostat. This element allows you to maintain a constant temperature of the water inside the storage tank. Water flows through pipes into the heat exchanger. If its temperature is too low (and this is usually the case), then the thermostat sends a signal and turns on the heating element.
The water is heated until it reaches the required temperature. After this, the thermostat operates again and turns off the heating element. Hot water is taken from the tank and replaced with cold water, the heating process is repeated again and again. This is a general diagram of the design and operation of a conventional storage water heater.
Flow models are designed somewhat differently. They heat not a static volume of water, but a flow. They use more powerful heating elements that start when the water is turned on and stop when it is turned off. To study the operation and design of a particular model in more detail, you need to carefully read the technical documentation accompanying it.
The heater tank is a durable stainless steel container, one or two millimeters thick. No matter how resistant this material is to corrosion, these processes still periodically arise and develop, which leads to water leaking from the device. One of the common causes of such breakdowns is electrocorrosion.
To prevent it, you need to regularly, i.e. annually replace the magnesium anode installed inside. This element is designed specifically to prevent electrocorrosion
Over time, it wears out, and storage tank owners overlook replacing this important part.
As a result, the tank, which has been serving well for some time, suddenly begins to leak. The incorrect condition of the magnesium anode can also affect the condition of the heating element. On the outside, the storage tank is usually enclosed in a metal or plastic housing, and it also has an insulating shell that prevents heat loss.
Damage to the outer shell and insulation occurs rarely, usually due to careless handling of the device. Cracks and chips on the body of the water heater may not disrupt its operation, but this will lead to a deterioration in the properties of the heat insulator and will negatively affect the functioning of the device as a whole.
Inlet and outlet pipes for cold water and outlet pipes for hot water usually do not cause any problems if the heater is installed correctly. Typically, a water heater is equipped with two thermostats, one of which is designed to control the water temperature, and the second monitors the condition of the first device.
Sometimes a third thermostat is used, which determines the working condition of the heating element. In any case, a broken thermostat will have to be completely replaced. There are capillary, rod and electronic types of thermostats. Their design is different, but the principle of their operation is similar.
The insulating gasket not only serves to seal the connection between the elements of the water heater, it is also necessary as an electrical insulator. It is recommended to replace this element regularly during each maintenance of the water heater.
The thermostat shows to what temperature the water inside the device is heated. If this element breaks, the water heater will still perform its functions, although data on the degree of heating will not be received.
Heat exchanger clogged, reduced throughput
Often the fouling of the internal walls of the heat exchanger with scale or mud deposits is the cause of problems with hot water. If tap water does not undergo pre-filtration (rough cleaning) and the temperature of the hot water is too high, the walls of the heat exchanger become overgrown with scale and dirt over time, reducing their thermal conductivity and flow area. Each time the user increases the DHW temperature on the boiler more and more in order to obtain the desired result on the mixer. As the temperature rises, scale forms even faster and, as a result, the temperature of the boiler's hot water supply is at its maximum, and the water does not heat up enough. This process has a particularly negative effect on a boiler with a bithermic heat exchanger. Plate heat exchangers are easy to clean.
Descriptions of the Ariston double-circuit boiler
One of the most important components in all gas boilers is the burner, in this case it can be modulating or conventional. The first option is more popular than the second. When using it, the entire system will be adjusted automatically, without human intervention. In this case, the power of the installed heating equipment depends on temperature indicators.
The burner is also divided into 2 types:
open;
The safest is since it does not involve combustion products entering the room in case of emergency. Also in this case, the owner does not have to worry about building a chimney. A special coaxial pipe must be connected to the closed burner; it can always be brought outside in any accessible place.
An open-type Ariston boiler, in any case, requires a chimney to remove combustion products to the street. Also, do not forget about natural cravings. Air will enter the system from the living space, so it will have to be constantly ventilated.
The coaxial pipe used in a closed combustion system has the advantage of being made of 2 layers. One is necessary to remove combustion products, and the other will ensure fresh air enters the boiler. Thus, the owner of the equipment does not have to constantly ventilate the room and worry about natural draft. The room will always have a sufficient amount of oxygen.
Specifications
Almost all gas boilers from the Ariston brand have a power of 15 to 30 kW. Thus, each client will be able to select the necessary indicators for the size of their apartment or house. It is also worth noting other distinctive characteristics of such gas equipment:
at maximum efficiency, boilers have a high level of efficiency; all wall-mounted boilers have Russian instructions and symbols on the equipment itself, so citizens do not have problems with operating the unit; most models from this manufacturer are able to cope perfectly with water in the system and low pressure; Particular attention to this equipment should be given to those people in whose homes voltage surges often occur. Ariston boilers cope with such network surges without any problems; All models are very easy to operate. To start using the boiler, you don’t need to study the instructions for a long time; all operating features are intuitive and accessible even to those who are installing such a unit for the first time.
To start using the boiler, you don’t need to study the instructions for a long time; all operating features are intuitive and accessible even to those who are installing such a unit for the first time.
In some cases, the boiler cannot simultaneously heat water and provide sufficient heating of the room; this applies to budget models. In this case, a person needs to think about installing an additional boiler.
Technical data of Ariston gas appliances
- Ariston boilers are used for heating and water heating, that is, they are double-circuit.
Each modification has its own characteristics, but the common type of fuel is gas. - The gas combustion chamber can be either open or closed.
If there is a chimney, units with an open chamber are used. And in apartments of multi-storey buildings, where there are not always chimneys, equipment with a closed combustion chamber is used. - Power.
Using this indicator, the gas consumption required to heat the room is calculated. - Compactness.
Wall-mounted units are used in small, narrow rooms. Floor-standing units used in production or warehouse areas are heavier and require more space for installation. - Availability of a control unit.
This element is indispensable when the water is turned off or when there is a sharp decrease in gas. In case of any malfunction, the unit will immediately turn off the device, which will prevent breakdown. It can also help you save fuel consumption.
General characteristics of Ariston boilers
The description of Ariston gas units must begin with the characteristics of their main part - the burner. This element is used to burn fuel and release thermal energy into the heating system.
Types of boiler burner:
- regular
- modulation
The modulation burner is more convenient to use. It provides automatic power control depending on the temperature of the device.
According to the type of exhaust of combustion products, burners are divided into:
- closed type
- open type
Units with a closed burner are safer to use. In this case, natural gas combustion products do not enter the room. No use required. A coaxial pipe is simply connected to the device and taken out.
The design of the coaxial pipe provides for the presence of two layers, which ensures the simultaneous removal of waste and the flow of air from the street into the burner.
Equipment with an open burner requires the use of a chimney to remove combustion products.
How to work with the menu
By pressing the “OK” button once, the number 2 will blink on the digital indicator - this will be the first digit of the future three-digit code (Menu Group Number)
Using the plus and minus buttons you can change this value from group number 2 to any other group. To fix the selected group for further entering the code number, you need to press “OK” again - after this the second digit of the future three-digit code begins to blink (Submenu)
Having selected a submenu, fix it by pressing the “OK” button again and similarly select and fix the third digit (Parameter)
All! Now the screen will no longer display the three-digit code itself, but the set value of this parameter, which can be changed by pressing “plus” or “minus”. Having made the necessary changes, do not forget to commit them by clicking “Ok”.
Please note that after selecting the desired menu, after a few seconds of inactivity, a three-digit code will begin to be alternately displayed (to remind you where you are) and the parameter corresponding to this menu.
The ESC button is used to exit the settings menu and return to the previous step. The exit is carried out step by step, one press is equal to one step back.
Let's practice
Now, if you want, practice to better understand the switching order. For example, enter menu code 701; this will turn on the forced air removal mode, essentially turning on the pump in the boiler for 6 minutes.
When this mode is turned on, the “P I -” symbol will light up on the display. You can exit the “Anti-Air” mode without waiting 6 minutes by pressing ESC.
Then, using ESC, try to go back and switch to mode 300, which means (Set water temperature in the boiler) in the values you can see the temperature that is currently set by your DHW regulator.
First start-up and setup of the boiler
When the installation work and connections are completed, you can proceed to setting up and testing the equipment.
Performing the first run
The initial action that accompanies the first start-up of an Ariston brand gas boiler is to fill the heating circuit with water. In this case, it is necessary to set the radiator air valves to working (open) condition.
The same actions aimed at bleeding air from the system apply to the boiler circulation pump. As the circuit fills with water, air is removed from the system, and the water pressure on the pressure gauge reaches 1 - 1.5 atmospheres, the tap on the make-up line is closed.
The first start-up of a gas boiler is usually accompanied by preparatory operations related to filling the system with water, bleeding air, and checking the tightness of gas lines
At the next stage of commissioning of a gas boiler, actions related to the gas supply are performed.
The procedure is approximately as follows:
- open the doors and windows of the workroom;
- exclude the presence of sources of open fire;
- check the burner circuit and control system for leaks.
Testing the control unit and burner for leaks is performed by briefly opening (no more than 10 minutes) the main shut-off valve of the gas line. In this case, the solenoid valve and manual boiler damper are set to the closed position. With this position of the system, the gas flow meter should show a zero result (no leakage).
Setting manipulations with the control panel
Modern gas heating equipment is equipped with a control panel where the user can set the desired operating parameters of the unit. Next, we’ll take a closer look at how to set up an Ariston brand household gas boiler.
Control during operation of the boiler, as well as control in the first start-up mode with the necessary settings, is carried out through the Ariston user control panel
Actually, the user’s actions on the control panel are obvious here:
- Turn on the device by activating the ON/OFF button.
- Mark the operating mode parameters on the display.
- Mark the service mode functions on the display.
Next, the gas parameters are checked, for which the front panel of the boiler is dismantled, the control panel plate is lowered and test manipulations are performed by connecting the measuring pressure gauge to the pressure tap pipes.
These operations are the prerogative of gas service specialists. Doing it yourself is not recommended, as you need to clearly know the functionality of the equipment.
Ariston remote control keyboard layout: 1 – information screen; 2 – DHW temperature regulation; 3 – mode selection key (Mode); 4 – “Comfort” function; 5 – ON/OFF key; 6 – “Auto” mode; 7 – reset key “Reset”; 8 – heating circuit temperature regulation
Then the boiler is started in test mode through the “Chimney Sweep” system function. To enter test mode, activate the Reset button and hold it pressed for at least 5 seconds. The test mode is exited by re-activating the reset key.
Maximum/Minimum Power Testing
This type of test also involves control sampling of pressure at specialized points of the equipment, followed by measurement of parameters on a pressure gauge. It is necessary to disconnect the combustion chamber compensation tube. Again, the “Chimney Sweep” mode is used, activated through the control panel.
The boiler is tested for the minimum power level in the same way. True, the modulator adjusting screw is additionally used if it is necessary to adjust the minimum operating pressure of the boiler. In this regard, there is a video below, where for some reason the modulator is called a motor.
Putting equipment into operation
The process of starting the device involves the following user actions:
- Activate the ON/OFF button.
- Select standby mode.
- Hold down the Mode button for 3-10 seconds.
- Wait for the air removal cycle to complete (about 7 minutes).
- Open the linear gas valve.
- Switch on the DHW operating mode using the “Mode” button.
If all the actions were performed by a specialist from a specialized company, then he checks the compliance of the gas pressure during operation of the unit and draws up an appropriate report.
He also provides instructions on the safe operation of gas equipment and puts the boiler under warranty.
Ariston boiler menu structure
At first it may seem complicated, but once you figure it out, everything will be simple and clear, so:
Each parameter is indicated by a three-digit digital code. For example 228 (this is just a parameter code that depends on the boiler version)
The first digit of the three-digit code means a separate menu group; the boiler has six separate menu groups, each responsible for its own settings section. Here they are.
2 - Boiler settings
3 - Solar collector and storage boiler
4 - Zone 1 parameters
5 - Zone 2 parameters
7 - Testing and maintenance
8 — Technical parameters.
The second digit of the three-digit code indicates the submenu, and the third is the parameter itself to which access is granted.
For example, code 228, already known to us, is deciphered as follows: 2 - Boiler settings (this is the Menu), 2 - Basic boiler settings (Submenu), 8 - Boiler version (Parameter).
So by typing the three-digit code 228 we get access to the set value of this parameter, which, according to the table, can vary from 0 to 5 and depends on the boiler version.
I will provide tables with menu codes and a description of what is regulated by a specific code below, but for now let’s figure out how to enter the boiler service menu.
General information and connection
A double-circuit gas boiler is a heating device equipped with burners and two heat exchangers. The work is structured in such a way that it is possible to heat several circuits. One is used to supply hot water to heating radiators or other heat consumers, the second provides the need for hot water.
The connection diagram for a double-circuit gas boiler to a heating system is quite simple. Both gravitational and forced coolant circulation are available for use. The complexity, electronic equipment, and controllability of the harness depend on the needs. The heating structure can provide for branching into multiple consumption circuits using hydraulic arrows.
Features of replacing a faulty heating element
If the boiler stops heating the water to the required temperatures, then the heating element should be replaced. To do this, you need to perform the following procedure:
- Disconnect the device from the electrical network.
- Stop supplying water to the container.
- Connect a hose to the drain valve and drain all the water into the sewer.
- Remove the protective box by removing 2 screws.
- Remove the return valve from the pipe.
- Drain the remaining water from the tank.
- Using a wrench, unscrew the nut that secures the flange.
- Carefully remove the old heating element without damaging the flange.
- Clean the walls of the container from accumulated dirt. If the inside walls have a special protective enamel, then there is no need to remove scale. You may simply damage the protective film. This layer of scale will protect the walls of the vessel from rust formation.
- The magnesium anode is removed and repaired if required.
- A new heating element is being installed. You need to do exactly the opposite of all the work.
- Checking operation after final assembly of all parts. The tank should not leak. Otherwise, you need to put in new gaskets.
Ariston water heater repair
The nuances of strapping
Despite the fact that the harness is selected individually, there are several general provisions that must be adhered to:
- The boiler for schemes with natural heating circulation is installed below the level of the radiators.
- The base for installing floor-standing units must be made of non-combustible materials.
- Boiler rooms are equipped with ventilation and lighting.
- The boiler unit is connected with the inclusion of a coaxial chimney.
- After assembling and installing the unit and smoke ventilation systems, a safety group is installed: a control pressure gauge, a pressure relief valve and then an air vent.
- The expansion tank is installed between the hydraulic switch and the boiler unit.
Connecting a wall-mounted boiler
This type of boiler allows installation on the wall in the kitchen. Structurally, it is made in such a way that the necessary piping has already been carried out by the manufacturer, and its elements are supplied as a kit. Depending on the type of unit, they can be single or double circuit, so the number of pipes for piping may differ.
Wiring a wall-mounted gas boiler
Algorithm for piping a double-circuit gas boiler:
- Remove the plugs from the pipes.
- Install a strainer on the return line to remove dirt and suspended solids.
- A filter is installed to purify water from hardness salts; it can be installed on the common tap water inlet.
- When piping a wall-mounted gas boiler, shut-off and control valves with detachable connections, for example, “American” ones, are installed.
- The cold water pipes are located on the left side relative to the center of the boiler, and the hot water pipes are located on the right.
- The boiler is connected to the gas mains with the involvement of a certified specialist; the final approval of the boiler will be issued by a representative of Gorgaz after a test run of the boiler equipment.
- When piping a double-circuit gas boiler, the threaded gas connections are sealed only with tow.
- Install a special filter on the gas shut-off valve.
- The boiler is connected to the gas main with a corrugated hose and a union nut with a paranitic gasket.
Connecting a floor-standing gas boiler
This scheme requires a separate room to house the boiler, since floor-standing models are large and often have an open firebox design that works with natural circulation through the gas-air path. The scheme also includes a pump for coolant circulation, especially for piping a double-circuit gas boiler and for a multifaceted heating level: number of floors, different types of heating - radiator and “warm floor”.
The circuit for dual-circuit heating (heating and domestic hot water) consists of 5 pipes: 1 - gas, 4 - water coolant. The first is connected to the burner device with a ball valve.
Connection diagram for water coolant when piping a floor-standing gas boiler:
- Heating boiler inlet;
- heating boiler output;
- DHW heat exchanger inlet;
- DHW heat exchanger output.
The distribution of water flows is automatic, performed by a three-way valve, hydraulic arrow or balancing valves.
For piping a floor-standing gas boiler with extensive heating networks and a long distance, it is recommended to connect 2 collectors with an autonomous pump, for example, one for low-temperature coolant up to 50 C for a “warm floor” system, and the other up to 90 C for conventional radiators.
To reduce the temperature, the manifold can be equipped with a mixer or a three-way valve with a servo drive installed between the supply and return on the comb. Sensors allow you to set different temperatures in the circuits.
Thus, in order to properly tie the boiler, you will need not only experience in installation work, but also strict compliance with state operating rules and the requirements of the manufacturer.
Operating instructions for Ariston gas boilers
Before purchasing an Ariston gas boiler, you need to understand that if the buyer does not understand its installation, it is better to contact experienced specialists and entrust all the work to them. After all, even with the most detailed instructions, it is not a fact that the matter will end successfully. In this case, there is every chance of damaging the equipment, after which you will have to call repairmen, and this will result in additional costs.
It is very important to keep children away from the equipment. To do this, after, you need to have a conversation with them and explain in accessible language that you cannot twist or place anything on the unit, this should only be done by an adult
If the family leaves, for example, on vacation, after the boiler is turned off, it is also necessary to shut off all gas and water supply pipes. Only after this is the equipment disconnected from the network.
If any model has a display, all indicators that it displays must be strictly monitored. It may display any problems or deviations from normal operation that occurred during the heating process.
One of the most important points in the instructions for gas equipment is safety precautions. Before connecting the boiler, you need to familiarize yourself with it first.
Wall mount
Initially, I installed a coaxial angle on the boiler and measured the distance from the edge of the boiler to the center of the corner - it, as indicated in the instructions, was 105 mm.
The distance from the center of the corner to the top of the boiler is 105 mm
You can immediately fasten the narrow clamp, not forgetting to put the sealing gasket.
Before tightening the clamp, it is necessary to insert a sealing gasket
My house is sheathed on the outside with vinyl siding, so I immediately decided to mark it so that the hole for the pipe would fit entirely on one strip of siding.
Some sites suggest first making a hole for the chimney, and then screwing in the mounting strip. I decided to screw the bar first. As mentioned above, the kit includes two dowel nails. They are designed for mounting the boiler to a brick or concrete wall. Since the house was built from sandwich panels, I fastened the plank with roofing wood screws.
The bar is set horizontally and secured with five galvanized screws
Further in the wall, a through hole with a diameter of 10 mm was drilled. The center of the hole corresponded to the center of the coaxial pipe. I cut out the hole for the pipes on both sides using an electric jigsaw.
After cutting the hole and hanging the boiler, you can install a coaxial chimney
It is better to install the chimney together - one pushes the pipe from the outside, the other puts on the internal insulating gasket (made of hard plastic) and the clamp (it is more convenient to immediately screw the screws into the clamp).
The pipe is installed, the clamps are tightened
Due to the fact that the outer insulating gasket is quite elastic, it fits quite tightly to the siding.
Coaxial pipe after installation
I'll end this for now. Next comes the soldering of polypropylene pipes, the connection of polypropylene pipes with metal-plastic ones and the installation of additional taps on the heating system. Only after this can Ariston be launched.
To be continued…
- https://sovet-ingenera.com/gaz/equip/kak-podklyuchit-gazovyy-kotel-ariston.html
- https://starsb.ru/shop/folder/skhemi-podklyucheniya-kotlov-ariston
- https://xn--80ayehece2h.xn--p1ai/installation-of-boiler-ariston/
Advantages and disadvantages
Ariston gas boiler systems are popular all over the world, this is due to their exceptional performance characteristics:
- effective built-in protection system against power surges in the network - devices can operate in the voltage range from 150 to 260 V;
- the ability to effectively regulate the rate of water heating: in the case when the flow rate does not go beyond 6 l/minute, the temperature can reach up to 37 degrees; in order for the water to heat up faster, you simply need to increase the boiler power;
- simultaneous operation in the mode of a water heater and an efficient heating device;
- the ability to automatically shut off the gas in the event of flame extinguishment, regardless of its causes;
- automatic shutdown of the heater if the water pressure in the system drops to a critical level;
- the presence of two heat exchangers;
- wide range of models;
- excellent adaptation to use in Russian conditions;
- Italian assembly;
- European quality control system.
However, there are also disadvantages, among them the following should be highlighted:
- very high cost in comparison with analogues;
- use of components produced in China.
Russian users highlight boilers of this brand as high-quality, reliable and practical. Reviews from owners of private houses indicate such advantages of Ariston as compact dimensions, energy-efficient gas consumption and ease of control of the mechanism. Among the disadvantages is the dependence of its operation on the power supply, but this feature concerns not only Ariston - almost no gas equipment operates without being connected to an alternating current network.
Specifications
Almost all gas boilers from the Ariston brand have a power of 15 to 30 kW. Thus, each client will be able to select the necessary indicators for the size of their apartment or house. It is also worth noting other distinctive characteristics of such gas equipment:
at maximum efficiency, boilers have a high level of efficiency; all wall-mounted boilers have Russian instructions and symbols on the equipment itself, so citizens do not have problems with operating the unit; most models from this manufacturer are able to cope perfectly with water in the system and low pressure; Particular attention to this equipment should be given to those people in whose homes voltage surges often occur. Ariston boilers cope with such network surges without any problems; all models are very easy to operate
To start using the boiler, you don’t need to study the instructions for a long time; all operating features are intuitive and accessible even to those who are installing such a unit for the first time.
In some cases, the boiler cannot simultaneously heat water and provide sufficient heating of the room; this applies to budget models. In this case, a person needs to think about installing an additional boiler.
Tables with three-digit codes, descriptions and set values
The values added in the white fields are the values used in my boiler. If there are no corrections, then I have the same values as those printed in the table. To enlarge, click on the photo of the table.
Do you want to install individual heating in your home? Have you already installed and connected gas equipment? Great, then all that remains is to figure out how to turn on the gas boiler. Do you think it’s enough to insert the plug into the socket and select the temperature? No matter how it is. Before this, it is necessary to bleed the air and fill the system with water. You will find instructions with the sequence of actions in our article.
First start-up and setup of the boiler
When the installation work and connections are completed, you can proceed to setting up and testing the equipment.
Performing the first run
The initial action accompanying the first start-up of an Ariston brand gas boiler is water. In this case, it is necessary to set the radiator air valves to working (open) condition.
The same actions aimed at bleeding air from the system apply to the boiler circulation pump. As the circuit fills with water, air is removed from the system, and the water pressure on the pressure gauge reaches 1 - 1.5 atmospheres, the tap on the make-up line is closed.
Weaknesses of the water heater
The Ariston brand is considered one of the most reliable. But despite this, these boilers have their drawbacks. Very quickly after purchasing the device and starting its operation, the display indicating the main parameters of the boiler’s operation breaks down. However, it is intended for the convenience of the user. A broken display does not affect the operation of the boiler in any way.
Although the manufacturer indicates that the device is frost-resistant, the water from it must be completely drained during downtime. Frozen residues may damage the device.
The temperature maximum of the Ariston boiler is 80 degrees. But it is not recommended to use it. The boiler will fail very quickly in this case. It is best to heat up to 60 degrees.
If all these disadvantages are taken into account during operation of the device, then it will last for many years.
Do-it-yourself Ariston water heater repair in the video below:
Some of the existing breakdowns can be easily fixed on your own; for some, the equipment will have to be taken to a service center.
Why is proper strapping so important?
Piping refers to pipes and mechanisms designed to supply coolant from the boiler to the radiators. This is almost the entire heating system, with the exception of the batteries.
The system consists of many components, but even a non-professional can install the simplest boiler piping. But if you need a complex circuit, it is better to contact an experienced craftsman.
It is better to install the boiler in a separate room, for example, in an outbuilding, boiler room or basement, because piping involves additional pipes and mechanisms, which is not always convenient. However, if there is not enough space, heating equipment is installed in the house
The choice of piping scheme for each specific house depends on the type of boiler, construction features, and type of heating system.
Any gas equipment is dangerous. Incorrect connection is fraught not only with heating problems, but also with explosions and destruction, so it is necessary to strictly follow the rules and regulations and comply with safety requirements. The main documentation that is relied upon when installing a gas heating system is SNiP.
The main unit of the system is the boiler. The piping scheme is chosen based on its type, location (wall-mounted or floor-mounted model), design features
It is necessary to carefully plan the heating scheme, the location of equipment, and the features of laying pipelines.
The boiler piping performs several significant functions at once:
- Pressure control. If the piping is installed correctly, thermal expansion is compensated, which means that the pressure in the system will not increase to critical levels.
- Removing air. Air bubbles form plugs, which reduces the efficiency of water heating: radiators do not warm up completely, but resource consumption remains the same. High-quality boiler piping is necessary to prevent this problem.
- Prevention of blockages in the system. If the boiler is not properly sealed, the risk of scale formation in radiators and pipes increases. Small debris in the coolant pollutes the system, which leads to excessive fuel consumption and increased heating costs while simultaneously reducing its quality.
- Possibility of connecting other circuits. You can install an underfloor heating system and a storage boiler.
In many ways, heat supply depends on the correct connection of the boiler to pipelines and other important components, so the gas boiler piping scheme must be carefully thought out and installed as efficiently as possible.
When installing a radial system, collector cabinets are installed where most of the boiler piping mechanisms can be mounted. It's convenient and practical
A correctly selected and installed boiler piping will last for many years without accidents or repairs, and its cost will be optimal.
Cold or insufficiently hot water flows from the boiler
The cause of a malfunction of this nature may be a breakdown of the heating element, thermostat and a large layer of scale on these devices. Before determining the cause of the malfunction of the Ariston 80-liter water heater and doing the repair yourself, you should turn off the power supply and drain the water.
Then, using a 13 mm wrench and a Phillips screwdriver, remove the protective box and unscrew the bolts on the mounting plate
Carefully remove the flange on which the heating element and thermostat are attached. Now you need to descale these 2 devices
The thermostat should be unscrewed, cleaning the attachment points to the flange from sediment, then carefully, using a screwdriver, free the thermostat from scale. You can check the functionality using a tester; the absence of a signal on its contacts indicates a malfunction and the need for replacement, since the thermostat cannot be repaired
You can also check the heating element for functionality using a tester by connecting the ends of the tester to the contacts of the heating element. If there is voltage, the heating element is working, but it needs to be cleaned
The heating element can be cleaned using a screwdriver, carefully removing pieces of deposits
Then you need to prepare a solution of citric acid - 100 g per 1 liter of water and immerse the heating element in the solution. The effect of the solution on the device will be indicated by air bubbles that appear as a result of the reaction. If this action is not enough for complete cleansing, you can put the vessel with the solution and heating element on low heat.
After cleaning the heating element, you need to descale the tank
Be careful not to damage the inner surface of the tank. If it is possible to remove the heater from the wall, cleaning can be done using a solution of citric acid, pouring it into the tank
After these manipulations, assemble all the parts in the order in which they were disassembled and carefully insert and secure the flange. Make sure that during assembly there are no distortions of parts, do not overtighten the bolts, change the gasket between the body of your storage boiler and the flange, since the flange gasket was also exposed to salts
What does the strapping scheme not depend on?
First, let's say what the heating boiler piping scheme does not depend on. On the hydraulic part, the type of fuel or energy that the heat generator uses does not matter. The wiring diagrams for gas, electric and solid fuel heating boilers are no different. At the coolant inlet/outlet there is not much difference whether pellets serve as an energy source, gas or diesel fuel. In complex systems, specialists take into account the type of heat generator when choosing a rational piping scheme, but this difference is insignificant. Also, apart from the configuration, the piping of the floor and wall heating boiler does not affect anything. But single-circuit and double-circuit boilers have different piping in terms of connection to the hot water supply system.
Filling the heating system with water
Starting a gas boiler begins with filling the heating system with water. Everything is simple here - modern double-circuit boilers do not require the installation of a special system feeding unit. It is already built into the boiler and equipped with a special tap, which, as a rule, is located at the bottom of the boiler in close proximity to the cold water connection pipe. Open the feed tap and slowly fill the system with water.
Starting the boiler - how to fill the system with water
A very important point in the operation of any boiler equipment is fluid pressure. To control this parameter of the heating system, almost all boilers are equipped with a pressure gauge. During the process of filling systems with water, it is necessary to monitor the pressure and after it reaches 1.5-2 atm, filling the system will need to be stopped. In principle, the operating pressure of a boiler may vary depending on the manufacturer and model - therefore, see the instructions for the boiler for the exact operating pressure.
Do-it-yourself first start-up of a gas boiler
Installing the boiler correctly
Unlike the installation of solid fuel and electric units, strict requirements are imposed on the installation and connection of gas heating boilers. The procedure is like this:
- You contact the organization supplying natural gas for permission to connect to the external network. The company issues technical specifications (TS) for connection to the main line.
- Based on the issued specifications, the licensed company develops design documentation approved by the engineers of the gas supplier organization.
- After the project is approved, the company's trained personnel connect the gas-using installation to the external network.
An example of a drawing from a gas boiler house project for 2 water heating units of different capacities
Clue. When contacting the management organization, take the technical documentation of the private home and the passport of the purchased heater. Point two: the employees of the gas office will probably suggest you a suitable design company.
Hence the conclusion: you should start installing and connecting a double-circuit boiler yourself at the design stage, when the heating unit has a clearly allocated place in the house. If it is installed in violation of the rules, then Gorgaz specialists will refuse to connect the main pipe.
Although the design engineer must know all the requirements for the placement and connection of a gas boiler, it will also not hurt you to familiarize yourself with the rules:
- room for the location of the heat generator: kitchen (if the power does not exceed 60 kW), a separate room on any floor (up to 150 kW), attached or separate furnace room;
Boiler room made of aerated concrete blocks attached to the house - the minimum height of the kitchen or furnace ceilings is 2 m, the volume is at least 7.5 m³;
- if two gas appliances are installed (for example, a boiler + a water heater), then you need an overlap of 2.5 m and a volume of 13.5 m³;
- ventilation: natural air exhaust in the amount of 3 room volumes in 1 hour, to add combustion air to this amount (the volume is indicated in the heater’s passport);
- the walls of the combustion chamber must be non-flammable or protected from fire and the spread of flame;
- the minimum permissible area of the transparent part of the windows is 0.03 m² for each cubic meter of combustion volume (called an easily resettable structure that flies out during a gas explosion);
- passage in front of the heating unit - no less than 125 cm, on the sides - 70 cm for maintenance;
- the distance from the boiler to the vertical chimney duct is no more than 3 m.
Note. Kitchen ventilation is provided through a window plus a gap under the entrance door with an area of 0.025 m². Passages on the sides and rear of the heat generator are made if maintenance is necessary, while in the front it is mandatory.
When installing a wall-mounted gas boiler on a wooden partition, a sheet of non-combustible material is placed under the housing:
- roofing steel 0.8-1 mm thick;
- asbestos 3 mm (unsuitable in the kitchen due to the dust generated);
- basalt cardboard;
- mineralite slabs.
The protection should exceed the dimensions of the case by 10 cm, on top - by 700 mm, which is what is done in the photo.
The distances from the mounted heater to the nearest structures or cabinets are indicated by the manufacturer in the operating instructions, as shown in the diagram. The floor heat generator is installed on a non-combustible base; the wooden floor must be protected with a sheet of metal.
The technological indentation diagram is taken from the heat generator manufacturer’s instructions
Peculiarities
Gas boilers made in Italy by Ariston are presented in a wide variety of models, however, regardless of the modification, the equipment of this brand is aimed at installing heating systems on an area of no more than 500 m2. Some boiler options only work for heating, while others are used not only to supply heat to the house, but also to supply hot water.
Speaking about the essential options for gas boilers from this manufacturer, we can highlight the following characteristics.
- The presence of a multilingual menu - this allows users to choose a language familiar to them to effectively control the operation of the boiler.
- The “auto” function makes it possible to configure the required power parameters in autonomous mode based on monitoring the actual temperature in the room, as well as inside the boiler.
- Heat and noise insulation - ensures silent operation of the equipment, and in addition helps to maintain the coolant at a given temperature for a long time even after stopping work.
- The warranty on all of our equipment is 2 years for standard boilers, and longer for condensing models - for 3 years.
- Ease and ease of use - the menu is thought out very competently, thanks to which even beginners who have not yet dealt with gas installations can effectively operate the boiler.
- A safety system that prevents breakdowns caused by power outages.
- Built-in electrified elements that maintain the operation and performance of the unit even in conditions of low water or fuel pressure.
A characteristic feature of all Ariston models is a well-thought-out and highly technological protection system, which ensures long-term and uninterrupted operation of the gas installation.
It includes:
- mechanisms for replenishing the boiler with water;
- built-in system for timely pumping out accumulated air;
- blocking the circulation pump;
- anti-scale and anti-freeze protection mechanism.
Common parameters of all Ariston models include small dimensions and the ability to supply hot water. The basic package includes: a double-type heat exchanger, a burner control module, a carbon monoxide control system, a mechanism for maintaining a normal indoor microclimate, and a device responsible for controlling the freezing of water inside the heating system.
Removing air pockets in the system
It's better to start with batteries. To remove air pockets, a Mayevsky tap is usually installed on them. We open it and wait for the water to run. Did you run? Let's close. Such manipulations must be done with each heating device separately.
How to start a boiler with your own hands photo
After the air is removed from the batteries, the pressure in the system will decrease and the pressure gauge needle will drop. At this stage of work, the solution to the question of how to start the boiler involves re-filling the system with liquid.
Now, the most difficult thing is that starting gas boilers requires bleeding air from the circulation pump. To do this, the boiler needs to be disassembled a little. We remove the front cover and look for a cylindrical object with a shiny lid in the middle, which has a slot for a screwdriver. After we have found it, we put the boiler into operation - we supply it with electrical power and set the water heating controls to the operating position.
Relieving air from the circulation pump when starting the boiler photo
The circulation pump will immediately turn on - you will hear a faint hum and loud gurgling and many incomprehensible sounds. This is fine. As long as the pump is aired, it will be so. Take a screwdriver and slowly unscrew the cap in the middle of the pump - as soon as water starts seeping out from under it, screw it back. After two or three such manipulations, the air will come out completely, the strange sounds will subside, the electric ignition will work and start working. Check the pressure again and add water to the system if necessary.
Basically, that's it. While the system is warming up, you can begin to study the instructions in detail (if, of course, you have not already done so) and start debugging the system that involves starting the boiler. Everything is simple here - the batteries closest to the boiler need to be screwed on, and the ones farther away need to be turned on to their full potential. This debugging is carried out using control valves installed on the supply connection pipe to the heating radiator.
Distinctive abilities
According to reviews of Ariston gas wall-mounted double-circuit boilers, they have 4 distinctive features that are useful for their owners:
- All models of this company are equipped with automatic protection systems.
- The presence of a water pump, which is necessary for constant circulation of water through the pipes.
- Possibility to choose a model with an expansion tank. With its help, pressure will be automatically adjusted inside the heating system.
- Ariston equips its equipment with various types of ignition. It can be automatic, which will make life much easier for the owner of a particular boiler. Otherwise, every time the unit starts, the person will need to press a special button.
Choice
Modern heating equipment can use natural gas, electricity or solid fuel. Installation of heating boilers requires compliance with special requirements for installation and operation.
Gas boilers
Heating systems with gas units are popular for use in a private home. Natural gas is an inexpensive and efficient fuel. Of course, this is only possible for those regions where there are main gas pipelines and supplying gas to the house does not cause any difficulties.
At the same time, we must not forget that gas is a highly dangerous environment due to its explosiveness. When choosing gas installations, you need to remember the following differences:
- manufacturer and price segment;
- power consumption;
- number of circuits - single-circuit and double-circuit models;
- type of installation (floor or wall);
- method of cleaning exhaust gases.
Wall-mounted gas installations are very popular - they are easy to install and small in size.
The equipment of such a unit includes a burner, expansion tank, circulation pump (one or more), pressure gauge and thermometer, heat exchanger, exhaust gas removal circuit (natural or forced). For safety, the equipment is equipped with special sensors.
Electric boilers
The main advantage of these compact boilers over units operating on other types of fuel is the complete absence of waste during operation (including the absence of combustion products). It is believed that this is the most environmentally (and aesthetically) clean type of heating in a private home. But, at the same time, perhaps the most expensive. Boilers can be installed on the floor or on the wall. Depending on the type of heating, such settings are:
The design of heating element boilers is quite simple. Several heating elements are placed in a container with distilled water or ethylene glycol-based antifreeze liquid. Depending on the set heating temperature, either all heating elements work, or only part of them. This design is very primitive and is partly considered obsolete.
The operating principle of an induction boiler is based on electromagnetic induction. To put it simply, a core is placed in a dielectric pipe, which is heated by the current of an electric coil around the pipe. The core heats the water that flows through the pipe.
The design is simple, and thanks to this, even very powerful installations are small in size.
The principle of operation of the electrode unit uses a law of physics based on the heating of water due to resistance when an electric current is passed through it. The water must have a special concentration of salts. These devices are safer than the previous two, since if water leaks from the heating tank, the unit automatically stops working.
Solid fuel boilers
Now this equipment is used to heat houses where natural gas heating is not possible. Such boilers operate on various types of solid fuel, but the main type is traditionally firewood. Heating equipment of this type is very similar to a stove, but at the same time meets all safety standards and modern quality requirements for similar installations.
The boilers have in their design a combustion chamber, a heat exchanger, a loading hopper, a chimney, nozzles, a control unit and a hot gas exhaust chamber. Installation of boilers is carried out only on the foundation. They have quite large overall dimensions and weight.
Boiler service menu
For all manipulations with switching modes, only 4 buttons are used - Plus, Minus, Ok/Menu, ESC.
It is important to understand that not all boiler menu items will be available to you; some of them will only become available when additional devices are connected to the boiler, such as external sensors or a solar collector. And most menu items are accessible only by service code, I’ll talk about this below, but for now let’s “practice on cats”
And most menu items are accessible only by service code, I’ll talk about this below, but for now let’s “practice on cats”
Our cats will have meanings that are open to free access. But first, read how to work with the menu.
Installation of solid fuel units
These units are installed in a private house in dry rooms, the dimensions of which are directly proportional to the dimensions and power of the unit. The walls of the boiler room must be plastered or covered with sheet iron. Their connection diagram implies the presence of supply and exhaust ventilation, which will provide good draft.
The boiler is installed level on a horizontal foundation covered with a layer of sheet iron. The foundation should be 10 cm larger than the base of the unit along its entire perimeter. The safety zone on the firebox side is at least 40 cm.
There are installation standards for operational safety, which are specified in the installation requirements or are freely available in open sources of information. They must be followed!
Tools and materials
To connect to the heating system you need to purchase:
- two ball valves with a coupling-fitting connection with a diameter of 50 mm;
- two bends of the same diameter;
- pressure gauge;
- safety valve;
- automatic air vent;
- two ball valves with a diameter of 15 mm;
- three steel couplings with a diameter of 50 mm;
- transitions 57 x 32 mm with a wall of 3 mm;
- bends 57 x 3.5 mm;
- chimney with gate valve;
- pipes 57 x 3.5 mm;
- heat-resistant sealant;
- plumbing winding;
- circulation pump.
Harness
The unit's piping is equipped with a safety system, which consists of a heat accumulator, a three-way valve for mixing cold water, and a thermostat. What need to do:
- place the boiler on the foundation;
- connect the heating pipes with the obligatory use of ball valves, sealing the joints with plumbing tape;
- make grounding and connect the power cable;
- install a safety system (pressure gauge, safety valve, automatic air vent);
- assemble the chimney, sealing the joints of the elbows with heat-resistant sealant;
- fill the heat exchanger with water;
- check the location of the grate, ignition valve, cleaning plug, etc.;
- Reduce the pressure in the heat exchanger to operating level;
- install the dampers in the chimney and firebox to the required position;
- carry out laying firewood.
In general, any heating equipment can be connected to a heating system with your own hands if you use the right approach and have basic knowledge and skills.
The desire to live in comfort, to enjoy the convenience of constant availability of hot water is quite understandable. The current level of technological progress can easily satisfy such a desire. There are quite a lot of convenient engineering solutions that are applicable even for a small house or one-room apartment.
The connection diagram for a double-circuit gas boiler takes into account all possibilities. You can act according to general principles or reduce fuel consumption and use a boiler for a hot water supply system or heating circuit, where it will serve as a heat accumulator.
Model operating instructions
You can also choose an Ariston boiler as a heating equipment; the operating instructions are included in the kit and must be studied by you before you start using the equipment. In it, the manufacturer discloses safety issues
For example, it is important to prevent leakage of liquid gas, as this can pose a danger to human life. If this does happen, then the heating system must be turned off.
The premises should be checked by closing all doors leading to living rooms. It is prohibited to use electrical switches.
If you smell gas, a leak could cause an explosion. Smoking is prohibited under such conditions.
It is important to eliminate the possibility of sparks and open fire. You need to immediately open the windows and turn off the gas supply
The heating system must be turned off. People should not be allowed into the danger zone.
The Ariston boiler, the operating instructions for which you must read if you have purchased such equipment, is installed taking into account the manufacturer’s recommendations. After reading them, you can find out that the device is mounted on a vertical flat surface. For ease of maintenance, minimum clearances should be ensured. No special ventilation is required in the room where the device is installed.
When connecting gas, make sure that the connections are tight. Electrical wiring should be connected in such a way as to facilitate electrical isolation of the equipment. Before applying water, flush the system without disconnecting the device. In order to remove contaminants and prevent damage to the heat exchanger, you should make sure that there are no contaminants, as they can cause build-up and corrosion.
General characteristics of Ariston boilers
The description of Ariston gas units must begin with the characteristics of their main part - the burner. This element is used to burn fuel and release thermal energy into the heating system.
Types of boiler burner:
- regular
- modulation
The modulation burner is more convenient to use. It provides automatic power control depending on the temperature of the device.
According to the type of exhaust of combustion products, burners are divided into:
- closed type
- open type
Units with a closed burner are safer to use. In this case, natural gas combustion products do not enter the room. No use required. A coaxial pipe is simply connected to the device and taken out.
The design of the coaxial pipe provides for the presence of two layers, which ensures the simultaneous removal of waste and the flow of air from the street into the burner.
Equipment with an open burner requires the use of a chimney to remove combustion products.
Correct maintenance of the device
The fact that problems have arisen in the operation of the device may be indicated by some changes in its operating mode. For example:
- increasing the time for heating water to a given temperature;
- the appearance of unusual sounds accompanying the operation of the device;
- the appearance of foreign impurities in tap water, changes in its color, smell or taste.
If at least one of these signs is observed, you should immediately clean the water heater. To do this you will have to perform the following operations:
- Disconnect the device from the power supply.
- Remove the protective cover.
- Disconnect the contacts of the electrical wires.
- Shut off the cold water supply.
- Use a hose to remove any remaining water from the tank.
- Unscrew the bolts that hold the heating element.
- Remove the heating element and descale it.
- Clean the inside of the drive from dirt and scale particles.
- Rinse the device thoroughly.
- Check the serviceability of the magnesium anode.
- If necessary, replace this element immediately.
- Wait for the cleaned tank to dry completely.
- Reinstall the heating element.
- Reassemble the device.
- Check the reliability of all fastenings.
- Connect the water heater to the power supply.
- Check for grounding.
The heating element should be removed from the tank carefully; the bolts may be too stubborn; sometimes the heating element is difficult to remove due to too much scale. The heating element is cleaned by mechanical or chemical means, as is the removal of contaminants from the tank. If a large amount of scale is found inside the device, you should consider reviewing the operating mode of the water heater.
This phenomenon is often observed when the device operates at maximum power for a long time. It is recommended to set the maximum heating temperature no higher than 60 degrees to increase the life of the device and reduce the number of breakdowns. If the body of the heating device receives an electric current, the heating element may be deformed and ruptured, or there may be a breakdown in the control system.
How to properly install a wall-mounted boiler
Before installation, unpack the heat generator and check the completeness of the device. Make sure the stock fasteners will fit your walls. For example, special fastenings are required for aerated concrete; ordinary dowels are not suitable.
We follow the following order of work:
- Mark the outline of the heating unit on the wall. Make sure that the technological distances from building structures or other surfaces are observed: 0.5 m from the ceiling, below - 0.3 m, on the sides - 0.2 m. Usually the manufacturer provides a diagram with dimensions in the operating instructions.
Technological indentations specified by the manufacturer in the boiler passport - For a turbo boiler with a closed chamber, we prepare a hole for a coaxial chimney. We drill it at a slope of 2-3° towards the street so that the resulting condensate flows out. The process of installing such a pipe is described in detail separately.
- The heat generator comes with a paper installation template with marked holes. Attach the sketch to the wall, level it using a building level, and secure the diagram with tape.
- It is better to mark the drilling points immediately. Remove the template and make holes 50–80 mm deep. Make sure that the drill does not go to the side, this happens on brick partitions.
- Install plastic plugs into the holes, screw in the hanging hooks to the maximum depth using pliers. Together with an assistant, carefully hang the device.
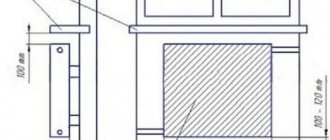
Important point. When installing a wall-mounted boiler in a wooden house, the wall should be protected from fire, these are the requirements of the standards. Between the rear panel of the unit and the combustible structure, a sheet of roofing steel is attached, protruding 100 mm beyond the body, as shown in the photo.
When marking holes in a wooden log wall, make sure that the fastening is on the crest of the log. Screw the hooks directly into the wood, without plastic plugs.
Installing a gas boiler in the kitchen - installation requirements and recommendations
- Content:
- Is it possible to install and close a gas boiler in the kitchen? Is it possible to install the boiler in the kitchen combined with the living room
- Recommended boiler types
- Is a door to the kitchen necessary when installing a boiler?
According to current SNiP, installation of a gas boiler in the kitchen is permitted. Subject to certain conditions, it is allowed to install heating equipment with a total power of up to 60 kW. General instructions and requirements are described in SP 55.13330 (SNiP 31-02-2001), SP 54.13330 (SNiP 31-01-2003).
Is it possible to install and close a gas boiler in the kitchen?
A planned kitchen renovation can be a real test for owners, especially if the apartment or house has autonomous gas heating.
SNiP strictly stipulates not only the installation of a new one, but also the replacement of an old boiler, its location in relation to plumbing units, windows, and hoods. Existing standards allow the installation of a wall-mounted or floor-standing gas boiler in the kitchen if this room is not used as a living space. In this regard, there are two popular methods for installing heating equipment:
- Installation in a special box for the boiler - this option allows you to hide the body by mounting it into kitchen furniture. It is not possible in every case to disguise a wall-mounted heating boiler placed in the kitchen by hiding it in a box, according to safety rules.
- Installation of a boiler with a decorative external panel. European manufacturers have long understood that boiler equipment, in addition to heating, must perform another important function: decorating the kitchen in which it is most often installed. The appearance of a kitchen with a gas boiler should be no worse than without it. For this reason, equipment models are produced in chrome, wood, with a beautiful snow-white panel, etc.
Although the design of a kitchen with a gas boiler on the wall or on the floor is important, the requirements and building regulations cannot be sacrificed for the sake of aesthetic value.
According to SP 55.13330, SP 54.13330, there are some restrictions that limit the free placement and decoration of heating equipment running on natural gas. You can beat a gas boiler in the kitchen with a kitchen set, but it is important to remember the need for unhindered air flow to the equipment with an open atmospheric burner. Condensing and turbo boilers do not have such restrictions.
Is it possible to place a boiler in a kitchen combined with a living room?
For installation, the requirements described in SP 55.13330, SP 54.13330 are met. In particular, the regulatory documents note:
- Gas boilers, water heaters and stoves are strictly prohibited from being installed in residential premises. The ban is related to existing sanitary and safety standards.
- The living room and bedroom are considered living rooms, the kitchen and dining room are considered non-residential premises.
- An individual heating gas boiler can be placed in the kitchen, provided that it has a window with a window, as well as a door separating the corridor.
- The kitchen-living room cannot be used for installing gas heating equipment.
Developers go to certain lengths to try to make the installation legal. In technical documentation, the term “kitchen-living room” is changed to “kitchen-dining room”. In this case, the requirements are met. Restrictions on the placement of the boiler apply exclusively to residential premises, and the kitchen and dining room are classified as non-residential rooms.
Recommended boiler types
Installing a boiler in the kitchen has its limitations not only in terms of placement, but also in the choice of heating equipment, which must be taken into account at the stage of preparatory work. There are three main types of household heating equipment, differing in operating principle, and each has its own distinctive characteristics:
- Atmospheric convection boilers with an open burner are not the best option for installation in the kitchen. During the operation of atmospheric devices, the air taken from the room is burned. This model is not suitable for a small kitchen. The minimum area of the room used for the boiler room is at least 9 m². For safety reasons, closing the atmospheric boiler is strictly prohibited. Therefore, if you decide to install convection equipment, you should choose a model with a beautiful decorative panel and appearance.
- Turbocharged boilers with a closed combustion chamber are less demanding for installation. They are connected to a coaxial chimney, through which air is taken in from the street and combustion products are removed. A turbocharged gas boiler can be hidden in the kitchen in a furniture cabinet. Recommended kitchen area is 6-8 m². The only drawback of turbocharged models is the large noise from the boiler, which is produced by the fans of the smoke exhaust system and forcing air into the combustion chamber.
- Condensing boilers are another type of heating equipment that is recommended for installation in the kitchen. During operation, a large amount of condensate is formed. It will be necessary to connect a condensate removal system, which affects the location of the boiler relative to the sewer. Condensing models are optimally suited for installation in an apartment building; they have maximum heat transfer and efficiency of up to 109%. The equipment does not burn indoor air. You can close a condensing gas boiler in the kitchen in any way: build it into furniture, make a decorative box, etc. Heat generators are designed for connection to low-temperature heating systems. Particularly effective when used together with heated floors.
Turbocharged and condensing heat generators are controlled by microprocessor automation and depend on the availability of electricity in the network.
Connection to the electrical network is made through an uninterruptible power supply. When deciding exactly how to place the boiler in a niche or in a furniture cabinet, take into account the need for additional space for related equipment.
Requirements for installing a boiler in the kitchen
The kitchen layout is carried out taking into account the requirements that apply to the installation of gas heating equipment. Current regulatory documents define:
- The presence of a door separating the kitchen and other rooms.
- Minimum requirements for window openings.
- The presence of supply and exhaust ventilation.
- Location of the socket, boiler pipes.
- Requirements for the smoke exhaust system.
The interior of a kitchen with a gas boiler on the wall or floor must strictly comply with current SNiP and sanitary standards.
If gross violations are detected, a representative of the Gas Industry has the right to turn off the gas supply and impose penalties. When installing a gas boiler, the main thing should be compliance with the rules of safe operation. Aesthetic value is of secondary importance.
Do I need a door to the kitchen when installing a gas boiler?
The requirements for installing gas heating boilers in the kitchen stipulate that the room must be fenced off from the corridor and living rooms with a door leaf.
It is strictly forbidden to replace the door with an arch. Doors in a kitchen with a gas boiler installed should not have a lower threshold for unhindered air circulation. As an alternative, it is allowed to insert a convection channel into the canvas, covered with a decorative panel.
Do you need a window in the kitchen if there is a gas boiler?
The rules for placing a gas heating boiler in the kitchen, in particular SP 54.13330, stipulate the need for a window opening with an installed window.
Strictly speaking, metal-plastic double-glazed windows with an opening window (without a window) are a violation of the norms. But usually representatives of the gas service do not pay attention to this. The window, like the convection openings in the door to the kitchen, is necessary to ensure continuous circulation of air flow. If you want to integrate a gas boiler into kitchen furniture, it is important to carefully choose the location so that it matches the direction of the circulating air. Convection holes are also made in the facade of the furniture.
Ventilation in the kitchen with a gas boiler
As practice shows, it is better to choose a boiler that can be hung on the wall. This facilitates air flow to the burner device. Even models with a closed combustion chamber, although in a smaller volume, still burn air from the room. Therefore, there are strict requirements for kitchen ventilation:
- Combining a hood for a gas boiler with a kitchen hood is prohibited by existing rules. The requirements stipulate the need for a separate channel.
- When installing a boiler in a kitchen, the diameter of the ventilation duct is calculated taking into account the performance of the heating equipment. Calculations are performed by specialists from the Ministry of Emergency Situations or a related organization. After calculating the diameter of the ventilation pipe, a report is drawn up on the compliance of the channels with the required parameters. The document is registered at the Ministry of Emergency Situations.
- The rules for installing a hood take into account the necessary air exchange in the room. According to clause 9.2, SP 54.13330, a multiplicity equal to 1 m³/hour + 100 m³/hour with the heating equipment turned on is taken into account. For atmospheric burners, double air exchange is taken into account. For heat generators with a closed combustion chamber, single.
What should the ceiling be like in the kitchen?
A ceiling made of plasterboard or fire-resistant gypsum plasterboard is ideal.
SNiP requirements allow the use of any type of non-combustible material. At the same time, the recommended height from the floor at which a gas boiler is hung in the kitchen is from 80 to 160 cm, and the minimum gap between the boiler body and the ceiling is 80 cm. According to this rule, make a suspended ceiling in the kitchen if you plan to install boiler equipment , running on gas, is not recommended. The use of plastic panels is prohibited. It is recommended to use gypsum and cement-sand plasters with subsequent painting of the surface.
Where should the boiler socket be installed?
The distance from the gas heating equipment to the outlet is specified in the operating instructions.
This requirement is controlled by Gaznadzor authorities. The electrical outlet for the boiler should be mounted no closer than 1 m. Another requirement is the correct location of the refrigerator in the kitchen, relative to gas heating appliances. The minimum distance must be at least 30 cm. The gap is necessary for servicing the boiler.
How to hide gas boiler pipes
Existing standards prohibit covering the risers of main communications with non-removable structures. In practice this means the following:
- It is prohibited to hide pipes in grooves in the kitchen. Although it is possible to achieve the commissioning of boiler equipment, at the first inspection, the inspector will issue a fine with instructions to provide free access to communications.
- The boiler and the pipes connected to it can be closed only with a decorative removable box. At the same time, it is extremely important that the communications remain in a free position and there is access to the shut-off valve. Hiding the pipes with a box of a removable structure is quite simple and does not require significant material costs.
How to remove a chimney from a kitchen for a gas boiler
In order to correctly position a gas boiler on the wall in combination with a kitchen unit, you will need to take into account the passage of the chimney.
Boiler equipment is installed as close as possible to the place where the chimney goes out onto the street. This way, you can avoid the need to drill holes in the cabinets for the passage of the chimney. The coaxial chimney is discharged through the wall. Atmospheric models are connected exclusively to a specially designed exhaust duct.
The requirements and standards stipulating the installation and placement of gas boiler equipment in the kitchen require strict compliance. To avoid mistakes, you should consult a gas service inspector.
avtonomnoeteplo.ru