close ×
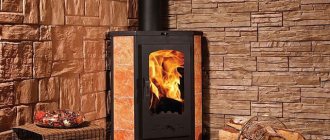
To make working in a garage or cold workshop more comfortable in winter, the owner needs to think about an energy source that can provide heat and at the same time be quite economical and easy to use. Such a heating device can be a drip-type furnace, for the operation of which ordinary waste oil is suitable. Constructing a drip-type furnace with your own hands is not difficult; the main thing is to prepare the necessary materials and know the technology.
Differences and features
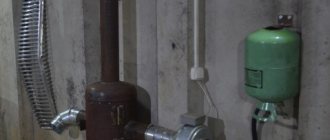
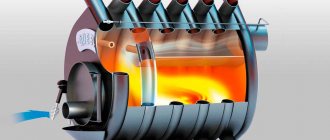
The main difference between a drip furnace and similar coolants operating on waste oil is that inside the fuel chamber there is a perforated pipe through which combustion air is supplied. The oil flows through the oil pipeline, which then drips into the combustion tank. Preheating occurs using a fuel tube installed in the afterburner. Such a stove operates either due to draft in the chimney or with the help of a fan, which increases heat transfer without increasing fuel consumption. The diagram shows how a drip furnace works:
How to light a stove
When starting the device, you need to pour a small amount of fuel into the pan. Then take a piece of foam rubber, well moistened with gasoline, solvent or white spirit, and place it directly into the oil in the pan. The foam rubber is set on fire. When the stand is already warm enough, you can turn on the fuel supply from the cylinder.
To stop the furnace, you must first close the valve on the oil cylinder, then the emergency valve. It will take a few more minutes for the fuel to burn out in the stove, after which the operation of the device will stop completely.
Read also: Why your hands started shaking
Cleaning
Combustion products are deposited on the burner, chimney and tray. Before you start cleaning the unit, you need to wait for it to cool completely. The cleaning process includes the following operations:
- From the outside, you need to throw 2-3 handfuls of small crushed stone or sand into the chimney.
- Natural building material removes soot from the canal. It is then removed from the top of the oven.
- The walls of the burner are cleaned with a metal rod (you can wear a glove and clean it with your hand). The carbon deposits are poured into the pan.
- You should take out the stand and shake out all the garbage into the trash bin.
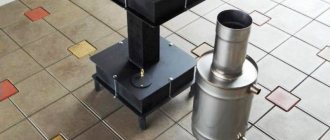
Waste oil supply
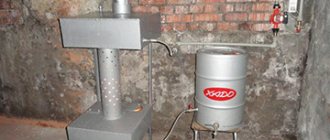
Fuel is supplied to the self-assembled drip furnace during production from an external tank using an adjustable dropper. In this case, it is used as a used freon cylinder, which must have a working needle valve.
The sequence of the process of how to make a drip for a stove is as follows:
- In the freon cylinder, in the lower compartment, a hole is made of such a size that it is convenient to pour waste into the structure from any container. If desired, a coarse mesh is placed on it. The tank must be located above the unit, so a special bracket is welded to its body. The hose is connected to the cylinder valve with a clamp.
- A hole is cut out in the housing on the mounting side of the oil tank; its diameter should correspond to a half-inch pipe for feeding waste, which will need to be fixed.
- Having cut a piece of pipe of a certain length, a thread is cut at one end, and the other is cut off under such a knot so that a stream of oil falls directly into the opening of the pan.
- The pipe is welded to the body, and the resulting seam is cleaned.
- A ball valve is screwed onto the end of the threaded tube. During the assembly process, a squeegee with an oil hose is connected to it.
Preparing the balloon
If you decide to use a gas cylinder to make an exhaust furnace, you will need to properly prepare it and cut off the lower and upper parts from it. To achieve the necessary stability, you need to weld metal legs to it, which can be made from previously cut parts. After this, you can begin constructing the camera, which, as mentioned above, should be collapsible. A hole should be made in it into which a tube will be mounted to regulate the supply of oxygen and fuel to the chamber.
A hole of the required diameter should be made in the center of the cylinder and a pipe connecting both chambers should be welded to it. The second compartment can be made either from the middle part of the cylinder or from a steel sheet. Having made the camera, it must be secured by welding. Having done this, you can install the chimney.
After the device is ready, you need to check its functionality. Please note that you should not completely fill the compartment with oil, as it will splash out of the combustion chamber. Fill in oil approximately 2/3 full. The same should be done during subsequent operation of the furnace.
Cleanable
It is definitely worth remembering that the chamber where the oil is burned must be made so that it can be disassembled during operation; this is the only way to make cleaning easier. The chimney does not need horizontal sections, since they can impair draft; in addition, there should be a minimum number of inclined sections. It is preferable to make the pipe vertical.
Types of homemade stoves in development
Engine oil contaminated with impurities will not ignite itself. Therefore, the operating principle of any oil stove is based on the thermal decomposition of fuel - pyrolysis. Simply put, to obtain heat, the waste must be heated, evaporated and burned in the furnace firebox, supplying air in excess. There are 3 types of devices where this principle is implemented in different ways:
- The simplest and most popular direct combustion design with afterburning of oil vapors in an open perforated pipe (the so-called miracle stove).
- Drip furnace using waste oil with a closed afterburner;
- Babington burner. How it works and how to make it yourself is described in detail in our other publication.
The efficiency of heating potbelly stoves is low and amounts to a maximum of 70%. Note that the heating costs indicated at the beginning of the article are calculated based on the indicators of factory heat generators with an efficiency of 85% (to get acquainted with the full picture and compare oil with firewood, you can go here). Accordingly, fuel consumption in home-made heaters is much higher - from 0.8 to 1.5 liters per hour versus 0.7 liters for diesel boilers per 100 m² of area. Take this fact into account when starting to manufacture a furnace for testing.
Main types of stoves
Exhaust furnaces are divided into two large categories, based on the type of fuel decomposition into combustible components. Now we will tell you why it is necessary to decompose waste in general. As we have already said, in its pure form it burns with the release of a minimal amount of heat, producing a huge amount of smoke and soot. Accordingly, such combustion is of little use. But if we heat fuel to a certain temperature, it will begin to disintegrate into its component fractions.
We suggest you familiarize yourself with: Steam room oven with water tank
Scheme of operation of a pyrolysis furnace using waste oil as fuel.
The resulting components mix with oxygen in the air and form a flammable mixture. It burns at higher temperatures and does not form soot. If we look at the chimney, we will see that only a small amount of light smoke comes out of it. This smoke is also dangerous, but it goes outside our premises. And the desired warmth awaits us inside.
An oil stove can operate through pyrolysis. A fire is ignited on the surface of the fuel, as a result of which it begins to evaporate, burning almost completely in a perforated pyrolysis chamber. The final combustion of all residues occurs in the afterburner. Advantages of the scheme:
- The most simple design;
- Almost complete combustion of fuel;
- Generates a large amount of heat;
- Versatility of use of the stove;
- Minimum amount of soot generated.
A homemade stove for testing, built on the basis of such a scheme, will delight you with its ease of ignition and quick access to operating mode.
The disadvantage of such a stove is that it cannot be extinguished - it goes out reluctantly, and if it goes out, it will continue to release a flammable mixture. Therefore, such heaters are charged with a strictly dosed amount of fuel.
Scheme of operation of a drip furnace operating in mining.
The drip furnace is a little more complicated - it uses a slightly different method of fuel decomposition. It falls into a special heated bowl and breaks down into components that burn with a large release of heat. Once in operating mode, the dropper furnace will burn flammable fractions at maximum high temperature - the color of the flame will change from yellow to blue-white, reminiscent of plasma. Due to this, drip furnaces received their alternative name - exhaust furnaces with a plasma bowl.
Naturally, there is no plasma in such furnaces and cannot be - this fourth state of aggregation of matter is formed at extremely high temperatures, reaching tens of thousands of degrees.
The exhaust furnaces themselves can have very different designs. Some use natural fuel supply, while others use supercharging, which increases the efficiency of fuel combustion and increases the flame temperature. They may also differ in case type. For example, in pyrolysis models, heat is released by the afterburning chamber and the pyrolysis chamber.
Security measures
- Do not use acetone, gasoline or other flammable liquids as fuel. Failure to comply with this rule may result in the device exploding.
- Remove all furniture and textiles from the stove. There should be nothing within a meter radius of the stove that could easily catch fire.
- Do not use the stove without a chimney, with closed air intakes, or leave it unattended for a long time.
You should not trust children or people who do not know how to use the unit to ignite and add fuel.
- It is not recommended to fill the stove with water to extinguish the flame.
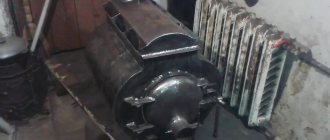
Heat exchanger assembly
I made the stove to heat the garage. I don’t have hot water heaters in my garage, so I decided it would be better to have it immediately heated and circulate the air. If you have water batteries, then you can abandon the air heat exchanger and simply run 4-5 water coils through the upper chamber, connecting them in parallel. In this case, the design must be supplemented with a circulation pump and fan. Such equipment will allow you to heat the entire house with a stove; you just need to allocate a room for installing the stove.
Heat exchanger assembly
Let's go back to my heat exchanger. I installed it between the smoke exhaust pipe and the stove burner - this is where the heat is greatest. I welded an iron plate to the heat exchanger. Thanks to it, the flame will be held better. It will also help distribute the fire inside the stove body.
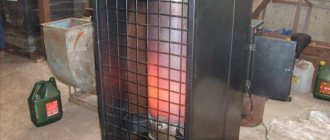
An air swirler was installed inside the heat exchanger. There are no engineering delights in such a swirler, but it copes with its task one hundred percent. When operating at maximum power, the metal of the case heats up to a scarlet color, and the heated outgoing air even penetrates the glove. You can see the swirler itself in the photo.
I'm making a swirler I'm making a swirler I'm making a swirler I'm making a swirler
Next, I took a duct fan and placed it on one side of the heat exchanger. By the way, you can connect a thermal relay to the fan for automation. This will allow you to set the temperature yourself and save resources. For example, I decided to use a thermal relay from Autonics - I just had it lying around idle. But you can also take some budget model, for example, Vemer KLIMA. I tried it too, it works great.
I supercharged it and this is what happens
Heat is concentrated in the firebox compartment.
Video: subtleties of filling a closed system
By observing caution and starting rules, you can independently cope with adding water to the old system. At the first start, checking and filling should be done by the technicians who installed the heating
If you do not have the skills, do not try to fix the leak or replace the coolant in the circuit yourself. Entrust the work to a specialist - the master will select the optimal media, a cleaning agent that will not damage the internal surfaces, and will correctly fill the system.
Drawings and assembly diagram
The manufacture of the furnace begins with the lower chamber. It is combined in the stove with a fuel tank, on the lid of which there are special holes for filling the waste and for the pipe connecting the first chamber to the second.
According to the dimensions shown in the figure, parts of the primary combustion chamber are cut out, the edges are polished and welded. The walls are made from pipe blanks.
Corners are welded to them, which will become legs, and a sheet of metal is welded to the bottom. A hole measuring 10 cm is cut in the center, and another 6 cm on the side, closer to the edge. If desired, make a removable lid - this makes it easier to clean the tank.
In a pipe 36 cm long and 10 cm in diameter, up to 50 holes with a diameter of 9 mm are drilled evenly over the entire area of the pipe so that the air flow is the same on each side.
A pipe with holes made is welded perpendicular to the tank lid. An air damper is installed on the lower tank. It is secured with a bolt or rivet. Through this hole the furnace will be ignited and the waste will be poured.
The upper tank is made in the same way as the lower one. A hole with a diameter of 10 cm is made in the plate, which is attached to the bottom of the tank, offset to one of the edges. A piece of pipe with a large diameter from the hole is welded to the hole below just enough so that it can be placed on the perforated upper combustion chamber.
Since the lid of the upper tank is exposed to high temperatures, it is recommended to make it of metal with a minimum thickness of 6mm. A hole is made in the upper part of the tank for the chimney, which is opposite to the hole in the bottom. A thick metal plate is placed between them - a cut-off device. It is inserted closer to the chimney opening.
A pipe is welded to the top cover, which is then connected to the chimney. To improve the stability of the structure, a spacer from a pipe or angle is welded. The stove can be painted with metal paint that can withstand high temperatures.
Supercharged drip furnaces
A forced-air furnace is the same heating device, only equipped with a fan. It is located closer to the second combustion chamber. Supercharging ensures uniform heating of the room.
It is difficult to assemble a drip furnace. Industrial heating devices are equipped with the same mechanism. Models of this type reduce the amount of fuel used.
Modern craftsmen have learned to combine the drip mechanism with supercharging. However, it is strongly not recommended to assemble such a unit without the appropriate skills.
Optional equipment
To achieve better heating of the garage, a drip-type furnace will need to be equipped with additional equipment. First of all, connect it to the heating system. To do this, you must first install the water heating tank. After this, connect it to the heating system. Thanks to this, the stove can be used not only for heating, but also for heating water, and, if necessary, for cooking. One of the key advantages of this oven is its compactness. It allows you to quickly dismantle it and then install it in the right place. It is also easy to transport.
Do-it-yourself oven assembly
Even after prolonged ventilation, condensation remains in the gas cylinder. To remove it, you need to remove the valve and gearbox and leave it in fresh air for several days.
Then a hole is drilled in the bottom of the cylinder. To prevent sparking, the drill is moistened with oil. Since it is not easy to make a hole in thick metal, it is better to start the work with a small diameter drill, and then it can be increased to 10–16 millimeters.
We have already examined all the features of furnaces operating on waste oil. Industrial units were also affected, including a “potbelly stove” type mining mini-furnace. All that remains is to deal with the homemade devices. We have already said that you can assemble the stove yourself using a welding machine, a set of tools and suitable iron. Let's look at this process from a practical perspective.
Next, we will tell you how to make a working furnace with your own hands. Let's start with the most difficult option - this is a homemade stove for a garage from a cylinder. The basis for its manufacture will be an old gas or oxygen cylinder, from which the condensate must be drained. The cylinders have fairly thick walls, so at the end of the work we will get a safe stove made with our own hands.
Looking at the drawing of a homemade furnace during testing, we can notice that the role of the body is played by the cylinder itself, from which the upper part is sawed off. Case height – 550 mm.
Now we will figure out how to assemble an exhaust furnace from a gas cylinder. For this we will need a welding machine, power tools and a tape measure. In addition to the cylinder, you need to prepare:
- A piece of pipe with a diameter of 110 mm (air will be supplied through it);
- A piece of pipe with a diameter of 20 mm (fuel will be supplied through it);
- Metal for welding legs;
- Metal for making a bowl.
From the upper part we make a lid through which a pipe with a diameter of 110 mm will be inserted into the cylinder, not reaching the bottom by 60 mm. We weld a cover with four holes to the bottom of this pipe (one hole in the center, its diameter is 22 mm, three more holes with a diameter of 5 mm along the radius, with a slight indentation from the middle). A pipe with a diameter of 20 mm is inserted into the hole in the middle, through which fuel is supplied.
We weld a metal bowl to the bottom of the inner pipe - diesel fuel will burn in it, heating the bowl, into which the waste will subsequently drip. The cup itself is made from a piece of pipe with a diameter of 140 mm and a piece of sheet iron, cut in the shape of a circle and welded on the bottom side. The height of the bowl is 20 mm.
By the way, during testing it is necessary to make five rows of holes with a diameter of 10 mm in the inner pipe of our furnace. The total number of holes is 35 pieces (a total of five rows of 7 pieces each). The distance between rows is 100 mm.
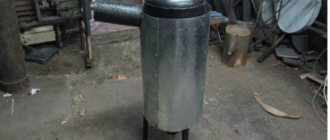
Ultimately you should end up with a design similar to this.
Next, we proceed to forming the chimney and vent. The ash pan is made at the very bottom of our stove - through it diesel fuel is poured into the bowl for ignition and heating. Also, dripping waste is ignited through it. We cut a hole for the chimney in the upper side part - weld a piece of pipe with a diameter of 110 mm into the resulting hole. Subsequently, the chimney pipe itself will need to be welded to it.
It is also recommended to make another viewing window with a lid at the top. As for the intake of atmospheric air, it is better to take it from the outside by welding a cover with a hole for the air supply to the top of the inner pipe.
To complete everything, we weld the top cover - the process of creating a waste oil furnace with your own hands can be considered complete. Now it needs to be tested in test mode - it is best to conduct experiments on the street. Pour some diesel fuel into a cup and wait until it burns out. After this, we open the exhaust valve and watch how the process of reaching the operating mode begins. Only after completing the test can you begin installing the stove in a heated room.
We invite you to familiarize yourself with: Vapor barrier for aerated concrete walls
Recommendations for safe work with the cylinder
If you are heating your garage with a do-it-yourself stove using a gas cylinder, you should follow some recommendations. This will allow you not only to speed up its production, but also to make this process safer. First of all, remember that even in a cylinder that has not been used for a long time, there may be residual gas that can explode. To avoid this, unscrew the valve and allow any gas that may be contained in it to escape. After this, fill the bottle with water. Only then can you cut it with a grinder.
Attention: Do not under any circumstances start cutting the balloon if you have not completed the steps mentioned above.
Making a drip-type oven yourself can be done quite simply and quickly. With its help, you can effectively heat your garage even in the coldest weather. In addition, thanks to its availability, you can save a lot of money. After all, the fuel for this furnace is any used type of oil, which any motorist can always find in the required volume. All this makes a drip furnace ideal for heating a garage.
List of popular stove models
Great demand for installations operating with waste creates supply on the market. The Belamos company, manufactured in Germany and Russia, can boast of good quality products. You can also highlight the following options for efficient heating:
Don't miss: How to properly heat a coal stove in a house - basic rules and features of the firebox
Emelya - exhaust heater with a power consumption of 40 W, capable of heating up to 200 sq.m.;
Heat pump NT 612 – positioned as a garage unit and suitable for small spaces;
Heat 25 – suitable for air heating with hot steam;
Master wa 33 – used for heating industrial premises;
Polarus - units from Polarus have a power adjustment function from 20 to 60 kW;
Euronord at 306 – drip design with a radial-type blower;
Typhoon is a heating device for garages, car services and workshops, thermal power ranges from 4 kW to 15 kW;
Herringbone - suitable for heating small rooms;
Thermobile at 306 – manufactured from Russia, technical or diesel fuel is used for operation;
Kronburg d15 is a convenient device at an affordable price that uses machine oil;
Multeat plus - products manufactured from Novosibirsk, are distinguished by smokeless combustion of the fuel mixture.
Some Belamos models are suitable for use in a bath; they do not emit black smoke if you follow all the rules of use. Stav products from Russia performed well. Many users learn about the features of using devices from the Thermoportal forum: stoves from various manufacturers are carefully discussed by their owners, highlighting the pros and cons.
Buleryan can be distinguished separately - the device operates in a combination of firewood and oil. To remake the model, you can arrange a door at the front of the installation to add a liquid component, and also make a reservoir. The Zhuchka stove is excellent for heating a car service center, as it is small in size and has low fuel consumption.
Ready-made installations or models made by yourself are beneficial to use: they save money, have low resource consumption and are affordable. Making the unit yourself is not difficult, and this model will last a long time.
How to do it yourself
What you will need
In order to make a stove, you can use almost any material: either sheet iron or a gas cylinder will do, you can also use an old metal barrel or a pipe with a diameter of 200 mm. The main thing is that the wall thickness is at least 3-5mm, otherwise the body may move when fired.
It is most reliable to use a gas cylinder; it has a fairly durable body that can withstand high pressure and temperature.
Materials for construction
- Gas cylinder. A liter used one will do, but with the body intact, without damage or deformation.
- Steel pipe with a diameter of 100mm, the wall must be at least 3.5mm thick. At least 2 m of it will be required, since it will be used for the production of the heat exchanger housing, burner and chimney.
- A 50mm metal equal angle corner, a little more than a meter long, will be used to make a stand, handles and other small elements.
- Steel sheet 4mm thick. It will take approximately 0.5 sq. m for the manufacture of plugs for the pallet and the bottom of the upper compartment.
- The cast iron car disk that will be inserted into the cylinder must therefore be of the appropriate diameter.
- Standard freon bottle. The used one must have a functioning needle valve - for use as a fuel reserve reservoir.
- A hose with a diameter that allows it to fit onto a 1⁄2-inch pipe will be used for the fuel supply.
- Clamps.
- Metal water pipe 0.5 m for supplying waste inside the furnace.
- Plumbing half-inch valve.
- Door hinges and fire door latch.
Scheme of operation of a drip furnace
Design features
The design of such drip-type waste oil furnaces is quite complex. Therefore, these devices are usually produced industrially. However, they are in good demand among consumers. The popularity of this type of stove is easily explained by their safety and cost-effectiveness. The last characteristic is due to the operating principle: oil is supplied in small doses, so its consumption is insignificant. In addition, such furnaces are quite inexpensive units.
The advantage of such heating devices for testing is also that they can be made independently. Both engine and transmission oil are used as fuel. A special fuel supply regulator allows you to change the temperature of the furnace. The fuel tank is located at a distance from the unit itself, which avoids heating the fuel.
An undoubted advantage of stoves is the fact that the oil in them burns out completely. This is achieved due to the instant heating, evaporation and combustion of fuel trapped in a hot pan. The process of cleaning the furnace from soot is simple. The unit ignites quite easily and stops its operation just as quickly. All operations are absolutely safe.
In the process of making a homemade stove, the following materials will be required:
- used 50L propane tank;
- a 2-meter steel pipe with a diameter of 100 mm, which will be used for the production of the burner, heat exchanger body and chimney;
- a metal corner 50 mm long, slightly more than 1 m, from which the stove stand, internal parts of the heat exchanger and door handles will be made;
- 4 mm steel sheet measuring approximately 0.5 square meters. m, from which the bottom of the upper chamber and the plugs for the pallet will be made;
- a cast iron brake disc from a passenger car, which should fit into the cylinder in diameter;
- fuel supply hose;
- a used freon container with a working needle valve for making a fuel storage tank;
- two good clamps;
- a half-inch water pipe for supplying fuel inside the heating device;
- a half-inch plumbing valve, which will additionally shut off the fuel supply;
- door hinges.
Making a furnace
Next, we will consider in detail how to make a heating device with your own hands.
Frame
You need to start by preparing the balloon. First of all, it is necessary to release the remaining gas by placing the container outside overnight with the valve open. Then you need to slowly make a hole in the bottom using a drill. This tool must be moistened with oil, otherwise sparks may occur. Next, the balloon is filled with water, which is then drained. Everything needs to be done outside, otherwise gas condensate along with water may spill, and its smell is very unpleasant, and it will not be easy to remove it later. Subsequently, the drilled hole will be useful for draining condensate.
The next step is to cut two holes in the cylinder: in the upper part for the combustion chamber with a heat exchanger, and in the lower part for the burner and pan. The volume of the top must be made such that the stove can be heated with wood, pellets and other solid fuels. The cut openings should have a 1:2 ratio in height. It is important that the distance between them is approximately 50 mm. At this stage, it is necessary to provide a small side at the top of the furnace, which will prevent slag from falling out when the door is opened. The openings must be made so that they are 30 mm away from the annular protrusions of the cylinder.
After opening the container, you need to rinse it again to get rid of the smell of condensation.
Burner and combustion chamber bottom
The lower part of the combustion cavity will be made of 4 mm thick steel sheet.
Before installing this structural element, you need to drill two holes with a diameter of 3-4 mm in it. They need to be made on the same line opposite each other and as close to the edges as possible. The bottom should be installed so that the holes are at an equal distance from the door. The purpose of these holes is also to drain condensate from the furnace, which will avoid corrosion.
A 200 mm long pipe serves as a burner. In this product, it is necessary to drill many holes in random order, which will provide free access of air. We clean the remaining burrs so that soot does not settle on them later.
The burner is welded to the bottom of the upper chamber, and the finished structure is installed inside the cylinder.
Oil pan
A cast iron brake disc from a passenger car works well as a tray for a drip furnace. Its important characteristic is high heat resistance. The purpose of such a stand is to ensure that the oil, entering the oven, quickly heats up and evaporates. And this will allow all the fuel to burn without any residue.
It is required to use a non-ventilated disk that is sized to fit the internal diameter of the case. A good option would be the rear metal part of the wheel of a Japanese car. This product is quite deep and can work for a long time without cleaning.
The bottom is welded to the lower chamber. A cover is installed on top, in which an opening is made for air intake, and the burner mating part is also mounted. The hole must be made large enough so that the oil gets directly into the stand under the bottom.
Then you need to make a coupling that will connect the burner to the pan. This is necessary to make it easier in the future to clean the device that ensures fuel combustion, remove the pan and get to the bottom of the furnace. For the coupling, a piece of 100 mm rolled metal product, cut lengthwise, is suitable.
Fuel will enter the stove through a water pipe, which should be welded into the body. It needs to be cut so that the oil falls exactly into the pan. A valve for emergency shut-off of the fuel supply and a hose are installed outside.
Chimney
The same 100mm pipe is used for this design detail. It must be welded strictly in the center of the top of the cylinder.
Heat exchanger
If you plan to use such a stove to heat a residential building with traditional water radiators, it is recommended to place several coils in the heat exchanger. You need to connect a circulation pump to them, purchased at a price approximately corresponding to the fan. A separate utility room must be allocated for the stove.
When installing an air heat exchanger, it must be placed between the burner and the chimney, where it will heat up well. To ensure stable combustion, complete combustion of the oil, as well as uniform distribution of the flame inside the stove, a metal plate must be welded to the heat exchanger. This device should also have an air swirler. This design allows the furnace to successfully cope with its tasks. If it operates at full capacity, then the middle part of the body becomes red-hot.
Waste oil tank
The fuel storage tank must be made from an empty freon cylinder. It can be easily found at scrap metal collection points or in workshops where car air conditioners are repaired. The most useful part of such a cylinder is the needle valve, with which you can regulate the fuel supply with great precision.
Doors
It is important that there is a hole in the bottom flap that allows air to flow freely to the burner and pan. The other door must provide a good seal, so stop plates must be provided in the opening.
A lock must be installed on the top door to ensure secure closure. This is important, because when it gets very hot, the body will certainly “lead,” and therefore, without such an element, the sash will not be able to ensure proper tightness.
At the bottom of the stove you need to install a metal stand, which will simplify maintenance of the unit and reduce heat loss to the floor.
Materials
To assemble a drip furnace with your own hands, you need to prepare:
- used 50-liter gas cylinder with a whole body;
- a two-meter metal pipe with a diameter of 100 millimeters with a wall thickness of at least 3.5 millimeters;
- for the heat exchanger and other small parts - the remains of an equal-flange metal corner with a thickness of 40–50 millimeters;
- a sheet of 4 mm steel or its trim of the required size;
- cast iron brake disc from a car, can be used;
- a regular-sized freon bottle with a needle valve;
- half-meter half-inch metal pipe;
- a hose of the required size, which is suitable for attaching to a ½-inch pipe and clamps;
- half-inch ball valve;
- door hinges and fire door latch.
In addition, pipes of a certain cross-section and a duct fan are needed to assemble an air heat exchanger. You can use a corrugated pipe or components for the chimney. To ensure a high-quality result, you should use drawings of a stove from a gas cylinder during testing.
Ignition and operation
Lighting up a cold furnace at work is not an easy task. Oil vapors only burn when heated. Therefore, you have to ignite it with the help of other flammable liquids - gasoline, alcohol. They are poured in a thin layer on top of the oil in the pan and set on fire.
When burning, they heat the upper layer of waste, the oil begins to evaporate, and the furnace starts in operating mode. After this, open the valve on the oil supply hose and adjust its flow into the furnace. To stop the furnace, simply close the valve. The fuel supply will stop and as soon as the oil in the pan burns out, the stove will go out.
Cleaning the stove from soot and soot is done using metal brushes or small gravel, throwing it into the chimney. Passing along the walls of the chimney, the gravel knocks off the soot, and it falls inside the combustion chamber. Open the door and sweep away the soot with a brush. Then they take out the pan, clean out sediment and fallen soot, gravel and other contaminants from it.
With proper operation and compliance with fire safety, a gas cylinder stove can serve for many years. It is not recommended to install it in a residential area due to the unpleasant odor that accompanies the combustion of waste, but you can install it in a boiler room and connect the water circuit. In this case, a drip-type stove can be used to heat a private house.
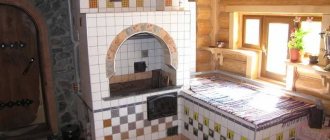
Design
The furnace usually consists of a cylindrical body or has a rectangular shape.
There is a combustion chamber inside. In its lower part there is a container for waste oil and an air suction hole. When heated, the oil begins to evaporate, and its vapors mix with the air in the chamber. This mixture rises under the influence of convection up the firebox, where it burns, releasing a large amount of thermal energy.
An air or water heat exchanger can be built into the upper part of the housing, this will allow you to heat the entire area of the room more completely and evenly or install a hot water supply circuit. Drip supply is carried out through a metal tube connected to the oil evaporator. The other end of the tube is brought out and connected to the tank using a flexible hose.
At the top of the stove there is a smoke pipe connected to the chimney. The temperature at the top of the stove, even if equipped with a heat exchanger, is high, so the chimney must be installed in strict compliance with fire safety regulations.
It is not recommended to make an open drip feed oven! Oil may ignite!
Drawings of a furnace in operation with drip irrigation are shown in the figure.