The decision to use a homemade liquid fuel stove may be prompted by the availability of shareware testing.
This is especially true in car service centers.
But many go further than simply installing a small burner in the home.
An exhaust furnace with a water circuit can become the main heating device in centers where there are several separated rooms - for customer service and technical ones.
How to bring an idea to life and what to consider when creating it, as well as the choice of design and correct installation. More about all this.
Features of the furnace during mining
Boiler furnaces for waste are most often installed in places where there is an abundance of used engine oil: in garages, car service centers, and on farms with their own fleet of vehicles. The process of recycling used oil is not easy, since it cannot be poured into the ground or sewer. Using it as fuel can solve the problem.
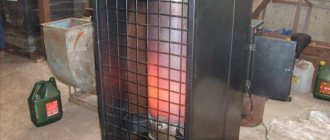
If you install an ordinary potbelly stove for this purpose, it will warm up the air quite quickly, but as soon as the burning of the fuel stops, it will immediately become cold. Therefore, it is impossible to stably heat a garage or workshop in this way. If you make an exhaust furnace with a water jacket, the energy efficiency of the heating unit will increase significantly.
Oven burner
In conclusion, let us recall one more method of fairly effective drip combustion of waste. This is a water-oil burner. These were once widely used by builders and road workers to heat up bitumen boilers, but now they have practically fallen out of use because the water-oil burner itself is bad: it is gluttonous and produces a lot of smoke. However, if it is attached to the combustion door of any furnace (air enters through the ash pan), then the oil vapor will burn out perfectly in the hot combustion chamber and the water-oil drip furnace will show very good efficiency.
The design of a water-oil burner is simple: fuel and water are dripped simultaneously into a hot bowl over which there is an air flow. Drops of water explode like on a hot frying pan and spray oil into the mist. Fuel vapor flows through the socket through the air flow (furnace draft or pressurization) into the furnace firebox, where it burns. The difficulty in this case is the need to configure 2 drops, fuel and water, but the design of a water-oil burner is simpler than any of the stoves described above, except for the wick. But its efficiency in combination with a potbelly stove is no worse than that of stoves with a flame bowl. How to make a water-oil burner for a stove with your own hands, see the final video:
Below you can share your thoughts and results with our readers and regular visitors.
You can also ask questions to the author*, he will try to answer them.
How the oven works and works
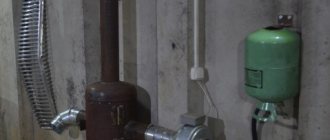
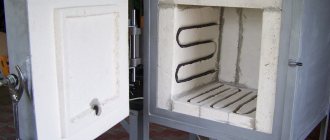
The design of an exhaust furnace with a water circuit is not complicated: two chambers that are connected by a perforated metal pipe. The lower chamber is equipped with a special container where the fuel (working off) is located. It can enter the waste oil boiler with a water circuit automatically or manually. Light the stove using a small amount of gasoline, which is poured onto the oil on top. The gasoline begins to burn, the oil underneath it heats up and begins to boil. Oil vapor enriched with oxygen in the perforated pipe begins to actively burn in the pipe and the upper chamber. At the same time, in the lower chamber the temperature is 350 degrees, and in the top it reaches 900.
If the stove has a manual fuel supply, the fuel flow and ignition in the lower chamber occurs through a special hole at the bottom of the chamber. With an automated fuel system, a pipe leads into the chamber, which is connected to a container filled with used oil.
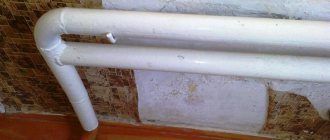
The lower chamber must be additionally equipped with a special hole with a damper so that the draft and combustion temperature can be controlled. To organize a water circuit, a tank is installed above the upper chamber or around the chimney duct with fittings welded to it for the supply and exit of coolant.
Important. To control the temperature and pressure of the coolant, you need to install a pressure gauge and thermometer on the heating unit.
Burner device
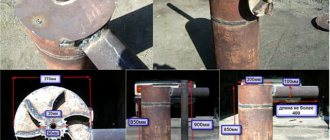
Pipe with a diameter of 100 mm with a wall thickness of 4 mm and a length of 200 mm (1). Holes with a diameter of 18-20 mm (2) are drilled in the lower part. All burrs on the inside of the pipe are carefully removed. If they are not removed, soot and soot settling on them will narrow the internal diameter of the burner.
The membrane separator is put on the pipe and welded exactly in the middle (3). Then it is installed inside the stove and welded to the inside of the cylinder around the entire perimeter (4). It is advisable to weld a separator at the bottom of the partition; this will create a sufficient height of the side so that in the absence of waste oil it is possible to switch to solid fuel pellets.
The advantages of such a stove, and what disadvantages need to be taken into account
Waste oil furnaces with a water circuit come to the rescue in many cases and have their own advantages:
- This is a universal heating unit that is ideal for utility rooms, greenhouses, home workshops, garages;
- construction of a furnace is inexpensive (it can be assembled from scrap metal);
- warms up the room very quickly in any frost;
- compact design;
- can be adapted for heating and cooking;
- allows waste to be disposed of.
But there are also disadvantages that need to be kept in mind when operating the stove:
- requires regular cleaning of the chimney and combustion chambers, as during operation it is intensively covered with soot;
- it operates “loudly” and produces a hum when the fuel is actively burning;
- you need containers and a place to store used oil (it will freeze outside at sub-zero temperatures);
- the furnace is a fire hazard, since the body heats up to very high temperatures and the requirements for installation and operation must be strictly observed.
But all these disadvantages are not significant compared to fuel savings, especially if used engine oil is obtained free of charge. If all requirements are met, the stove will serve for a long time and safely.
Oil furnaces with a water circuit can have any configuration and size, it depends on what materials the home craftsman has at his disposal, and on what power the unit plans to obtain.
Work specifics
The hot water boiler is located at the top of the stove. It is non-removable and has taps for drawing water into the bathhouse and for starting the heating circuit. The steam room is heated from a brick wall facing inside. To maximize its effect, it is necessary to make the distance from the stove to the brick box quite small to reduce heat loss, but also sufficient for air penetration. Essentially, you need to build a structure reminiscent of a long-burning brick furnace with your own hands, only the combustion chamber is replaced by a metal furnace during mining. In this case, the creation of a powerful separate foundation will not be required, which greatly facilitates the process of building a bathhouse.
There is another option for making a structure using mining, combined with a brick kiln. Only the lower reservoir is manufactured. The combustion chamber has the shape of an elbow, smoothly bent at 90°. A vertical plate is welded to the end, which communicates with the internal (furnace) part of a conventional brick oven. The hot gases generated during the combustion of waste enter the brick stove and heat it.
The further design is no different from the usual one: a water boiler is installed, a heating circuit with natural or forced circulation, shut-off valves, and so on are connected. This compact option is optimal for those who already have a ready-made furnace and only want to adapt it for burning waste.
Brick stoves with a ready-made water circuit are more stable heat sources that maintain temperature for a long time, which is important when winter cold sets in.
What are the fuel requirements?
Any oil that has exhausted its service life is suitable as fuel: industrial, transmission and motor oil.
There are certain requirements and precautions that you need to be aware of before you start operating the unit:
- the mining should not contain impurities, even minor ones, as this may cause an explosion of the heating unit;
- A fire can be caused by ordinary water getting into the oil, which boils much faster than oil, and the splashes can ignite.
Important. Before pouring waste into the fuel container, it must be filtered. It is prohibited to use other flammable liquids as fuel. Gasoline for ignition is taken in very small quantities.
Fuel supply system
We insert a ½ inch water pipe (1) (with a reserve) into the hole at an angle (30 - 40o), weld it to the stove body. The location of drilling the hole does not play a special role, since the evaporator bowl is made mobile and can be turned with the receiving hole in any direction.
We lower the coupling onto the end of the pipe and mark the outreach distance (2), cut it with a grinder, forming a “spout” for more convenient formation of a stream of oil (3).
A regular water ball valve (4) is screwed to the tube, which will be used as an emergency backup to shut off the fuel supply in the event of a failure of the valve on the exhaust tank.
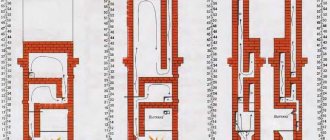
What stoves can you build yourself using drawings?
A waste oil stove with a water circuit can have a different design:
- The stove is round in shape, welded from steel sheet. The fuel tank is combined with the combustion chamber. The afterburning chamber is a perforated pipe and an upper chamber equipped with a dividing partition that cuts the flame. A hole is cut in the lid of the lower chamber into which the waste is poured, and air will also flow there. The principle is this: the wider the damper is open, the better the oil will burn.
- Two barrel oven. In one (bottom) there is a fuel tank, there is a hole for loading it. The upper combustion chamber consists of a pipe that passes through an upper barrel filled with water. It has fittings for supplying coolant water. Externally, the model is very similar to a samovar. Its body gets quite hot, so you need to handle the stove with care. Such a “samovar” is installed only in those rooms where accidental contact with the body of people or animals is excluded. This design has a big advantage: the large tank acts as a heat accumulator.
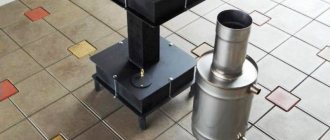
- Compact mini-oven made of square profiled pipes 18x18 cm and 10x10 cm. Simple in design, it is very easy and quick to assemble. You can cook food on it.
- A practical model of an exhaust boiler with a water circuit from a gas cylinder with a cut off upper part. Here you can provide an automated feed of mining. The oil line is located in the combustion chamber. The water circuit has the form of a boiler, through which a chimney channel is passed. Or it could be a copper heat exchanger coil that is used to wrap the furnace body.
Sizes may vary. But the location of the main nodes is unchanged.
What to assemble a stove from
To assemble such a stove, I prepared the following:
- 50 liter gas cylinder;
- steel pipe. It is best to use a pipe with a diameter of 10 cm. Two meters of the product was enough for the body, burner and chimney;
- steel corner. In total, it took me a little more than a meter of 5 cm corner. From it I made a stand for the stove, various internal parts of the heat exchanger and door handles;
- sheet of steel. About 50 cm2 of 4 mm sheet was used for the plugs and the bottom of the upper chamber;
- brake disk. I used a cast iron disk from a machine. The main thing is that it fits freely into the cylinder;
- empty freon bottle. A standard bottle will do. The main thing is that the needle valve works. I used it to make a fuel tank;
- a piece of fuel supply hose;
- a pair of clamps;
- a piece of half-inch pipe. Oil will be supplied to the stove through it;
- half-inch valve;
- loops.
How to make a waste oil stove: step-by-step instructions
The most common furnace model used for mining is made from pipe sections with a diameter of 352 mm and steel sheets 4 mm and 6 mm thick. You need to prepare a small piece of thick-walled pipe with a diameter of 100 mm and a metal steel corner for supports. This model can cope with heating an area of 80 square meters. meters.
Tools you will need for work:
- welding equipment;
- grinder with a circle for cutting metals and a grinding disc;
- drill;
- roulette.
You also need to purchase heat-resistant paint and solvent.
Stages of manufacturing a stove for mining with a water circuit according to the drawings:
- The necessary parts are cut out, and burrs are removed from the cut areas;
- The lower tank is welded from a pipe 115 mm high and 344 mm in diameter. The bottom is made of steel sheet. The legs can be welded from a metal corner or from pipe scraps.
- A pipe section with a diameter of 100 mm and a height of 360 mm is perforated.
- The lid of the lower tank is assembled together by welding: a pipe with a diameter of 352 mm, a height of 60 mm, a lid with two holes and a perforated pipe. The damper is secured to the air supply hole with rivets.
- Parts of the upper compartment are welded from a pipe with a diameter of 352 mm and a height of 100 mm. The bottom is welded from a steel sheet, in which there is a hole for a perforated pipe.
- Weld a chimney pipe with a diameter of 100 mm and a height of 130 mm. On the inside of the lid, closer to the chimney, a partition made of steel sheet is attached.
- The upper chamber is welded to the lid on which the chimney is installed. The upper chamber is connected to a perforated pipe. You can strengthen the structure by tightening it with an iron rod.
- The upper compartment of the boiler is tightly placed on the lower one.
- In order to increase the service life of the unit, it is painted with heat-resistant silicone paint. Before applying paint, the metal is cleaned of rust, and the seams after welding are cleaned of scale.
- Install the stove and connect it to the chimney duct.
Important. The chimney pipe of a welded stove for mining with a water circuit must be straight, at least four meters long and without bends.
Using the same principle, you can make a rectangular oven.
What is good about a brick oven with a water boiler?
How can you not enjoy the sounds of peacefully crackling logs in a bathhouse?
And what if, besides, there was an original wicker firewood basket nearby, with logs lying comfortably in it? Modern wickerwork used for these purposes is made from wicker, birch bark and even metal. Woven into a trough shape, they allow firewood to be neatly stacked and beautifully complement the design of the sauna. This is not only an aesthetic pleasure, it is also “natural” warmth, heat and a unique aroma. How to save firewood, since it takes a lot of it to kindle? Every year the popularity of standard or Russian stoves with water heating boilers is growing. A brick kiln with a water circuit is characterized by good heat transfer, reliability and high efficiency. This design will be effective both in a small and in a bath room with an area of up to 100 sq.m.
It is not too difficult to make such a design, the main thing is to take into account all the features and recommendations. For example, the pipe must not only be thick-walled, but also seamless, the welding seam must match the thickness of the pipe walls, and the feed is welded only to the edge of the upper thick pipe. The oven is laid out with ordinary and refractory bricks; for masonry, ordinary and refractory mortar are used. Such bath heating will be reliable, durable and comfortable.
Pellet stoves are an economical and convenient device that allows you to save on fuel. Pellet units operate on special compressed pellets made from wood shavings, which are easily combustible. The main advantage of the work is that the pellet burner is able to burn fuel as efficiently as possible thanks to unique supply algorithms, as well as the flow of air, which helps regulate combustion.
A wood burning stove with a water circuit is efficient and reliable. Such designs make it possible to heat large rooms, even at low outside temperatures. Their advantage is an environmentally friendly combustion process and good efficiency. In the process of their work, they produce process water at high temperatures, which is also used. At the same time, fuel costs are minimal, and the heating rate of the room is fast. The stove looks like a steel firebox with a wall thickness of 4-6 mm. The heat exchanger tubes are located between the walls.
Each of the described options is a universal solution for heating a bathhouse or other country house. Having decided to purchase a stove of a certain type, you need not only to study the options for modern models offered by manufacturers, but also to think through everything thoroughly and take into account the parameters of the actual room where it will be installed, its area, and functional features.
Connecting the water circuit to the furnace
The water circuit is connected to the upper chamber. You can weld a water container directly to the surface of the furnace, but it is better to make a separate structure so that when the bottom burns out, water does not get into the combustion chamber. This will cause the oil to splash and ignite.
The tank can be made to any size. For maximum heating, it should fit tightly to the upper chamber and the chimney. Fittings for the coolant supply and return are welded to the tank.
Be sure to attach a thermometer and pressure gauge. The pump and expansion tank are installed on the return line, closer to the boiler.
Case manufacturing
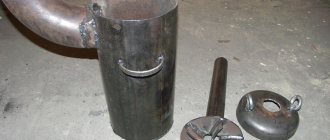
I will make a stove from this cylinder.
I used a used cylinder. There was no more gas in it, but just in case, I opened the valve and left the cylinder outside overnight.
Then I carefully and slowly drilled a hole into the bottom of the cylinder. To prevent sparks from appearing, I pre-moistened the drill with oil
Hole
Then I filled the bottle with water and drained it - this removed the remaining gas. Work carefully, try not to spill gas condensate, as... It stinks very strongly and for a very long time.
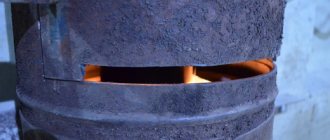
Then I cut out a couple of openings. In the upper opening I will make a combustion chamber and install a heat exchanger, in the lower opening there will be a burner with a tray. The chamber at the top is specially made so large that, if necessary, it can be heated with wood, pressed briquettes, etc.
Shown how to cut a balloon
Shown how to cut a balloon
Shown how I cut a balloon Shown how I cut a balloon In the end, this is what happened
Then I once again washed the opened gas cylinder from gas condensate.
Fire safety requirements
During testing, the furnace becomes hot and becomes a fire hazard, so you must comply with the requirements for its installation and operation:
- The floor surface must be fireproof. Concrete, ceramic tile, and metal surfaces are allowed. The wooden floor near the stove is covered with metal.
- If the wall next to which the stove is located is made of wood or other non-fire-resistant material, then it must be covered with an asbestos sheet.
- Do not allow drafts in the room where the stove is installed. Flames from a perforated pipe can spread to surrounding objects.
- Storing any flammable materials near the stove is prohibited.
- Mining reserves are stored in another room.
- Do not add fuel while the stove is operating.
- You should keep powder or salt fire extinguishers in a convenient place indoors.
Important. Burning used oil must not be extinguished with water. The fire will only get worse.
A waste stove is an economical and convenient heating unit, which, with proper operation and installation of the water circuit, will significantly improve the indoor microclimate and will be an indispensable source of heat in a garage or workshop.
Basic rules of operation and maintenance
To protect yourself when using a homemade stove, and also to extend the life of the structure, you must adhere to some rules:
- it is prohibited to fill the lower compartment with liquid fuel more than 66 percent;
- to ignite, you must first ignite the paper sheet and then lower it into the lower tank;
- the required operating mode is set by adjusting a special damper;
- during operation it is not allowed to use other types of liquid fuel, the design is intended exclusively for testing;
- Do not leave a lit stove unattended for a long period of time;
- Attaching the structure to the walls of the building and using high stands should be avoided;
- It is prohibited to place the oven directly under shelves or other objects that may fall;
- Do not keep flammable substances in close proximity to the heating device;
- the room in which the stove will be operated must have good ventilation;
- Water should not get into the oil, otherwise it will foam and slowly splash out;
- contacting surfaces of the room must be made of non-combustible materials;
- cleaning the internal parts of the structure is allowed in any convenient way;
- There is no need to add fuel after ignition; the poured portion of waste should burn out completely.
You should stick to approximately these sizes
The structure must be cleaned regularly
Heater design and drawings
Craftsmen engaged in the manufacture of waste oil boilers use in practice 3 methods of burning waste:
- surface combustion with pyrolysis afterburning in a perforated pipe and secondary chamber;
- the use of Babington burners and other homemade structures;
- combustion in a flame bowl, fuel supply is organized by the drip method, air is forced.
Methods of burning waste oils in homemade heaters - pyrolysis combustion, flame bowl, Babington burner device
The first option is implemented in the famous garage stove, consisting of 2 chambers connected by a vertical perforated pipe. We described the second method in detail in the corresponding publication - a Babington burner is made and built inside the body of a steel boiler that previously operated on wood.
We propose to focus on the third option - a dropper stove, converting it into a double-turn (the correct name is two-pass) water boiler. The drawing below shows the basic version of this stove, made from a Ø219 mm pipe. Why it is recommended for beginners to take the drip principle of operation of the heating unit as a basis:
- The design of oil burners is quite complex. Assembly requires some experience and financial investment (for example, for Babington you will have to buy a compressor).
- Surface combustion heaters are fire hazardous (they shoot out flames when water gets into the fuel). Equipping a miracle stove with a water jacket is not an easy task.
- Fuel consumption during surface combustion is prohibitively high - up to 2 liters of waste per hour.
- According to reviews on the forums, the drippers are reliable and can work without automation (however, the owner will have to devote some time to the boiler to get used to manual control). The unit is relatively simple to manufacture.
Dripper stove - a prototype of a two-pass hot water boiler for burning liquid fuels
Liquid fuel boiler diagram
The dropper diagram shown in the drawing needs to be redone, since together with the fire tube heat exchanger the structure will not fit inside the gas cylinder - you will have to look for a large pipe with a diameter of 400 mm. The dimensions of the heat generator can be reduced without loss of power (15-20 kW) as follows:
- make an afterburner from a DN40 pipe, changing the number and diameter of the holes (more precisely indicated in the drawing);
- for the combustion chamber, take a DN150 pipe;
- weld a water jacket from two propane gas cylinders;
- heat exchanger – at least 8 flame tubes Ø32 mm;
- bowl size - according to the combustion chamber (DN150);
- height from the edge of the afterburner to the bottom of the bowl is 6.5-7 cm.
How a double-turn boiler operating on waste oil works is shown in the drawing. The difference from a simple dripper lies in the fire-tube heat exchanger located between the walls of the combustion chamber and the outer casing. Accordingly, the chimney pipe moved to the lower zone of the housing.
Operating principle of the unit
This section is intended for beginners who have not previously had to deal with heating equipment using liquid fuel - waste or diesel fuel. The boiler shown in the drawing operates according to the following scheme:
- Used automobile oil flows through a tube running inside the afterburner. Feeding method: by gravity or using a pump.
- Air is forced into the combustion zone by an electric fan.
- Drops of oil falling to the bottom of a hot bowl evaporate and immediately ignite. Afterburning of rising oil vapors occurs opposite all the holes drilled in the central pipe.
- The heat released from the flame is directly transferred to the water jacket of the boiler. Hot flue gases, displaced by air from the fan, pass through the flame tubes, give off some of the heat and fly out into the chimney.
Depending on the quality of the fuel and the operating mode, the heat generator is cleaned once every 3-7 days. The bulk of the soot accumulates in the bowl, which is easily removed through a special hatch. One of the masters will tell you how a drip boiler made with waste oil, made by yourself, functions in the next video:
We make a heat generator from a cylinder
First of all, prepare the gas cylinders for welding - remove the spherical parts (don't forget to fill them with water first!) and cut one vessel to size so that together they form a body of the required height (1 m).
Prepare the remaining materials, taking into account the following recommendations:
- It is better to make the combustion chamber and flame bowl from stainless steel with a thickness of 1.5-3 mm (for example, grade 12X18H12T);
- if you couldn’t find stainless steel, use black steel grade St3 - St20 from 4 mm thick;
- Also select a stainless steel waste oil supply tube;
- wall thickness of flame tubes – at least 3.5 mm;
- to seal the top cover, select a 40 x 4 mm steel strip (rim) and an asbestos cord;
- prepare 3 mm sheet metal for the manufacture of an inspection hatch;
- For the heat exchanger, use pipes with a wall thickness of at least 4 mm.
The manufacturing process of a two-pass boiler during testing looks like this:
- Cut the Ø32 mm flame tubes to size and weld the heat exchanger using one cylinder as the outer casing and a Ø150 mm tube as the walls of the combustion chamber.
- Attach the water heating system supply pipes to the heat exchanger.
- In the second cylinder, cut holes for the inspection hatch and chimney pipe. Weld a Ø114 mm fitting and make a neck with a cover from sheet steel.
- Weld both tanks into one body. Make a shell of iron strip on top - it will serve as a seal for the lid. Fill the gap between the edges with asbestos cord.
- Make an afterburner in accordance with the drawing. Make holes in the hemispherical cover (formerly the end of the cylinder) for the viewing window and installation of the afterburner (in the center).
- Equip the lid with handles and a shutter on the window. The afterburner pipe can be tightly welded to it or screwed with bolts sealed with asbestos cord.
At the bottom end, the perforated pipe is closed with a plug, where 4 holes are made - one in the middle, the remaining three - radially. An oil pipeline tube is inserted into the central hole and scalded. The last step is to make a flame bowl of the boiler where the waste oil will burn.
Upon completion of assembly, weld an elbow with a flange to the afterburner pipe and install the “snail”. To prevent the outer metal wall of the water jacket from wasting heat in vain and heating the boiler room, insulate the body from non-flammable basalt wool. The simplest way is to wrap the insulation with twine and then wrap it in thin sheet painted metal.
The manufacturing process of an oil-fuel boiler is demonstrated more clearly in the following video:
Operating principle of a potbelly stove
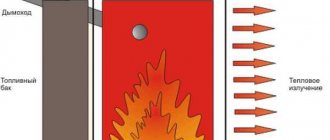
The operation of a potbelly stove is based on the phenomenon of pyrolysis. Such a furnace, where the fuel is waste oil, has 2 main compartments: a tank and a combustion chamber, located at different levels. The first is intended for pouring waste and burning it.
In another compartment, located above, combustion products of waste mixed with air are burned. At the first stage, the temperature is relatively moderate, and at the second stage it is much higher - up to 800⁰.
When making such a stove, the main task is to ensure that air flows into both compartments. It enters the first chamber through an opening designed for loading liquid fuel. The hole is equipped with a special damper, through which the volume of air supply is regulated.
Despite the fact that the design of the stove is very simple, increased demands are placed on the chimney of a potbelly stove. To effectively remove combustion products, you need to prepare a straight pipe with a diameter of more than 10 cm and a length of more than 400 cm. Bends and horizontal sections are extremely undesirable. In addition to its intended purpose, the pipe also serves as a residual heat exchanger
Air access to the second tank is provided by holes with a diameter of about 9 mm. The efficiency of a properly assembled potbelly stove reaches 90%. Visually, different potbelly stoves may differ from each other in both shape and size, but the principle of operation is the same.
The power of a potbelly stove is proportional to the volume of the lower tank. The larger it is, the less often you will have to add mining. Sometimes this container is made very massive, holding about 30 liters of used oil.
Improving the simple design of the stove during development made it possible to invent a unit for arranging a garage, in which it would be pleasant to wash your hands with hot water, or a small private bathhouse:
Image gallery
Photo from
Enlarged afterburning chamber
Lower chamber in the form of a drawer
Convenient scheme for pouring waste
Practical hot water tank
Algorithm for the operation of a homemade stove
By their structure, oil stoves can be classified as pyrolysis. Petroleum products, nitrogen-carbon chains begin to disintegrate into elementary compounds. After this, further cooling occurs and decomposition into harmless elements - water and nitrogen gas. That is, in a small room, a potbelly stove using waste oil with your own hands does not harm your health. There is no need to install an additional purification filter.
If you make the calculations correctly and draw up a basic drawing, then the combustion products will completely disappear and you won’t even have to clean them.
In total, the design includes three main parts:
- The chamber in which combustion of the fuel mass occurs;
- Pyrolysis gas combustion element;
- Part of afterburning and cooling.
The lower part of the tank is a container with a flat bottom. This is where the oil is poured and boils when it reaches operating temperature. The evaporation process begins. Fuel does not enter the second chamber due to the turbulent process. That is, the simple design is self-regulating and does not require adjustment. In addition, the working Coriolis force creates a vortex flow.
To maintain the combustion process, an oil stove requires a constant supply of oxygen. Air enters through the installed damper. Depending on its location, the combustion strength and the intensity of fuel breakdown are regulated. If you close it completely, the equipment will begin to fade out.
After swirling into a vortex, the gases begin to move through the second chamber. The specificity of the process is that they are constantly moving and must mix with oxygen. To do this, many holes are drilled in the tube. It must be done on an ongoing basis. Due to the high speed of gas movement, it does not penetrate outside.
At the combustion site there is a sharp increase in temperature - almost up to a thousand degrees. It is important that in this case harmful oxides are formed that threaten health, so the oven must be cleaned periodically during do-it-yourself mining.
The last camera plays two roles at once. First of all, it is intended for final combustion of gas. In addition, it regulates the temperature jump. It is this that causes the breakdown of harmful oxidizing substances into harmless nitrogen, water vapor and soot. To be sure of safety, it is better to use proven drawings, diagrams and instructions.
What is mining
Waste oil is petroleum products obtained as a result of the operation of internal combustion engines. With constant heating and mixing with air, it begins to gradually change its properties and eventually becomes unusable.
Such a liquid contains a large amount of soot impurities, oxidation products, resins and salts. It needs to be drained so that the motor continues to function properly.
Draining oil into the soil is not recommended. There will be acute contamination of the soil with a whole galaxy of harmful substances. Therefore, it is convenient to use it to create a waste oil stove.
Flaws
Many people install a furnace for working with their own hands in garages. Low fuel consumption, safety and lightness are attractive. But you don’t need to assemble a unit for yourself until you know the shortcomings.
- Open flame. In fact, high temperatures within four walls are very dangerous. If you do not want to get a sudden fire, it is advisable to remove all petroleum products or collect them in a separate corner. In addition, organic solvents and alcohol-containing liquids should be kept away.
- Metal body. Since the flame is in direct contact with the metal body, it heats up. And temperatures around 900 degrees Celsius can cause inconvenience, in the form of 3rd degree burns. Since the second chamber is demanding on air, it is not possible to line it with asbestos or mineral wool.
- Difficult to control. Even when the damper is completely closed, air will still flow into the system for some time. Therefore, you will have to expect the fuel to burn out, albeit slowly.
- Requirements for safety precautions. If you are used to powder fire extinguishers, you will have to change it. The powder immediately explodes as soon as it comes into contact with hot metal. In case of fire, only use a carbon dioxide fire extinguisher.
How to avoid shortcomings
The most dangerous part of the entire structure is the tank, which can lead to an explosion. The safest way to solve deficiencies is considered to be the complete elimination of this part. Now in industrial production there are special models of boilers that run on fuel oil. When assembling a furnace for mining, you can use burners designed to work with pyrolysis gases. Some models combine a chamber and afterburning at once.
You can make a simple burner from a metal bowl. Steel with a high melting point is best. A dropper is connected to it, through which oil flows. When hit, it immediately boils.
Despite the low safety and good results, they do not burn the waste to the end. Here, use an additional pipe to mix the pyrolysis with oxygen.
Always follow the drawings. Having little idea about the design of heating devices, take drawings from the Internet. Experienced designers have already drawn up many diagrams for assembly.
Manufacturing the main part of the boiler
It consists of a housing with a water jacket, an air supply channel and a tube through which the waste flows. At the bottom of the structure with a water circuit there is a door for removing the bowl, as well as for igniting the oil steam.
Making the base of a boiler for heating a house includes the following steps:
- Cutting two holes in a pipe with a diameter of 60 cm. The first, square, is made at the bottom, the second, round, is made not far from the top. As for the sizes, the bottom hole can have any size (the main thing is that the hand can fit and be able to pull out the bowl). The diameter of the top can be 14 cm.
- Welding to the cut holes of the necks. Their thickness should reach 5 cm.
- Welding a ring with a width of 3 cm to the bottom of the pipe. The ring (shell) is put on the end of the structure so that the planes of the two parts intersect at right angles.
- Preparing the outer pipe. Its length should be 0.5 cm less than the height of the inner part. The resulting gap will be closed with a weld. Holes are cut out in this pipe for the chimney, door, and coolant supply and return pipes. The last two are done at the top and bottom.
- Putting the outer pipe on the made structure and welding the two parts.
- Welding another ring. It is installed at the top, closing the space between the pipes.
- Welding of pipes for supply and return of water.
- Plug one of the pipes and check the tightness of the water circuit.
- Cutting 2 circles from sheet metal. The diameter of both is 66 cm. In one circle you need to make a hole for the air supply pipe. Hole diameter – 13 cm.
- Welding circles and the completed structure.
- Making a channel for air supply. This channel should be a tube with a diameter of 6-8 cm. The length of the tube can be 10-15 cm greater than the height of the structure made. One hole must be made in it. It should be at a distance of 50-60 cm from one end.
- Making a channel for oil supply. It will be placed inside the air supply pipe. To make it, take two pieces of tube with a diameter of 1 cm (the length of one is 45-50 cm, the second is 6-8 cm) and weld them so that the angle formed between them reaches 130-150 °.
- Installing the oil supply tube into the air supply channel. The principle of operation is for the short end of the tube to fit into the hole in the outer tube. The internal structure is centered in the external one and welded to it. It is desirable that the lower ends of both elements are at the same level.
- Placing the air duct into the boiler with your own hands and welding it to the top of the structure. It should be placed so that there is 25-30 cm between the lower end of the air supply channel and the bottom of the boiler for heating the house.
- Placing a bowl in a pipe boiler.
- Door fixation.
Date: September 25, 2022
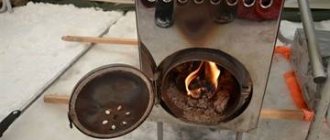
Making a pallet for mining
The tray was made from a cast iron automobile brake disc. Cast iron has good heat resistance, so I decided to use it.
I will make a pallet from this disk
I welded the bottom underneath.
The steel circle is the bottom
Welded the bottom
I welded the lid on top. In it you can see the counterpart of the burner and the opening. Air enters the stove through the opening. I made it wide - it's better that way. With a narrow opening, the air draft may not be strong enough, which is why the oil will not be able to get into the pan.
Next I made a coupling. In my stove it connects the pan and the burner. With a coupling it will be much easier to maintain the stove. If necessary, I can take out the tray and clean the burner from below.
Next I made a couplingCoupling
I put the clutch in place
I put the clutch in place
The coupling was made from a 10-centimeter pipe, simply cutting it along the longitudinal edge. I did not weld the opening in the coupling - there is no need for this.
Making boilers with your own hands
The manufacture of boilers must begin with accurate calculations of technical parameters, required dimensions and materials used.
In order for the boiler to work efficiently and with maximum efficiency, its manufacture by hand should be done only after all the necessary drawings are ready, indicating the exact dimensions and parameters of all elements. A detailed diagram of the design of the stove and the bathhouse must also be drawn up to ensure reliable operation and safety of its heating. Most often, metal sheets are used for this design, but these can be gas cylinders, steel barrels, etc. Making a boiler with your own hands must take into account safety standards and be carried out in compliance with the exact dimensions indicated in the drawing.
The boiler must be completely sealed so that the integrity of the equipment is maintained as much as possible and safety requirements are met. The device can be installed anywhere where heating and hot water are required. Often boilers are installed as a reserve for use only in severe frosts.
A modern waste heating boiler must be equipped with a protection unit against oil overflow and boiling and a pump for pumping waste. A self-made sauna boiler will be practical and reliable only if all these recommendations were taken into account when creating it.
The waste can be poured into the boiler directly during combustion, but to avoid a fire, you must carefully ensure that the fuel level in the tank is lower than in the stove itself. It is recommended to clean such a boiler once a week, while a gas installation does not need cleaning.