Heating utility rooms, service stations, greenhouses and workshops is a pressing problem for many.
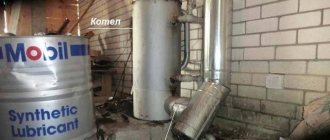
Boiler under development
It is not always possible to gasify these premises, and heating with electric appliances is very ineffective. An exhaust boiler with a water circuit is an excellent solution that allows you to use resources economically and efficiently.
In this article we will look at the principle of operation, the design of the boiler during testing and tell you how to build this unit with your own hands.
The main advantage of such a boiler is its fuel efficiency, because sometimes you can even get it for free. Many car services and workshops provide recycled oil on condition of pickup.
Arrangement of doors
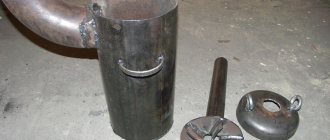
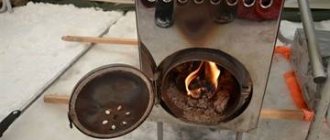
The stove is almost ready. The finishing touches remain. I cut an opening in the door of the lower chamber through which air can freely flow to the pan and the stove burner.
Gap
The opening in the upper door was equipped with thrust plates for additional sealing.
Riveted the thrust plates
I assembled a simple lock for the top door. During the heating process, the stove body “leads”. To ensure that the combustion chamber remains airtight, the top door must close as securely as possible. That's why I made the castle.
Simple castle
I screwed several pieces of metal corner to the wall.
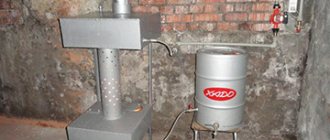
I installed the stove on the screwed corner. This is both convenient (if necessary, it will be much easier to carry out an inspection) and functional (heat loss into the ground is reduced).
Installed the stove
How to weld a simple stove
Then the heat is released in greater quantities into the room, rather than being “thrown out” to the street.
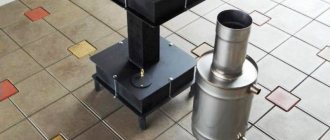
Another upgrade is to make an iron drawer. Oil is poured into it. With this design, the stove is easier to maintain. The drawing contains all the necessary dimensions. Before assembling a homemade oil stove, it is necessary to select the correct diameter of the firebox and body. Here everything depends on the volume of the room that needs to be heated. If it is a garage of 3 by 6 meters, take a profile of 80x80x4 mm. The fuel box is made of metal 60x60x4. It is more difficult to work with round rolled metal.
The step-by-step instructions look like this:
- Cut the metal according to the drawings to make a casing, drawer, afterburner. If the latter has a bend, the tube is cut at an angle of 45 degrees.
- For a profile of a smaller standard size, one wall is cut out with a grinder. Plugs are welded to the sides. The result is an open container to which you need to attach a handle.
- The structure is welded. It is necessary to drill an air hole at the top of the fuel chamber. The pipe is perforated. At this point the work is completed.
It should be taken into account that you need to calculate the number and diameter of holes in the afterburner. If you use a profile of 80 by 80 mm, then the cross-sectional area will be equal to 6400 square millimeters. This value is divided in two
Pay attention to the markings of the drill used. If it is 8 mm, then the hole area will be 50 sq. mm
Now 3200 must be divided by 50. The result is that 64 holes will be required to work effectively. However, as a result of customization, their number can be increased.
It is important that the chimney is of sufficient length. The elevation of the chimney outlet must be at least 5 meters
Then the operation of the stove during testing will ensure the highest possible efficiency even without supercharging. Otherwise, the pipe will have to be extended to this mark. But you can further increase productivity if you organize an inclined chimney running along the wall. The heated metal will release heat into the room. Only in this case is it important to follow fire safety rules. There should be no wooden shelves above the pipe, and no wallpaper on the walls. Even better is to cover the wall with a metal sheet.
Making a drip heater
Professionals who have assembled more than one “dripper” use old propane cylinders with a diameter of 200 mm. Oxygen ones are also suitable, since their cross section is 220 mm. the latter benefit due to thick walls. They serve for a long time, do not burn out, and accumulate heat. Pipe C-10 is also suitable if it has a wall thickness of 5 mm. An excellent option for a durable housing is pipes made of heat-resistant stainless steel alloys, alloyed chromium, molybdenum or nickel (for example, 15X1MF or 12X18H12T) with a wall no more than 3 mm. However, it is not advisable to specifically purchase this raw material due to its high cost.
Technologically, the manufacturing process is as follows:
- A flame bowl is made using a piece of pipe or ready-made steel containers. This one is pulled out through a rubber hatch, so it is not made too big.
- The openings necessary for connecting the chimney pipe and the cleaning service hatch are cut out in the body. The latter is framed and closed with a door. Bolts can be used for fastening.
- An afterburner is being made. All holes are not made at once. Usually the bottom 2-3 rows are drilled, and the rest are drilled during the setup process. If you do everything at once and there are too many of them, you will have to make a new one.
- Weld the cover with the air duct and flange. The latter is necessary for installing the fan. The fuel supply device is connected. Photo and video instructions will help here.
Now assemble all the components and connect the electrical wiring. The structure will be more stable if you make a metal frame. A heavy metal profile is suitable for this.
Assembling a homemade heating device
The boiler can be made in various shapes depending on the wishes of the owner. As a rule, it is made round and rectangular.
In order to begin assembly, you should prepare the necessary materials and tools for the work. Their standard list looks like this:
- steel sheets whose thickness is more than 4 mm;
- air duct pipe;
- pieces of reinforcement (4 pcs.);
- pump and compressor;
- expansion tank;
- welding tools;
- asbestos sheet.
Since the boiler can be of different configurations, instead of the main material, you can use improvised means, for example, a cylinder or a thick-walled pipe of sufficiently large diameter.
Manufacturing of the boiler body
To assemble the boiler body, you first need to take a pipe of the largest diameter and cut it on both sides to obtain a cylinder, the length of which should be no more than 1 m. The same cylindrical shape is made from a pipe of a smaller cross-section, but 20 cm high.
After that, holes are cut out in the plates, in which the diameter of one should be equal to 20 cm, and the second - in accordance with the dimensions of the chimney. Then a cylinder of larger diameter is welded on both sides with pre-prepared plates so that a 20-centimeter hole is made from the bottom.
A cylinder of smaller diameter is built into it and welded. The bottom of the pipe should also be covered with a plate and fixed by welding. Then reinforcement legs are attached to the body, and ventilation holes are also drilled. After that, a chimney is installed on top of the cylindrical device, and a door is cut out in the lower part using a grinder.
This housing has the simplest configuration, but even a water circuit can be connected to it. To do this, a fuel supply container, a pump and an air compressor are additionally connected. At the same time, a circuit is also drawn to ensure water circulation.
Burner installation
To ensure uniform heating of the water in the boiler for a device with a dual-circuit system, it is necessary to install a reliable burner.
A ready-made burner can be purchased in a store or ordered from a specialist, but you can also make it yourself using a specific scheme.
Preparing the site for installing the system and exhausting the chimney
The assembled parts of a heating device operating during mining are usually installed in the corner of the building. Since the boiler heats up very quickly, the floor and walls should be prepared for this.
In the place where the system will stand, it is necessary to make a concrete screed or cover it with ceramic tiles. The walls adjacent to the device should not be made of flammable materials.
After the housing of the heating system is fixed in the selected location, it is necessary to begin installing the chimney. As a rule, it is made at least 4 m long.
In the section of the ceiling covering where the pipe goes outside, a heat-resistant casing is installed, the function of which can be performed by several layers of asbestos. To ensure draft regulation, the chimney is equipped with a metal damper.
How to connect the water circuit?
DIY waste oil boiler drawings.
In order to install a water circuit on a structure operating in mining with your own hands, you will first need to install a pipeline and batteries, which are connected to each other and fixed around the perimeter of the room along the walls. Then you need to select a water container and securely attach it to the boiler body using bolts or welding.
A hole is cut out of the top of the container and a pipe is welded to supply heated liquid to the system. Another pipe is attached to the bottom of the circuit so that the cooled water returns to the boiler.
Do-it-yourself heating system is a convenient and simple design not only during installation, but also during use. By installing this equipment, you can spend more time in the garage, even in severe frosts.
What is good about a brick oven with a water boiler?
How can you not enjoy the sounds of peacefully crackling logs in a bathhouse? And what if, besides, there was an original wicker firewood basket nearby, with logs lying comfortably in it? Modern wickerwork used for these purposes is made from wicker, birch bark and even metal. Woven into a trough shape, they allow firewood to be neatly stacked and beautifully complement the design of the sauna.
This is not only an aesthetic pleasure, it is also “natural” warmth, heat and a unique aroma. How to save firewood, since it takes a lot of it to kindle? Every year the popularity of standard or Russian stoves with water heating boilers is growing. A brick kiln with a water circuit is characterized by good heat transfer, reliability and high efficiency. This design will be effective both in a small and in a bath room with an area of up to 100 sq.m.
It is not too difficult to make such a design, the main thing is to take into account all the features and recommendations. For example, the pipe must not only be thick-walled, but also seamless, the welding seam must match the thickness of the pipe walls, and the feed is welded only to the edge of the upper thick pipe. The oven is laid out with ordinary and refractory bricks; for masonry, ordinary and refractory mortar are used. Such bath heating will be reliable, durable and comfortable.
Pellet stoves are an economical and convenient device that allows you to save on fuel. Pellet units operate on special compressed pellets made from wood shavings, which are easily combustible. The main advantage of the work is that the pellet burner is able to burn fuel as efficiently as possible thanks to unique supply algorithms, as well as the flow of air, which helps regulate combustion.
A wood burning stove with a water circuit is efficient and reliable. Such designs make it possible to heat large rooms, even at low outside temperatures. Their advantage is an environmentally friendly combustion process and good efficiency. In the process of their work, they produce process water at high temperatures, which is also used. At the same time, fuel costs are minimal, and the heating rate of the room is fast. The stove looks like a steel firebox with a wall thickness of 4-6 mm. The heat exchanger tubes are located between the walls.
Each of the described options is a universal solution for heating a bathhouse or other country house. Having decided to purchase a stove of a certain type, you need not only to study the options for modern models offered by manufacturers, but also to think through everything thoroughly and take into account the parameters of the actual room where it will be installed, its area, and functional features.
Advice from the master!
Making a product yourself must take into account all the necessary requirements and recommendations for its safe operation. And only then will the waste oil stove not only fulfill its main function - heating the room, but will also harmoniously complement the sophisticated style of any home or bathhouse.
https://youtube.com/watch?v=oyWnB-cS1M8
Do-it-yourself boiler assembly for testing
It includes the following steps.
- We divide the body into two parts, making a “shirt” at the top. We make a sealed partition between the two chambers. You will need to connect the return wiring of the heating system to the lower part; in the upper part we attach a pipe for pumping hot water.
- We pass the pipe through a sealed partition. This pipe will act as a second combustion chamber and chimney. The inside of the pipe is carefully insulated from water, so welding is done with circumferential seams on the outside of the pipe. We make cuts in the lower part of the pipe to form an air-oil mixture.
- We weld the lower end with the lid of the primary combustion chamber in a separate cylinder. This cylinder must be removable. There is also a burner there.
- In the lower part of the housing we pass through a fitting connected by hoses to the burner nozzles.
- We equip the primary combustion chamber of the mining with a door. Through this door it will be possible to clean the burner and the chamber itself.
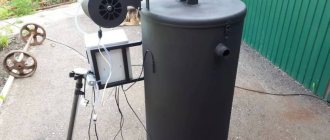
- We assemble the structure. We fill the “jacket” of the upper part of the boiler with water. Pour oil into the lower part of the combustion chambers, turn on the pump and spark plug. Our working boiler is not only made by hand, but also works!
Installation of boiler and chimney
The oil heating boiler is placed in a pre-selected location at a certain distance from flammable elements. If desired, you can arrange a concrete platform with a protective edge, which will ensure safety during fuel overflow. It is advisable to mount the automation unit on the wall. Equipment must be easily accessible.
Wires and oil hoses are insulated so that there is no direct contact with the hot boiler. Thermal sensors are mounted on the side of the tube, and the waste container is placed within 1.5 meters from the heated surface of the structure.
When installing a chimney, the following rules are observed:
- the diameter corresponds to the pipe outlet;
- metal pipe thickness not less than 0.5 mm;
- no more than three turns;
- height not less than 5 meters.
The chimney should rise above the roof.
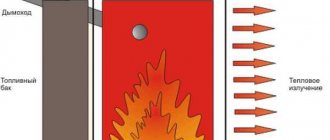
Principle of operation
By the way, how does it all work? After all, if you pour used oil into a regular furnace, it will all end in a fire!
In many ways, the principle of operation of the described devices is similar to that of the familiar blowtorch. The oven is made of two containers, which communicate thanks to a pipe for air supply.
In this case, the oil itself is poured into the lower compartment. There it heats up and begins to evaporate. These vapors enter the air exchange pipe, where they ignite. The burning oil-air mixture passes into the second tank (afterburner). There it finally burns out, and all the remaining gases and metal particles (of which there are many in oil) go down the chimney.
Installation Tips
Installing a boiler that uses waste oil is practically no different from installing other types of heaters. There is one advantage: thanks to the presence of turbocharging and smokeless combustion of liquid fuel, the chimney does not have to be raised by 6-7 meters. It is enough to remove the chimney head from the wind pressure zone and raise it to a height of 4 m.
Regarding proper installation, we will give the following recommendations:
- The boiler and steel chimneys not protected by insulation are located at a distance of 0.5 m from combustible walls and other elements of a wooden house. The minimum distance from fireproof structures is 100 mm.
- Pass through the outer wall and the entire outer section of the flue with an insulated pipe - a sandwich, otherwise there will be a lot of condensation and soot. The chimney installation technology is described in detail in a separate material.
- Be sure to install a safety group on the heating supply line.
- Organize a good exhaust hood in the furnace to remove odors. Combustion air intake can be provided from the street.
- Equip the supercharger with a speed regulator and the oil line with a valve. This will allow you to control the power of the heat generator manually. Do not confuse the control valve with a regular tap; shut-off valves are installed on pipelines in any case.
- Make a primitive automatic emergency stop - install a thermostat on the supply, turn off the fan and the oil pump in case of overheating of the coolant.
First start
To do this you need:
- Move the valve on the evaporation chamber and check the flow of fuel into it.
- Start the fan and make sure that it effectively disperses air throughout the combustion chamber. The quickest way to verify this is by the flow of cold air from the chimney.
- Turn on the supply and check the air supply using the valve at the outlet of the combustion chamber.
If all components are functioning normally, all that remains is to check the boiler assembly itself. To do this, you need to start feeding the mining and light the burner from the lit paper. If after an hour the room becomes warm, the boiler is working properly and you can use it constantly.
Possible problems during operation
It is possible that you may encounter problems during the first launch. Possible malfunctions and their causes are listed below:
- The boiler is working properly, but the heating is weak. Increasing the temperature to warm the fuel will solve the problem. This will be confirmed by quickly accumulated soot.
- The room is stuffy and lacks air. The problem is poor sealing - waste fuel boilers burn oxygen from the surrounding space.
- The burner goes out quickly. It is necessary to inspect the filters and change them if clogged, because... poorly refined used oil quickly clogs the burner with soot even before it has time to heat up.
Heater design and drawings
Craftsmen engaged in the manufacture of waste oil boilers use in practice 3 methods of burning waste:
- surface combustion with pyrolysis afterburning in a perforated pipe and secondary chamber;
- the use of Babington burners and other homemade structures;
- combustion in a flame bowl, fuel supply is organized by the drip method, air is forced.
Methods of burning waste oils in homemade heaters - pyrolysis combustion, flame bowl, Babington burner device
The first option is implemented in the famous garage stove, consisting of 2 chambers connected by a vertical perforated pipe. We described the second method in detail in the corresponding publication - a Babington burner is made and built inside the body of a steel boiler that previously operated on wood.
We propose to focus on the third option - a dropper stove, converting it into a double-turn (the correct name is two-pass) water boiler. The drawing below shows the basic version of this stove, made from a Ø219 mm pipe. Why it is recommended for beginners to take the drip principle of operation of the heating unit as a basis:
- The design of oil burners is quite complex. Assembly requires some experience and financial investment (for example, for Babington you will have to buy a compressor).
- Surface combustion heaters are fire hazardous (they shoot out flames when water gets into the fuel). Equipping a miracle stove with a water jacket is not an easy task.
- Fuel consumption during surface combustion is prohibitively high - up to 2 liters of waste per hour.
- According to reviews on the forums, the drippers are reliable and can work without automation (however, the owner will have to devote some time to the boiler to get used to manual control). The unit is relatively simple to manufacture.
Dripper stove - a prototype of a two-pass hot water boiler for burning liquid fuels
Liquid fuel boiler diagram
The dropper diagram shown in the drawing needs to be redone, since together with the fire tube heat exchanger the structure will not fit inside the gas cylinder - you will have to look for a large pipe with a diameter of 400 mm. The dimensions of the heat generator can be reduced without loss of power (15-20 kW) as follows:
- make an afterburner from a DN40 pipe, changing the number and diameter of the holes (more precisely indicated in the drawing);
- for the combustion chamber, take a DN150 pipe;
- weld a water jacket from two propane gas cylinders;
- heat exchanger – at least 8 flame tubes Ø32 mm;
- bowl size - according to the combustion chamber (DN150);
- height from the edge of the afterburner to the bottom of the bowl is 6.5-7 cm.
How a double-turn boiler operating on waste oil works is shown in the drawing. The difference from a simple dripper lies in the fire-tube heat exchanger located between the walls of the combustion chamber and the outer casing. Accordingly, the chimney pipe moved to the lower zone of the housing.
Operating principle of the unit
This section is intended for beginners who have not previously had to deal with heating equipment using liquid fuel - waste or diesel fuel. The boiler shown in the drawing operates according to the following scheme:
- Used automobile oil flows through a tube running inside the afterburner. Feeding method: by gravity or using a pump.
- Air is forced into the combustion zone by an electric fan.
- Drops of oil falling to the bottom of a hot bowl evaporate and immediately ignite. Afterburning of rising oil vapors occurs opposite all holes drilled in the central pipe. Diagram of combustion of waste oil in the boiler and movement of flue gases through a fire tube heat exchanger
- The heat released from the flame is directly transferred to the water jacket of the boiler. Hot flue gases, displaced by air from the fan, pass through the flame tubes, give off some of the heat and fly out into the chimney.
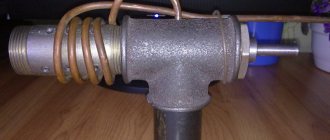
Heat exchanger assembly
I made the stove to heat the garage. I don’t have hot water heaters in my garage, so I decided it would be better to have it immediately heated and circulate the air. If you have water batteries, then you can abandon the air heat exchanger and simply run 4-5 water coils through the upper chamber, connecting them in parallel. In this case, the design must be supplemented with a circulation pump and fan. Such equipment will allow you to heat the entire house with a stove; you just need to allocate a room for installing the stove.
Heat exchanger assembly
Let's go back to my heat exchanger. I installed it between the smoke exhaust pipe and the stove burner - this is where the heat is greatest. I welded an iron plate to the heat exchanger. Thanks to it, the flame will be held better. It will also help distribute the fire inside the stove body.
An air swirler was installed inside the heat exchanger. There are no engineering delights in such a swirler, but it copes with its task one hundred percent. When operating at maximum power, the metal of the case heats up to a scarlet color, and the heated outgoing air even penetrates the glove. You can see the swirler itself in the photo.
I'm making a swirl I'm making a swirl I'm making a swirl
Installed a swirler
Next, I took a duct fan and placed it on one side of the heat exchanger. By the way, you can connect a thermal relay to the fan for automation. This will allow you to set the temperature yourself and save resources. For example, I decided to use a thermal relay from Autonics - I just had it lying around idle. But you can also take some budget model, for example, Vemer KLIMA. I tried it too, it works great.
Supercharged
This is what happens
Heat is concentrated in the firebox compartment.
We make a heat generator from a cylinder
First of all, prepare the gas cylinders for welding - remove the spherical parts (don't forget to fill them with water first!) and cut one vessel to size so that together they form a body of the required height (1 m).
We turn out the valve with a pipe wrench and a wrench. If it doesn’t work, then file it and carefully beat it with a hammer.
Prepare the remaining materials, taking into account the following recommendations:
Options for manufacturing bowls installed on the bottom of the heating unit
Advice. As a supercharger, craftsmen usually use the “snail” of the VAZ 2108 cabin heater, but this is not a panacea. Take any similar fan - its performance will still have to be adjusted in order to increase or decrease the boiler power.
The manufacturing process of a two-pass boiler during testing looks like this:
- Cut the Ø32 mm flame tubes to size and weld the heat exchanger using one cylinder as the outer casing and a Ø150 mm tube as the walls of the combustion chamber.
- Attach the water heating system supply pipes to the heat exchanger.
- In the second cylinder, cut holes for the inspection hatch and chimney pipe. Weld a Ø114 mm fitting and make a neck with a cover from sheet steel.
- Weld both tanks into one body. Make a shell of iron strip on top - it will serve as a seal for the lid. Fill the gap between the edges with asbestos cord.
- Make an afterburner in accordance with the drawing. Make holes in the hemispherical cover (formerly the end of the cylinder) for the viewing window and installation of the afterburner (in the center).
- Equip the lid with handles and a shutter on the window. The afterburner pipe can be tightly welded to it or screwed with bolts sealed with asbestos cord.
At the bottom end, the perforated pipe is closed with a plug, where 4 holes are made - one in the middle, the remaining three - radially. An oil pipeline tube is inserted into the central hole and scalded. The last step is to make a flame bowl of the boiler where the waste oil will burn.
The lower (end) part of the afterburner with 3 holes Ø4 mm
Recommendation. If you want to make an exhaust boiler installation with a water circuit that provides hot water supply, do not rush to push the coil inside the heat exchanger. There is a simpler solution: weld 2 additional pipes to the water jacket and connect them to the indirect heating tank through a circulation pump. The second option is to install a samovar-type heat exchanger on the chimney.
Upon completion of assembly, weld an elbow with a flange to the afterburner pipe and install the “snail”. To prevent the outer metal wall of the water jacket from wasting heat in vain and heating the boiler room, insulate the body from non-flammable basalt wool. The simplest way is to wrap the insulation with twine and then wrap it in thin sheet painted metal.
The outer casing of the heat generator can be made rectangular
The manufacturing process of an oil-fuel boiler is demonstrated more clearly in the following video:
The principle of operation of a homemade stove during testing
My working stove works on a very simple principle. Ignition is in progress. The fuel begins to burn on the surface of the body and heats up the stove. As the process progresses, oil vapors are removed through the chimney under the influence of draft.
The stove design includes a part of the chimney with many holes (usually up to 50). This part of the unit is called the burner. In such a burner, oil vapors are mixed with oxygen entering the smoke exhaust pipe under the influence of draft. As a result of their mixing, the combustion process begins to be much cleaner and more intense, releasing a huge amount of heat.
The principle of operation of a homemade stove during testing
Double-circuit boilers
Oil double-circuit heating allows, in addition to heat, to provide residential/non-residential premises with hot water supply. The flat surface of the tank filled with water is heated and the pressure in the line is regulated using a pump. The temperature of the supplied liquid practically does not change, so dilution with cold water is necessary.
In exhaust heating systems, it is recommended to use tanks with a volume of no more than 140 liters. The boiler heats up in a short period of time, on average 2 hours depending on the size of the reservoir.
Furnace manufacturing procedure
Let’s say right away that it is advisable to adhere to the above dimensions as accurately as possible, since all of them are calculated from considerations of the greatest efficiency of the device and the maximum degree of fuel combustion.
- A mining tank is made, for which a bottom made of steel sheet is welded to a piece of 344 mm pipe. The legs are immediately welded to the “pan”.
- A lid for the tank is being made. A hole with a diameter of 60 mm is made in it, which simultaneously serves to fill the mining and to regulate the draft during operation of the furnace, so the hole is equipped with a gate. Through it, ignition will also be carried out using rolled paper, wood chips, etc.
- A combustion chamber is made, for which 48 holes of 9 mm in diameter are evenly drilled in a long 100 mm pipe. The chamber is welded to the lid of the oil reservoir.
- The afterburner chamber is made from a 352 mm pipe. Don’t forget to weld the partition; the reason for its necessity was described above.
- Weld the structure to the perforated combustion chamber.
steam heating
Installation
A key requirement when installing waste oil boilers is compliance with fire safety standards. It is prohibited to use them without an equipped chimney. To protect ceilings from overheating, special covers are used. It is necessary to provide a special damper, with which you can block the draft and avoid excessive penetration of cold in the event of a boiler shutdown. Both factory-made and home-made structures consume oxygen abundantly, so care should be taken to ventilate the boiler room.
It is recommended to install boilers on a stone base or on top of heat-resistant tiles. Sheathing with wooden and plastic elements is prohibited; only painting with heat-resistant paints and varnishes is permissible. Since used oil will have to be continuously refilled, it is worth preparing access routes to the boiler in advance. Considering the high heating of the equipment, it is not advisable to place it where there are easily flammable or damaged items. Of course, the heating device should not create any obstacles to the movement of people.
Sometimes a concrete platform is created under the boiler, which is equipped with a shallow side. This is a passive safety element in case of a fuel spill. The concrete mass must be poured strictly according to the level to eliminate mistakes. The best location for the automatic control unit is on the wall. But you cannot place it on top of the lid of the boiler itself, otherwise the microcircuits will overheat and fail.
Hoses through which oil is pumped, as well as electrical wires, must be removed from the surface of the boilers. What will happen even if they touch briefly is not difficult to guess. The thermal sensor is installed inside the tube located on the side of the boiler. The reservoir into which used oil is poured is placed no closer than 70 and no further than 150 cm from the heater. The oil pump adapts to the neck of the barrels used.
The diameters of the chimneys are selected equal to the outlet from the boiler, although sometimes they can be larger. You should not make chimneys higher than 5 m, this almost inevitably causes instability during combustion. It will not be possible to provide full fuel combustion power. It is recommended to nail down a steel sheet before firing. A box of sand in the room where the boiler is placed will also not hurt.
The minimum diameter of the chimney is 11 cm, narrowing is not allowed. It is recommended to make horizontal fragments only when it is impossible to do otherwise. When a smoke duct is passed through a wall, it must be pierced at a strictly 45 degree angle. The remaining fire and explosion safety requirements are the same as for a coal or wood stove. If you can reduce the number of welds, you should do so.
Do-it-yourself production of boilers for testing
The ability to make boilers using waste oil with your own hands is one of the main advantages of this type of heating equipment.
Boiler components undergoing testing. Click to enlarge.
Simplicity and low cost of production, as well as subsequent operation, characterize homemade boilers and heating systems used during development.
At home, you can make homemade boilers that work on mining, with a power of 5-15 kilowatts.
Such a power reserve will be enough to heat a room of up to 50 square meters to 80°C. The time spent on warming up will not exceed 1.5 hours.
Before proceeding with the process of assembling and subsequent installation of a boiler operating on waste oil, it is necessary to prepare the following parts, tools and equipment: circulation pump, oil supply pump, air compressor, special burner, boiler, expansion tank, sections of pipes intended for devices for supply and return lines, or ready-made assembled lines, welding equipment.
Dimensions of boiler parts for self-production. Click to enlarge.
The evaporation chamber can be made from a piece of durable, thick-walled pipe that can withstand heating up to 400°C. In the central part of this chamber there is a small tube into which air is supplied, forced by a fan.
Oil vapors are enriched by the influx of air masses and burn in the working chamber of the boiler. During the combustion process, the coolant circulating through the pipe lines is heated.
Ignition of the boiler
For the initial ignition of the boiler, it is necessary to use about 100 grams of flammable liquid (kerosene, diesel fuel, special liquid), which should be poured into the combustion chamber.
A wick made of paper is dipped on one side into a flammable liquid. After this, the wick is ignited and lowered to the bottom of the chamber through the top cover or ash pan.
This operation must be performed with the boost fan turned on. The consequence of the rapid combustion of the flammable liquid will be the boiling of the oil and heating of the boiler and reaching operating mode.
Heating boilers operating on oil waste or during production require only periodic addition of oil during further operation as it burns.
Some recommendations from experts
- It is strictly prohibited to store fuels and lubricants in the immediate vicinity of the boiler.
- It is imperative that the heated room be equipped with a chimney designed for reliable and efficient removal of combustion products (smoke and burning).
- It is necessary to protect the contact points of the chimney with the wooden floor and ceiling using protective casings made of heat-resistant material, such as asbestos.
- It is necessary to use a special control valve designed for the required operation of the entire traction system. In winter, the damper performs the function of regulating cold air flows; in summer, it organizes the circulation of air masses.
- Premises in which heating boilers using waste machine oil are operated must be equipped with effective air ventilation systems.
This requirement is dictated not only by the need to ensure a constant flow of fresh air for the normal functioning of open-type burner devices, but also eliminates the danger of carbon monoxide accumulation in a heated room.
Afterword
Compliance with fairly simple requirements for the manufacture, installation and further operation of the boiler allows you to fearlessly use this type of heating equipment for heating industrial, utility and even residential premises.
When operating mining boilers, you should always be aware of the potential danger of this type of boiler equipment.
By the way, this requirement applies to all types of heating boilers, which include a heating boiler operating on waste engine oil.
Advantages and disadvantages
The main advantages of an oil boiler include:
- Autonomy. An oil heating system does not require a gas supply.
- Reliability. A simple, understandable design with proper and careful operation rarely requires repair. The main thing is to carry out maintenance in a timely manner and change worn parts.
- Benefit, savings. Used oil is an inexpensive and efficient fuel and costs less than gas and electricity.
- Wide range of applications: office buildings, residential buildings, manufacturing/industrial areas, etc.
- Environmental friendliness. During operation, the fuel burns out completely, which guarantees no emissions of harmful substances into the atmosphere.
- Fast heating. The operating temperature is reached quickly, heat transfer begins from the first minutes of operation.
In addition to its advantages, the exhaust boiler has minor disadvantages:
- Regular maintenance required. Since used oil is a recyclable material, it contains various impurities that settle on the surfaces of the structure. To reduce frequent breakdowns, the walls of the combustion chamber require constant cleaning of contaminants.
- Chimney installation. Oil boilers require the installation of additional elements.
Before choosing equipment of this type, it is necessary to evaluate the availability of fuel. Mining is mainly carried out at service stations and some enterprises.
Features of ignition of the furnace during mining
To light a stove of this design, you need to know some nuances, which are due to the complexity of igniting mineral oils:
Ignition of the furnace
- Before each use of the stove, it is necessary to carry out an external inspection of the structure, make sure that it is in good condition, and check the condition of the chimney (if necessary, clean it).
- Inspect the lower container (oil reservoir), make sure that no water has entered it.
- The usual fuel supply should be 2-3 liters of oil; if necessary, add it.
- The stove is ignited through the filling hole using a burning oiled wick, which can be twisted from an ordinary rag. It may take up to 5 minutes for the main volume of oil to ignite (to speed up ignition, you can add 100 grams of kerosene to the container).
- After stable flame combustion appears, it is necessary to set the required furnace draft. Usually the damper is left slightly open by 1-2 cm. If necessary, the combustion intensity is adjusted using the same damper.
Devices of this type are characterized by a simple design, while the heat transfer of such a furnace is quite high. Therefore, if you have unlimited waste reserves, install heating of this type, you will not regret it, and you will also save a lot.
Operating rules
When using a heating boiler that runs on waste oil, certain rules must be followed. Otherwise, gas pollution in the room or even a fire may occur.
The basic rules for using the boiler are as follows:
- A working device must not be left unattended;;
- When the boiler is on. You cannot add fuel to it;
- In a boiler of this design, only waste oil can be burned. it is not suitable for using other types of fuel;
- You need to make sure that no water gets on the surface of the hot boiler. otherwise, due to sudden cooling, it may simply burst;
- When the boiler is running, the burner hole must always be open;
- It is strictly prohibited to keep combustible and flammable substances near the boiler;
- When the boiler is on, the damper is not closed. otherwise all the carbon monoxide will go into the room.
When the boiler is running, the burner hole must always be open
The best known manufacturers and models: characteristics and prices
DanVex B-30
One of the best Finnish-made boilers for heating a private house. In addition to the 35.6 kW version, there are also other versions with a heating capacity of 60-220 kW. It is distinguished by high reliability, a well-thought-out system to simplify maintenance and cleaning (for example, an increased diameter of the firebox and smoke pipes, a vertical chimney, so that soot pours into the ash pan, a door that opens with the burner, so access to the combustion chamber is achieved by pressing the handle).
The boiler is also known for its compact size, functional automation with the ability to connect a GSM module and one of the highest efficiency for this type of boiler - 88%. Fuel consumption at maximum load is 3.3 l/h. The model has all the necessary protective functions and modes, the ability to connect a room thermostat and external temperature sensors.
The only known disadvantages are noisy operation, the absence of a fuel pump, heavy weight (157 kg) and an unreasonably high price. Country of origin: Finland.
Cost: 250,000-275,000 rubles.
NORTEC B70 (WB 40)
Model from a Russian manufacturer with a power of 40 kW. In terms of design and principle of operation, it does not differ from the above-mentioned Finnish analogue, it is equipped with the same heat exchanger made of heat-resistant steel, is less convenient to maintain, inferior in quality of materials and assembly, has larger dimensions and less functional controls.
However, it also has significant advantages in the form of a much lower cost, a full-fledged fuel unit (pump, filters, tank) included with the boiler, and the ability to operate on a large number of fuels (fuel oil, crude oil, heating oil).
Cost: 146-175 thousand rubles.
EcoBoil-18
Vertical drip type model made in Russia with a power of 15 kW. The distinctive features of the model are its extremely low cost, compact size, reliability and the presence of an oil pump included. In addition to mining, it is capable of burning kerosene. The model is equipped with one of the best automatic control units in the drip oil boiler segment, but the automation is still inferior to standard models that spray fuel.
Also known disadvantages are the need for daily cleaning and domestic build quality. According to installation practice and owner reviews, in all cases the model has been working without problems for more than 7 years.
Cost: 36,800-39,900 rubles.
Furnace KDO-2
Another domestic drip-type model with a power of 28 kW. The boiler has the same design and operating principle as EcoBoil, but has a higher cost with less functional automation. The advantage is the removable pyrolysis bowl (in which the oil evaporates), this makes it easier to clean, and in case of burnout it can be easily replaced.
Cost: 44,500-50,000 rubles.
Types of chimneys
There are a large number of types of chimneys. But the most popular, at the moment, are only three types:
- brick
- modular single circuit
- modular dual-circuit
Brick chimney (made of brick)
Advantages : fire safety, high reliability. Disadvantages : unevenness inside the pipe delays the passage of smoke. Water and sulfur oxide react, resulting in the formation of sulfuric acid, which over time destroys the structure.
Modular single-circuit chimneys (made of stainless steel pipes 0.6-1 mm) Advantage : lower price, ease of repair, low weight. Disadvantages : formation of a large amount of condensate, service life no more than 10-15 years
Modular two-tone chimneys (2 pipes with non-flammable insulation between them) Advantages : high throughput, minimal amount of condensate. Disadvantages : the price is significantly higher than that of single-circuit
Requirements for the operation of oil boilers during development
Oil boilers are considered simple and convenient equipment, but only if used correctly.
There are few requirements, however, they will increase the service life of the flawless operation of the units:
- The boiler room should be equipped with good ventilation. Sometimes combustion product vapors enter the air, poisoning it. To prevent leaks in residential premises, the boiler room is organized outside the residential building or in a separate isolated and ventilated room.
- The cleaner the waste, the longer the injectors will work, and the combustion process will be more efficient. Any oil can be used, including waste oil from household appliances. Equipment manufacturers indicate energy requirements in the technical data sheet; they should be adhered to.
- Install an additional filter system. Oil filtration devices will help further purify the energy carrier.
- Connect the boiler to the chimney with a damper. The pipe passage area in the roof should be supplemented with a protective casing.
- Provide a separate room for storing waste. You cannot store supplies in the boiler room.
- Before adding oil, turn off the unit from operation. The first portion can be mixed with kerosene at the rate of 10 parts oil to 1 part kerosene.
- The heat exchanger must be cleaned regularly. Factory boilers are equipped with a removable back panel. In self-produced boilers, provide access to the heat exchanger for cleaning soot and combustion products. Cleaning is carried out in stages - first brush dry, then after removing the layers, it is permissible to wipe the parts with a damp cloth.
- Change injectors at least once per season. Even if the nozzles are visually clean, the boiler has not been operating for long, replace the parts as they become clogged inside. Timely replacement will double the service life of the equipment.
- Oil filters are changed at least once a season, but it is better to do it more often. Especially if you use oil with poor filtration. It is more practical to install two filters - coarse and fine. In this case, the nozzle receives a purified mixture, it clogs the structure less, and combustion will be efficient and fast.
Waste oil heating for a private home
Waste heating oil was initially used together with diesel fuel. This method has proven its effectiveness and cost-effectiveness. Then they decided to reduce the cost of the product even more and removed diesel fuel from the composition. Used oil resembles diesel fuel in its characteristics, but is much cheaper.
Photo 1. This is what used oil looks like, which is used for heating. The liquid is dark brown in color.
Features of use
The waste is used as fuel in a special boiler or furnace. Only this guarantees complete combustion of the product without the formation of fumes. Re-equipment of the heating system or installation of a new circuit pays for itself in the first year of use of the product.
Types of fuel. How much heat is produced by burning one liter?
Burning one liter of such fuel produces 10-11 kW of heat per 60 minutes. The pre-treated product has more power. Its combustion produces 25% more heat.
Types of used oils:
- motor oils and lubricants used in various types of transport;
- industrial products.
Advantages and disadvantages
Pros of fuel:
- Economic benefit. Consumers save money on fuel, but businesses benefit the most. The implementation of processing eliminates the costs of storage, transportation and disposal of the product.
- Conservation of energy resources. Refusal to use gas and electricity for heating prevents the depletion of sources.
- Environment protection. Due to the high cost of disposal, business and vehicle owners disposed of oil by dumping it into waterways or into the ground. This had a negative impact on the environment. With the beginning of the use of waste as fuel, such manipulations stopped.
Disadvantages of fuel:
- poses a health hazard if the product does not burn completely;
- large dimensions of the chimney - 5 m in length;
- difficulty of ignition;
- the plasma bowl and chimney quickly become clogged;
- The operation of the boiler leads to the combustion of oxygen and evaporation of moisture from the air.
How is oil processed?
Processing is obtained by burning any type of oil, but for heating the premises, oil refining products from internal combustion engines are usually used.
Also from industrial mechanisms, compressors and power equipment.
What does not apply to such fuel?
List of products not related to waste:
- processed oils of vegetable and animal origin, which are used for household needs;
- solid waste with processing;
- solvents;
- products that are not subject to the same processing as waste;
- natural petroleum fuel from the spill;
- other unused petroleum products.
A few words about working out
Used oil is waste fuel and lubricants; it is a dark oily liquid that has a strong, specific smell of petroleum products.
The waste contains microparticles of metal, so it is not recommended to use it as a lubricant for an engine or transmission. However, the waste burns as well as ordinary mineral oil, so it is widely used as heating fuel. Incineration of waste can be called one of the methods for recycling fuels and lubricants. Due to the low cost of exhaust, a boiler operating using it is environmentally friendly and economical.
What stoves can you build yourself using drawings?
A waste oil stove with a water circuit can have a different design:
The stove is round in shape, welded from steel sheet. The fuel tank is combined with the combustion chamber. The afterburning chamber is a perforated pipe and an upper chamber equipped with a dividing partition that cuts the flame. A hole is cut in the lid of the lower chamber into which the waste is poured, and air will also flow there. The principle is this: the wider the damper is open, the better the oil will burn. Two barrel oven. In one (bottom) there is a fuel tank, there is a hole for loading it. The upper combustion chamber consists of a pipe that passes through an upper barrel filled with water. It has fittings for supplying coolant water. Externally, the model is very similar to a samovar
Its body gets quite hot, so you need to handle the stove with care. Such a “samovar” is installed only in those rooms where accidental contact with the body of people or animals is excluded. This design has a big advantage: the large tank acts as a heat accumulator. Compact mini-oven made of square profiled pipes 18x18 cm and 10x10 cm
Simple in design, it is very easy and quick to assemble. You can cook food on it. A practical model of an exhaust boiler with a water circuit from a gas cylinder with a cut off upper part. Here you can provide an automated feed of mining. The oil line is located in the combustion chamber. The water circuit has the form of a boiler, through which a chimney channel is passed. Or it could be a copper heat exchanger coil that is used to wrap the furnace body.
This design has a big advantage: the large tank acts as a heat accumulator. Compact mini-oven made of square profiled pipes 18x18 cm and 10x10 cm. Simple in design, it is very easy and quick to assemble. You can cook food on it. A practical model of an exhaust boiler with a water circuit from a gas cylinder with a cut off upper part. Here you can provide an automated feed of mining. The oil line is located in the combustion chamber. The water circuit has the form of a boiler, through which a chimney channel is passed. Or it could be a copper heat exchanger coil that is used to wrap the furnace body.
Sizes may vary. But the location of the main nodes is unchanged.
Diesel heating
This heating method is used to heat suburban properties and garages.
What does it represent?
This heating has a similar principle of operation with a water circuit, but it also has its own nuances. The boiler that heats the coolant runs on diesel fuel.
The liquid is distributed throughout the system and returned back using a circulation pump. After heating the coolant, the source stops working, and after cooling it resumes.
Advantages and disadvantages
Advantages of diesel heating:
- automated boiler operation;
- independence from central heating, due to which the user turns the heating on and off at his own discretion, based on the outside temperature;
- the prevalence of fuel that can be purchased at any gas station.
Flaws:
- high cost of diesel fuel;
- high price of equipment and components.
Organization of drip oil supply
To do this, perform the following actions:
- Cut a piece 30-40 cm long from a pipe with a diameter of 8 cm.
- Make two holes in the pipe: one 2 cm from the bottom, the other 4 cm from the top. The diameter of the holes is 1 cm.
- Fittings are welded to the holes.
- A circle with a hole in the center is welded to the lower end of the pipe. Hole diameter - 1 cm.
- A fitting is welded to this hole.
- Similar actions are done at the other end. However, the hole should have a diameter of 3-4 cm and instead of a fitting, a nut with the appropriate dimensions is welded. You need to screw a long bolt into this nut, which will serve as an adjustment rod. You need to make several small holes in the plug for air movement.
- Flexible hoses are attached to the fittings. Two side flexible tubes are lowered into a container with oil. Before this, a pump is placed at the end of the hose attached to the lower side fitting, and another piece of tube with an oil filter is attached at the end.
- A drip clamp or some equivalent is placed on a short hose connected to the fitting at the lower end of the pipe. This element will allow you to control the supply of used oil.
- The structure with hoses is suspended in a vertical position.
- A funnel is placed under the end of the hose with a clamp, from which a flexible tube extends. It is connected to a pipe that is located inside the air duct.
After this, the homemade boiler for heating the house is ready. It is worth saying that its use is not easy, because after each oil change you need to adjust the fuel supply, or rather the drop frequency.
If the water jacket does not have time to absorb all the heat, then you can build a special chimney shown in various videos with an additional heat exchanger.