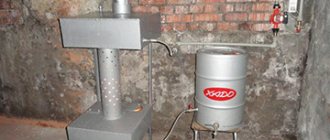
One of the cheapest types of fuel used to operate heating boilers is waste oil. It can be anything: synthetic or natural. Oil drained from cooking units, cars or diesel locomotives is suitable.
In any case, when burned, it will produce a large amount of heat. Therefore, assembling a waste oil boiler with your own hands is very profitable. Especially if you need to heat a utility room or garage.
We will tell you how the heating device is designed and works, what are the design nuances of a home-made unit, and also describe the step-by-step process of assembling the boiler and the features of its operation.
Making boilers with your own hands
The manufacture of boilers must begin with accurate calculations of technical parameters, required dimensions and materials used.
In order for the boiler to work efficiently and with maximum efficiency, its manufacture by hand should be done only after all the necessary drawings are ready, indicating the exact dimensions and parameters of all elements. A detailed diagram of the design of the stove and the bathhouse must also be drawn up to ensure reliable operation and safety of its heating. Most often, metal sheets are used for this design, but these can be gas cylinders, steel barrels, etc. Making a boiler with your own hands must take into account safety standards and be carried out in compliance with the exact dimensions indicated in the drawing.
The boiler must be completely sealed so that the integrity of the equipment is maintained as much as possible and safety requirements are met. The device can be installed anywhere where heating and hot water are required. Often boilers are installed as a reserve for use only in severe frosts.
A modern waste heating boiler must be equipped with a protection unit against oil overflow and boiling and a pump for pumping waste. A self-made sauna boiler will be practical and reliable only if all these recommendations were taken into account when creating it.
The waste can be poured into the boiler directly during combustion, but to avoid a fire, you must carefully ensure that the fuel level in the tank is lower than in the stove itself. It is recommended to clean such a boiler once a week, while a gas installation does not need cleaning.
Furnace design
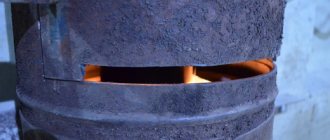
Having seen in a video or photograph what this design looks like, you will immediately understand that anyone with straight arms can repeat this. The oil-powered unit consists of only two tanks - they are located at a distance from each other and connected only by a pipe.
The pipe has holes (rather large) located at a certain distance from each other. The lower element is used as a tank - you pour used oil into it, and primary ignition takes place there using gasoline/solvent or an ordinary rag/paper - it’s more convenient for you. After the oil has saturated, vapors begin to be released - they rise to the upper reservoir.
A violent combustion reaction occurs there, resulting in a huge amount of heat being generated. We recommend using thick sheets of iron to create a furnace, because the temperature of the impact on the material will be enormous. If the sheets are thin, then after the first launch the entire structure will be skewed and it will be impossible to use it.
Also, ready-made elements are often used to create such units. The most popular option is an old gas cylinder or metal barrels. The cylinder has thick walls, this design “lives” for a very long time and tolerates rough use. A barrel is easier to find than a gas cylinder, and it costs less, but it will work less well, because they often consist of rather thin sheets of iron.
Operating rules
When using a heating boiler that runs on waste oil, certain rules must be followed. Otherwise, gas pollution in the room or even a fire may occur.
The basic rules for using the boiler are as follows:
- A working device must not be left unattended;;
- When the boiler is turned on, no fuel should be added to it;
- A boiler of this design can only burn waste oil; it is not suitable for using other types of fuel;
- It is necessary to ensure that no water gets on the surface of the hot boiler, otherwise it may simply burst due to sudden cooling;
- When the boiler is running, the burner hole must always be open;
- It is strictly prohibited to keep combustible and flammable substances near the boiler;
- When the boiler is on, the damper is not closed, otherwise all the carbon monoxide will go into the room.
When the boiler is running, the burner hole must always be open
Blitz tips
- Before pouring oil into the structure, it is advisable to first settle the mass so that there is no water or any other substances left in this material. If this is not done, then during operation the device may simply go out or its operation will become unstable;
- When using such a system, there must be a fire-acid type fire extinguisher in the room where it is installed. This is due to the fact that if water or a similar liquid gets on the surface of the structure, a fire or explosion may occur.
Heater design and drawings
Craftsmen engaged in the manufacture of waste oil boilers use in practice 3 methods of burning waste:
- surface combustion with pyrolysis afterburning in a perforated pipe and secondary chamber;
- the use of Babington burners and other homemade structures;
- combustion in a flame bowl, fuel supply is organized by the drip method, air is forced.
Methods of burning waste oils in homemade heaters - pyrolysis combustion, flame bowl, Babington burner device
The first option is implemented in the famous garage stove, consisting of 2 chambers connected by a vertical perforated pipe. We described the second method in detail in the corresponding publication - a Babington burner is made and built inside the body of a steel boiler that previously operated on wood.
We propose to focus on the third option - a dropper stove, converting it into a double-turn (the correct name is two-pass) water boiler. The drawing below shows the basic version of this stove, made from a Ø219 mm pipe. Why it is recommended for beginners to take the drip principle of operation of the heating unit as a basis:
- The design of oil burners is quite complex. Assembly requires some experience and financial investment (for example, for Babington you will have to buy a compressor).
- Surface combustion heaters are fire hazardous (they shoot out flames when water gets into the fuel). Equipping a miracle stove with a water jacket is not an easy task.
- Fuel consumption during surface combustion is prohibitively high - up to 2 liters of waste per hour.
- According to reviews on the forums, the drippers are reliable and can work without automation (however, the owner will have to devote some time to the boiler to get used to manual control). The unit is relatively simple to manufacture.
Dripper stove - a prototype of a two-pass hot water boiler for burning liquid fuels
Liquid fuel boiler diagram
The dropper diagram shown in the drawing needs to be redone, since together with the fire tube heat exchanger the structure will not fit inside the gas cylinder - you will have to look for a large pipe with a diameter of 400 mm. The dimensions of the heat generator can be reduced without loss of power (15-20 kW) as follows:
- make an afterburner from a DN40 pipe, changing the number and diameter of the holes (more precisely indicated in the drawing);
- for the combustion chamber, take a DN150 pipe;
- weld a water jacket from two propane gas cylinders;
- heat exchanger – at least 8 flame tubes Ø32 mm;
- bowl size - according to the combustion chamber (DN150);
- height from the edge of the afterburner to the bottom of the bowl is 6.5-7 cm.
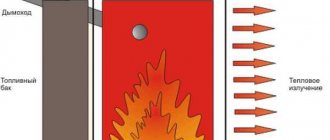
How a double-turn boiler operating on waste oil works is shown in the drawing. The difference from a simple dripper lies in the fire-tube heat exchanger located between the walls of the combustion chamber and the outer casing. Accordingly, the chimney pipe moved to the lower zone of the housing.
Operating principle of the unit
This section is intended for beginners who have not previously had to deal with heating equipment using liquid fuel - waste or diesel fuel. The boiler shown in the drawing operates according to the following scheme:
- Used automobile oil flows through a tube running inside the afterburner. Feeding method: by gravity or using a pump.
- Air is forced into the combustion zone by an electric fan.
- Drops of oil falling to the bottom of a hot bowl evaporate and immediately ignite. Afterburning of rising oil vapors occurs opposite all holes drilled in the central pipe. Diagram of combustion of waste oil in the boiler and movement of flue gases through a fire tube heat exchanger
- The heat released from the flame is directly transferred to the water jacket of the boiler. Hot flue gases, displaced by air from the fan, pass through the flame tubes, give off some of the heat and fly out into the chimney.
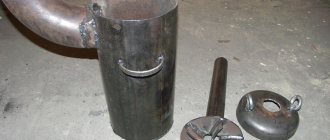
We make a heat generator from a cylinder
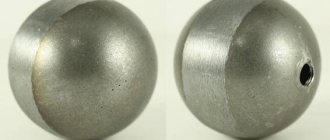
First of all, prepare the gas cylinders for welding - remove the spherical parts (don't forget to fill them with water first!) and cut one vessel to size so that together they form a body of the required height (1 m).
We turn out the valve with a pipe wrench and a wrench. If it doesn’t work, then file it and carefully beat it with a hammer.
Prepare the remaining materials, taking into account the following recommendations:
- It is better to make the combustion chamber and flame bowl from stainless steel with a thickness of 1.5-3 mm (for example, grade 12X18H12T);
- if you couldn’t find stainless steel, use black steel grade St3 - St20 from 4 mm thick;
- Also select a stainless steel waste oil supply tube;
- wall thickness of flame tubes – at least 3.5 mm;
- to seal the top cover, select a 40 x 4 mm steel strip (rim) and an asbestos cord;
- prepare 3 mm sheet metal for the manufacture of an inspection hatch;
- For the heat exchanger, use pipes with a wall thickness of at least 4 mm.
Options for manufacturing bowls installed on the bottom of the heating unit
Advice. As a supercharger, craftsmen usually use the “snail” of the VAZ 2108 cabin heater, but this is not a panacea. Take any similar fan - its performance will still have to be adjusted in order to increase or decrease the boiler power.
The manufacturing process of a two-pass boiler during testing looks like this:
- Cut the Ø32 mm flame tubes to size and weld the heat exchanger using one cylinder as the outer casing and a Ø150 mm tube as the walls of the combustion chamber.
- Attach the water heating system supply pipes to the heat exchanger.
- In the second cylinder, cut holes for the inspection hatch and chimney pipe. Weld a Ø114 mm fitting and make a neck with a cover from sheet steel.
- Weld both tanks into one body. Make a shell of iron strip on top - it will serve as a seal for the lid. Fill the gap between the edges with asbestos cord.
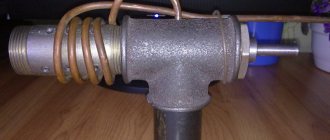
- Make an afterburner in accordance with the drawing. Make holes in the hemispherical cover (formerly the end of the cylinder) for the observation window and installation of the afterburner (according to src=»https://otivent.com/wp-content/uploads/2018/01/Dozhigatel-dlja-pechi-v-sbore -min.jpg" class="aligncenter" width="550″ height="733″[/img]
- Equip the lid with handles and a shutter on the window. The afterburner pipe can be tightly welded to it or screwed with bolts sealed with asbestos cord.
At the bottom end, the perforated pipe is closed with a plug, where 4 holes are made - one in the middle, the remaining three - radially. An oil pipeline tube is inserted into the central hole and scalded. The last step is to make a flame bowl of the boiler where the waste oil will burn.
The lower (end) part of the afterburner with 3 holes Ø4 mm
Recommendation. If you want to make an exhaust boiler installation with a water circuit that provides hot water supply, do not rush to push the coil inside the heat exchanger. There is a simpler solution: weld 2 additional pipes to the water jacket and connect them to the indirect heating tank through a circulation pump. The second option is to install a samovar-type heat exchanger on the chimney.
Upon completion of assembly, weld an elbow with a flange to the afterburner pipe and install the “snail”. To prevent the outer metal wall of the water jacket from wasting heat in vain and heating the boiler room, insulate the body from non-flammable basalt wool. The simplest way is to wrap the insulation with twine and then wrap it in thin sheet painted metal.
The outer casing of the heat generator can be made rectangular
The manufacturing process of an oil-fuel boiler is demonstrated more clearly in the following video:
What is good about a brick oven with a water boiler?
How can you not enjoy the sounds of peacefully crackling logs in a bathhouse?
And what if, besides, there was an original wicker firewood basket nearby, with logs lying comfortably in it? Modern wickerwork used for these purposes is made from wicker, birch bark and even metal. Woven into a trough shape, they allow firewood to be neatly stacked and beautifully complement the design of the sauna. This is not only an aesthetic pleasure, it is also “natural” warmth, heat and a unique aroma. How to save firewood, since it takes a lot of it to kindle? Every year the popularity of standard or Russian stoves with water heating boilers is growing. A brick kiln with a water circuit is characterized by good heat transfer, reliability and high efficiency. This design will be effective both in a small and in a bath room with an area of up to 100 sq.m.
It is not too difficult to make such a design, the main thing is to take into account all the features and recommendations. For example, the pipe must not only be thick-walled, but also seamless, the welding seam must match the thickness of the pipe walls, and the feed is welded only to the edge of the upper thick pipe. The oven is laid out with ordinary and refractory bricks; for masonry, ordinary and refractory mortar are used. Such bath heating will be reliable, durable and comfortable.
Pellet stoves are an economical and convenient device that allows you to save on fuel. Pellet units operate on special compressed pellets made from wood shavings, which are easily combustible. The main advantage of the work is that the pellet burner is able to burn fuel as efficiently as possible thanks to unique supply algorithms, as well as the flow of air, which helps regulate combustion.
A wood burning stove with a water circuit is efficient and reliable. Such designs make it possible to heat large rooms, even at low outside temperatures. Their advantage is an environmentally friendly combustion process and good efficiency. In the process of their work, they produce process water at high temperatures, which is also used. At the same time, fuel costs are minimal, and the heating rate of the room is fast. The stove looks like a steel firebox with a wall thickness of 4-6 mm. The heat exchanger tubes are located between the walls.
Each of the described options is a universal solution for heating a bathhouse or other country house. Having decided to purchase a stove of a certain type, you need not only to study the options for modern models offered by manufacturers, but also to think through everything thoroughly and take into account the parameters of the actual room where it will be installed, its area, and functional features.
General operating principle
If we want to get high-quality heating based on waste, we cannot simply take the oil and set it on fire, as it will smoke and stink. To avoid these unpleasant and hazardous side effects, you need to heat the fuel so that it begins to evaporate.
Volatile substances obtained as a result of heating will burn. This is the basic principle of operation of the heating unit during testing.
Application of perforated tube
To implement this principle, the design of the stove includes two chambers, which are connected to each other by a pipe with holes. Fuel enters the lower chamber through the filler hole, which is heated here. The resulting volatile substances rise up the pipe, becoming saturated with air oxygen through the perforation.
A schematic diagram of a two-chamber stove with a connecting perforated pipe allows you to understand exactly how a simple unit functions during mining
The resulting combustible mixture ignites in the chimney, and its complete combustion occurs in the upper afterburning chamber, separated from the chimney by a special partition. If the process technology is properly followed, virtually no soot or smoke is generated during combustion. But the heat will be enough to warm the room.
Using the plasma bowl
In order to achieve maximum efficiency of the process, you can go a more complicated route. Let us recall that our goal is to separate volatile components from the fuel by heating it. To do this, a metal bowl should be placed in the only chamber of the unit, which must not only be heated, but heated.
Through a special dispenser, waste will flow from the fuel tank into the chamber in a thin stream or drops. Once on the surface of the bowl, the liquid will instantly evaporate, and the resulting gas will burn.
The efficiency of this model is higher, since fuel supplied by drip burns better, and the problem of topping it up during the operation of the furnace disappears by itself
If everything is done correctly, the combustion of gases should be accompanied by a bluish-white flame. A similar flame can be observed when a plasma burns, which is why the red-hot bowl is often called a plasma bowl. And the technology itself is called drip feed: after all, fuel must be supplied in exclusively small doses.
With all the variety of designs, the operation of all heating units using waste fuel is based on the principle described above.
Industrial products
Although it is not at all difficult to make a boiler with your own hands using ready-made drawings, such products are still produced by industrial enterprises.
It is recommended to use such equipment for heating the following premises:
- animal pens;
- warehouses and garages;
- production workshops and technological lines;
- winter gardens and greenhouses;
- city and private baths;
- country houses.
It is noteworthy that equipping a heating boiler with a water circuit will allow it to be used more efficiently and heat a larger area.
Among the most well-known brands of exhaust boilers from industrial manufacturers are several:
- Boiler Kroll SKE 100 F, made in Germany. A universal unit capable of operating on any type of waste, including vegetable oil, as well as diesel fuel.
- Model Kroll W401-L, made in Germany. This device is also suitable for any type of waste. There is no need for additional installation of the burner.
- Finnish boiler DanVex B-30 and B-220 with a single-stage burner. Processes diesel fuel, any type of waste and even traditional furnace fuel.
- The Teplamos NT-320 and NT-370 models, manufactured in Russia, are capable of operating on any liquid fuel, including kerosene and diesel fuel.
In any case, you can assemble such a boiler yourself, and even connect a water circuit to it.
How to determine the sufficient power of a heating device?
The power of the boiler should be several percent greater than the heat loss of the building , so the smaller it is and the better it is insulated, the less powerful the apparatus is needed to heat it.
It is generally accepted that in central Russia, for a well-insulated house, the boiler power should be 1 kW for every 10 m2 of its area.
That is, to heat a building with a total area of 155 m2, you will need a heating device capable of constantly delivering 16 kW of thermal energy .
However, to reduce the load on the heating device and increase the reliability of the entire system, we recommend increasing the power by 15–25%, that is, for a house with an area of 155 m2, a boiler with a capacity of 18–20 kW/h would be ideal.
The principle of operation of boilers during mining
All boilers that use waste oil operate on the same principle, which is to evaporate the oil and burn its steam. However, everything is not so simple here.
The fact is that used oil is a substance that contains many additives, heavy metals and various elements. And so that when the fuel burns, they do not fly out into the chimney, it is necessary to ensure that the temperature inside the boiler for heating the house reaches 600 ° C. It is under such conditions that complete oxidation of these elements occurs.
Oil evaporation can occur in two ways:
- Casting it onto a hot container, which is called a combustion bowl.
- Igniting a liquid substance. In this case, the released steam burns out in special chambers.
Since there are only two of these methods, each owner can make a heating boiler with his own hands in two modifications. They can be seen in different videos or in many photos.
Types of structures under development
Depending on the area of application, boilers using waste oil as fuel can be divided into three groups:
- household stoves;
- water heating units;
- heating boilers.
Household stoves are installed in rooms that, for a number of reasons, cannot be equipped with water heating. These units are characterized by reduced fuel consumption, and their design ensures the most complete combustion of oil. Household equipment is virtually smoke-free. In addition, furnaces are often equipped with emission treatment systems, which increases the safety of their operation. The main advantage of units of this type is their mobility. Small dimensions make it easy to transport the stove and install it in a small room
It is also important that the device, if necessary, can be easily retrofitted with a water circuit or a cooking platform
Household oil stove
Water heating units at the module level for afterburning gases have a special platform on which a container of water rests. Its toroidal shape gives an additional advantage, since heating is carried out both from below and from the side of the smoke channel, which runs inside the tank. For autonomous water supply, a small water pump is installed at the inlet of the boiler. Due to the high temperature, water can be heated much faster than in factory water heaters. For example, a 100 liter tank will reach a temperature of 20°C to 65°C in about two hours, while an electric or gas appliance will take twice as long. If we talk about the cost of a standard liter of hot water, then when using waste water, costs are reduced by 20–25 times.
A container installed at the level of the afterburning zone turns the exhaust furnace into a powerful water heater
Heating boilers are used to connect to water heating systems, therefore they are equipped with exhaust gas afterburning devices, filters and safety devices. Despite all precautions, it is recommended to install waste oil heating equipment in separate rooms or outbuildings. Heating of water in heating units is provided by a heat exchanger installed in the fuel combustion zone
It can be made either with a continuous water jacket or in the form of a spiral tubular circuit. The movement of the thermal agent in the system is possible thanks to a circulation pump powered by electricity. The coolant temperature is adjusted by decreasing the flame temperature. For this purpose, the boiler is equipped with a forced air supply system. By decreasing or increasing the turbine speed, the air supply to the combustion zone is regulated. Installing a thermostat allows you to automate this process
Heating of water in heating units is provided by a heat exchanger installed in the fuel combustion zone. It can be made either with a continuous water jacket or in the form of a spiral tubular circuit. The movement of the thermal agent in the system is possible thanks to a circulation pump powered by electricity. The coolant temperature is adjusted by decreasing the flame temperature. For this purpose, the boiler is equipped with a forced air supply system. By decreasing or increasing the turbine speed, the air supply to the combustion zone is regulated. Installing a thermostat allows you to automate this process.
A boiler with a spiral-type water circuit will ensure the operation of the heating system of a country house
First start
Before starting operation, you need to check the functionality of all individual mechanisms and the boiler itself!
To do this you need:
- Move the valve on the evaporation chamber and check the flow of fuel into it.
- Start the fan and make sure that it effectively disperses air throughout the combustion chamber. The quickest way to verify this is by the flow of cold air from the chimney.
- Turn on the supply and check the air supply using the valve at the outlet of the combustion chamber.
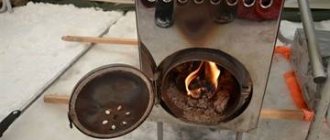
May be interesting: Choosing oil for a piston air compressor
If all components are functioning normally, all that remains is to check the boiler assembly itself . To do this, you need to start feeding the mining and light the burner from the lit paper. If after an hour the room becomes warm, the boiler is working properly and you can use it constantly.
Possible problems during operation
It is possible that you may encounter problems during the first launch. Possible malfunctions and their causes are listed below
- The boiler is working properly, but the heating is weak. Increasing the temperature to warm the fuel will solve the problem. This will be confirmed by quickly accumulated soot.
- The room is stuffy and lacks air. The problem is poor sealing - waste fuel boilers burn oxygen from the surrounding space.
- The burner goes out quickly. It is necessary to inspect the filters and change them if clogged, because... poorly refined used oil quickly clogs the burner with soot even before it has time to heat up.
Manufacturing the main part of the boiler
It consists of a housing with a water jacket, an air supply channel and a tube through which the waste flows. At the bottom of the structure with a water circuit there is a door for removing the bowl, as well as for igniting the oil steam.
Making the base of a boiler for heating a house includes the following steps:
- Cutting two holes in a pipe with a diameter of 60 cm. The first, square, is made at the bottom, the second, round, is made not far from the top. As for the sizes, the bottom hole can have any size (the main thing is that the hand can fit and be able to pull out the bowl). The diameter of the top can be 14 cm.
- Welding to the cut holes of the necks. Their thickness should reach 5 cm.
- Welding a ring with a width of 3 cm to the bottom of the pipe. The ring (shell) is put on the end of the structure so that the planes of the two parts intersect at right angles.
- Preparing the outer pipe. Its length should be 0.5 cm less than the height of the inner part. The resulting gap will be closed with a weld. Holes are cut out in this pipe for the chimney, door, and coolant supply and return pipes. The last two are done at the top and bottom.
- Putting the outer pipe on the made structure and welding the two parts.
- Welding another ring. It is installed at the top, closing the space between the pipes.
- Welding of pipes for supply and return of water.
- Plug one of the pipes and check the tightness of the water circuit.
- Cutting 2 circles from sheet metal. The diameter of both is 66 cm. In one circle you need to make a hole for the air supply pipe. Hole diameter – 13 cm.
- Welding circles and the completed structure.
- Making a channel for air supply. This channel should be a tube with a diameter of 6-8 cm. The length of the tube can be 10-15 cm greater than the height of the structure made. One hole must be made in it. It should be at a distance of 50-60 cm from one end.
- Making a channel for oil supply. It will be placed inside the air supply pipe. To make it, take two pieces of tube with a diameter of 1 cm (the length of one is 45-50 cm, the second is 6-8 cm) and weld them so that the angle formed between them reaches 130-150 °.
- Installing the oil supply tube into the air supply channel. The principle of operation is for the short end of the tube to fit into the hole in the outer tube. The internal structure is centered in the external one and welded to it. It is desirable that the lower ends of both elements are at the same level.
- Placing the air duct into the boiler with your own hands and welding it to the top of the structure. It should be placed so that there is 25-30 cm between the lower end of the air supply channel and the bottom of the boiler for heating the house.
- Placing a bowl in a pipe boiler.
- Door fixation.
Date: September 25, 2022