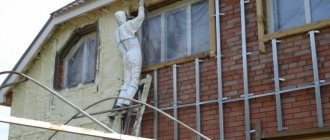
There is no better material for building a private house than brick. It can withstand heavy loads and is durable and non-flammable. But, despite its advantages, brick has one significant drawback - high thermal conductivity.
External wall insulation will help correct this deficiency. But, before insulating a brick house, it is important to study the technologies used and choose among them the one that is suitable specifically for your home.
How does insulation of house walls “work” in general Source stroystory.ru
Why is it worth insulating walls outside?
Placing a heat insulator inside a building leads to the following negative consequences:
- Reducing the usable area of the house.
- Reducing the service life of capital structures. They do not receive heat from the room, so during the winter the water in the pores freezes and thaws repeatedly. This leads to the gradual destruction of the brick.
- Freezing of walls in the area adjacent to enclosing structures. Moisture condenses in cold corners, which affects the appearance of the interior and causes mold spots to appear.
Thus, insulating a stone house from the outside is the most correct solution.
You can do the opposite in regions with a warm climate and in some exceptional cases. For example, an apartment wall is insulated from the inside, separating it from the elevator shaft.
Summing up
External insulation of a house with your own hands is quite a difficult task. However, it is quite possible to perform it efficiently with theoretical preparation and with the right choice of materials for finishing. Depending on budgetary possibilities, climate and the material of the walls themselves, you should choose the right thermal insulation, which will be safe for health and life, and will also increase its service life.
If you lack any skills, seek the help of specialists. But usually this process does not cause any difficulties, and every man can easily cope with it.
What characteristics should a thermal insulation material have?
The following parameters are taken into account:
- Coefficient of thermal conductivity. As this parameter decreases, the energy-saving effect increases. For modern materials, the figure reaches 0.028 W/m*S.
- Vapor permeability. In a multilayer structure, this indicator should increase from the inside to the outside. Otherwise, moisture accumulates at the boundary between the layers, and the masonry quickly collapses. The vapor permeability coefficient of silicate and red brick is 0.11 mg/m*h*Pa, for hollow brick - 0.14-0.17.
- Moisture absorption. At a high rate, the material needs waterproofing. Otherwise, as a result of saturation with water, it will lose its working qualities.
- Weight. Heavy insulation significantly increases the load on the structure.
- Fire resistance.
- Environmental Safety.
Thermal insulation material must be vapor-tight.
In the question of which insulation is best for the walls of a brick house, vapor permeability plays an important role.
A material with a higher index than brick is preferable. Such structures “breathe”, i.e. some of the moisture is displaced by partial pressure through them. The use of insulation with low vapor permeability will cause a chain of undesirable phenomena:
- The enclosing structures will have to be sheathed from the inside with a vapor barrier, otherwise water will accumulate in them.
- As a result, moisture will no longer escape through them, and to remove it it will be necessary to increase the ventilation performance.
- As a result, heat loss will increase, and with it heating costs.
Features of internal insulation
Insulation from the inside is carried out in cases where it cannot be done from the outside. If there is a need to insulate walls from the inside, then you need to take this work responsibly and choose the right materials.
The disadvantage of insulating walls from the inside is that the wall not only does not become warmer, but also begins to freeze more, so the dew point moves closer to the inner surface of the wall. The presence of condensation leads to dampness and mold development.
It is brick walls that are most afraid of increased dampness, as a result of which they begin to collapse. To correct this drawback, you need to choose materials that have minimal vapor permeability and moisture absorption.
When laying insulation, it is necessary to properly seal the seams so that moisture does not penetrate into the room.
When insulating walls from the inside, in order to do the job efficiently, adhere to the following rules:
- the wall must be completely dry;
- It is imperative to use steam and waterproofing materials;
- the material used must be moisture resistant and have minimal vapor permeability;
- There should be a minimum of seams on the heat insulator, and if there are any, they must be sealed hermetically.
Thermal insulation “pie” of the wall
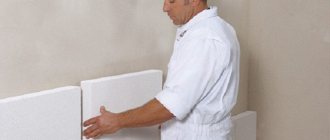
When using polystyrene foam and other polymers, the sequence of layers from the inside to the outside looks like this:
- Vapor barrier. You can cover the wall with vinyl wallpaper.
- Main material.
- Glue.
- Styrofoam.
- Glue.
- Alkali-resistant reinforcing mesh.
- Plaster.
The “pie” of the wall consists of a vapor barrier, base material, and sheathing.
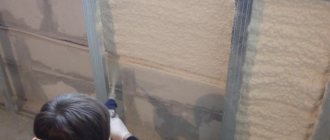
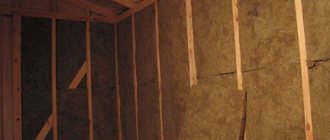
Insulation with mineral wool is carried out using 2 methods:
- Using “wet” technology.
- With a suspended (ventilated) façade.
In the first case, the order of layers is as follows:
- Main material.
- Glue.
- Mineral wool slabs.
- Glue.
- Alkali-resistant reinforcing mesh.
- Vapor permeable plaster.
Design of a “pie” with a curtain wall:
- Main material.
- Glue.
- Mineral wool slabs.
- Superdiffusion membrane.
- Air gap.
- Siding.
A superdiffusion membrane allows steam to pass through but retains liquid water.
Thus, it serves as waterproofing for mineral wool, while the wall remains vapor-permeable.
Video description
In this video we will take a closer look at insulating a house with polystyrene foam.
How safe is polystyrene foam: See also: Catalog of companies that specialize in insulating country houses.
Expanded polystyrene
Essentially, this is a more modern type of foam. Its full name is extruded polystyrene foam . It is more durable than conventional foam and does not absorb moisture. The disadvantage of using it is its cost, which is higher than that of other thermal insulation materials.
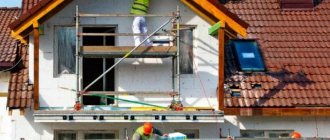
Insulation of a house can be carried out both at the construction stage and already in a residential building Source foveotech.pl
Warm plaster
Warm plaster consists of the following components:
- cement;
- lime;
- plasticizers
- expanded polystyrene and expanded clay granules.
Slightly inferior to other materials in terms of thermal conductivity. But it is resistant to bacteria and moisture, does not burn and allows steam to pass through well.
The material has significant density, which creates additional pressure on the foundation. The applied layer should not exceed 5 cm.
Micropores formed in warm plaster protect the house from the cold Source pilorama-chita.ru
Which insulation to choose for a brick house is determined by the personal preferences of the home owner, the timing of the work and financial capabilities.
What needs to be calculated before insulation
It is necessary to determine the thickness of the insulator. It must be such that the thermal resistance of the enclosing structure R is not less than the value established by the standards in the given region. R is calculated by the formula: R = R1 + R2, where R1 and R2 are the heat transfer resistance of the base material and insulation.
These values are determined by the formula: R1=R2=d/c, where D is the thickness of the corresponding layer, m; C is the thermal conductivity coefficient of the material, W/m*°C.
As an example, we consider a structure with the following parameters:
- location - Moscow region;
- wall thickness - 380 mm.
For a given region, the normalized heat transfer resistance is 1.6 square meters. m*°C /W (SNiP “Construction Climatology”).
Before insulation, it is necessary to determine the thickness of the insulator.
Thermal conductivity coefficient of sand-lime brick: c1 = 0.6 W/m*°C.
Then R1=d1/c1=0.38/0.6=0.63 sq. m*°C /W.
Required thermal resistance of the heat insulator: R2=R-R1=1.6-0.63=0.97.
Taking c2=0.4 W/m*°C (mineral wool), calculate the thickness of the insulator: d2=R2*c2=0.97*0.04=0.0388 m = 38.8 mm.
Thus, it is necessary to insulate the facade of a brick house with 4 cm thick mineral wool slabs.
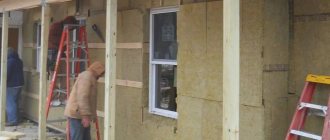
Preparing the brick surface
Before insulating a building, carry out the following actions:
- Decorative elements, lamps, canopy over the door, spotlights, antenna, and external air conditioner unit are dismantled. Remove window sills and frames.
- Knock down the old facing material in places where it does not hold firmly or has crumbled.
- Eliminate defects: seal cracks and potholes with mortar, knock down bumps.
- They clean the walls from dirt and sweep away dust.
- Cover the façade with primer.
If foam plastic is intended to be used, the enclosing structures are sheathed on the inside with a vapor-proof film.
Waterproofing walls before installation
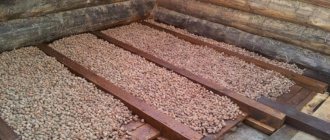
Brick does not need to be specially protected from water. A reliable barrier is a heat insulator and plaster applied on top of it (in the case of mineral wool, a superdiffusion membrane).
Waterproofing material covers the foundation.
The foundation and basement are covered with waterproofing material, if it is also decided to insulate them. Use bitumen-polymer mastic or rolled material such as rubemast.
Consequences of wrong choice or poor quality material
The work of insulating a brick house is not difficult; home craftsmen can do it on their own. The material for the production of insulation systems is also not in short supply and is available to users in all regions of Russia. But the cost of insulation work is expensive.
If you choose the wrong building material or violate the installation technology, then the effect of such work can be, at best, zero, and maybe even negative . Then the dew point in the house will be disturbed and it will “float” from condensation, thereby creating a threat to the load-bearing walls and foundation.
You will find everything you need to know about insulating brick walls in this section.
Is lathing always required and how to make it
The frame is mounted under siding or other sheet facing material. It is dialed:
- Made from wooden blocks.
- Galvanized profiles.
The size of the slats corresponds to the thickness of the insulation or exceeds it by 4 cm if they plan to install a ventilated facade. They are placed vertically along a plumb line and screwed with dowels in increments of 25-30 cm. The clearance between the slats is equal to the width of the slab, so that it fits without gaps.
The sheathing is needed under the sheet facing material.
Paronite washers are placed under the galvanized profiles at the fastening points. Without them, the slats become cold bridges.
Before installing a ventilated façade, horizontal strips of superdiffusion membrane are laid at the top and bottom under the frame elements. One edge is left free so that after installing the insulation, it can be used to cover the ends of the slabs.
Many companies sell façade systems with gaps in ready-made kits. They include brackets with extensions up to 240 mm, installed instead of rails.
How to make thermal insulation
Any homeowner with minimal technical skills can insulate a brick wall with their own hands. But you need to know about the intricacies of the process, otherwise the efficiency and durability of the insulator will be less than expected.
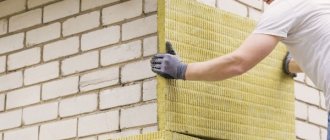
Using mineral wool
Installation of the curtain facade is carried out in the following order:
- Glue is applied in the corners and in the center of the mineral wool board in spots with a diameter of 5 cm.
- The product is inserted between the lathing slats and glued to the surface of the enclosing structure.
- Other slabs are glued in the same way. At the corners of the building, the seams are bandaged: on one wall, every even row protrudes beyond the corner, on the adjacent wall, every odd row.
- Around windows and doors, the slabs are laid so that the seams between them are not in line with the boundaries of the opening.
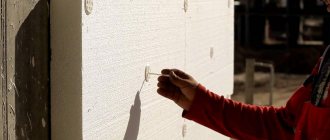
- The glued heat insulator is screwed to the brickwork with special disc-shaped dowels. They are made of plastic and have a wide cap. Thanks to this, the product does not conduct cold and does not press through the material. At the first stage, each plate is screwed with 2 dowels.
- In corners and around openings, special profiles are glued to mineral wool.
- Cover the coating with a superdiffusion membrane. The panels are laid horizontally, from bottom to top, with an overlap of 100 mm. The edges of the strips previously fixed at the top and bottom cover the ends of the slabs. The film is temporarily fixed with a construction stapler.
- Screw another 3 dowels into each slab. As a result, it should be fixed at 5 points: in the corners and in the center. At the same time, the dowels will fix the membrane.
- Window slopes and ebbs are installed from painted galvanized steel. The facing material can be fixed on top.
- Siding is attached to the sheathing. Self-tapping screws are screwed into the middle of the oval hole and not tightened tightly so that thermal expansion is not accompanied by the appearance of internal stresses.
Thermal insulation is carried out using mineral wool.
The canopy, antenna, outdoor unit of the air conditioner, etc. are returned to the insulated facade. The brackets for them must be lengthened, taking into account the thickness of the insulation and the air gap.
Foam insulation
Most often, this material is laid without lathing, followed by finishing with plaster. They operate in this order:
- Above the base, a leveled starting strip is screwed to the wall. Use dowels 6x80 mm with a pitch of 450 (mm).
- The profile offset is equal to the thickness of the insulation and plaster. If necessary, a steel strip on paronite washers is placed under it.
- Attachment strips are screwed along the edge of the openings.
- Horizontal strips of alkali-resistant reinforcing mesh are glued to the top and bottom. One edge is left free to later cover the end of the insulation.
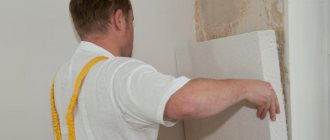
- Apply glue to the wall above the starting strip with a roller and secure the first slab. Its edge protrudes beyond the corner of the building by the thickness of the insulation. The front edge is set vertically using a bubble level.
- According to the described scheme, the bottom row of slabs is glued sequentially. Their edges must be in the same vertical plane (check with the rule and ironing the seams with the palm of your hand). The last slab is cut so that it protrudes beyond the corner of the building by the thickness of the insulation.
- Glue the second row offset onto half of the slab and then to the top. Around windows and doors, modules are laid so that the seams between them do not lie on the same line as the boundaries of the openings. Bandaging is performed at the corners of the building: on one wall even rows go beyond the edge, on the adjacent wall - odd rows.
- After the glue has dried, the foam plastic is screwed with wide plastic dowels-“umbrellas”, 5 pieces each. on the sheet (in the corners and in the center). The material is cut so that the caps do not protrude. The sleeves are immersed into the brick by at least 60 mm.
- A perforated corner with strips of reinforcing mesh is glued to the corners of the building. To prevent it from protruding, the top layer of foam is first removed with a grater.
- With the onset of darkness, the surface is checked using oblique rays from a flashlight. Irregularities are revealed by shadows. The mounds are cut off with a grater, the depressions are marked with a marker so that more glue can be placed here later. Minor defects are left as they will be hidden by decorative plaster.
- Cover the facade with glue and embed the reinforcing mesh in it. The edges of the previously glued strips are wrapped onto the foam at the top and bottom. The overlap is 100 mm
- In narrow places, near the porch and in other areas where there is a high probability of damage, the mesh is laid in 2 layers.
- Cover the facade with glue again. Using oblique rays, defects are identified and corrected.
- The insulation is covered with decorative plaster.
Finally, the visor, air conditioner and other dismantled elements are returned to their place.
How to apply warm plaster
The mixture is prepared according to the recipe on the package. To check the consistency, pick it up with a trowel and turn the tool over. A good solution will not fall off. Then proceed in this order:
- Window frames, glass and other parts are sealed with masking tape so as not to get dirty.
- Using a paint brush, cover the wall with a silicone or acrylic primer with quartz sand.
- Corners and cracks are sealed with reinforcing mesh.
- After wetting the surface of the facade, apply warm plaster. Use a wide spatula, moving from bottom to top. Layer thickness - no more than 20 mm. Otherwise, it will slide under its own weight.
- After the solution has set (at least 4 hours are required), a second layer is applied. If the air is humid or cold, for example in autumn, a longer pause is maintained.
- If necessary, after the second layer has set, apply a third 10 mm thick. The total thickness of warm plaster should not exceed 50 mm. The surface is checked according to the rule for gaps and bumps, and any defects found are eliminated. Deviation from the plane is allowed no more than 3 mm per 1 m.
- Decorative plaster is applied to the insulation. The wall is covered in 1 step, otherwise the areas will be different.
- By making circular movements with a plastic grater, a structure is formed.
Decorative plaster can be painted.