Although aerated concrete has a porous structure, which allows for the presence of air inside (the best heat insulator of all existing ones), it still needs insulation. But the performance characteristics of the material depend on the density. As it increases, thermal conductivity also increases, which entails the need for additional layers that protect cellular concrete from negative influences and make it more durable.
Typically, house construction is carried out using aerated concrete marked D500 and higher. This material is very durable, but has low heat-saving ability, so the walls need additional thermal insulation.
Insulating aerated concrete from the inside, like any other material, is not encouraged, but is still often carried out. If you still plan to carry out such work, you must ensure that the vapor permeability of the layers decreases closer to the room.
Table of contents
- Insulation of aerated concrete walls from the outside
- Insulation of aerated concrete walls from the inside
- Insulation of aerated concrete walls with expanded polystyrene
- Insulation of aerated concrete walls with polyurethane foam
- Insulation of aerated concrete walls with foam plastic
- Insulation of aerated concrete walls with mineral wool
- Conclusion
Aerated concrete is suitable for low-rise construction, houses up to three floors high. Thanks to its porous structure, it retains heat and releases steam outside. It is resistant to cold, has low thermal conductivity - 0.12 W/m C, which is 4 times lower than that of brick. Another advantage of the material is its low weight, which allows structures to be erected quickly.
Despite all the advantages, aerated concrete has features that need to be taken into account during construction. Due to its low weight, the material does not withstand mechanical loads well and can become deformed. The porous structure increases water absorption, which means that by absorbing moisture, aerated concrete retains heat less well. When insulating a house made of aerated concrete, it is better not to use powerful drills and dowels, so as not to damage the walls.
How to choose insulation for an aerated concrete house?
Here it is worth dwelling on several points at once.
Firstly, the insulation you choose must allow water vapor to pass out. This is necessary so that aerated concrete can easily regulate the humidity in the room.
Secondly, the vapor permeability of the insulation should be higher than that of the gas block.
Thirdly, it is important to correctly combine the insulation with each other. Each subsequent insulation must be higher in vapor permeability than the previous one. If the selected material does not allow air to pass out well, then you need to make a ventilated gap behind it.
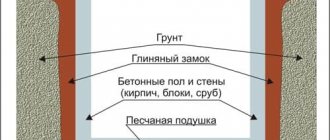
If all three points are met, then the dew point will move outside the walls. If the masonry is not protected by anything, the moisture inside will begin to freeze at sub-zero temperatures, leading to serious heat loss. After several cycles of freezing and thawing, the surface layer of the aerated block may begin to collapse.
“The dew point is a plane in the thickness of the wall where, due to the difference in external and internal temperatures, water vapor condenses into dew. With proper organization of external insulation, the dew point moves outward and cannot harm the walls.”
But correctly selected insulation is only a third of the way; it is equally important to make high-quality wall masonry. If the seams between the blocks are thick, then even well-carried out insulation will not give the desired effect. Today, adhesive seams with a thickness of 1.5-2 mm are valued.
Insulation of aerated concrete walls from the outside
After erecting aerated concrete walls, you need to wait until they dry, absorb air, and only then insulate them. As a rule, this takes from 2 to 5 months. If this is not done, moisture will damage the walls and the insulation layer.
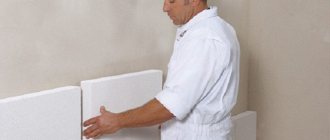
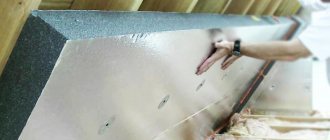
Afterwards, the surface must be cleaned of dirt and all cracks and chips must be repaired. Install base profiles and guides on them, which will help to evenly distribute the insulation around the perimeter of the building. Primer on exterior walls will ensure better adhesion. Plates or rolls of insulation must be attached to the walls. This can be done using polyurethane glue and chemical anchors. It is not recommended to use ordinary dowels; they can damage the structure of aerated concrete. When using chemical anchors, in addition to a mechanical pin, fixation occurs due to glue. Even if a crack appears, the adhesive composition will support the entire structure.
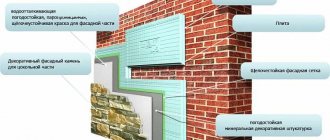
Another stage when insulating aerated concrete walls from the outside is waterproofing. Its installation will protect the house from moisture penetration and extend the life of the entire structure. A PVC or polyurea membrane is suitable. When fixing the membrane, use glue or dowels, and polyurea is sprayed with an airless installation and forms a continuous elastic layer.
Finally, the surface needs to be plastered and a finishing touch applied, for example, installing a curtain or ventilated façade.
Insulating a house made of aerated concrete from the outside allows you to save usable space and additionally protect the structure from the wind. To keep the house warm and increase the energy efficiency of the building, you should also insulate it from the inside.
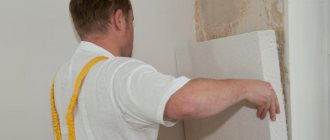
Insulation of aerated concrete walls from the inside
Work on insulating walls from the inside is carried out according to a similar algorithm, but waterproofing can be omitted. Also, no façade installation is required. Therefore, it takes less time to insulate aerated concrete walls from the inside.
To attach materials to walls, it is better to use adhesives and solutions rather than dowels. This will maintain the integrity of the surface. Before starting work, clear the walls of debris and remove everything that might interfere: fastenings, fittings. Seal all cracks and chips with a cement-polymer composition and cover the surface with a primer.
The method of fastening depends on the material. For polystyrene and foam plastic, polyurethane glue is needed. For mineral wool - lathing. Polyurethane foam is sprayed using high or low pressure installations. If cracks and gaps appear during the installation of insulation, they must be closed with sealant or strips of heat insulation. After this, the walls can be plastered by attaching a reinforcing mesh to the surface. Finally, apply paint in two layers.
Final points and recommendations
Gas silicate blocks are an excellent masonry material, however, they should be purchased from trusted manufacturers, with a certificate of conformity, so as not to waste money on low-quality handicraft material.
When performing work, it should be remembered that this material has low mechanical and impact strength; the use of an impact tool with a rotary hammer is unacceptable.
Since the blocks have high moisture absorption, it is advisable to hydrophobize them with a special primer before gluing the insulation.
Insulation of aerated concrete walls with expanded polystyrene
Extruded polystyrene foam is produced in slabs up to 30 millimeters thick. To insulate a house made of aerated concrete from the outside, slabs from 10 millimeters thick are suitable. The material has low thermal conductivity - 0.032 W/m*K, but has a high flammability class G4 and emits toxic smoke when burned. It is characterized by low density and deforms under mechanical loads. Therefore, during installation, it is better to cover it with siding or make a curtain wall that will protect the insulation.
Before starting work on insulating a house made of aerated concrete, the outside walls must be treated with an antiseptic, and the polystyrene foam boards must be sanded to increase adhesive properties. Then apply adhesive to them and glue them to the walls. It is better to start work from the base and move around the perimeter, arranging the slabs in a checkerboard pattern. Wait 24 hours for the glue to dry and install the reinforcing mesh on the slabs. Then apply two coats of plaster.
Installation of stove-fireplace + video
In order to protect yourself and your home from dangerous situations, the installation of fireplaces must be carried out in strict accordance with the regulations and in compliance with the correct technology.
First of all, a project is developed, then work is carried out in the following sequence:
- preparation of the base (insulation with a number of bricks or 12 mm metal sheet);
- installation of a cast iron firebox;
- laying a smoke exhaust pipe;
- portal device, external cladding.
Modern metal products do not require much time to equip. The main rule that must be followed is: place the stove away from the walls (20-30 cm), even if it is lined with non-flammable material.
The apparatus does not require a foundation, only a low base lined with fireproof elements (minerite sheet, steel or tile).
Connection to the heating system
There are two installation schemes:
- from scratch";
- into an existing unit.
To implement the second option, you will have to put in more effort; you need to disassemble the fireplace stove, design and select the correct design and dimensions of the heat exchanger, and then correctly put everything back together.
The device with a water jacket has different connection schemes:
- open is implemented under a pressure of about 1.5 bar, and the wall thickness of the connected pipe must correspond to 4 or more millimeters;
- closed can withstand 2.5 atmospheric pressure with a partition of 6 mm.
If the structure is organized according to a natural circulation system, then a situation with liquid boiling cannot be ruled out. To avoid this, you will have to install a pump.
Insulation of aerated concrete walls with polyurethane foam
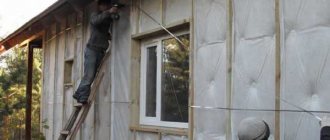
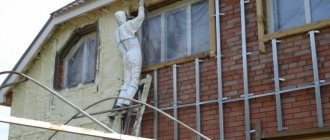
To insulate aerated concrete walls from the outside, closed-cell polyurethane foam with a water absorption rate of up to 5% of the volume is suitable. This means that the material does not absorb or allow moisture to pass through. Its thermal conductivity coefficient is 0.022 W/m*K - one of the lowest among insulation materials. Polyurethane foam does not rot and does not emit harmful toxins, and when sprayed onto the surface it forms a dense, unbreakable layer. After installation, it increases in volume by several millimeters. Since the material is sensitive to the rays of the sun, it must be covered with siding or a curtain wall. This will extend the life of both the insulation and the entire building. PU foam does not lose its thermal insulation properties for 30 years.
Before spraying, aerated concrete walls must be cleaned, coated with an antiseptic and primed. You need to install polyurethane foam using special equipment and work together. One person controls the pressure level, the second sprays foam. Due to good adhesion, the polymer is easy to apply to both horizontal and vertical surfaces.
Find out more about the process of applying polyurethane foam in the video at the link.
Insulation of aerated concrete walls with foam plastic
Residential buildings made of concrete, aerated concrete and brick are insulated with polystyrene foam. Its thermal conductivity coefficient of 0.038 W/m*K allows the use of slabs up to 50 millimeters thick. It has low water absorption by volume - 4%, which means it does not absorb moisture. But it has high vapor permeability, that is, it evaporates moisture. If polystyrene foam is used to insulate aerated concrete walls from the inside, the room may always be stuffy. It is better to use it for external protection and take additional care of waterproofing.
First, the walls need to be cleared of debris and covered with primer. When installing foam boards, use cement-based adhesive. Install guides and sheathing around the perimeter of the house to glue the foam evenly. It is important to avoid gaps; if there are any, seal them with polymer-cement mixtures. A day later, when the slabs are completely glued to the walls, take umbrella dowels and secure the slabs with them. To do this you will need a drill, a dowel and a fixing umbrella nail. Finishing can be applied to the foam: plaster and siding.
How to insulate with penoplex itself?
Everything is done in several stages:
- Level the façade walls, seal cracks, and treat with primer.
- Glue the penoplex with glue and then fasten it with dowels.
- Apply reinforced mesh for finishing.
- “Finish” the finishing with façade plaster.
If you make the facade with siding or PVC panels, then do not forget to install vertical guides. Additionally, there is no need to cover anything with a vapor barrier, since the material will already be protected by vinyl siding.
The advantage of penoplex insulation is that you can install it yourself, even with two hands.
Insulation of aerated concrete walls with mineral wool
Mineral wool comes in the form of soft rolls or slabs consisting of slag, sand, glass pieces and dolomite. It is non-flammable, vapor-permeable, but its water absorption coefficient is 30% of the volume. Such insulation requires protection from moisture.
Before installation, you need to prepare the walls: clean and prime, and install the sheathing. Attach vertical strips at a distance of 50 centimeters from each other. It is necessary to ensure that the distance between them is 15-20 millimeters less than the length of the insulation. This will allow you to install mineral wool without gaps. Then you need to apply glue to the insulation boards, insert them into the sheathing and begin installing the horizontal slats. Afterwards you can install a second layer of mineral wool. Attach a waterproofing membrane on top of it, install a reinforcing mesh and make a curtain or ventilated façade.
You can see a comparison of insulation in a separate article.
Conclusion
It is better to insulate a house made of aerated concrete inside and outside. This will increase the performance properties of the structure and extend the service life of the materials. When choosing materials, you should pay attention to the combination of different insulation materials. For example, non-flammable mineral wool on the outside and non-toxic polyurethane foam on the inside. When insulating aerated concrete walls, it is better to use glue or chemical anchors, but not dowels.
If you find it difficult to choose materials, calculate consumption, or are looking for a suitable team, use the service on the website poliol.ru.
There are more than 650 registered performers ready to help. Leave a request on the website, our consultant will advise, announce the cost of the work and help you choose insulation. Consultation is free.
Introduction
Aerated concrete is a relatively young material that in a short time has been able to reach the level of such construction mastodons as brick and wood.
At least a third of all individual buildings today are buildings made from this material. But when choosing a gas block, it is worth considering that a house made from it must be insulated either outside or inside, otherwise troubles may occur. Do you want to know how to avoid them and do everything right yourself? Give this article 15 minutes of your time, because making thermal insulation is not so difficult!