Today there is a lot of debate about how to insulate the walls of a house, and there is no end in sight to these disputes. The effectiveness of these disputes is practically zero, because often in theory the problem looks completely different than in practice.
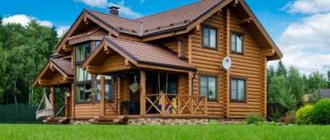
The fact is that the insulation of buildings in general is replete with many nuances that depend on many different conditions.
Of course, few people would argue that there is no need to insulate a private house. But those who still say so do not look like some kind of profane. Therefore, it is necessary to carefully understand who exactly advises insulating a home, what exactly, and which one.
What makes you insulate?
The main argument of defenders of the insulation theory is that most of the territory of our country has a continental climate. It's too cold in winter, too hot in summer. In a sense, insulation helps keep the inside of the house cool in the summer.
Since in the hot months it seems to work in reverse mode. But again, there are different conditions and different considerations. Our builders cannot turn to European or American experience here.
Because in countries located on these continents, winters are warm and frosts are rare. And in those regions where it is still cold in winter, like ours, people, as a rule, do not settle en masse (northern Scandinavia, central Canada, etc.).
However, we also have excellent centuries-old experience in insulating the walls of houses. Although here, again, there are many nuances.
What can be insulated
Do-it-yourself insulation of a house can take place depending on the characteristics of the room. For example, when snow melts, you can find that heat often escapes through the roof.
This can be seen both with the naked eye, if the roof is leaking, and with the help of a special device - a thermal imager.
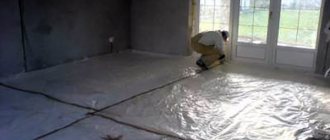
- If we take into account the laws of physics, we must remember that warm air always rises upward, while cold air remains below.
- Therefore, it is worth insulating not only the ceiling, but also the floor so that heat loss is minimal or disappears altogether.
- This is mandatory in houses where there is no basement. The house simply stands on the ground, which makes the room very cold.
- If you are insulating the house from the outside, then do not forget about the base. Otherwise, it may turn out that there will be an unprotected space through which the cold will penetrate.
Heat loss often occurs through windows. Old wooden ones are replaced with plastic ones, but sometimes this doesn’t help if the space between the window and the wall is not foamed. There are usually batteries under the window.
For them to work more efficiently, they should not be blocked by the window sill, and their length should be less than the window itself. With the help of radiators, a thermal curtain will be formed, which will prevent the cold penetrating from the street into the apartment.
Advantages of external thermal insulation
The most widespread today are two insulation technologies: with the insulation located inside and outside the walls of the house. The location of the heat insulator outside the building allows you to solve problems with the formation of condensation inside the insulating layer.
The advantages of external thermal insulation include the following:
- The light weight of the insulation used reduces the load on load-bearing walls.
- The facade and thermal insulation “pie” will be protected from temperature fluctuations, which will extend the service life of the constructed structure.
- The choice of heat insulators used is significantly expanding.
- The simplicity of the technology allows you to carry out all the work yourself.
- The internal area of the house remains unchanged.
- Affordable cost of materials used.
Each homeowner, regardless of the wall material and the overall budget for insulating the walls of the house, will be able to choose a high-quality heat insulator and do all the work independently, which guarantees the warmth and comfort of living in the cottage .
Insulation materials
The step-by-step instructions for insulating a house with your own hands say that the materials for the work can be very different. If you are doing this yourself, it is better that they are not only of high quality, but also easy to use.
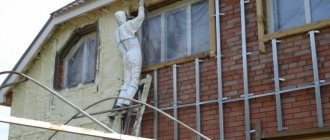
Few people would want to buy special equipment to insulate their home. There are insulation materials that are applied by spraying, for example, polyurethane. Judging by the method of its application, you can understand that this material is definitely not suitable for independent work.
Simple materials for independent work:
- Mineral wool - can be either in rolls or slabs. If the surface is horizontal, then you can simply lay the material. It should be fixed on the walls using self-tapping screws with plastic caps. Good for both stone and brick houses. It breathes, so there will be no greenhouse effect indoors;
- Polystyrene foam - it can be glued, and for additional fixation, use the same screws with plastic umbrellas;
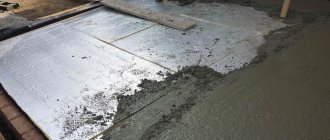
- You can also take bulk materials - vermiculite, sawdust. They are poured into specially prepared formwork.
Remember that working with materials requires minimal skills in working with them and tools. At a minimum, you will need a screwdriver or drill to screw the fixing screws into the wall. A grinder can also be useful for cutting some elements with it.
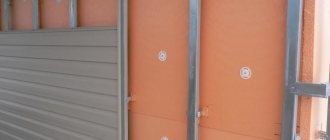
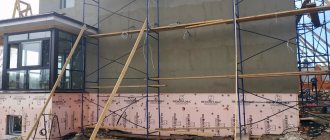
How and with what to insulate the walls of a house outside
Let's look at external insulation in more detail.
First of all, we inspect our wall, check the finishing layer for strength (ideally, you need to completely remove the finishing).
We completely prepare the wall for insulation (you can follow the advice above). That is, we clean the previous coating, seal the cracks, and prime it.
After this, you need to select and purchase insulation.
The most commonly used material is expanded polystyrene (foam).
Advantages of polystyrene foam:
- Good thermal insulator; Mold and mildew very rarely form on it; Low price; Long service life; Withstands temperature fluctuations well.
Do not forget that before insulation the wall needs to be leveled; large differences greatly spoil the future appearance of the facade.
Installation of insulation
The polystyrene foam has been selected and purchased, now we need to install it (in addition, we bought glue and cement - we will lay insulation on this).
The glue must be diluted with water until the consistency of plaster is obtained and applied to the wall with a spatula.
Along the lower border of the foam sticker we install a bar along which we will line up the panels.
First we spread it on the wall, then we cover the panels with a small layer and apply it to the wall (lightly pressing it against the wall).
After this, we additionally secure the foam sheets with “umbrellas” (you can also secure them with “umbrellas” a few days after gluing).
Then we cover the joints and caps with glue (if the gaps are large, then we first blow them out with construction foam).
Place a mesh on top, apply a cement mixture to the mesh (try to glue the mesh gradually, in parts).
After the solution has hardened, use a float and sandpaper to sand the surface, removing roughness and unevenness.
After this, we apply the last layer - the finishing mixture. After it dries, we also sand the surface with sandpaper.
How to calculate the thickness of insulation
It is also important in insulation to calculate what thickness of material will be needed. To do this, they look at what the walls are made of, how thick they are, what the temperature is in the room on the coldest days.
- There are certain standards according to which different types of materials require different quantities.
- For example, if you only need about 5 cm of polystyrene foam, then you will need much more vermiculite - up to 13 cm in thickness.
- This indicator implies that the windows will be caulked.
If you want heat loss to be kept to a minimum, you need to calculate the individual volume of insulation. So, for a stone wall of one brick you need about 10 cm of mineral wool. For timber, this indicator for the thickness of the material will be the same. But for a house made of aerated block it will decrease by half, to 5 cm.
Features of use
Each insulating material has its own degree of permeability to water vapor. This is the main indicator that determines the suitability of a material for internal or external installation. The basic rule applies here: the degree of vapor permeability of materials should increase as they are removed outside. This means that impermeable insulation should be used only for indoor installation, and permeable insulation for outdoor installation.
If the material parameters are chosen incorrectly, water vapor will not be able to overcome the boundary of different layers and will begin to accumulate on the transition plane. For example, if mineral wool is installed inside a house, steam will be absorbed into it, but will not be able to pass through a concrete (or brick) wall, since the partial pressure energy will be weakened.
Do-it-yourself insulation
Before starting work, it is important to calculate everything carefully, otherwise the rework will require more money and time. In a private house, only walls that border the street can be insulated.
- If you start insulating the walls between rooms, this will cause the area of the room to decrease and the dew point to shift.
- This will make the room damp and may cause mold to form. This will harm both the building and the health of the residents.
Choose vapor-permeable materials. Moisture will still be absorbed into the insulation, so it should easily allow it to pass through. Also, the rule of vapor permeability should be taken into account when laying the material so that the distance between it and the frame remains free.
If vapor permeability is impaired or absent altogether, fungus will begin to appear. As a result, this will damage both the premises and the residents of the house. Especially take this into account when insulating the ceiling, because warm and humid air will rise towards it.
In what cases is this relevant?
Insulating walls from the inside certainly improves the thermal performance of a house. But this is an unconventional technology, because usually they try to do external insulation. However, there are situations when there is no other choice.
Internal thermal insulation is recommended only when external insulation is not possible
This option is also relevant for apartment buildings. It helps not only to increase the comfort of your home, but also to prevent the occurrence of troubles such as mold or mildew.
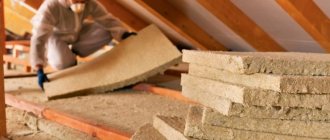
Bulk materials
As a rule, such materials are environmentally friendly and inexpensive. Especially in forest regions where there is a lot of sawdust. Bulk insulation is convenient because it is very easy to use.
- For example, to insulate the roof from the attic side, it is enough to simply pour a certain thickness of sawdust or vermiculite and cover it with a waterproofing film. You don't even have to cover it with film.
- The bulk material absorbs and allows moisture to pass through well. Rodents don’t like them, which is also a big plus; they won’t make holes in it.
True, this type of material also has its disadvantages: expanded clay is heavy, so it is not suitable for a light foundation. But vermiculite is also not very light, and it does not absorb moisture.
Methods for gluing foam boards
To increase the effectiveness of thermal insulation, the slabs must be glued to each other. At the same time, it is important to choose the right adhesive that does not contain components that damage the foam. These include:
- alcohol-based solutions;
- solvents containing acetone;
- Oil and gas products.
The best options for gluing foam boards are:
- "liquid Nails";
- polyurethane glue;
- PVA.
It is impossible to give an unambiguous answer to the question of what is the best way to attach polystyrene foam to a particular surface. This depends on a number of factors, including the conditions in which the insulation will be used. If any controversial issues arise while carrying out the work yourself, consult with specialists.
Styrofoam
Polystyrene foam has poor vapor permeability, so it is not advisable to use it for wooden buildings.
To avoid the greenhouse effect, you need to consider ventilation.
The material also has its advantages:
- It is lightweight and easy to install;
- Safe, easy to cut;
- It is inexpensive and lasts a long time;
- No rotting, does not lose its shape.
Polystyrene foam is placed in slabs on a flat surface. You don’t have to prepare the screed, the main thing is that the elements do not protrude. The material is simple in that it can simply be glued without further fastening. True, some still attach it with self-tapping screws for reliability.
The joints of the plates must be sealed with polyurethane foam, the excess parts are cut off. Bare and loose parts also need to be sealed.
Application of basalt wool
The active use of basalt wool in construction work is shown. It is made from mountain raw materials, so the material does not burn. The insulating raw materials will last for a long time, which exceeds 50 years.
Basalt wool is characterized by the following advantages:
- Low thermal conductivity;
- Environmental cleanliness;
- Does not absorb moisture;
- There is no deformation.
No negative aspects have been identified when using basalt wool, as everyone can see for themselves.
Photo of effective insulation
Types of installation
How to insulate the walls of a house from the outside is a controversial question. Not only are there several types of material, but installation can also be done in several ways. You will have to make a choice yourself, we can only consider each of them in detail.
Dowels or metal cores
This method is considered reliable, since the protection against negative atmospheric phenomena is high and effective. The design is not particularly heavy, and also allows the use of any type of finish. But with this method of insulation, it is necessary to make the wall as smooth as possible and take care of organizing moisture-resistant protection.
Profiles and brackets
In this case, you will get a curtain façade that will be ventilated. Between the wall and the insulation there should be a layer of air with a thickness of at least 6 cm. To attach the cladding, you will have to build a base. A clear advantage of this installation method is that there is no need to level the wall.
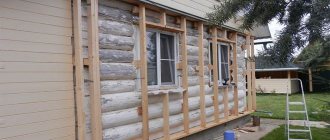
Slat frame
This method can be applied to various types of insulation. For those who are interested in how to insulate walls from the outside using this method, you can read the practical guide below:
- we prepare slats with a thickness that will be greater than the thickness of the insulation;
- we mount the slats to the wall;
- The distance between the slats depends on the size of the slabs, which should not fall out during installation.
This method eliminates the need for plastering and brick lining. The most convenient is siding, which can be mounted directly on the slats.
That's all we wanted to tell you. If you have carefully studied the material, then you know how to choose insulation for the exterior walls of a house and what installation method to choose. Everyone can make their home warm.