Wood is the best heat insulator and does not require additional insulation. But some owners understand that wood does not last forever and needs protection, so the question immediately arises of how to properly insulate a wooden house from the outside under siding.
In a wooden house it is easier to prevent the formation of dampness than to deal with it. The appearance of fungus and mold can be seen visually, like stains on wood, or you can smell their specific smell. These signs indicate that the house is in urgent need of “treatment.”
Increased wood moisture – consequences
Dampness is the most common and most harmful damage factor for wood. Such material requires a minimum level of humidity both in the solid wood itself and indoors. If in one of these cases the indicator is allowed to increase, then problems with dampness begin in the wooden house. Usually craftsmen, even at the construction stage, warn the log house against the encroachment of moisture. The first step is to check the moisture level of building materials: boards, timber and logs. In wooden products, a humidity level of 15 and a maximum of 20% is allowed.
What happens to the log at elevated humidity levels? At first everything will be fine, but as your house begins to settle, a displacement will form that will be much larger than it should be. As a result, you will get large gaps and crooked seams between the crowns. And that's not all, the problem of blue staining will appear. It is formed when wood with excess moisture is exposed to cold. Simply put, the tree begins to freeze. Further changes in climatic conditions do not save the situation; the wood turns blue, turns black and becomes unusable.
Selection of insulation materials
It is not easy to understand all types of insulation materials. A large range of products and varying prices will take inexperienced consumers by surprise. Insulation materials can be rolled or tile, expensive or cheap. The difference will be the density and thickness of each type. The choice lies in correctly identifying the right product. You need to be guided by the quality requirements of the material. You need to pay attention to:
- Thermal conductivity;
- Vapor barrier;
- Fire safety.
The thermal conductivity indicator should be minimal, otherwise the heat will easily escape and in winter the room will cool down in a few hours. In summer, it is important that the building does not heat up quickly, keeping it cool inside. Only properly selected, high-quality thermal insulation will allow you to maintain the optimal temperature in the room, regardless of the time of year.
Vapor barrier is also an important requirement for insulation materials. If the moisture content is high, fungus may appear under the siding in the room. The insulation must be able to “breathe”, reliably protecting the structure from the cold, but without accumulating moisture. If water accumulates under the sheathing, the material - wood - begins to rot. In this case, the house will quickly collapse.
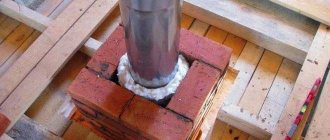
It is not recommended to insulate a building with flammable materials. Despite the fact that the insulation is located outside the building and has minimal contact with electrical wiring, the risk of fire still exists.
In summer, siding can become very hot from the sun's rays. Toxic elements contained in some insulation materials cause negative reactions in the body.
Thermal insulation materials
Insulating a wooden house from the outside under siding will be ineffective if the thermal insulation is not performed correctly. The range of building materials offered by the market in this area is very large. Among the most common thermal insulation solutions for a wooden house are the following:
- stone wool;
- slag;
- glass wool;
- expanded polystyrene;
- Styrofoam.
We would not recommend the last two insulation materials for insulating a wooden house, but they still provide insulation.
Why do you need a vapor-permeable membrane?
Cladding wooden walls using mineral wool requires creating free vapor exchange. For this purpose, a special covering material is used in the form of a film, which allows excess moisture to escape, but does not allow it to penetrate back. Such finishing products are laid on top of the insulation and fixed to the wooden frame posts with a stapler, and to the metal sheathing with double-sided adhesive tape.
Important! A high-quality membrane must be supplied with installation instructions, and also has markings that allow you to avoid mistakes in the location of the sides.
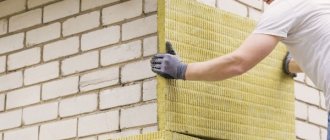
Stone wool
Basalt wool is a material that, in all its properties and characteristics, is the best for external insulation of facades. The only significant drawback of the material is its high price. This kind of house insulation under siding will cost you a pretty penny, but the unique distinctive properties of stone wool will cover this disadvantage.
This insulation for siding for a wooden house has the following properties:
- thermal insulation;
- fire resistance;
- durability;
- soundproofing;
- vapor permeability;
- moisture resistance;
- environmental friendliness.
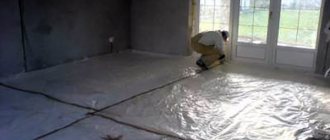
Stage five. Windproof layer
After installing the thermal insulation, it is highly desirable, and when using cotton insulation, it is simply necessary to cover our structure with a vapor-and-wind barrier layer. What is it for? As the name suggests, this protection should prevent moisture and steam from getting between the siding, insulation and the wall. If the mineral wool is wet or damp, consider that you have practically no thermal insulation. It also protects the building from being blown out by strong winds. Although there are skeptics who consider this protective layer optional, citing the fact that almost all moisture-proof materials are flammable
But, in my opinion, you should not pay attention to this, since this protection brings much more benefits
The materials used are polyethylene film, good old roofing felt or modern membrane materials such as isospan or technohaut. I won’t go into too much detail here because you can watch it all in the video. Let me just say that the most budget-friendly film is made of polyethylene, and, accordingly, membrane materials are much more expensive. Windproof material is laid along the wall in a vertical direction, with an overlap of about 10-15 cm. In some developed countries, the joints are glued, but in our country it is customary to use self-adhesive tape for sealing.
If the protective film and insulation were laid according to all the canons of construction art, then you will not be afraid of either Siberian frosts or the southern heat.
Slag
This is an inexpensive and accessible type of mineral wool. It is made from glassy or rocky mass, which is waste from metallurgical enterprises. Temporary structures or non-residential premises are usually insulated with slag.
Advantages:
- the possibility of insulating curved surfaces;
- excellent sound insulation performance;
- durability;
- low cost;
- ease of installation.
Flaws:
- does not tolerate temperature changes well;
- has high acidity levels;
- It is recommended to work with the material in overalls, since during its installation, fiber particles peel off.
Builders who use this external insulation consider slag wool to be an inexpensive and durable material with a long service life.
Application area
It is not enough to know what materials are used for insulation and cladding of the facade; it is important to combine them correctly. First of all, when choosing, you should take into account the wall material and type of house, its load-bearing capacity
Houses on pile and column foundations are usually built on unstable soils, so heavy fiber cement and sometimes metal siding are unlikely to be used for cladding. The most acceptable option is vinyl or metal (not all houses) panels.
To cover a brick house on stable ground with sufficient load-bearing capacity, you can use all types of finishing; for a cinder block house, it is better to abandon fiber cement siding and increase the thickness of the insulation.
To decorate a country house that provides only seasonal living, there is no point in spending money on more expensive metal siding; vinyl siding will be quite sufficient.
For houses in the construction of which wood is used, that is, timber, panel, frame, it is undesirable to use polystyrene foam and polyurethane foam insulation. The wall under such heat insulators begins to get wet and rot, which is due to their low vapor permeability. The optimal choice for a log house or a timber house is mineral wool, always with a waterproofing system.
Glass wool
The latest technologies are used in the production of glass wool, so it is completely safe. Glass wool is a universal insulation for a wooden house under siding, since it can be used at any temperature.
Such insulation of a wooden house from the outside with mineral wool under siding has many advantages:
- frost resistance;
- fire resistance;
- glass wool is convenient to use in hard-to-reach places;
- the material does not absorb moisture at all and at the same time allows steam to pass through;
- has water-repellent properties;
- low cost;
- easy to install;
- environmentally friendly;
- resistance to temperature changes.
Flaws:
- undergoes shrinkage;
- has low density;
- thermal insulation properties are slightly worse than those of mineral wool;
- increased fragility of fibers.
Where does moisture get into wood?
There is an opinion that moisture enters the walls of a wooden house from the outside with slanting rain, fog and snow. Precipitation actually moistens the walls. But wet weather does not last so long; the sun and especially the wind help to quickly remove excess moisture. An attentive reader will tell you: the average annual air humidity outside is 78% (data for the Moscow region), and in the house it fluctuates between 40-70% - which means there is more moisture outside and it should penetrate from outside to inside.
But actually it is not. The fact is that climatologists operate with relative humidity, this is the ratio of the proportion of water vapor to the maximum possible, taking into account the temperature. And the colder the air, the less moisture it can contain. To understand the real moisture content in the air, absolute humidity values are used in building physics. In the summer, when the temperature outside and inside the house is approximately the same, the humidity is similar. But in winter and in the off-season the picture is completely different. For example, at an outside temperature of -20 ºС and a relative humidity of 80%, the absolute value will be 0.6 g/m3, and inside the house at 20 ºС and a relative humidity of 60%, the absolute value will be 10.4 g/m3. Accordingly, the actual moisture content in the air inside the house is 17 times higher. It is not surprising that wood, like a pump, absorbs moisture from the inside and releases it to the outside through micropores and joints between logs filled with flax, moss, jute or other “breathable” inter-crown insulation.
It is important to know: most of the year, with the exception of the warm period, water vapor penetrates the wood from inside the house and tends to escape outside, the greater the quantity, the colder it is outside and the warmer it is in the house.
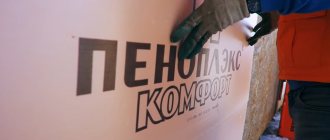
Extruded polystyrene foam
The material is a plate made of foamed polystyrene. It is characterized by high strength, low moisture absorption and excellent heat saving properties.
Advantages:
- ease;
- cheapness;
- durability;
- possibility of internal and external insulation;
- corrosion resistance;
- low water absorption coefficient;
- simple insulation of the walls of a wooden house with your own hands.
Flaws:
- flammability;
- non-vapor permeable.
Stage six. We install siding panels
We will look at the installation of panels using vinyl siding as an example. But we dare to assure you that the installation of the same metal panels is fundamentally no different. First of all, we make sure that all preparatory work is completed and there are no shortcomings or flaws
By the way, this is a very important note, since there are no ideal people and no ideal workers. Man is created in such a way that he is bound to leave something unfinished or make a mistake.
This, of course, is all lyrics and therefore let’s move on directly to the process itself.
Since buildings rarely have an even geometric shape, such as a square or rectangle, we will definitely have a need for additional elements that serve to complete the façade work. The main elements of which are drainage systems that prevent water from getting inside. Initial and final strips, the functionality of which can be understood from the name. These also include external and internal corners, used for connections at external and internal corners, respectively. To join the side connections and fix them, we need J-profiles. For direct connections, a connecting strip is used.
You need to start laying from a predetermined starting point, from where the installation of the first row of panels and fastening of various elements - window strips, corners and starting strips - will begin. The recommendations below will help you ensure that the facade will last a long time and keep the material intact.
- A certain distance of approximately 30 cm should be maintained between fasteners.
- The fastening material (nails, screws) should not be pressed against the siding until it stops, otherwise it may become deformed and fasten them exclusively in the center of the hole.
- Attach hardware strictly at right angles.
The vast majority of sheets are mounted horizontally, for this we first need to install the starting strip. We fasten it so as to cover the upper edge of the foundation. Its installation should be given special importance, since the beauty and neatness of the appearance of the house depends on it. It is necessary to set the strip strictly according to the level, otherwise there is a high chance of wasting time starting all over again. There are no special requirements for the aesthetics of the strip itself; it can be of any color and even assembled from pieces so that it will still be covered with a vinyl panel.
To strengthen the strip as evenly as possible, we determine the location of the siding and screw in the screws. We pull the rope through the screws and use an accurate level to check whether the line is exactly horizontal. Using a marker or chalk, we draw a line along the rope, and using this line, we finally install the strip.
- If there is a need to splice several strips, be sure to leave a gap of about 6 mm between them.
- Under no circumstances should you attach it to the very corner of the building; a special profile is designed for finishing corners.
- You should not put a strip under doors and windows in advance, because you can easily make a mistake with the distance.
The next step is to install the internal and external corner strips. There are some differences in fastening siding from different manufacturers, which are outlined in the included instructions, but they are generally the same. The corner panels are attached in the same way as the starting strip, with the exact location of the fasteners - the middle of the hole. Further installation is not particularly difficult. The only place where you will have to tinker is with window and door openings.
That's all, good luck in all your endeavors and have a warm winter!
Styrofoam
It is a white cellular material consisting of 98% air. The material has excellent thermal insulation properties due to the insulation of the cells. Insulating a house under the siding from the outside with polystyrene foam is a way to protect the wood from the adverse effects of the environment and save interior space.
Advantages:
- has excellent thermal insulation properties;
- the material does not absorb moisture;
- mold and fungus do not form on its surface;
- easy to cut;
- easy to install;
- has an affordable price;
- ease;
- When installing foam plastic, no additional waterproofing is required.
Flaws:
- destroyed upon contact with nitro paints;
- does not allow air to pass through;
- needs additional protection from mechanical damage.
Conclusion
Compared to a brick building, where each brick is placed on a mortar that prevents cracks from occurring, a log house does not seem so successful. But everything is not as bad as it seems, since only here a healthy atmosphere always reigns.
It is advisable to find alternative ways out of the situation and not spoil the appearance of the building. At the same time, the insulation process is not that complicated, so it can be done quite quickly. The video in this article will give you the opportunity to find additional information on the above topic.
Technology of insulating a wooden house from the outside with mineral wool
Properly performed insulation will extend the life of the log house, improve the microclimate in the house and save on heating.
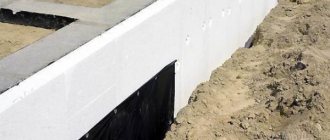
Preparatory work
The reliability and service life of the insulation will depend on the quality of this activity. You need to check the walls for any gaps or cracks. They are cleaned of dirt and dust and blown with antiseptic agents. You can use felt, moss or tow to seal cracks.
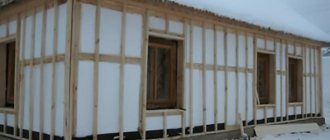
Frame structure
The frame is made of boards with a width of 100 mm and a thickness of 40 mm. They are packed vertically so that the distance between 2 adjacent boards is slightly less than the width of the seal. The sheathing is secured with nails or self-tapping screws. The timber must be treated with antiseptic solutions.
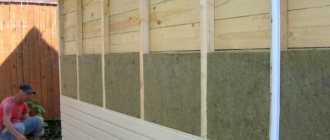
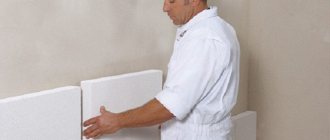
Laying insulation
Mineral wool slabs must be inserted between the frame boards so that there are no gaps between them. It is recommended to lay mineral wool in 2 layers so that the middle of the second layer of slabs is aligned with the joint of the first. Since mineral wool slabs are elastic and rigid, they do not require additional fastening.
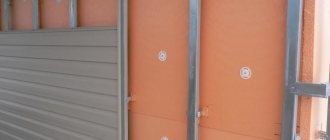
Vapor barrier
This is a very important stage in insulating a wooden house under siding. Can be used:
- roofing felt;
- special vapor barrier film;
- plastic film;
- foil (aluminum).
You need to ensure ventilation of the facade of the house under the film. This only applies to houses with smooth wooden surfaces.
Price for façade insulation work under siding
Any of the chosen methods is easy to do with your own hands, but if circumstances do not allow, you can order work from professionals. Similar work is carried out in any construction company that has finishing specialists. The price depends on the scope of work:
| the type of materials | Material price, rub./m2 | Price of work without material, rub./m2 |
| Membrane waterproofing | From 55 | From 100 |
| Bituminous mastic for wall treatment | From 15 | From 55 |
| Mineral wool (glass/min.) | From 100/250 | From 250/200 |
| Styrofoam | From 70 | From 120 |
| Vapor barrier | From 25 | From 50 |
| Vinyl siding | From 100 | From 450 |
You can save money by doing the insulation yourself and inviting specialists to install the siding. In any case, the work must be done with high quality; this determines whether frequent façade repairs will have to be made, and how warm it will be in the house.
Advantages of cone drills
Stepped products have the following positive properties:
- allow you to make a hole with smoother edges compared to spiral and feather counterparts;
- For holes of different diameters, one step drill is used;
- perfectly centers the hole;
- used for processing very thin sheet metal;
- ideal for processing non-ferrous metals;
- for large volumes of work, it saves time due to the absence of the need to frequently replace drills of different diameters.
A step drill allows you not only to perform high-quality drilling of metals, but also to correct hole defects that were made with other types of products. For example, if the center of the hole is displaced when using spiral analogues, a conical one can completely correct the defect.
It is also possible to expand the holes if necessary to a fixed diameter. Despite the higher cost of cone drills, significant savings can be achieved with frequent use. Due to the absence of the need to purchase a large number of tools of different diameters.
How to connect the backlight yourself
Making and connecting kitchen lighting is easy. LED strips under cabinets are especially popular today. All you need to do is secure it with adhesive tape or fasteners, and then connect it to the network.
Note! As for other lighting sources, they can be connected according to a diagram taken from the Internet. Carrying out work with rubber gloves as a guarantee of safety when connecting lighting equipment
Carrying out work with rubber gloves as a guarantee of safety when connecting lighting equipment
In general, there is only one condition for lighting - it must comply with regulatory rules
At the same time, attention should be paid to a fluorescent lamp or LED backlight due to their economical use. As for the switch, you can install either a surface-mounted switch or a dimmer
You can connect any lighting yourself using simple recommendations.
Why insulate walls before finishing siding?
For specialists, this question does not require an answer, since it is obvious. When installing siding without a heat-insulating layer in the cold season, warm and moist air passing through the load-bearing walls will meet the colder surface of the sheathing. When the dew point is reached, the moisture in the air gap between the wall and the finishing material will turn into condensation, which can penetrate into microcracks in the walls, leading to their increased humidity, and this is detrimental to wooden buildings.
But that’s not all: when the outside air temperature drops below 0 °C, the moisture in microcracks will turn into ice; when freezing, the water expands, which leads to the destruction of walls and other load-bearing structures of the house. Do not think that this only applies to brick or concrete houses. Wooden buildings suffer much more from high humidity and condensation.