The cellar is intended for long-term storage of vegetables and fruits, canned goods, juices and dairy products. If there is sufficient free space, this structure, unlike the basement, is located separately from residential buildings. To store food supplies, it is necessary to create special conditions. High and low temperatures lead to their rapid deterioration. Therefore, it is imperative to insulate the walls of a concrete grounded cellar. This process is simple enough to do it yourself without the involvement of professionals.
We insulate the ceiling of the cellar
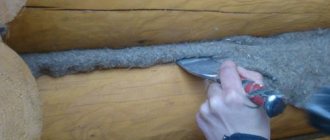
Before starting insulation work, we check the entire surface of the ceiling in the basement for cracks, potholes, etc. We carefully clean all these defects and seal them with a solution or carefully blow them out with foam. After this, we treat the entire surface of the ceiling with antifungal solutions (quicklime or copper sulfate).
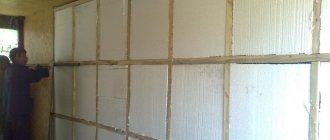
There are a lot of options for insulating a basement ceiling in a garage - from polystyrene foam to reflective insulation.
The ceiling can be insulated with any of the materials described above; for insulation with mineral wool or glass wool, a special frame will be required, which is then sheathed with HA sheets, plastic, plywood, etc. Installation of polystyrene foam or expanded polystyrene can be carried out on parachutes with the preliminary application of a special solution, then the mesh is applied and plastered surface and painted, you can also use facing material (decorative tiles, panels, etc.). Decorative cladding material can also be used for reflective thermal insulation.
Recommendation! Before insulating the ceiling, all electrical wiring for lighting should be done, and the wires should be laid in non-flammable corrugation.
Footer care rules
As mentioned above, footer is a fabric that is not at all fancy in everyday life. But still, I advise you to follow a few simple rules in order to extend the life of your favorite things:
- When washing, use the delicate cycle;
- The optimal water temperature for washing items made from footer is 30 degrees;
- To avoid damage to the fabric by the fittings, it is better to turn the product inside out before washing, while fastening all the buttons or zipper;
- Do not use high speeds when spinning;
- Do not leave clothes to dry in the sun for a long time, otherwise the fabric may be damaged by sunlight;
- It is recommended to wash children's clothing with soft, gentle powders;
- Iron the footer from the inside out.
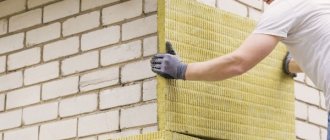
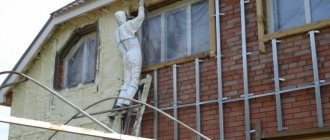
Insulation of basement walls from the outside using materials from TechnoNIKOL
A large number of brands of insulation are offered by the famous Russian manufacturer of materials for facades and roofs, TechnoNIKOL. Among them is Carbon series polystyrene foam.
Note!
A distinctive feature of the brand is the presence of an L-shaped groove on the edge of the slab, which simplifies installation and eliminates cold bridges at the seams.
The slabs are installed on a pre-cleaned, prepared and waterproofed base using glue. Suitable compositions are Ceresit, Caparol.
Laying rules:
- The adhesive can be applied in a continuous mass, dotted or along the perimeter of the slab with two additional lines in the middle.
- The top row of PPS slabs is laid with joints spaced apart from the bottom row.
- After 24 hours, when the composition has completely hardened, the masonry should be reinforced with plastic dowels with wide plate-shaped caps at the rate of at least four pieces per PPS workpiece.
- Next, you need to lay a mesh with a cell size of up to 7 millimeters on a special reinforcing compound and cover it with the same compound.
- Finishing options: facade plaster + painting, tiled coating.
DIY basement insulation technology
Let's look at how complex basement insulation is carried out using penoplex (the technology will be similar for polystyrene foam and expanded polystyrene). Note that comprehensive thermal insulation includes external and internal insulation (in particular walls, floors, ceilings).
In addition to insulation for work you will need:
- material for interior decoration;
- polyurethane foam;
- reinforced polymer mesh;
- waterproofing material (bitumen mastic);
- adhesive solution;
- concrete or external plaster;
- tool.
In order for the insulation of the basement from the inside to be sufficient for the minimum level of heat loss, the thickness of the insulation should be:
- 10 centimeters for polystyrene foam;
- 8 centimeters for polyurethane foam.
But it is recommended to increase this value by 40 - 50% if the basement is supposed to be heated and maintain a temperature of 20 - 25 degrees in order to reach the recommended level of thermal insulation.
If water penetrates, then it is unacceptable to insulate from the inside.
Insulating the basement from the inside is a necessary measure when external insulation is impossible or not cost-effective. Internal insulation of the basement can only be carried out on dry foundation walls. But this poses a risk of increasing the rate of destruction of the foundation due to its freezing.
If water penetrates into the basement from the ground through the foundation walls, then laying insulation on the inner side surface of the foundation is strictly prohibited.
Internal insulation will cause even greater moisture in the foundation, and will also lower its temperature in winter, since there is no external insulation.
The freezing area inside the foundation will increase significantly, which, coupled with increased humidity, will very quickly damage the foundation.
How to drain and drain water
Eliminating water penetration into the basement from the ground is either difficult or impossible. More often it is necessary to install a drainage system around the house or repair the existing one.
In this case, it is necessary to tear off the foundation from the outside. In this case, talking about internal insulation loses all meaning, since the foundation walls become free for external insulation and for additional waterproofing.
There may be other drying options. Sometimes the issue is resolved comprehensively for a group of houses or an entire village, by opening a drainage ditch.
Sometimes the basement can only be drained by installing a well with a pump. Although pumping out a spring under a house is an extremely thankless task, what should you do? This source of water can serve the purpose of water supply to the house, so not all the work of the pump will be “wasted”.
Thus, for a wet basement there is only one method of insulation left - external with preliminary drying of the soil.
If finishing is required
In the basement, polystyrene foam does not require additional protection, since sunlight does not penetrate into the basement. Therefore, the layer you paste on the wall yourself does not need to be covered with additional protection.
If finishing is necessary, then the easiest way to insulate the basement from the inside is to do the following:
- coat the polystyrene foam with a thin layer of glue using an 8 mm notched trowel;
- drown a plaster fiberglass mesh with a cell size of 4 - 5 mm in glue;
- Apply another layer of glue on top of the mesh with a shaped roller, obtaining a shaped surface that is suitable for painting.
But this simple option can be replaced with any other finishing option, with the exception of heavy finishing (ceramic tiles, stucco...), and methods where it is necessary to break through the continuity of insulation. Most often, either figured plaster or leveling the wall under wallpaper is used.
Which material to choose
Thermal conductivity coefficient of various insulation materials
The basement level is constantly exposed to lateral and vertical pressure, dampness, acids, insects and rodents. These factors must be taken into account when choosing insulation. There is a wide range of materials on sale, differing in price, performance characteristics and installation features. When making a choice, you should evaluate each product property.
Expanded clay
Expanded clay is balls or sharp porous granules obtained by vulcanization of natural clay. The material is more often used when constructing roofs in residential buildings and outbuildings.
Floor insulation scheme with expanded clay
The product has the following advantages:
- affordable price;
- low density;
- ease of use;
- environmental Safety;
- low thermal conductivity.
Styrofoam
Foam is easy to process and has high water resistance
Polystyrene foam is a time-tested material that is used in private and industrial construction, in preparing country houses and garages for winter.
Expanded polystyrene has the following advantages:
- excellent insulating properties;
- waterproof;
- low specific gravity;
- ease of processing and installation;
- small price.
Disadvantages include fragility and toxicity when burning.
Penoplex
Thanks to the spongy structure, penoplex is easy to cut
The decision to insulate the basement from the inside with penoplex will create high-quality and reliable protection of the room from dampness, temperature changes, insects and rodents.
Polymer material has the following advantages:
- dense structure, eliminating crumbling and breaking during installation;
- low thermal conductivity;
- almost zero hygroscopicity;
- long service life;
- environmental cleanliness;
- repellent effect on living beings;
- wide temperature range;
- resistance to alkalis and acids.
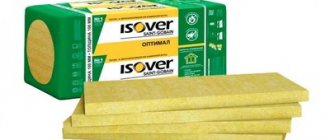
Minvata
Mineral wool is a good thermal insulator
The industry produces mineral wool from broken glass, steel slag and natural stone. The finished products are fibers randomly bonded in space. Mineral wool is produced in the form of mats and rolls, the thickness of which is 100-400 mm.
Advantages of the material:
- ease;
- low thermal conductivity;
- elasticity;
- flexibility;
- durability.
The disadvantage is its hygroscopicity and the release of many volatile particles harmful to health during installation.
How to insulate a ceiling in a cellar
To organize a favorable microclimate, you need to know how to insulate the ceiling correctly and so that new problems do not arise. Penetrating cold air forms condensation on the ceiling. Simply covering the cellar will solve this problem.
Insulation of the cellar ceiling, work plan:
- Inspect the basement from above. Take a close look at the surface for seams and cracks that may exist between the concrete slabs. To eliminate them, you need to lubricate the problem areas with putty with antiseptic additives. This will insulate the basement well.
- A special membrane is installed on the areas treated with putty. It promotes normal moisture release throughout the entire period of operation. The membrane is better than other similar material as it prevents the penetration of moisture from the outside. If you didn’t know how to insulate the cellar lid, then a membrane is the best option.
How to insulate a damp space? A better solution than vapor barrier would be to install sheathings on the sheathing. It is necessary to select a material that will show excellent performance even in a damp space. Any strong bars can act as hangers, but their installation takes a lot of time. Insulation of the cellar lid, both outside and inside, can be done using a galvanized profile, which is attached to hangers.
Spray polyurethane foam
The most modern and high-tech insulation option. The insulating layer is applied using a special sprayer and after application it hardens, forming a porous layer of material similar in characteristics to polystyrene. In addition, this type of insulation can be used both for internal insulation and for external work. This will help create an effective heat-insulating gasket in cases where the building is free-standing and the ceiling freezes.
The only disadvantages of this solution include the high cost of implementation and the fact that the technology of applying polyurethane will not allow you to insulate the ceiling in the cellar yourself, without the use of special equipment. If the cost of the work and the ability to do everything yourself is crucial for you, then it is better to insulate the ceiling in the cellar with penoplex or polystyrene - the layers of these insulators are simply glued to the desired surface with a special glue.
vote
Article rating
Is it necessary to insulate the basement?
From the description above, it becomes obvious that yes, it is better to insulate the basement. Let's give a few more arguments for those who doubt:
- effective use of usable area;
- the appearance of fungi and mold in the basement, which are a source of unpleasant odors and deterioration of the microclimate on the lower floor of the house, is excluded;
- the temperature in the insulated basement does not drop to below zero;
- insulating the basement in a house makes it possible to protect the foundation from dampness and deformation due to soil heaving;
- the rate of destruction of the building foundation is reduced;
- the consumption of electricity or gas for heating the house is reduced.
Note. If the basement is not insulated, according to GOST 9561-91 “Reinforced concrete floor slabs” it is necessary to insulate the floor that separates the floor of the first floor from the non-insulated area. The same requirement is specified in SNiP 2.08.01-85
For your information, the technology for insulating a cellar is similar, but has some differences.
Thermal insulation of the basement
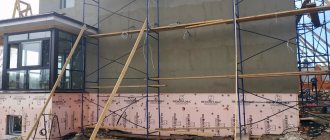
There are two ways to insulate a cellar: from inside the room and from outside. According to experts, the most effective is still external insulation. With this method of thermal insulation, the material is installed outdoors (outside the room), thereby preventing the walls from freezing.
Basement wall insulation scheme.
There is only one technology for external insulation of a cellar: you need to dig out the entire structure that forms the underground storage, and then carry out full waterproofing and insulation of the cellar walls. Of course, all existing water leaks must be repaired.
Of course, carrying out such work requires a lot of money. Just digging up the soil will take a lot of effort, money, and time. But the end result will be a complete insulation system for your cellar, which will have waterproofing properties. If you do something, do it for a long time. All temporary options will bring absolutely nothing but continuous waste of your money and time.
When insulating a cellar from the inside of a room, it should be taken into account that condensation will certainly appear at the joints of the insulating material and the wall, which will cause damage to any coating. Based on this, it is imperative to carry out thorough waterproofing on the entire plane of the walls. Also, when insulating the cellar from the inside of the room, it is necessary to use only such insulating material that perfectly tolerates moisture.
Today, the most reliable thermal insulation material for this type of room is extruded polystyrene foam. This is ordinary foam plastic that has been processed by extrusion. During this process, it turns into an unbending, dense and fairly rigid slab. She is not afraid of practically anything: neither cold nor dampness. Only exposure to ultraviolet (sun) rays is harmful to it. Therefore, polystyrene foam is the most ideal thermal insulator for basements and foundations.
Very important!
Useful tips
If you decide on external thermal insulation of the basement, a few tips will be useful for you that will help increase the efficiency of the measures taken:
It is better to carry out insulation in dry and clear weather. Especially if instead of EPS you use regular foam, which is less resistant to moisture. Never neglect waterproofing
This operation not only prevents damage to the insulating material, but also protects the foundation and walls of the basement from destruction. When choosing a mastic with which you are going to glue foam or EPS, pay special attention to its hydrophobic properties. And do not apply it pointwise (as I described for interior work), but in a continuous layer
Then it will play the role of another waterproofing agent. The edge of the glued insulation material must rise above the ground level (after backfilling) by at least 50 cm.
A basement like this is everyone’s dream.
Choosing insulation
We decided to insulate the cellar, but we don’t know how to do it, and most importantly, what material to use.
Let's look at how to insulate a cellar in a garage using modern materials that experts use to insulate basements:
- polystyrene foam or extruded polystyrene foam;
- mineral wool;
- “warm” plaster;
- glass wool;
- reflective thermal insulation.
Insulating a cellar in a garage with the materials described above allows you to achieve good thermal insulation properties and prevent the appearance of fungus in the room, but each material has its own advantages and disadvantages.
Extruded polystyrene foam or polystyrene foam
Advantages:
- simple installation;
- environmental friendliness;
- you can use extruded polystyrene foam for floor insulation;
- service life up to 40 years or more;
- excellent water resistance;
- low cost;
- perfectly tolerates sudden temperature changes.
Flaws:
- is flammable;
- does not allow air to pass through.
Helpful information! Extruded polystyrene foam differs from polystyrene foam in its increased density and strength. Thus, the thermal conductivity coefficient of extruded polystyrene foam will be higher than that of polystyrene foam with the same thickness of the material. In addition, only extruded polystyrene foam is used to insulate the floor covering.
| Characteristics | Expanded polystyrene PSB-30 | Foam plastic PSB-35 |
| Density (kg/m3) | 30−32 | 27−29 |
| Thermal conductivity coefficient (W/mK) | 0,032 | 0,038 |
| Compressive Strength (MPA) | 0,25 | 0,08 |
Important! When using polystyrene foam or extruded polystyrene foam as thermal insulation, it will be necessary to treat all surfaces with a primer before starting work and, upon completion, additionally plaster the walls using reinforced plaster, and make a screed of cement and sand on the floor
Mineral wool
Advantages:
- allows air to pass through, allowing the room to “breathe”;
- excellent sound insulation;
- excellent thermal insulation;
- affordable price;
- long service life of 30 years or more.
Flaws:
- an additional frame for installation is required;
- allows moisture to pass through;
- work is performed in special clothing and gloves.
Important! If mineral wool is chosen as insulation, then it will be necessary to additionally make a vapor barrier in the basement to prevent moisture absorption by the wool itself and deterioration of its thermal insulation properties
"Warm" plaster
Advantages:
- excellent thermal insulation;
- affordable price;
- excellent sound insulation.
Flaws:
- it is necessary to apply a thick layer for good thermal insulation;
- difficulty in installation.
Recommendation! It is optimal to use “warm” plaster to cover surfaces together with other thermal insulation materials in order to achieve good thermal insulation.
Glass wool
Advantages:
- low cost;
- good thermal insulation properties;
- good sound insulation properties.
Flaws:
- work is performed in special clothing and gloves;
- an additional frame for installation is required;
- allows moisture to pass through;
- If exposed to moisture, it may emit an unpleasant odor.
Important! If mineral wool is chosen as insulation, then it will be necessary to additionally make a vapor barrier in the basement to prevent moisture absorption by the wool itself and deterioration of its thermal insulation properties. In addition to the vapor barrier material, it is necessary to use film or foil to insulate glass wool
Reflective Thermal Insulation
Advantages:
- high thermal insulation properties;
- material thickness is only from 2 to 5 mm;
- simple installation;
- possibility to use facing material.
Flaws:
- price;
- possible heat loss
Important! Reflective thermal insulation is quite thin and, like a mirror, will reflect infrared heat when reflected. As a result, it is not efficient enough at convection or induction of reflected heat, which leads to heat loss.
Video description
Video on how to thermally insulate a cellar with sprayed insulation:
Several options are possible:
- Expanded clay granules of the required thickness are poured onto level, cleaned and prepared soil. Then reinforcement is laid on top and a concrete screed is poured.
- Penoplex is laid on a smooth soil surface. A waterproofing coating is laid on top of it. Then a concrete screed is made in a layer of 5 cm.
- The leveled ground floor is poured with molten bitumen for waterproofing. Next, a 10 cm layer of crushed stone is poured, and then a 5 cm layer of sand. Then the material is compacted, and rigid insulation is laid on top. Finally, a concrete screed is performed.
A rigid, moisture-resistant material should be used as the basis for floor insulation. It is allowed to use mineral wool, but subject to reliable waterproofing.
Recommendation! Thermal insulation of an underground storage facility would not be complete if the entrance area was not insulated - be it a door or a hatch. It is best to use double-sided structural protection and also seal the joints well. The materials must be sufficiently stable, as they will be constantly subjected to dynamic loads.
Types of cellars for a private home
When deciding how to insulate a cellar from the inside or outside, the type of cellar is first taken into account:
Above ground cellar
Above ground cellar
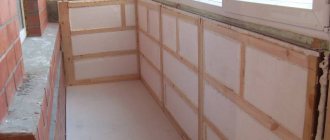
A separate room with a depth of up to 0.5 m into the soil. It can be free-standing or wall-mounted (one of the walls of the cellar is the wall of an outbuilding or garage). From the point of view of insulation, this is the simplest option, because It is possible to insulate the walls and roof from the outside and inside.
Deep cellar (semi-underground)
Deep cellar
The lowest point of the building is located at a depth of no more than 1.5 m from the ground surface. In this case, in addition to insulation, you should also think about neutralizing the effects of groundwater and frost heaving of the soil.
Underground cellar (bulk)
Underground (bulk) cellar
It is distinguished by the location of the floor at a level of 2-3 meters underground. With proper waterproofing, this is the most advantageous cellar from the point of view of operation, which perfectly maintains above-zero temperatures, approximately constant, throughout the year.
Despite the differences in construction, the design of the cellar is not diverse.
Standard cellar design:
- walls - if the soil is dense - soil, if the soil is moving - brick or stone;
- there is no floor, or rather it is dirt;
- ceiling - reinforced concrete or wood.
Accordingly, the ceiling, walls, and floor are insulated. Those. all cellar surfaces through which heat loss is possible.
Ventilation device
The first stage of insulation is the installation of a ventilation system in the underground, which will ensure air circulation inside the room and prevent the formation of condensation on surfaces.
Underfloor ventilation consists of installing two pipes on different sides of the room. The optimal location of pipes is on the south and north sides of the house. The installation of pipes is carried out in accordance with the laws of physics, cold air tends downward, and after warming up it rises.
The supply pipe is located at a height of 20-30 centimeters from the basement floor, and the inlet pipe - 40 cm from the ground. The outer opening of the pipe is covered with a fine mesh - protection against rodents entering the basement.
The outlet pipe is placed 30 centimeters below the basement ceiling. And its upper end is brought out onto the roof of the house. The top of the pipe is covered with a protective cap. This arrangement of pipes will ensure optimal air movement in the underground and protect the room from mold.
The final stage
By installing a thermal insulation layer on the ceiling in the cellar, its owner will solve the problem of cold and water entering the room. But moisture can still form in this part of the house. And the reason for this is that the material is not able to remove it from the cellar. At any moment, condensation will appear, which will cause the spread of unpleasant mold and rot. All this will provoke active reproduction of the pathogenic fungus, which should not be allowed in cellars. A special hole that will perform the functions of standard ventilation can solve the problem. Air circulation will help quickly remove steam from the cellar.
Insulation of cellar walls from the inside
Cellar floor insulation scheme.
Now you need to insulate the cellar from the inside. Getting started involves choosing insulation. Foam plastic has proven itself well.
It has a number of advantages:
- not damaged by moisture;
- strong enough, does not crumble;
- does not rot;
- does not need to be isolated from water by film devices;
- easy to install;
- has little weight.
The disadvantages of polystyrene foam are its high flammability and the fact that it is damaged by rodents. It is better not to lay it near electrical wiring.
Insulation of walls with foam plastic is carried out in several stages:
- treating walls with foam or sealing with sealants;
- smoothing out irregularities;
- insulating the surface from moisture using liquid rubber;
- insulation with foam plastic (work on insulating walls with foam plastic begins from their lower part, the plates are joined and glued, the cracks are treated with foam, the insulation is fixed with dowels);
- strengthening the mounting mesh and plastering.
The ceiling and ground floor also require a number of works on arrangement and insulation. The fact is that the reinforced concrete floor slab that serves as the roof can allow rain and melt water to pass through cracks, does not protect against the cold, and overheats greatly in the summer, which is unacceptable for storing food.
https://www.youtube.com/watch?v=6mInDEJmkrs
Insulation and ventilation of the basement
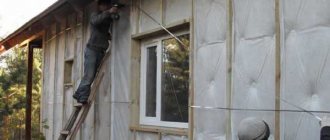
Insulation technology can vary significantly depending on the type of basement structure. If there is an above-ground structure, the main emphasis should be on installing insulation inside and outside the structure. Foam plastic is best suited for such tasks. The technology for installing these materials involves carrying out all work outdoors.
Basement insulation, stages of work:
- Check the walls for damage.
- Remove all unnecessary items from the basement.
- Cleaning the hatch.
- Removing all detected defects.
- Basement waterproofing.
- Fixing rigid insulation boards.
- Attach a polymer mesh to the surface.
- Blow foam over the joints of the sheets.
- Apply plaster.
Features when working with acrylic paints
Acrylic paints are an inexpensive material that is easy to work with and dries relatively quickly. But the disadvantage is the narrow palette of colors, so you need to create the desired shade manually. You can get burgundy, lilac, turquoise, sand, wenge, lilac, and others by mixing colors.
Mixing colors
There are some rules when working with acrylic:
- The surface to be painted must be smooth, clean, free of oil and grease stains. It must first be cleaned of the previous finish. It is not recommended to apply a new coat of paint over an old one;
- Before painting, the walls need to be leveled with putty, and then several layers of primer must be applied. The primer is used for better adhesion of paint and for less paint consumption;
- Before use, acrylic must be diluted with water or special solvents, but it is better to do this in a separate container with a portion of paint. This is necessary in order not to spoil the entire volume at once, but to use only as much as needed.
- After use, used rollers and brushes must be rinsed thoroughly with water, otherwise they will become unsuitable for further work. You also need to wash other tools that were used. The top of the paint bucket needs to be wiped down so that the lid can be opened in the future.
- Most often, painting occurs in 2-3 stages, and for an effective result, this must be done in one direction. To simplify and speed up the work, you can take a spray bottle.
Important! Also, do not forget about precautions; before work, it is better to cover or seal all places and objects that will not be painted. You can work with the material at a temperature not lower than 5 degrees and not higher than 27 degrees
Another main rule of application is to use paint first on a small area or a completely separate surface. When creating the desired shade, it is better to try it on a draft. You also need to wait until it dries completely, as after that the color becomes a little darker or lighter, depending on the type of paint. And if the color matches the expected desired result, then you can start painting the surface or decorating objects.
Options for insulation materials and their characteristics
There are several types of basement insulation, each of which has its own characteristics.
Styrofoam
One easy way to insulate the inside of a basement wall is with foam insulation that is glued or attached directly to the concrete.
Advantages of the material:
- moisture resistance;
- does not rot, is not affected by fungus;
- not expensive;
- creates a vapor barrier;
- easy to install and cut;
- does not add load to structures.
Disadvantages of polystyrene foam:
- fragility;
- instability to fire, release of toxins when ignited;
- rodent damage.
Expanded polystyrene
Similar in characteristics to foam plastic, but does not have fragility. The material is not attractive to mice. Just like foam plastic, it requires a flat surface for installation and forms so-called “cold bridges” - cracks between the joints. They require additional sealing with polyurethane foam. The material is much more expensive than foam.
Expanded polystyrene - material for basement insulation
Rigid polystyrene foam panels will create a barrier on the basement walls that will hold back water and condensation that could otherwise accumulate in the basement, contributing to higher humidity levels and mold growth.
Polyurethane foam
Insulating basements with polyurethane foam is the most modern method. The material is applied by spraying. Distributing directly onto concrete walls, it provides uniform and complete thermal insulation. The foam should be covered with drywall for fire protection.
Advantages:
- sticks to all substrates (steel, concrete, wood);
- since it adheres perfectly to substrates, it can be used to continuously seal structures without creating any joints (a major advantage over polystyrene);
- serves as an air barrier;
- serves as a vapor barrier;
- resistant to temperature changes;
- does not rot;
- durable;
- quickly applied.
The disadvantage of application is the need to use a high-pressure installation, which precludes self-application. Hiring specialists is an expensive undertaking.
Mineral wool
Mineral wool is a traditional insulation material with proven effectiveness.
Pros:
- Mineral wool is inexpensive compared to other materials for basement insulation.
- Easy to install yourself.
- High thermal insulation properties.
Minuses:
- The material in the basement is susceptible to mold.
- Mineral wool is permeable, which does not prevent the contact of moist indoor air with structures. This may cause moisture condensation.
- If the integrity of mineral wool is compromised, it releases harmful particles that can get on the skin and into the respiratory tract.
Mineral wool - material for basement insulation
The material can become saturated with moisture from flooding the foundation, water flowing through the walls, and even from water vapor passing through the pores of the concrete. Wet mineral wool loses much of its core value and as it gets heavier it sag, leaving gaps in the insulation. Over time, a damp coating will encourage the growth of mold and mildew. The risk of moisture problems is reduced if the concrete is first covered with a solid layer of rigid foam. It is better to use mineral wool to insulate dry basements.
Expanded clay
The material has a narrow scope of application - it is used only for floor insulation. Has high moisture-absorbing and heat-insulating properties. This is a simple and effective remedy, economical in cost.
Ventilation and waterproofing layer
Insulating the basement of a private house requires the provision of high-quality waterproofing and ventilation. They help prevent premature wear of almost any insulation.
Waterproofing
There are many methods and materials for waterproofing a basement from the inside. The simplest and most reliable is surface treatment with liquid rubber. This is a water-based polymer-bitumen mass. The material is quite easily applied to the surface in any way: brush, roller or spatula.
Before starting work, it is necessary to ensure good ventilation of the room. Then a primer is applied to the entire surface, which is usually sold complete with bitumen paste. The mastic is mixed with a construction mixer and applied to the walls, floor and ceiling in any convenient way.
After drying, a homogeneous rubber layer is obtained. Despite the fact that the adhesion of waterproofing to the surface is very strong, it is necessary to additionally press it against the walls and floor so that even after several years, leaking water cannot tear off the rubber layer. To do this, a screed is made on the floor, and the walls are plastered, lined with brick or tile.
Ventilation
One of the simplest ways to ensure cellar ventilation is to install special vents in the foundation or two supply and exhaust ducts made of PVC pipes with a diameter of 1 to 5 centimeters. The operation of such a system is based on the temperature difference between the air coming from the street and the basement air.
Drainage
Additional protection is provided by drainage channels dug around the foundation, forming a single system. A drainage ditch is dug outside the building, and its depth is 0.2–0.3 meters. Next, geofabric is laid and crushed stone is backfilled. After laying the drainage pipe, cover it with geotextiles and fill it with sand or carefully compacted soil. The arrangement of a drainage system is necessary when the groundwater level is high.
Step by step instructions
We will present in detail the installation of an insulating “pie” for various floor arrangement options.
Floors on joists
Vapor barrier for the floor in a wooden house provides different options, the choice of which depends on the design features of the building.
A wooden floor is most often laid on logs, which, in turn, rest on the ground in the basement, a concrete screed, or are mostly in the air supported by pillars.
Installing joists directly on an earthen floor is a budget option in construction and can only be found in old country houses. The joists and the finishing layer are susceptible to getting wet from moisture from the soil, especially with temperature changes. Mice and rats will definitely make underground passages and annoy their owners.
If a concrete screed is not provided in the basement or subfloor of the house, then the preferred option is to lay the floor on wooden logs, which are attached to the walls and supported on brick (concrete) pillars.
With this option, an air cushion is formed under the subfloor, which slightly dampens the effect of the cold base on the temperature in the house. In any case, the floor on the joists needs insulation, hydro- and vapor barrier, and wind protection.
Correctly lay floors on joists in the following sequence:
- Level the base, using shovels to remove excess soil.
- Compact the soil with a vibrator or tamper made from a piece of log.
- A layer of crushed stone 8-15 cm thick is poured, compacting it with a tamper.
- In areas of future brick supports, formwork is constructed 10-15 cm larger than the geometric dimensions of the columns.
- The formwork is poured with concrete. Further work begins after 5-7 days - this is a sufficient waiting period before starting work, although complete setting of the concrete occurs within 28 days.
- Cover the concrete base with a layer of waterproofing (roofing felt, roofing felt) and build support posts for the logs, trying to maintain the level.
- Before laying the logs, the columns are covered with a waterproofing layer.
- The logs are mounted, attaching them to the walls and supports. Level the top edge, cutting off excess wood.
- A block is nailed to the sides of the joist, which serves as a support for the subfloor (rolling).
- Cover the nailed bevel with a waterproofing membrane (necessarily with an overlap on the joists), which will serve as protection for the insulation.
- The insulation is laid close to the joists, the cracks and voids are filled with polyurethane foam.
If polystyrene foam or extruded polystyrene (penoplex, penoplex) is used as insulation, then there is no point in laying a layer of vapor barrier - the materials do not absorb moisture, and condensation will evaporate as the air dries, without harming the insulation. At the same time, the logs at the joints with the foam are also protected from getting wet by a layer of foam.
- A layer of vapor barrier is nailed down.
- Install floorboards.
Wooden floors
Up to 20% of the heat escapes through the ceiling of the house into the outside space, so it is imperative to insulate the ceiling separating the rooms and the attic.
In the summer heat, the insulation will keep the house cool, and the soundproofing properties of the heat insulator will create comfort.
The attic and rooms of the house in any climatic conditions differ in temperature background, therefore, when installing insulation, be sure to use vapor and waterproofing, which will prevent the formation of condensation on the ceiling and walls.
The order of the rows is similar to the insulation and vapor barrier of the floor on the joists.