I've been thinking about insulating the ceiling in my garage for a long time, but never got around to it. It seemed to me that it was expensive and time-consuming. I didn't know what material to choose. There were many excuses. The mood changed after a conversation with a neighbor. He boasted that he insulated the ceiling in his garage for pennies. According to him, he spent 1,500 rubles on everything.
The cheapest insulation of a garage ceiling from the inside
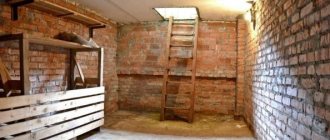
To understand, both mine and my neighbor’s garage are located in a garage cooperative. The walls are half brick and the ceiling is wooden. They are not insulated with anything. Both he and I have stoves. In severe frost, the stove saves little. When it is -25 outside, in 5 hours of continuous heating it is possible to warm up the garage to +10. The next day the heat was gone. There are no working conditions. Anyone who has repaired a car in cold weather understands.
In general, in winter I cursed everything in the world and promised myself, as soon as it got warmer, I would take up the issue of insulating the ceiling. As we know, most of the heat leaves through it due to the fact that warm air is lighter than cold air and goes up. It turns out that the stove heats the street more than the room. In the spring, of course, the winter inconveniences were forgotten. I was working on the dacha and had no time for repairs in the garage.
A neighbor reminded me of a promise I made to myself. On the weekend, as usual, I went to the garage. And there the neighbor is busy with work. I looked in and we started talking. He showed how he insulates the ceiling from the inside with ordinary 50-gauge foam. I bought it for 1500 rubles. Cheap and cheerful. Actually, this is something that I didn’t dare to do for a long time. Many people criticize polystyrene foam - they say it burns, mice chew it, chickens peck. But in fact, you won’t find warmer and cheaper insulation!
Air exchange rates
According to SNiP 21-02-99 “Car Parking”, a warm garage must be equipped with supply and exhaust ventilation, and in such a room the air temperature must be maintained no higher than 5°C.
Ventilation in the garage is needed to:
- dry the room intensively;
- dilute and remove exhaust gases;
- dry the car.
ABOK standard “Residential and public buildings. Air exchange standards" requires at least 180 cubic meters of fresh air per hour per passenger car.
Foreign manufacturers of ventilation equipment (XPELAIR, UK) believe that a garage should provide 6-10-fold air exchange: for a garage with a volume of 60 m3 - from 360 to 600 m3/h.
MatildaFORUMHOUSE Consultant
No one in their home adheres to these standards, but it is necessary to ventilate at least 0.5 - 1 volume per hour, otherwise the machine will begin to rust.
I'm telling you how I insulated the garage ceiling from the inside for pennies.
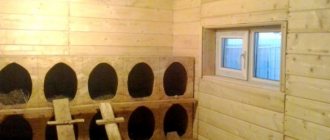
After watching how my neighbor insulated his ceiling, I went to the market. I bought a set of foam plastic boards 1000x2000 cm, 5 cm wide. They cost me a little more than what my neighbor bought - 1650 rubles. Plus I used round white washers for the screws for the insulation. Spent 1780 rubles.
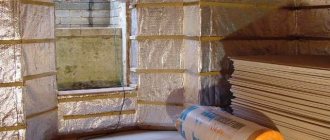
There is, in fact, nothing to explain further. Installation on a wooden ceiling is very simple:
- I prepared the ceiling: I walked over it with a stiff brush to remove dust and dirt. He brushed away the cobwebs.
- I started the installation from the far corner. I pressed the foam with a self-tapping screw in the center, and then screwed in 4 more in the corners. This is how I laid slab to slab. I cut it where necessary with a cutter.
- As a result, there were cracks here and there and gaps near one wall. I cut out the necessary polystyrene bushes for them. I foamed all the cracks.
We recommend: Why fire buckets are conical - 8 versions
It was possible to glue foam onto foam. But it seemed longer to me. Until everything sets, you will have to stand and hold the stove with your own hands. Or look for something to support the foam in several places. I slowly insulated the garage ceiling over the weekend. I worked for 4 hours. I have zero experience in construction and insulation.
PVC panels
These panels are easy to install, taking no more than 4 hours. At the same time, the service life is truly impressive, which, in tandem with ease of maintenance, makes this material a favorite in the eyes of supporters of practicality. Any household chemicals are suitable for cleaning. Regarding the external component, the modern assortment always allows you to choose something to suit your taste. The galaxy of advantages of PVC is completed by a very reasonable price.
PVC panels on the garage ceiling
The only drawback of PVC is its fragility. However, if you handle it carefully, there will be no problems; just refrain from hitting the panels.
Installing PVC plates on the ceiling involves the following sequence of actions.
Step 1. Prepare wall-to-wall panels. The panels will be located across the frame profiles. For your own convenience, you should cut the canvas with a construction knife, not forgetting to break off the dull end.
How to cut and bend PVC panels
Step 2. Cut a chamfer on the first board so that it is in closer contact with the guide. This will prevent a dust streak from appearing.
Step 3. Fix the panel with self-tapping screws and press washers. This will ensure the strength of the structure even when deformed under the influence of temperature.
PVC panels are attached to the metal frame with a self-tapping screw and a press washer.
Step 4. Shorten and trim the board. To calculate the appropriate width, you need to measure the distance from the deep edge of the profile to the near end of the penultimate panel, and then subtract 5 mm from the resulting value.
Installation of PVC panels on a wooden frame
Step 4. Insert the final element of the new ceiling first into the guide, and then push it into the end groove of the adjacent board (preferably with wet palms for better grip).
Video - Installation of PVC panels on the ceiling
This algorithm, with some differences, is also used when installing drywall and OSB boards.
Pros and cons of ceiling insulation with foam plastic
Before deciding to insulate the garage ceiling with polystyrene foam, I heard a lot of different “horror stories”. I won't even list them. I think you know everything yourself. I will only write what I noticed myself. I'll start with the positive points:
- Inexpensive. Insulating the ceiling in a garage costs less than 2,000 rubles (pennies compared to other options).
- Easy. During work, your hands practically do not get tired.
- Easy to install. You can insulate the ceiling without special tools and assistants.
- Fits well. You can remove excess on the go with a cutter.
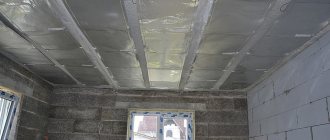
- Excellent heat retention. The garage has become warmer, and it is noticeable.
I read somewhere that 5 cm of foam plastic is equivalent in thermal conductivity to a meter of brick laying! Now regarding the disadvantages of insulating the ceiling with polystyrene foam:
- The material is fragile. You have to work carefully. If you accidentally hit the ceiling with something hard, it will leave a depression. But it can be foamed.
- Steals ceiling height. My ceiling is already low, but with insulation it became even lower. But that's how it is.
- The foam shrinks in size.
You need to buy it about a month before the planned work. This is what my neighbor advised and he turned out to be right. The foam plastic has indeed shrunk somewhat, if you can call it that. If I had insulated the ceiling with it right away, cracks would have appeared. I strongly advise you to let him rest!
Expanded polystyrene
This type of insulation is a derivative of polystyrene foam; their characteristics are very similar, but there are significant differences:
- Much denser than foam;
- It is heavier in weight; when insulating a roof with this material, sheathing is required;
- Does not absorb moisture;
- In terms of price category it is inferior to foam plastic.
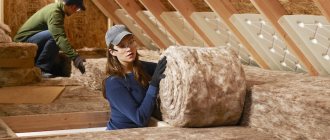
Manufacturers also offer materials such as glass wool and mineral wool for insulation. Glass wool is also an inexpensive insulation material if you don’t buy brand names.
The advantage over polystyrene foam is that it is not flammable. The disadvantages include the fact that its fibers are very fragile and cause irritation when working with this material.
Despite all its advantages, the use of this insulation is not justified if no work is carried out in the room that causes a fire.
Having considered the proposed materials, each garage owner will decide for himself how to cheaper insulate the garage from the inside.
Watch the video:
It is recommended to carry out the garage insulation process in stages:
- Preparation: we determine the scope of work, calculate the area of the insulated surface, the required amount of waterproofing, insulation and other materials;
- Selection of necessary materials;
- Floor insulation;
- Insulation of gates;
- Roof insulation;
- Insulation of walls.
How to insulate a garage ceiling correctly
Covering the garage ceiling with foam plastic from the inside has nothing to do with rules and safety precautions. And this needs to be understood. In case of fire it will burn out instantly. But what’s worse is that when polystyrene foam burns, it produces phosgene, a poisonous gas. Inhaling it is life-threatening. Just a couple of breaths, and he’s already a non-resident.
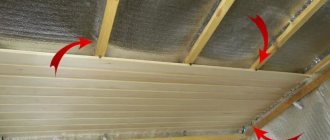
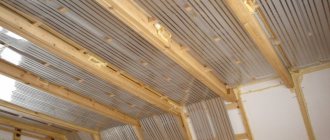
To insulate the garage ceiling more or less correctly, you would have to dismantle the roof, install a water barrier and use something non-flammable as insulation. For example, mineral wool and profiled metal sheets. They have fire resistance for several hours. While cars are burning in neighboring garages lined with foam plastic, yours will have time to wait for the firefighters to arrive.
We recommend: How to sew a cover for an ironing board with your own hands: updating old fabric
The bad thing is that such insulation will cost more, and installation will require a lot of effort and time. And working with mineral wool is also a pleasure. I've dealt with her before, that's enough. No matter how you defend yourself, you still get itchy. Again, disassembling everything, insulating it with high quality, and reassembling it is a considerable amount of work and a big investment. It's too expensive to spend two days a week in the garage.
If you want to do everything according to the rules, you can study the sixth section of SNiP 2.07.01–89. It describes all the requirements for premises where vehicles are stored.
Wet plastering
This method became widespread earlier than others and still remains relevant, since it shows very good results regarding the criteria of resistance and durability. The process itself consists of three steps.
Prices for OSB boards
OSB boards
Installation of fiberglass plaster mesh
First you need to lay the reinforcing mesh
Step 1. Spraying - applying the solution, brought to a creamy consistency, onto a previously wetted surface.
Spraying walls and ceiling
Step 2. Applying an even more thickened composition to the frozen spray and further leveling. This is the “foundation” of the coating, therefore this layer is the thickest.
Applying a second layer
Step 3. Covering. Here the thickest solution is used, which is applied locally and smoothed with a trowel. Such careful measures are necessary since the previous two stages cannot give a sufficiently smooth plane.
Grinding
The attractive properties of a wet-plastered ceiling are too good not to hide the catch, which is the labor-intensive process. Not everyone can invest so much effort and time into arranging a garage, and therefore many turn to alternative solutions.
How to make a ceiling fireproof?
You can use expanded polystyrene (penoplex) instead of polystyrene foam. It is impregnated with some kind of fire-fighting compound and goes out on its own. I tried to set fire to this one. Indeed, it burns worse than polystyrene foam, but it also burns out quite well before going out. In my opinion, in a severe fire there is little difference between the two.
I decided for myself that it would be better to cover the foam with plaster, as time and desire allow. And the appearance of the ceiling will improve, and there will be no protection from fire.
Fiberglass materials
Glass wool is inexpensive - this is the most significant advantage of this material. Glass wool needs waterproofing, as when wet they lose their properties. It would be a good idea to equip a fire barrier, as fiberglass can catch fire. When working with glass wool, it is necessary to use eye and respiratory protection to prevent glass dust from injuring the mucous membranes.
Stages of work
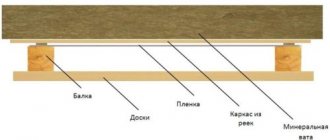
With a continuous sheathing, glass wool is attached to the bottom of the roof structure, and with a loose sheathing, the wool is placed between the rafters. In this case, the waterproofing is located on top of the insulation. The waterproofing film should not adhere closely to the insulation - this is only permissible if there is a diffusion membrane.
Glass wool is attached to the ceiling using wooden beams: the beams are installed in the form of a lattice, in the cells of which layers of insulation are laid. After which the structure is covered with a vapor barrier film and sheathed with clapboard, PVC panels or other finishing material as desired.
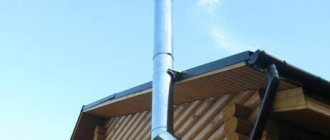
You can't do without ventilation
Without which it makes no sense to insulate the garage ceiling, it is without normal ventilation. At a minimum, it is needed to remove exhaust and fumes. I think everyone has a memory of someone accidentally suffocating in a garage. In our garage cooperative, three men got poisoned in different years.
It is basically impossible to properly insulate a garage ceiling from the inside. Insulation is always placed outside. Otherwise, you end up with a thermos with all the consequences - the dew point moves inward, the floor slab becomes damp, the fittings rust, etc.
Without ventilation, we get an ideal environment for condensation, corrosion and mold to develop. The garage may simply be overgrown with “moss.” Therefore, after insulation, this issue needs to be given enough attention. My ventilation is normal.
But I’m thinking about making it forced (installing a fan). I'll see if condensation forms in the winter. And then I’ll decide.
I hope my experience will be useful to someone. I finally accomplished what I wanted, and I’m very pleased. The cheapest and most inconspicuous ceiling insulation with polystyrene foam is better than nothing at all.
In winter, not only is it incredibly cold in an uninsulated garage, but the heated car is also covered in condensation. The result is corrosion. Both the body and electronics deteriorate. Ceiling insulation reduces temperature differences. The garage is already noticeably warmer. No drops of moisture were noticed. In general, I'm glad.
Outdoor installation
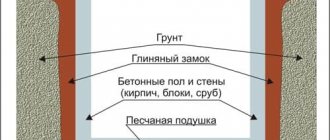
With this approach, all layers of insulation and waterproofing are located on the outside of the ceiling. Accordingly, it is necessary to create a heat-saving “pie” that can withstand all temperature and climate changes. There are two main types of flat roofs, insulated differently:
A classic roof is insulated according to a standard scheme and the layers are laid in the following order, counting from bottom to top:
- Floor slab
- Vapor barrier film
- Insulation
- Waterproofing
This scheme has a significant drawback - external waterproofing requires periodic maintenance and repair. It is produced every two to three years and this entails additional costs, although such a roofing device is slightly cheaper than the other option - the inversion one.
This type of roofing is considered more expensive to install, but it withstands temperature changes better and does not require such frequent repairs. Its fundamental difference from the classic version will be a different scheme for laying layers and arrangement:
- The first will be, as in the previous case, the floor slab
- Then - screed
- Next comes waterproofing
- Next is insulation
- A special film is placed on top - a filter.
- Cover the pie with expanded clay or gravel, at least 50 millimeters thick
This solution allows you to protect the waterproofing gasket and significantly increase its service life.
Waterproofing
In a garage, you can often see water leaks on both the walls and the ceiling of the building. This indicates not only non-compliance with technology during the construction stages, but also the formation of condensation on the ceiling due to a sharp temperature change and freezing of the roof material. To get rid of water getting inside the garage, it is advisable, of course, to eliminate the causes themselves.
However, sometimes this may entail the dismantling and complete replacement of not only the roof covering, but also the roof slabs themselves. If you can localize the location of the damage, then it is best to completely perform a spot repair. In other cases, in order to save money, the ceiling is waterproofed from the inside of the room using the following options:
- rolled materials;
- coating mixtures;
- injection waterproofing.
Roll materials are most often used for waterproofing outside and are not suitable for lining the ceiling indoors. Injection hydro- and vapor barrier is a fairly effective method. Using injections of a special solution, various microcracks and voids in the structure are filled. The disadvantage of this method is the need to purchase expensive professional equipment or pay for the work of specialists.
Coating insulation is a mastic that is applied in one or several layers to the prepared ceiling surface. When dry, this mastic turns into a durable film that does not allow moisture and steam to pass through. However, in garages waterproofed with coating mastic, additional installation of forced ventilation is required to remove exhaust gases and various fumes.
Materials
There are so many materials on the market that an inexperienced user is faced with a dilemma - how to insulate the ceiling in the garage. You can insulate a garage using the simplest, inexpensive materials possible. The final cost will depend on the area of the room and the characteristics of the raw materials used.
Kinds
There is a whole range of both traditional and modern insulation materials that successfully resist heat loss. Let's look at the most popular:
- mineral wool, which is produced by melting basalt rocks;
- polymer insulation materials made from polymers as a result of extrusion processing;
- fiberglass materials obtained from the processing of broken glass;
- penoizol is a material that, in terms of external and quality indicators, is comparable to polystyrene foam, but with expanded capabilities.
The main requirement for any type of insulation is waterproofness, fire resistance, ease of installation and reasonable cost. After insulating the ceiling from the inside, it is worth finishing the ceiling with clapboard or PVC panels - the latter are the most popular material for finishing the inside of a garage.
Gate protection
Many people are faced with the problem of seasonal “walking” of the pillars (the base of the gate), which is why they do not close. The best solution is to protect the base (posts) from freezing when installing the gate. If you have already installed ordinary iron gates, then they must also be thermally insulated from the inside. If it is possible to attach the sheets with dowels to the material from which the gate is made, it is worth doing so. If not, the usual glue method will do. The already glued insulation is covered first with a vapor barrier film, then with outer skin. To enhance thermal protection, you can use foiled polyethylene.
Thus, the correct choice of thermal insulation material makes insulating a garage a fairly simple process that anyone can do.
15.06.2018
Return to list
Advice from professionals
To avoid mistakes when carrying out thermal insulation work in the garage, you need to take into account the recommendations of specialists:
- If there is poor ventilation in the room, the level of humidity in it will be quite high, which will lead to damage to property.
- When insulating, lighting must be removed in advance, stretching it over the last layer of heat insulation.
- The arrangement of a lattice structure allows you to expand the possibilities in matters of final finishing: installation of plasterboard sheets, plastic panels, OSB boards, plywood.
Types of insulation
Before you start work, it is better to familiarize yourself with the main thermal insulation materials for the garage. This will greatly simplify the choice of insulation for finishing the ceiling.
Styrofoam
Foam sheets are considered the most common material for finishing ceilings in garages. Their main advantages are tolerance to high humidity, resistance to low temperatures, ease of use, low price, and long-term heat retention.
However, sheets also have disadvantages, which are best familiarized with before using them. These include poor protection from mechanical damage and high flammability. Experts advise using foam sheets measuring 100 x 100 mm to cover the ceiling surface.
Mineral wool
Many people prefer to make thermal insulation using mineral wool. In this case, two main types of this thermal insulation material are used:
- Slag. It is considered the highest quality and most reliable, as it is resistant to fire and temperature changes. However, builders do not recommend using slag-type wool in rooms with high humidity, since in such conditions it will quickly deteriorate.
- Basalt. This type of wool is used in conjunction with a waterproofing material, which will provide additional protection against moisture. Among the advantages of basalt material are low price and durability.
Expanded polystyrene
Some people confuse this material with polystyrene foam, but polystyrene foam has characteristic features that are best familiarized with. Its main advantage is considered to be durability, due to which polystyrene foam does not deteriorate for 20-25 years. The sheets are also protected from fire, low temperature and humidity.
Glass wool
Glass wool is often used to save money, since it is cheaper than most other materials.
It must be used very carefully, as it contains crumbling glass chips. Therefore, when working with glass wool, you should use gloves to protect your hands and special glasses to protect your eyes.
Expanded clay
Expanded clay is a porous material made from slate and baked clay. It is considered universal, since it can be used to insulate floor coverings, walls and ceilings. Some people use it in gardening and add it to the soil mixture.
Penoizol
Penoizol is used less often, since it has recently appeared on the domestic building materials market. People who professionally insulate rooms advise using penoizol. It retains all its properties and does not deteriorate for about forty years.
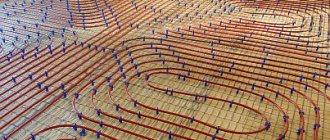
Installation methods
When attaching the heat insulator externally, you can simply lay it on the surface of the ceiling, which will be the floor for the upper room. If you intend to walk on the created insulating layer, then it is necessary to create a special sheathing on which the finishing floor covering will be laid.
In this case, it is necessary to install the logs of the future floor. They are arranged in such a way as to form unique cells into which the penoplex will be laid. The dimensions of the cells can be arbitrary, but it is better that they coincide with the dimensions of the penoplex slabs.
When the logs are installed, the heat insulator itself is placed in the cells. The seams are filled with polyurethane foam or sealant. The absence of even small cracks is quite an important point. Without this, ceiling insulation with penoplex will not be as effective.
The flooring on which people will walk is laid along the joists. In all installation options, a vapor barrier is not required for this heat insulator, since it has practically zero vapor permeability.
It is worth remembering this, since if you decorate a room from the inside with this heat insulator, then there will be fewer opportunities for moisture to leave the room. Therefore, good ventilation is required. In cases where insulation is carried out from the outside, and a floor covering is constructed above the laid insulation, it is necessary to provide a small ventilation gap between the insulating layer itself and the floor covering.
The resulting ventilation gap will allow moist air, which is certainly present in all rooms, to pass freely around the flooring, and will prevent moisture from condensing on the surface of the boards or other material used to create the covering.
Internal insulation is done in a similar way. The insulation boards must be attached to the surface of the ceiling, and then finished with finishing.
You can attach the slabs in different ways. The easiest way is to glue them directly to the concrete. An adhesive composition is applied to each part, in a continuous strip around the perimeter, and in the middle - a couple of small “bloopers”. The part with an applied layer of glue is pressed tightly against the surface of the ceiling.
If it is undesirable to use glue for some reason, you can use special “fungi” for attaching such materials. A hole is drilled through the insulating layer into which a special long rod is inserted. It is screwed into the concrete base using a dowel. The wide cap securely secures the penoplex to the ceiling surface.
Exterior finishes may also vary. If it is necessary to plaster the surface, then you will first have to stick a special reinforcing mesh onto the heat-saving layer. This insulation has very low adhesion, and without a mesh, the plaster will not lie on it. You can cover the insulation layer with a panel or plasterboard ceiling.
Preparatory work
In order for a ceiling insulated with penoplex to hold normally and not fall off, it is necessary to carefully prepare the surface for installation.
Especially when you glue it to a special construction mixture.
It is necessary to clean the surface from dust and debris. Then, apply one or two coats of primer. After that, you can start working.
You need to stock up on the following additional materials:
- The mixture with which you will install the layers;
- Dry glue;
- The mixture that will be used to pass through the already installed ceiling;
- Polyurethane foam, which must be used to seal all remaining cracks and seams;
- Fastening tools.
Advice from professionals
To avoid mistakes when carrying out thermal insulation work in the garage, you need to take into account the recommendations of specialists:
- If there is poor ventilation in the room, the level of humidity in it will be quite high, which will lead to damage to property.
- When insulating, lighting must be removed in advance, stretching it over the last layer of heat insulation.
- The arrangement of a lattice structure allows you to expand the possibilities in matters of final finishing: installation of plasterboard sheets, plastic panels, OSB boards, plywood.
Required Tools
Before insulating the garage ceiling, you will have to familiarize yourself with the list of the main tools that will be needed to complete the work. To install insulation material you will need to prepare:
- Self-tapping screws. These are fasteners that are used to secure foam sheets or other thermal insulation products to the ceiling.
- Special glue. Some builders use glue instead of self-tapping screws, which can attach insulation to almost any surface.
- Stapler. Sometimes you can’t do without a construction stapler, which uses plates to secure insulation.
- Roulette. Not a single construction job can be completed without this measuring device. A tape measure is used to measure and determine the optimal width and length of thermal insulation materials.
- Level. Builders advise using bubble levels, which help determine and control the evenness of the ceiling surface.
- Saw. Used for cutting thick insulating material. When working with glass wool or mineral wool, scissors are used instead of a saw.