Pay maximum attention to this element of the heating system
Installing a chimney in a wooden house with your own hands - conventional and coaxial
We will now try to establish the differences between these chimneys, find out how they are installed, and in addition, we will give you the opportunity to watch the video in this article.
General rules and location selection
How to route a stove pipe through a wooden ceiling - this must be done so that there are no problems, as in the photo. The main task of the preparatory stage is to determine the location of the stove installation and the installation of the chimney to the street. Depending on the materials of the floor slabs and chimney pipes, work will need to be done taking into account several sizes:
- the maximum distance from the ridge to the pipe canopy is 1000 mm, and the minimum protrusion is 350 mm;
- distance to wooden wall surfaces – at least 250 mm;
- length of the horizontal section of the chimney up to 1000 mm;
- When choosing a passage location, take into account the passage of the pipe through the roof structure. This place should be located between the rafters;
- When passing steel pipelines through wooden slabs, finishing elements and roof structures, we must use homemade, industrial boxes or couplings with an internal layer of thermal insulation.
Installing an iron stove: choosing a base
Nobody just puts a metal stove on the bath floor. And here's why: the thing is heavy, and therefore it would simply begin to sag on the floor over time . And it would do it unevenly. And when the stove is not level, it can crack . Therefore, either a brick foundation is made for it , or even a separate foundation with verified level horizontal lines to prevent destruction of the furnace.
To decide whether you need a lightweight or a full-fledged base, you must first calculate the mass of the stove with everything due to it. You will learn how to do this from our article - you don’t want to repeat yourself, but everything is described in detail there.
Do-it-yourself installation of polyurethane foam
The hole should be approximately 0.5 mm larger than the thickness of the channel diameter. This will ensure ease of insertion. Thermal insulation is packed along the outer and inner walls. The distance between them is 1-2 cm.
If you do not have a ready-made kit, you can perform high-quality stove heating in your home without it. To do this, the free space in the ceiling is sealed with fire-resistant thermal insulation, on top of which steel strips are installed. A plate made of heat-resistant metals is installed on it, in which a suitable hole is cut. This plate is secured with a bolted connection. It is most convenient to make it from metal.
When installing it, we comply with all requirements and maintain the established distances to fire hazardous objects. The resulting voids on the side of the second floor or attic should be filled with expanded clay or other non-flammable insulation.
Passage of a brick chimney through a wooden ceiling
Laying out a stove chimney is a complex process where many nuances must be observed. Therefore, it is better to entrust this matter to specialists. In addition, errors during construction can lead to poor draft and fire.
An important point: simple building bricks are not suitable for laying individual parts and the entire chimney. A prerequisite for long-lasting and trouble-free operation of a brick pipe is the use of a ceramic heat-resistant type of brick.
When building structures, it is necessary to lay them out in a special way in the places where the floors pass. The ideal option would be to cut the chimney on the ceiling. The height of this section of the masonry must be at least three rows of bricks. The thickness of the chimney walls when passing through the roof or wall (partition) should be greater than along the main height. The distance to flammable materials must be at least 25 cm.
Two passages of a brick chimney are possible. In the first option, the passage unit is mounted by increasing the thickness of the masonry, the so-called “fluff”. The second option for passing a brick pipe through the attic floor without laying out the “fluff” is carried out in almost the same way as for a metal pipe. In this case, the chimney along its entire height has the same cross-sectional size, without increasing the thickness of the walls.
The hole in the ceiling is secured with a stainless steel sheet or mineralite slab. A window is cut out in the center of the sheet through which the chimney will pass. The length and width of this opening should exceed the similar parameters of the pipe by literally 3–5 mm. When laying a chimney, approximately three or four rows up to the ceiling, a sheet with a prepared opening is placed on it, and then the laying is carried out further up to the height of the finished attic floor. Wooden floors are laid with mineral wool to reduce heat transfer from the pipe. But a more reliable way would be a stainless steel box into which a brick chimney will pass; the distance from the pipe to the walls is also laid with mineral or kaolin wool at 5-7 cm.
Sealing joints
This stage is considered the most difficult when removing through the roof. To do this, install a lower apron made of tin.
A “tie” made of metal is placed under it, the purpose of which is to drain liquid into the drain. Outside, you can install a decorative apron, the purpose of which is to create an aesthetic appearance.
When using a flexible coating, the task of waterproofing is greatly simplified. It is quite easy to bend such material onto a pipe that has been pre-coated with impregnation to create a better fit. It is also recommended to treat the joints of the wall and roof with sealant.
Video tip - assembly of a chimney pipe passing through a wooden ceiling
From the following video you can learn how to properly lay the structure without spending extra effort.
Chimney pipe lining and special caps
One of the finishing methods is cladding. For this, natural or artificial stone is used, but this option is not practical. This is explained by the fact that often the cladding is torn off from low-quality bricks, along with the top layer of ceramics, which spoils the roof. If the brick is of high quality and beautiful, there is no point in covering it.
When the sheathing is heavy, it should be fixed not only with adhesive, but also with hardware. For this purpose, metal brackets or dowels are used - nails directly through the stone tiles.
To protect ventilation ducts from atmospheric hazards, protective caps are installed on the pipe heads. They reduce traction force, so their size should not be too large. In this case, the distance from the top of the pipe to the bottom point of the cap must be at least 15 centimeters. The shape of this product and the material it is made from can be very different.
Preparing the floor before installation in a wooden bath
When the total weight of the furnace is less than 7 centners , the need for a foundation disappears, but a kind of “pedestal” of brick is still erected. It's good when this happens during construction. You can again calculate the position so that the base lies between the lower beams under the floor . But it happens that you have to redo the old base for a new stove in an old bathhouse. Then you can't do without opening the floors and checking their strength . We advise you to read the relevant paragraphs of this article, where you will find tips on strengthening beams and joists, and tables for calculating their “endurance”.
Passage through a wooden floor
As a rule, the most common material when building a bathhouse is wood. Therefore, when passing a chimney through a ceiling, it is necessary to use a passage unit.
Below we will look at the main options for the passage duct, based on the material of the chimney itself.
Use of brick structures
If you have a brick chimney in your bathhouse, then the cutting of the chimney on the ceiling is made of brick by thickening it at the passage points. The height of this section of the masonry must be at least three rows of bricks.
Laying out a stove chimney is a complex process, since errors during construction can lead to poor draft and a fire. Therefore, it is better to entrust this matter to specialists.
Plasterboard box
The passage box can be made from heat-resistant plasterboard. To do this, you will need to prepare insulation from mineral wool or asbestos. This option is made in the same way as in the case of a metal box. The first step is to install plasterboard walls, and fill the space between them with insulation.
Expanded clay can be poured on top of the cotton wool or even instead of it, which gets clogged into all pores and provides additional insulation.
Metal box
A more popular alternative to passing through wooden floors has become the use of a stainless steel ceiling-pass assembly. It is a box made of several steel plates; a hole is made in one of the walls based on the diameter of the outer contour of the sandwich. The void between the pipe and the box is filled with heat-insulating material.
Ceiling cutting for sandwich pipes is found in GOST and conventional. They differ in the size of the hole. According to GOST, it is necessary to cut a square measuring 1.0 by 1.0 m in the ceiling or wall, into which the polyurethane foam will be directly inserted. However, this size is not particularly popular, since then it is necessary that the distance between the logs in the bathhouse be 1.0 x 1.0 m, otherwise it is very difficult to insert such a unit.
A regular knot is a square measuring 48-50cm. To determine the size of the cut, you need to start from the diameter of the sandwich:
- if more than 200mm, then the correct size is 1.0x1.0m;
- if 200 mm – 48-50cm.
Important information: if the chimney is for a fireplace, then the size of the cut must be 1.0 x 1.0 m.
When installing the box, foil insulation is glued to all points of contact with wooden surfaces.
What to install a sauna stove on
A sauna stove, like no other, requires installation on a non-flammable base, because its combustion center is practically on the floor. This means that the temperature load on the floor is greater. We recommend that you use only one of the four base options listed below for sauna stoves.
A metal sheet
Most often, stainless steel or galvanized sheets are used, but painted flood sheets look more beautiful. They come in different sizes, shapes and colors. The options are presented here.
Thermal insulation must be laid under the metal sheet, because... it conducts heat very well. Ordinary basalt cardboard will do, but it is better to additionally use a fiber cement board: faspan, mineralite or flamma.
Agglomerate tiles
This is a tile made from pressed granite chips. Due to the dense structure, the weight of one tile measures 600x600 mm. is 20 kg. As a rule, several pieces are used for the agglomerate base, which are laid on a sheet of CBPB or the same fiber cement board. It is also necessary to use basalt cardboard.
Fig. 1. Base for a sauna stove made of agglomerate tiles
Installation on ordinary porcelain tiles is allowed - the base design will be the same as with agglomerate tiles. But porcelain stoneware is thinner and more fragile, it can burst under the weight of the stove, especially with stones.
Bricks
Installing a sauna stove on bricks is only possible on a flat floor. If a sheet of metal and agglomerate tiles allow for slight unevenness, then the bricks will not “forgive” them - they will move higher and lower. In this case, you will need to level the floor first. If the bricks are laid on a concrete floor, then no thermal protection is required, but if on a wooden floor, then the above-mentioned basalt cardboard can be used.
Fig 2. Grill'D Cometa 180 Vega sauna stove mounted on bricks
Ready bases
Some manufacturers of sauna stoves produce special podiums on which they recommend installing their products. Such podiums, as a rule, do not require additional thermal protection, because have convection channels that cool the floor underneath.
But we consider it not unnecessary to use additional thermal protection under ready-made substrates.
Thermal insulation materials are presented in our section of the website here.
Fig 3. Vesuvius Legend sauna stove installed on the “original” metal base
Ceramic chimneys
When manufacturing an internal chimney, the following requirements are imposed on it:
Ceramic pipe installation
- the minimum distance from the chimney to the load-bearing beams, if laying asbestos sheets in two layers between the pipe and the ceiling is provided - 250 mm, without laying asbestos - 380 mm.
- if there is asbestos insulation, the distance from the pipe to the wooden wall is taken to be 250 mm or more; if insulation is not provided, the distance is taken to be at least 380 mm.
- when using mineral wool for insulation, the distance from the pipe to the rafters is taken to be at least 130 mm;
- when using flammable materials - 260 mm;
- for roofing in places of contact with the pipe, materials resistant to high temperatures (steel, ceramic tiles, slate) should be used. If materials such as flexible bitumen shingles are used, it is necessary to prevent their contact with the pipe. The distance from the bitumen coating to the chimney in plan should be at least 50 cm.
All the requirements described above are relevant for the manufacture of an internal chimney, but sometimes it is better to choose an external outlet. It avoids complications and increases the safety of the structure, since combustion products cannot enter the room.
This installation is only suitable if the boiler is located directly on an external wall. The design will not allow for an extended horizontal section. The advantages of use include the attractive appearance of the building. This option is best suited for boilers running on liquid and gaseous fuels. The disadvantage of the design will be the increased formation of condensation, which leads to the deposition of substances on the walls that destroy the pipe.
The external chimney is made in the same way as the internal one, but insulation of its walls in contact with cold air should be provided. The thickness of the thermal insulation is up to 10 cm and is assigned depending on the climatic characteristics of the area
It is important that in most cases the pipe will still pass through the roofing, so it is worth following the recommendations for internal connections. A hole is provided in the lower part for inspection and cleaning, and a drip line is installed.
Under the brick pipe you will have to make a separate foundation or a support ledge for the house.
It is worth considering the following masonry requirements:
- providing dressing;
- production of ceramic solid bricks using lime (cement-lime) mortar inside the house;
- after exiting through the roof, the masonry is carried out using cement mortar;
- the thickness of the seams should not exceed 10 mm;
- Plastering the inner surface of the pipe is prohibited.
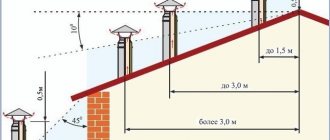
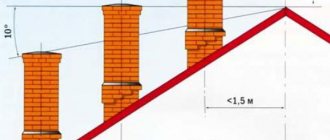
Graphical and mathematical method for determining the height of the chimney
This method of determining the distance of the chimney from the ridge is considered the most difficult; it is used when the chimney is 300 cm or more away from the ridge.
Quite often the stove is installed almost in the center of a complex building in which the chimney crosses the roof at the extension site or very close to the edge of the main slope. If the distance from the grate level to the designed chimney outlet is 500 centimeters or more, then it is not possible to install it. In this case, it will be necessary to determine the height of part of the smoke exhaust duct in relation to the roof ridge.
To determine the minimum limit of the distance of the chimney from the ridge of the roof, two methods are used: graphical and mathematical.
Graphic constructions have some similarity with the above methods for determining the maximum value of the chimney height. A diagram of the house is drawn on a suitable scale with the indicated dimensions, taking into account the proportions.
A horizontal line is drawn at the top of the roof, and from it down, using a protractor, an angle of 10º is measured and marked. The place where the estimated axis of symmetry of the chimney intersects with a line drawn at an angle will indicate the value being determined.
The resulting segment is measured, and the results on a scale are converted to real values.
If necessary, the project can be changed slightly by moving the chimney in a horizontal plane. Thus, you can find its optimal location. Remember that the distance between the roofing material and the short part of the smoke exhaust duct must be at least 50 cm. This is necessary for the arrangement of the otter and the possibility of protecting the roof with a metal roof covering.
Installation technology
Increased requirements are imposed on buildings made of combustible materials. When venting a chimney through a wall in a wooden house, you must take into account all fire safety standards.
Step-by-step instructions on how to make a chimney correctly:
- For the pipe, a passage is made through the wall in accordance with SNIP standards. The distance from the pipe to a wall built from fire-resistant building materials is at least 25 cm. To a surface made from materials susceptible to combustion - 45 cm. In the second case, it turns out that you need to punch a fairly large hole. To make the hole for the chimney through a wooden wall smaller, the surface is sheathed with metal or other fire-resistant material. Make a hole of 25 cm, since the surface is insulated from fire.
- A metal box is mounted into a hole in the wall.
- The pipe is passed through a metal box, secured in the middle, and taken out. The pipe must be solid; elements cannot be joined inside the wall, as they will be problematic to maintain.
- All free space in the wall is filled with non-flammable thermal insulation material.
- The hole on both sides is covered with metal or other heat-resistant raw materials.
- A support platform for external pipes is mounted outside, which is held by metal brackets attached to the wall.
- An adapter in the form of a tee is installed on the outgoing segment.
- The lower part is removable. It functions as a glass to collect condensate. Some models are equipped with a fitting with a tap to which a hose is connected, through which the water accumulated inside is poured out.
- A chimney is connected to the upper part, which is brought to the desired height. To prevent debris from getting inside the pipe, a cap is installed on it.
The pipe brought out is secured to the wall using stainless steel clamps.
In a frame house, it is recommended that instead of a support platform, build a small foundation that will hold the outer pipe in order to relieve the load from the wall.
For more details on how to install a chimney through a wall, watch the video:
Postulates of chimneys in a private house.
Fire safety requirements form the basis of any chimney in a private home. According to SNiP 41-01-2003, channels are designed vertical, bends up to 30° are allowed (attitude from the vertical to a meter). The chimney is created with an equal cross-section along its entire length, with a smooth inner surface. Pipe height - from 5m.
Chimney in a private house
Gases are easily removed through round pipes, but more difficult through square or rectangular shapes. The cross-section of the chimney is selected according to the power of the heating boiler and is prescribed in the instructions. It corresponds to the size of the outlet pipe. If the cross-section of the channel is made smaller, the waste is poorly removed, the fuel burns poorly, and gases enter the room. If it is more, the heat “flies into the chimney”, due to which the automation is disrupted. Plus, more condensation forms (the smoke cools). The minimum cross-section of the chimney for a stove is 140*140mm and increases with increasing its power. For fireplaces, the ratio is 1/15 of the firebox parameters.
The interfloor cutting for the chimney duct has its own standards, where an increase in fire safety will not be superfluous.
Chimney in a private house
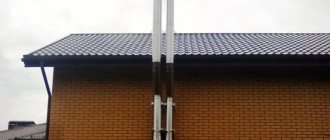
Modern chimneys
However, thanks to the achievements of modern technological progress, it was possible to solve this rather difficult problem by using such an acid-resistant material as stainless steel.
Due to the low fire resistance of wood, it is considered optimal for wooden houses to install chimneys made of sandwich pipes, since such elements have low thermal conductivity, which completely eliminates the possibility of fires.
Let's face it, the use of sandwich pipes for arranging outlet channels is the best material option for forming such structures.
Sandwich pipes are elements consisting of two pipes inserted into one another and an insulating layer located between them, which is most often basalt fiber, which has low thermal conductivity and high resistance to temperature influences.
If the chimney is formed from several elements, then the joints of the pipes are fastened with a special locking connection and additionally treated with a heat-resistant sealant.
The thermal insulation layer can have a thickness from 2.5 to 6 cm. The outer pipe can be made of steel or galvanized iron, a more expensive option is brass or copper.
The installation of a chimney in wooden houses is carried out in strict accordance with the design documentation. The chimney pipe is installed strictly vertically, but its deviation from the axis by no more than 30° is permissible. The minimum height of the chimney above the ridge should not be less than 50 cm, and the element should be located at some distance from the ridge purlin.
When installing a coaxial chimney, it is recommended to replace the part of the wall where the hole will be formed with any fire-resistant material, for example, foam concrete
Particular attention should be paid to the wooden wall next to which the pipe will be installed
If the distance between it and the pipe is less than 60 cm, it is enough to treat its surface with fire retardants.
If this distance is less than 60 cm, then it is recommended to plaster the wall surface or line it with metal sheets or ceramic tiles to reduce the possibility of its ignition.
What should be the distance from the chimney to the tree?
It is very difficult to answer this question unambiguously, because everything depends, among other things, on the type of chimney system. In this article, we used data that is suitable for stoves burning solid fuels (wood, fuel briquettes, coal, etc.).
There are three main types of chimney systems - single-circuit metal chimneys, sandwich chimneys and ceramic ones. Each of them has its own rules regarding the distance of the chimney pipe from combustible structures.
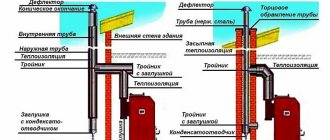
Waterproofing a chimney on the roof
When making a passage through the roof, it is important to comply with SNiP standards. A gap should be left between the roof elements and the chimney, the size of which is regulated by documents. At the point of passage through the roof, a box (wooden or galvanized metal) is usually installed, in which all the free space around the pipe is filled with non-combustible material - stone or glass wool
At the point of passage through the roof, a box (wooden or galvanized metal) is usually installed, in which all the free space around the pipe is filled with non-combustible material - stone or glass wool.
Sealing a chimney on the roof can be done using improvised means or using standardized elements. Around the chimney you should make a so-called collar, or flashing - a trim made of strips of metal, about 40 cm wide, in accordance with the dimensions of the pipe. The bend angle of the steel strips must correspond to the angle of passage of the chimney pipe through the roof. To calculate the length of the section, you need to take into account
:
- slope angle;
- chimney dimensions;
- chimney finishing type.
If the flashings are made of galvanized sheets, then they are interconnected with an overlay and soldered. Elements made of sheet steel are connected by a double standing seam. The rebated seam connection is used to seal the passageway on roofs made of corrugated slabs and tiles. If the roof slope angle is more than 30 degrees, a special beam should be installed behind the chimney - a “bumper”, which will protect the pipe from rainwater flows and excessive snow pressure in winter
.
A protective elastic apron for a chimney can be made
:
- from flexible metal tape (lead or aluminum);
- made of galvanized metal with polymer coating.
The apron is installed around the pipe in two layers around the entire perimeter. The bottom layer of the apron is placed under the roofing, and the top layer is mounted on top of the roofing material. To cover the top layer of the apron, a waterproofing film and metal profiles are used.
The top curved edge of each apron should fit into a groove cut around the perimeter of the chimney. After installing the edge into the groove, the joint is filled with polymer sealant or silicone for roofing.
Ready solutions
Sealing a chimney on the roof is a rather complex task, the quality of the solution of which determines the reliability of the thermal and waterproofing of the roof. You can make the passage assembly yourself, using various materials and special strips, or mount a ready-made structure, which includes a wide protective apron.
Ready-made roof cutting on the construction market is presented in many versions - models differ in material and manufacturing method, as well as the angle of inclination of the element that protects the place where the pipe passes through the roofing pie from water. The angle of inclination can be from 15 to 55 degrees, therefore, the cutting of the chimney on the roof is designed for the most common slope options.
To install such a structure, a hole of appropriate dimensions is made in the roofing pie. A seal made of rubber is attached to the outside of the structure using silicone. The distance between the pipe and the collection passage is filled with non-combustible insulation. The roofing penetration covers the passage unit, after which the penetration can be attached to the roof with self-tapping screws. To ensure a tight connection, it is recommended to use a sealant.
When choosing the option of how to seal a chimney on the roof, you can use other ready-made solutions, for example, Master flash roofing penetrations.
https://youtube.com/watch?v=rL-_Irakk4s
Calculations and installation rules
Installation rules imply careful consideration of all stages of future work:
- You should make sure that the pipe itself will not come into contact with any flammable materials, which, under the influence of high temperatures, may begin to smolder and release toxic fumes.
- When installing the system directly externally, it is necessary to remember the deflection angles, which will act as active guides for smoke removal. The chimney pipe should not be located parallel to the wall of the house, since in this case smoke stasis will occur - it simply will not be removed from the system.
- Special tees must be installed in the lower and side parts of the pipe, which will be used as a place to install mechanisms for condensate drainage. If this step is not completed, then moisture when lighting a fireplace or stove will simply enter the firebox and extinguish the flame. All this will significantly complicate the kindling process!
- The upper part of the pipe should rise above the edge of the roof to ensure that smoke and soot are blown away in an area of more rarefied air. Typically, such zones are formed at a distance of 15-25 cm from the roof sheet.
Design features of a chimney for a steam room
- The chimney is a vertical structure mounted inside the bathhouse or on the facade of the building. Its main task is to remove fuel combustion products at a speed sufficient to maintain natural draft in the furnace.
- A well-designed design ensures quick heating of the bath, maintaining the necessary microclimate in the steam room and economical fuel consumption.
- The most common problems with smoke exhaust ducts: Extremely strong draft, which will lead to rapid burning of fuel without adequate heating of the steam room. Traction too weak. An inadequate amount of oxygen enters the firebox, as a result of which the combustion process is interrupted, and then the thermal conductivity of the stove decreases.
- Proper installation of the chimney is a guarantee of your own safety and the longest possible service life.
Options and features of exterior finishing
The chimney trim on the roof plays a decorative role. To avoid maximum smoke removal and prevent the formation of condensation, the outer part of the pipe must be insulated, and insulating materials require mandatory external protection. The finishing of the chimney pipe should be in harmony with the design of the roof, and it will make the smoke exhaust structure a full-fledged decorative element.
There are a lot of finishing options, the most current ones can be named:
Plaster. This is a simple solution that allows you to protect the pipe from the cold and provide it with a pleasant appearance. At the request of the house owner, mineral chips are added to the plaster mortar, which allows the finished cladding to be given a beautiful relief structure.
Decorative brick. This is another common solution that is widely used in finishing brick buildings. This finishing of the fireplace chimney allows you to maintain the temperature in the chimney; it lasts for a very long time and does not collapse even from very strong heat. Artificial or natural stone
A stone chimney looks very solid and stylish; it attracts attention to the roof and performs its functions perfectly. This is an almost eternal facing material that will make the smoke removal system more reliable.
Finishing the chimney with corrugated sheeting. An interesting option is one in which the smoke exhaust duct is designed in the same way as the roof itself. Finishing a chimney with a metal profile is a fairly strong and durable option; such lining is installed on a metal frame and reliably covers the insulating material.
These are just some of the external cladding options that will help make the chimney beautiful and very noticeable. An ordinary pipe can be turned into a real home decoration.
Finishing the chimney with a metal profile on the outside
Finishing a chimney on the roof with corrugated sheeting is one of the simplest options; even a novice home craftsman can handle such work. A galvanized sheet equipped with an anti-corrosion coating will be a strong and durable solution: it does not burn, does not collapse under the influence of high temperature or strong vibrations, and installation of such cladding does not take much time. However, this is a cold material, so the chimney will have to be insulated.
Finishing the chimney with a metal profile is carried out after the construction of the metal frame. Metal sheets are installed overlapping on it to ensure the strongest possible connection. To ensure that the sheets are positioned evenly, a building level is used when attaching them.
The metal profile is attached with self-tapping screws; this work is more convenient to carry out using a screwdriver. Between the metal sheet and the smoke exhaust pipe there is a layer of non-combustible insulation.
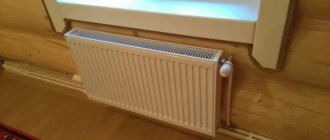
Finishing the chimney inside the building
A fireplace or stove is usually installed in a living room or study, so it becomes necessary to conduct smoke exhaust ducts through the second floor and the attic or attic room. The decoration of the chimney inside the house can be very diverse in appearance, but in any case it is installed on a common basis. The interior finishing of the chimney is carried out as follows:
- To line the chimney, a metal profile frame is built around it, which is sheathed with special plasterboard sheets. They must be fire-resistant, this will ensure the fire safety of the house. Such sheets are designated by the special abbreviation GKLO.
- The frame is insulated: a layer of mineral wool or other non-combustible insulating materials is laid around the chimney.
- Smooth plasterboard sheets are finished with any selected materials: it can be ordinary wallpaper, ceramic tiles, plaster and much more. This decoration of the fireplace chimney allows it to be harmoniously integrated into the space of the room, and the choice of material depends on the style of interior design.
The interior decoration of chimney ducts can have a wide variety of colors, so it can be chosen to suit every taste. However, in any case, it is recommended to choose non-combustible materials so as not to increase the risk of fire
This is especially important in a wooden house: walls located near the chimney, and especially all bending areas, must be treated with fire retardants
External and internal finishing of the chimney will allow you to turn it into a full-fledged decorative element: the choice of materials depends on the design features of the building and the financial capabilities of the owner. Self-installation of the cladding will allow you to save a lot, but it must be carried out in strict compliance with all technological requirements.
You need to enable JavaScript or update your player!
What materials can be used for fire protection when installing polyurethane foam?
Both brick, ceramic, and metal parts of interfloor cutting units are heated to temperatures that create a risk of wood fire. To reliably isolate the flammable elements of the ceiling pie, you need to make a gasket made of protective materials.
| Material | Description |
| Slab fireproof material based on cement with the addition of limestone, mica and cellulose. Withstands constant heating up to 150 °C. When exposed to higher temperatures, the organic mineralite filler burns out and it becomes brittle. | |
| This general name refers to fibrous insulation, consisting of molten threads of various inorganic natures. This can be either minerals (basalt, dolomite, etc.), or blast furnace waste, slag. Slag wool does not lose its properties up to temperatures of 300°C; in a hotter environment, sintering of the fibers occurs - binders and water-repellent additives are not as resistant to fire as the mineral component. As a result, thermal conductivity increases sharply. Rigid mineral board of the PZh-175 brand is positioned as a fire-resistant material. It is capable of maintaining insulating properties up to 1000°C. | |
| Available in thicknesses from 2 to 10 mm. This is a material that perfectly protects against fire; it not only does not burn, but also does not smolder. Harmfulness may be considered a limitation on its use - asbestos vapors are undesirable in a bathhouse. All asbestos gaskets on the steam room side must be covered with metal. | |
| A highly efficient and absolutely environmentally friendly heat insulator, which belongs to the group of non-combustible materials. Its thickness is 5 mm, the thermal conductivity coefficient increases slightly with increasing temperature, and it operates reliably at temperatures up to 900°C. |
These are materials that can protect wooden parts from charring and fire at high temperatures in a high-heat zone. But the primary cladding of the ends of the floor, if the necessary indents are observed, can be carried out not only by them. For these purposes, it is allowed to use materials with flammability class G1 (low flammability).
| Material | Description |
| It has the designation GKLO, gray sheets with red markings. It differs from the usual one by the presence of internal reinforcement with a tighter adhesion of the layers. This prevents the penetration of oxygen into the thickness of the material, combustion is not supported and even in an open fire the material does not collapse within 20 minutes. | |
| Only products labeled as Premium class have fireproof properties of the NG degree. A sheet of the Standard class, which is not marked in any way, cannot be used to protect wood. |
The choice of thermal insulator can play a decisive role. It should be remembered that ordinary mineral wool, which is sometimes recommended to be used for filling the passage unit, sinteres when heated and quickly loses its fire-retardant properties.
High temperature leads to a change in its structure - while remaining unchanged in appearance, it can heat up significantly and can no longer cope with thermal insulation. To ensure reliable thermal insulation of the chimney, it is necessary to use basalt wool, designed for operation at temperatures of 800-1000°C.
It is also safe to lay mineralite, asbestos or basalt cardboard. There is also a time-tested budget option for thermal protection - sand was used for it (the passage box was filled with it) and clay. For example, sufficient thermal insulation of the part of the ceiling to which the box is attached is achieved by applying an even layer of clay about 2 cm thick to a metal sheet with a flange.
The main tasks that the builder faces when arranging the passage of a chimney through the ceiling of a bathhouse are fire protection for the ceiling and an even vertical installation of the pipe. The work takes place in three stages:
- determination and arrangement of the location of the cutting unit;
installation of a ready-made or self-made protective casing;
final thermal protection gasket.
These are general rules, and specific methods of work depend on many factors - the allocated budget, preferences in the choice of materials, even whether the technologies were followed during the construction of the bathhouse.
Chimney on a metal roof
Bypassing a chimney with metal tiles is a complex process. It does not bend like ondulin and is difficult to install hermetically.
Sealing includes the following steps:
- Roof waterproofing is installed on the side walls of the pipe
- Behind the pipe, at a distance of 80 cm, a gutter is built into the waterproofing material to drain moisture
- A box is installed in the roof and the chimney is removed
- A groove is made for the wall profile
- Set up a profile. The process is described above
- Set language
- The roof is covered with metal tiles. Around the pipe it should overlap the profile and the tiles that flow around the pipe
- Install the apron. For metal tiles they are made smooth. It should be secured to the protrusions of the coating with self-tapping screws.
Preparing the oven
Before you work on the chimney, the stove should already be in its intended place. But first, it should be heated in the yard for the first time. is necessary to do this , because during the first fire the industrial heat-resistant paint usually sets and partially burns out. It “smoke” a little when fired and smells. This is normal, this is how it should be.
By the way, new stones in the yard - sometimes they give off a stench that stings the throat and eyes. It is better to experience this in the fresh air, and not in the steam room.
Assemble the stove according to the instructions, install it on a flat and solid base, place some piece of at least a ventilation pipe on the chimney pipe ( at least 2 meters long) and heat it thoroughly once. At the same time, find out if there are any design defects, if it smokes, in general, get to know each other.
On a note! Heat for the first time with normal wood, not garbage, and most importantly, wait for natural cooling after the wood has completely burned out. In this case, the paint polymerizes correctly.
Finishing a pipe with slate stages of work
Lining the chimney on the roof is necessary not only for better preservation of the chimney structure, but also as a decorative finish, so it is usually made from materials that are most suitable for roofing. One of the most durable, durable, and also very aesthetically pleasing is the stanza.
- Purple
- Green
- Graphite
It can be in the form of tiles or panels. Fastening the slate is possible using copper nails with a wide head with a diameter of 2.5 mm and a length of 40 mm.
When performing work, it should be taken into account that due to temperature changes, deformation of materials is possible. Therefore, the nails are not nailed down completely; a small gap must be left between the head and the tile.
The tiles are installed on the sheathing, the beams are attached to the corners of the chimney, and if its width is more than 60 cm, another additional beam will be required.
- The outer guides are set according to their level, the rope is pulled (above, below and in the middle - at a height of more than 2 m), and then the intermediate bars are set
- If necessary, the smoke duct is insulated
- Plywood sheets are laid on the guides
- The tiles are being laid (their installation is carried out in such a way that one overlaps the other within 1.2, and the angle is not less than 22°
There are several ways to lay slate - from the standard rectangular one, to one reminiscent of fish scales. They are selected taking into account the pattern of the roofing.
The first is performed on a previously primed surface. To do this, the dry mixture is diluted with water in a bucket in the proportions indicated on the packaging. Please note that it is usually sold in white, and to obtain a colored coating, color is added.
aab06e3d460b8aa8c97245c54ec5d49a.jpe
The diluted composition is applied in a thin layer and left to dry, and then cleaned with a steel brush. Next, a second layer is applied - if necessary, but experts still recommend limiting yourself to one. The final touch is to treat the surface with a grinding machine and grout with an iron spatula.
Venetian plaster, unlike marble, is considered an expensive pleasure, but it looks amazing. Moreover, if you do everything yourself, you can save a certain amount of money.
It is also sold in bags, has a white color and is diluted with water with the addition of color for application. Apply with a spatula or trowel. But to obtain a high-quality coating from Venetian plaster, the use of forced drying technology with a construction hairdryer is required. Any cracks that appear are treated with paint or varnish and, after drying, polished with a grinding machine.