A beautiful roof is the calling card of any country house. In addition to the roofing, the chimney also attracts attention. A crumbling brick or improperly made chimney spoils the entire impression of the architecture of the cottage. The location of the chimney on the roof and its design are subject to certain requirements specified in building regulations. Violation of technical regulations on the correct design of chimney systems can lead to problems with the operation of heat generators (boilers and heating stoves) and a reduction in the service life of the chimney itself. And replacing or even repairing such a structure that runs through the entire house is almost a new overhaul. The article tells you how to avoid the most common mistakes when installing a chimney.
General rules and location selection
How to route a stove pipe through a wooden ceiling - this must be done in such a way that there are no problems, as in the photo. The main task of the preparatory stage is to determine the location of the stove installation and the installation of the chimney to the street. Depending on the materials of the floor slabs and chimney pipes, work will need to be done taking into account several sizes:
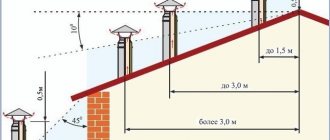
- the maximum distance from the ridge to the pipe canopy is 1000 mm, and the minimum protrusion is 350 mm;
- distance to wooden wall surfaces – at least 250 mm;
- length of the horizontal section of the chimney up to 1000 mm;
- When choosing a passage location, take into account the passage of the pipe through the roof structure. This place should be located between the rafters;
- When passing steel pipelines through wooden slabs, finishing elements and roof structures, we must use homemade, industrial boxes or couplings with an internal layer of thermal insulation.
Differences in designs
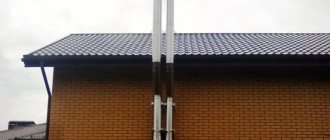
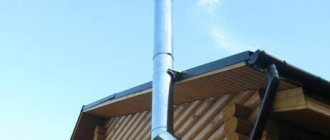
The most visible and main difference between the two methods of exhausting a chimney is the location of the pipes: one is located inside, the other outside the room.
Other differences in the designs of both chimneys:
- The external chimney has many angles, bends and slopes in its structure. And the pipe that runs inside the building and then exits through the roof is strictly straight.
- The outlet on the external facade is carried out through a hole in the wall, and another way is through the ceiling, roof and roof of the building.
- When the pipe is routed through the ceiling, the small outer part of the pipe is practically not damaged by climatic conditions. In the case of an external method, the structure may suffer from dampness and strong winds. There are cases when structures could not withstand the weight of wet snow adhering to them.
Both options, despite their differences, advantages and disadvantages, are widely used in the construction of houses, cottages or baths.
Both structures may suffer from exposure to adverse weather
Schemes for exhausting the chimney through the ceiling and roof
1st floor
The passage of the chimney through the 1st floor ceiling is equipped with a metal box filled with a layer of thermal insulation. To do this, you can use expanded clay filling and filling cavities with mineral wool. For non-residential premises, the use of asbestos slabs is allowed.
Installation diagram of a chimney through the ceiling with access to the roof (one-story house)
2 or more floors
When passing through slabs of the 2nd and subsequent floors, a situation may arise when the chimney cannot be installed vertically. Builders could move partitions or install a beam in the floor structure.
Therefore, in order not to take risks, when installing chimneys in a multi-story building, it is better to use a house ventilation system. If you make a horizontal indentation, possible condensation will collect in this place and a thick layer of soot will be deposited on the walls. And it will be difficult to clean the chimney through turns.
Installation diagram of a stove chimney in a 2-story house
Diagram with a description of all elements
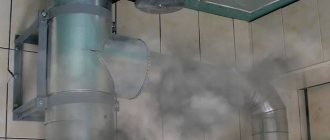
Ventilation outlets of sewer risers
There is only one way to make the toilet’s bathroom safer and more comfortable, remove unnecessary odors and normalize the operation of the water seal. This can only be achieved by equipping the sewer with a ventilation outlet to remove gases accumulating inside the system. Similar devices are found in almost any sewer drain system equipped with a water seal. If the ventilation system of the riser becomes clogged, freezes, or does not work efficiently enough, the entire entrance to the house will know about it.
Exiting the chimney through the ceiling
The choice of design and materials depends on the type of chimney. Let us analyze the rules for organizing work for the main materials of pipelines in detail.
Round metal
The whole process is divided into several stages:
- The most popular today for the manufacture of steel chimneys are double-sided metal sandwich pipes with an internal layer of thermal insulation. For such chimneys, you can easily make a homemade box from tin or buy a ready-made one in a store.
- According to the dimensions of the box, we cut out a cavity in the ceiling, insert the box so that it is securely fixed with its curved edges on the floor of the attic or 2nd floor.
- We insert the pipe into the prepared hole and secure it to the wall with self-tapping screws. Fill the remaining gaps with heat-resistant sealant.
- We fill the entire remaining cavity of the box with insulation. You can use mineral wool, penoizol, polystyrene foam and any other material. The use of asbestos is prohibited in residential premises.
- The thermal insulation layer should protrude slightly beyond the metal sides. All that remains is to cover the surface of the box with decorative wood trim. You can buy a polished stainless steel plate that will decorate your ceiling.
Passage diagram
Stages of work on removing a steel chimney through the ceiling
Important! When installing a steel chimney pipe, be sure to take into account the general direction of the joints. It is customary to lead them inside the building “through the smoke.” The upper pipe fits onto the lower one, so smoke cannot escape even if the chimney is clogged.
Brick chimney
Here everything is much more complicated:
- Before the floor slab, the mason must fluff the pipe and gradually expand the outer size of the chimney. If you have skills in laying bricks, you can do the job yourself. If not, you will have to hire an experienced stove maker.
- An opening is cut in the slab (ceiling) according to the dimensions of the pipe, even with a small margin. After laying the bricks and the chimney exiting the surface of the ceiling, we cut the slab insulation material to the size of the pipe.
- You can use mineral wool or prepare foam blanks. The main thing is that the thickness of the layer compensates for the high temperature of the exhaust gases and does not allow them to affect the surface of the walls and ceilings.
- Then we lay the blanks around the pipe and secure them with special screws or simply wrap them with tape. The main thing is not to leave large gaps, but to fill small gaps with fire-resistant sealant. Having filled the entire cavity with insulation, we cover it with a layer of decorative finishing.
Scheme of the outlet of a brick chimney through the ceiling and roof of the house
Ventilation of sewer risers
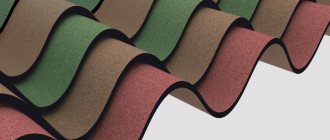
- Roofing Materials Bituminous shingles
- Ceramic tiles
- Cement-sand tiles
- Operated roofs
- Roofing films
- Drainage systems
- Ventilation outlets on the roof Ventilation of sewer risers Sewage outlet Vilpe 110/300
- Sewage outlet Vilpe 110/500
- Insulated sewer outlet Vilpe 110/IZ/500
- Cap - deflector for sewer outlet
- Corrugated pipe Vilpe Ø=110 mm
- Insulating casing for VILPE pipe
- Outputs for supply and exhaust ventilation of premises on the roof, assortment
- Electric roof fans, assortment
- Pass-through elements for all types of roofing coverings for installing ventilation pipes and electric fans on the roof
Summer 2022
Hurry up to buy artificial stone facing tiles with rocky texture (artificial rock stone) at a discounted price!
An excellent material for finishing facades and plinths - maximum wear resistance, excellent appearance.
The price is reduced by 15% during the promotion! We invite you to our showroom, where we have a wide collection of all models and colors of White Hills artificial stone.
Cutting a chimney on the roof
The cutting of the chimney on the roof is carried out taking into account several dimensions:
- the minimum distance from the roof surface to the rafters is 250-300 mm;
- if roofing felt or roofing felt is used as a surface covering, the size up to the chimney pipe is from 300 mm;
- if metal or concrete parts are used as rafters, this distance is reduced to 200 mm.
Difficulties arise when pipes pass through layers of roof protection (steam, waterproofing, wooden sheathing of the structure and layers of insulation). We carry out the work very carefully, trying not to disturb all layers of insulation and structure.
To install the glass, we perform additional lathing, connecting 2 adjacent rafters with 2 jumpers according to the size of the sleeve.
We carefully pull up all the old layers and tuck them inward, fixing the edges with a stapler or nails with heads. We fill all gaps with a layer of thermal insulation and sealant.
Waterproofing surfaces is carried out in several stages:
- on the roof we lay a groove over the entire surface of the pipe for drainage and removal of possible leaks;
- we fix and fill all the gaps and install the outer waterproofing apron. It can be made of steel or rubber. We place its edges under the roof covering and fix it on top of the internal apron of the main structure and seal all the joints;
- Now, when water passes through small cracks, it will enter the drainage groove or be removed along the covering of the roof apron.
After laying the roof covering layer, we install the outer apron and seal it tightly to the surface of the chimney and roof.
Scheme:
Scheme of cutting a chimney on the roof
Installation of a brick chimney
What is a sewer drain pipe, and how does this system work?
First, let's figure out what it is.
A sewer pipe is a section of pipeline that connects the sewerage system to the atmosphere (exits upward through the roof). It branches off from the sewer riser and goes up through the entire house.
At the top (on the roof) it is covered with a fungus (head, umbrella) - so that precipitation and debris do not fall from above.
The waste flows through the sewer pipe from top to bottom. If you open the drain at one point (for example, drain the water in the toilet), then the water will pass through the system without any problems. If water simultaneously drains from several plumbing points (toilet, bathroom sink, bathtub, shower, washing machine), then the riser will be filled to its full diameter.
This will create a vacuum, which will “pull” water out of the water seals, which will cause an unpleasant odor in the bathroom - if there is no drain pipe in the house.
If there is one, then air will be sucked in from the atmosphere through its hole, and the pressure in the system will equalize. Thanks to this, the plumbing seals remain in place and do not allow the smell to penetrate from the pipes into the room.
Another solution to the problem is a fan valve. It can be installed instead of a drain pipe, or it can complement it.
More information about the operation of the sewer system (video)
Why is it needed: purpose and functions
Now let's look at why such a scheme is needed:
Removing gases that accumulate in the sewer system (they are removed upward through the pipe and released into the atmosphere).
Maintaining pressure in the sewer system (equalization when draining a large amount of water).
“Protection” of water seals (preventing them from being sucked in).
In general, the drain pipe ensures the normal operation of the sewer system.
Final works
Cutting a chimney pipe on the ceiling or roof with your own hands is finished. All that remains is to dry the oven. But before that, we check the draft in the pipe. To do this, we bring the torch to the open door of the firebox; if the flame draws inward, the draft is normal. If there is insufficient ventilation, you will need to remove construction debris from the pipes and only then proceed to the next stage of the final.
We put no more than 3 kg of firewood in the firebox and set fire to it. During the first burning of wood, grease, dirt and paint materials will burn off from the surfaces of the stove, and moisture will be removed from the bricks. Therefore, we recommend opening windows and doors.
After the surfaces have cooled, we dry the stove a second time and check all the joints and the chimney itself for leaks and that there are no leaks of gases into the room. We eliminate possible malfunctions and only after the final check can we begin to operate the furnaces.
Only by qualitatively completing the main stages of work and carefully checking the finished chimney, you will be able to protect your home from fires and inhale the fragrant smell of burning wood, and not carbon monoxide pouring out of the cracks of the chimney.
Why is sewer riser ventilation necessary? How to do it?
Any bathroom in the house should be equipped with two types of ventilation outlets. Firstly, ventilation of moist air from the room must be organized.
Secondly, it is necessary to arrange ventilation of the sewer riser so that no unpleasant odor penetrates into the room.
This is achieved as follows . Each plumbing fixture: toilet, sink, bath or shower has a characteristic sewer pipe bend (elbow)
, in which there should always be water.
Water here acts as a barrier against the penetration of odors
.
When draining the tank from the top floor, a drop of water flies down,
while creating rarefied air behind it.
Air tends to the rarefied zone from all sides, and if there is a ventilation pipe, it primarily comes from it, being sucked in from the roof
.
If there is no such pipe
, the air will have nowhere to come from, and
the so-called water seal failure occurs
, when water from the elbows of plumbing fixtures is sucked into the sewer pipe, providing an influx of air, already from the room, into the rarefied sewer zone.
In this case, the plumbing elbows remain dry
and provide unhindered air flow from the room to the sewer and back, filling the room with unwanted aromas.
The presence of a drain pipe not only eliminates the possibility of a possible failure of the water seal, but also ensures ventilation of the sewer riser in case of possible drying out of the plumbing siphon.
Types of paint
For a brick pipe, only heat-resistant or enamel paint compositions are suitable, which, when properly applied to the surface, ensure the durability of the coating for 10 years. An option is to use a special varnish, the protective decorative properties of which are less and last 3-4 years. Each type of coating has pros and cons, for example:
How to choose?
To carry out high-quality painting of a brick chimney, which should retain its protective and decorative properties for a long time, it is necessary that the paint and varnish materials meet the following requirements:
- They had a high level of adhesion (adhesion of surfaces of dissimilar solid and liquid bodies) - the coloring composition must be absorbed by the structure of the brick, providing protection from fluctuations in temperature and humidity.
- They were vapor and water permeable - they removed excess moisture from the surface, but did not allow drying out.
- They were resistant to ultraviolet rays - they retained their color for a long time and did not fade in the sun.
So, for example:
- The mass fraction of non-volatile substances should not exceed 17%.
- The optimal indicator of conditional viscosity at air temperatures from 0 to +20 ° C should be 36 s.
- Important points are the drying time, the operating temperature range, and the shelf life.
Home Remedies
The chimney can also be treated with homemade coloring agents. For example, brick is ground into small crumbs and sifted in a sieve until a homogeneous mass is obtained. Then it is mixed with homemade milk, village milk and egg whites. The solution should look like liquid sour cream. It is applied with a wide brush, covered with drying oil or, if a shiny surface is needed, with varnish. Forms a heat-resistant and durable brick-colored coating. To prevent the painted brick from getting dirty, it is recommended to apply a layer of whipped egg white. This heat-resistant paint protects brickwork from moisture and dirt.
How to properly paint a brick chimney?
The quality and durability of the varnish coating is greatly influenced by appropriate surface preparation. Only the tidied, repaired areas need to be coated with the paint composition. Old pipes are damaged first of all. The reason is the influence of water, wind, time. In addition, the solution that holds them together becomes unusable.
Basically, only plaster is sufficient to treat a damaged surface, but restoration of damaged masonry may be necessary. Thus, the bolted connections on the clamps may become loose, since chimneys are high-rise structures that are subject to vibrations. As a result, the trunk tilts and destruction is possible, to prevent which these connections need to be tightened.
After restoring the brickwork, it is worth cleaning the outer surface of the pipe (wet, household washing) using special equipment, and sometimes manually, to remove dirt, soot, soot, and ash. Loose layers of paint can be effectively removed using a sandblaster or acid solvent. The better this work is done, the smoother the new coating will lie and the longer it will last.
The cleaned surface is coated with a primer. Coloring compounds are applied on top of it. To ensure color saturation, durable and long-term preservation of the flooring, the paint must be applied twice. For structures such as a brick pipe, devices are used that can operate in high pressure mode, and rollers are also used. Paints and varnishes are applied by spraying to the surface.
Jumpers
Functions
Regardless of which risers are connected by jumpers - heating or hot water supply - the jumpers perform one function - they ensure continuous circulation of water. Why it is needed in the heating system - I think there is no need to explain.
In hot water supply, connecting two or more risers with jumpers solves two problems at once:
- Provides almost instantaneous supply of hot water after opening the tap. In houses with dead-end DHW risers, water has to be drained for a long time to heat it;
- Ensures continuous operation of heated towel rails. In new buildings they are installed in the gap of the riser, and not in the hot water supply line.
The towel rail is a bend in the riser.
Installation
There are more than a few requirements for installing lintels in the attic:
- An air vent (Mayevsky tap or regular valve) is mounted at the top point of the jumper. It is needed to remove air plugs from risers;
- If there are brackets (bends in the vertical plane), the air vent is installed at the top point of each bracket;
- The lintel above the ceiling level is thermally insulated.
Installation of passages for two-story buildings
If the building is two-story, then in this case, after installation on the first floor, it is necessary to work on the second. How to install a sandwich pipe through the second floor? Let's consider the main points of wiring a sandwich chimney through the second floor:
- As a rule, the second floor of the baths is equipped as a rest room. Also, laying a sandwich chimney can take place in a private house. In such cases, a transition is made from a sandwich pipe to a single-wall pipe. This is done so that the heat from the chimney spreads and warms the rooms. The transition to a single-wall pipe should be carried out at a height of 1 m from the floor of the second floor.
- In front of the attic passage unit, a transition is made back to the sandwich pipe.
- The attic passage unit is installed in the same way as the previous one.
Note! It is strictly forbidden to seal the joints of the chimney waterproofing apron using ordinary construction silicone. For these purposes you need to use a special sealant.
- It is necessary to route the chimney through the waterproofing coating and the roof. It is imperative to carry out thermal insulation and install a protective apron, which will serve as waterproofing for the chimney sandwich. Homemade aprons and heat-resistant sealant may be suitable for these purposes.
Waterproofing after running the pipe through the roof is necessary to ensure that moisture does not penetrate into the attic and does not flow down the structure. When passing a sandwich pipe through the roof, it is also necessary to comply with the standards described in SNiP.
What should be the height
The height of the chimney above the roof requires special attention, since this is where combustion products pass from a closed and safe environment to the outside. If this height is not sufficient to safely cool the gases and mix them with air, a dangerous situation of combustion poisoning or even a fire may occur.
Design parameters for the location of the chimney on the roof
Another issue that deserves attention is the physics of the process of the emergence of natural draft. The fact is that, being in the chimney pipe, heavy air tends to rise upward, forming the physical phenomenon of draft
The more warm air, the more draft is created. The volume inside the pipe is affected by two indicators: internal volume and height.
Here it is worth achieving the “golden mean” indicator. Natural draft can lead to a significant increase in heat loss, since the exhaust will not have time to exchange heat with the internal volume. This is very critical for fireplaces and stoves that burn solid fuel.
Let's say you have a chimney about 4 meters high. Based on the above, the higher the chimney, the greater the draft, but it turns out that there is also a downside to this process - cooling. A tall pipe will cool faster and create an air lock with heavy cool gas, which will interfere with draft. The second negative phenomenon caused by abuse of the chimney height will be condensation.
Specialists calculate the height and cross-section of chimneys using special software products that are based on thermodynamic data.
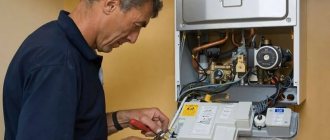
Chimney size for gas boiler
Gas boilers come with open and closed combustion chambers. Units with a closed combustion chamber are equipped with coaxial chimneys. The rules for placing them are quite simple:
- The chimney rotates 90 degrees and ideally should immediately exit horizontally behind the wall
- The outlet should be made at a slight slope towards the street so that condensate does not enter the boiler.
- If the pipe is mounted vertically, then a condensate drain must be provided.
- The height of the chimney for a gas boiler with a closed chamber is regulated by each manufacturer in its own way, because the power of the smoke exhauster into the boiler may vary. Therefore, please read the instructions before installation.
- There is no need to install a chimney above the roof and ridge.
For boilers with an open combustion chamber, the height of the chimney is calculated similarly to the method described above.
How does the cross-section of a chimney affect its height?
Round chimney
In addition to the fact that the height of the smoke exhaust ducts is regulated by the requirements of SNiP, its cross-section and internal shape must be taken into account. These parameters also affect the normal functioning of heating devices and their efficiency.
According to the laws of physics, warm air - in our case, flue gases - rises when heated. And the closer it is to the exit, the more it cools, resulting in the formation of draft. Accordingly, a large chimney cross-section, it would seem, should create better draft. But in reality this is not always the case. The larger the internal cross-section, the faster the heated air cools, releasing more condensate. And it negatively affects the quality of this very traction.
What is the expected way out? You can increase the height of the pipe and reduce its cross-section. In this case, the draft will be so great that it can lead to a loss of efficiency of the heating boiler or stove. After all, the supply of cold air from below will be increased, due to which the heating of the heating device itself will be insufficient. This means more fuel consumption and warm-up time will be required.
If the chimney is high and the internal diameter is insufficient, the draft will also be insufficient for normal operation of the device. In addition, smoke and carbon monoxide may be released into the room. To prevent this from happening, and to ensure that the heating devices operate at full efficiency and productivity, it is necessary to calculate all parameters using a calculator or inviting specialists.
Thrust calculation
Any ventilation system will not be able to function normally without good draft, which is created by the difference in pressure inside and outside the room.
To calculate the draft of a chimney, you need to multiply the height of the channel by the difference in the density of the internal and external air.
The calculation is carried out using the following formula:
F= A(pв - pд)h,
- F – thrust;
- A – coefficient;
- pв – density of outside air;
- pd – density of flue gases;
- h – pipe height.
Example
When fuel burns in the firebox, heated gases are removed. Natural draft occurs due to the difference in temperatures inside and outside the room.
Air density and temperature are directly related
When calculating, dynamic pressure is not taken into account, since the process speeds are very low
All data is substituted into the famous Bernoulli equation. Next, the pressure loss values are found, then they are compared with the thrust parameter.
If the same indicators are obtained, further calculation does not make sense. The system will work normally, combustion products will begin to be completely removed.
If equality is not maintained, you need to increase the level of traction or reduce the number of losses. To implement the first method, you can:
- lengthen the chimney pipe;
- increase the temperature difference.
To reduce pressure loss, it is recommended to use the following methods:
- make the canal walls smoother;
- reduce the path of removed gases;
- reduce the number of turns;
- increase the cross section.
Using the same method, natural ventilation indoors is calculated.
Ondulin surface
Ondulin is otherwise called “Euroslate”. According to its characteristics, it does not have reliability and durability. Therefore, it is necessary to cut a hole in the roofing surface and fill it with heat-resistant material, which, in turn, will prevent the penetration of moisture.
To waterproof the ondulin surface, install an apron or use a flexible tape - Onduflesh. This coating requires additional ventilation.
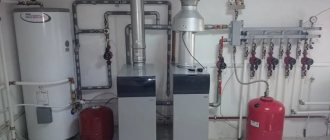
Heating bottling
Functions
What are the benefits of moving the heating supply bottling to the attic?
- Extremely simple start of the heating system. You just need to fill it, open both house valves in the elevator and bleed the air from the expansion tank in the attic. For comparison: in the case of bottom filling, you need to bleed the air in the jumper between each pair of risers;
- Uniform heating of all heating devices on each floor. The drop in coolant temperature as it moves from top to bottom is compensated by an increase in the size of the radiators.
Schematic diagram of a heating system with top filling.
The only inconvenience is that it is more difficult to reset and start a separate riser with your own hands: in the case of top filling, it must be turned off both in the basement and in the attic.
Installation
The filling is installed with a constant slope along its entire length. An expansion tank is placed at the top point, collecting air when the circuit starts. Each riser is equipped with:
- A valve that allows you to turn it off independently of the others;
- A plug. It will allow the riser to suck in air during discharge and prevent water from hanging in it.
Discharge of riser from bottling. Instead of a plug, a relief valve is installed - a ball valve.
In ventilated attics, both the bottling and the sections of risers located above the attic floor are thermally insulated. As a rule, glass wool or mineral wool, rags and knitting wire are used for this purpose. Thermal insulation reduces both non-target heat loss and the likelihood of circuit freezing during short-term circulation stops during winter cold.
Announce the entire list
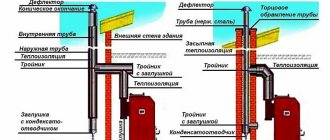
The following are usually discharged through the roof:
- Pipes for removing combustion products from a furnace or boiler;
They are needed mainly for solid fuel boilers with natural draft. For example, modern gas boilers are usually equipped with a coaxial (double) pipe leading through the nearest external wall. Combustion products are removed through the inner pipe, and air is taken from the street through the outer pipe for gas combustion.
- Ventilation terminals;
- Fan conclusions of sewer risers.
In the attic you can find three more types of pipelines:
- Heating supply bottling. It is carried into the attic in so-called top-fill systems;
Heating bottling in the attic.
- Jumpers between the risers in the bottom filling system (when both the heating supply and return are separated in the basement). More often, these jumpers can be found in apartments on the top floor, but their location in the attic is more rational: in this case, starting the heating system and bleeding air from the paired risers does not require the presence and participation of residents;
- The same jumpers between the DHW risers.
Standards for the distance from the pipe to the walls
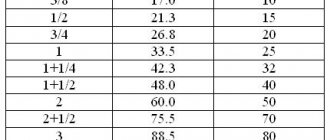
According to SNiP (Appendix 16), there are certain standards for the distance from the surface of the pipe to materials prone to fire, described in the table below.
Table 1
| Sandwich pipe thickness, mm | Indentation for the partition, which is protected from fire, mm | Indentation for partition not protected from fire, mm |
| 120 | 200–260 | 260–320 |
| 65 | 380 | 320–500 |
This appendix describes the norms for the distance between pipes and walls. The wall material may not be fire resistant, so they, like ceilings, need insulation. For this, mineral wool and a sheet of galvanized steel are used, mounted on top of the insulation.