Errors when installing a roof are unacceptable. This affects the integrity of the structure and its durability. Ondulin has earned trust with its qualities and characteristics. And if you managed to install the roofing material, then another problem arises: how to remove the pipe through the roof from the ondulin. After all, you will have to make a hole in it that needs to be properly sealed.
In fact, the work is not difficult, since the manufacturers themselves provide detailed instructions and videos on how to do the job. With them, the pipe on the roof made of ondulin will not violate the integrity of the roof. We will look at the features of ondulin and the technology itself for removing pipes, ventilation or chimneys.
What is the difficulty of passing a pipe through an ondulin roof?
As a rule, the roof frame and ceiling in bathhouses are made of wood, which is also a flammable material.
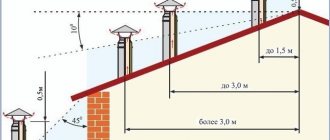
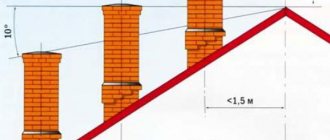
Meanwhile, the corresponding SNiP prohibits the placement of flammable roof elements closer than 130 mm in the light of brick, concrete, or ceramic insulated pipes. For pipes without thermal insulation, the distance is even greater - 250 mm. If we take into account that this distance must be maintained on all sides of the pipe, we get a very large hole in the roof.
The presence of such a large hole in the roof can lead to moisture entering the insulation, both from the atmosphere and from the bathhouse room. In addition, the organization of ventilation of the under-roof space becomes problematic.
How to solve a problem
There are two ways to reduce the problems that arise when leading a pipe through an ondulin roof to a minimum, or even avoid them altogether.
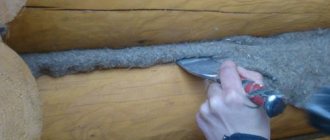
The first method is to install your own rafter system around the chimney. The gap between the pipe and this system must be filled with any non-flammable insulating material (for example, basalt mineral wool).
In order to avoid disruption of air circulation under the roof, it is necessary to install the necessary ventilation components above and below the pipe exit point.
The second method is to install special mass-produced metal kits on the roof. However, there are a number of limitations:
1. Steel pipes for furnaces can be used if the temperature of the exhaust gases does not exceed 500 degrees Celsius.
2. The use of metal pipes for furnaces that burn coal is prohibited.
3. Chimneys must be equipped with spark arresters.
Advice. Do not attach the pipe rigidly to the roof structure. Any deformation of the roof can destroy the pipe.
There are technical solutions for how to remove a chimney through the roof of a bathhouse covered with ondulin. All you have to do is choose the one that suits you.
Source
Sealing of passages of round pipes
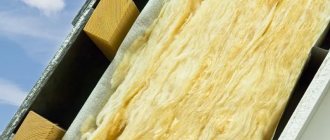
As you know, stoves and fireplaces in recent years are increasingly equipped with round chimney pipes of different diameters. Modern metal chimney pipes most often represent a “sandwich structure”, that is, they consist of three layers - two metal cylinders, outer and inner, and a layer of thermal insulation between them. Basalt-based mineral wool is usually used as thermal insulation.
Prices for metal tiles
metal tiles
To seal the joints between the roof and round pipes, special rigid or elastic penetrations are produced
Manufacturers have provided special elements - penetrations - to seal the junction of such round pipes to the roofing. These parts can be made of metal or of an elastic, heat-resistant composite material, which is mounted in conjunction with metal elements.
In principle, the same principle is used to construct a hermetically sealed roof connection for ventilation pipes.
Metal penetration for round pipes
Options for finished metal products for arranging the junction of the roof with round pipes usually consist of two parts. This is a cap-apron and the so-called “sole”, which is a rigid base and made of a steel sheet on which the cap is attached by the manufacturer. Metal penetrations differ from each other in the angle of slope of the bottom plate of the structure in relation to the cap, therefore, they are selected depending on the slope of the roof. As a rule, in specialized stores you can always find the desired version of the products, since they are produced for roof slopes of various slopes.
Before installing the structure on the roof, the upper part of the hood is cut to the diameter of the chimney pipe, since it must pass freely through the hole in the hood. Then, the “sole” is rigidly fixed to the roof surface using roofing screws, onto which sealing elastic gaskets made of rubber or neoprene are put on.
Very often, when installing a metal penetration on a relief roof covering, to enhance the sealing of the junction, a metal sheet is fixed above the pipe, which is brought under the ridge element and fixed with an overlay on the upper side of the “bottom” of the penetration.
Rigid metal penetration for round pipe. The sheet located above it and placed under the ridge element reliably protects the penetration unit from above - a particularly relevant measure for piece roofs with a pronounced relief
After the sole is fixed to the roof surface and the pipe is passed through the penetration, the upper edge of the cap is pressed against the chimney using a special clamp in which a heat-resistant elastic gasket is installed. This element will protect the junction of two elements from moisture entering it.
Ready-made elastic penetrations
As mentioned above, in addition to metal penetrations, you can also find elastic ones on sale, equipped at the bottom with a sole made of soft flexible metal, such as lead or aluminum. Through this plastic, but preserving the shape given to it, spacer, framing the “bottom” of the penetration, it is fixed to the sheathing, through the surface of the roofing material. The cap itself is made of weather-resistant elastic rubber, and tightly covers the pipe around the circumference, especially since it is usually also “grabbed” with a metal clamp.
Slate prices
slate
Elastic penetrations for round pipes – “master flash” – have become very popular.
The advantage of elastic penetrations is their versatility, since they can be installed on slopes that are built at any slope. Thanks to the flexibility of the combined penetration base, it is easy to shape the base of the roofing material.
Such flexible penetrations for round pipes are often called “master flash”. There is no shortage of such products in our time. And installation is very simple and accessible to any home owner.
Installation of a master-flash penetration is simple and intuitive. A feasible task even for a home owner who is inexperienced in such work
Video: installation of an elastic penetration for a “master-flash” chimney
Sealing the junction of the roof to a round pipe using aluminum or lead tape
In cases where for some reason it is not possible to use ready-made penetrations to seal pipe passages, then special self-adhesive aluminum or lead tape can be used to perform this work. Due to the flexibility, heat resistance and versatility of this material, you can use it to form a penetration yourself.
Self-adhesive sealing tape on an aluminum or lead base allows you to seal the joints between the pipe and the roofing, if the use of a finished penetration seems impossible
The vertical part of the pipe with the transition to the roofing is covered with pieces of tape. And then the tape is secured around the chimney - thus sealing the joint.
This material is highly resistant to various external negative influences: high and low temperatures and their sudden changes, moisture, ultraviolet radiation,
In order for the tape to provide high-quality waterproofing of the junction, and the sealing to last as long as possible, the tape must be applied to a clean, degreased and dried surface of both pipes and roofs.
The passage of a chimney through a roof made of corrugated sheets or ondulin
The chimney passage must always comply with strictly defined construction standards, since the fire safety of the entire residential building depends on this. Therefore, special attention should be paid to some features of the roof through which it will be installed. In this article, experts will consider the nuances of installing a chimney passage through a roof made of ondulin.
Features of ondulin roofing
In modern construction, roofing material such as ondulin is often used to cover roofs.
It is also called “Euro slate”, since its appearance is similar to the usual Soviet slate, and its quality meets European standards. The name of this roofing material “ondulin” comes from the French company of the same name, which is its manufacturer. Ondulin roofing is characterized by both positive and negative reviews from experienced Russian builders. Let's start with the positives:
Among the disadvantages of roofing ondulin, experts note the following qualities:
But, despite these disadvantages, this material is popular among builders in our country and is used quite often to cover the roofs of residential private houses.
The passage of a chimney through the roof: the main nuances of arrangement
As you can see, a roof covered with ondulin has both advantages and some disadvantages that must be taken into account when arranging a chimney passage.
Roofers recommend paying special attention to the following points: Having understood all the subtleties we have mentioned, you can begin to directly arrange the chimney opening through the ondulin roof.
Chimney passage through the roof (roofing material - ondulin)
To create a sealed and fireproof passage for a chimney pipe through a roof covered with ondulin, it is necessary to install a separate box.
It is in this box that the chimney pipe will be placed. And under the box, an opening of the required size is prepared, which is cut through the roof. Such a passage should provide a good sealed connection to the roof, so you will have to complete the following: The technology for installing a chimney passage through the roof is standard (regardless of the roofing material, that is, it is also suitable for ondulin) and ensures a high-quality connection to the duct of all vapor barrier and waterproofing layers.
The first step: the canvases are cut using the “envelope” technique, their edges are brought together with the rafters, and fixed with staples.
Second step: protect the insulation layer from excess moisture getting into it; to do this, install an airtight seal (experts advise using a special adhesive tape or construction adhesive).
Third step: waterproofing the junction of the chimney passing through the roof made of ondulin (this operation is carried out using “Onduflesh” - a self-adhesive insulating tape).
Fourth step: the chimney passage is sealed so that water does not get into the attic through the opening in the roof; for this purpose, a special apron is installed (it is placed on the roof slope and goes under the roofing).
These steps are not very simple to perform on your own, so if necessary, it is best for novice builders to turn to qualified roofing specialists.
[content-egg module=GdeSlon template=compare]
Insulated attic
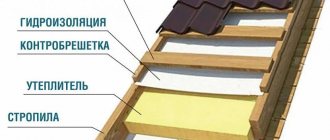
Mansard and warm roofs using Ondutis materials may have a different structure of the roofing pie.
Insulated roof with one ventilated gap
This scheme is used when diffusion membranes Ondutis SA130 or Ondutis SA115 are used as waterproofing, which can be directly laid on the insulation.
The installation sequence of the roofing pie looks like this:
- A waterproofing membrane is attached to the rafters. A spacer bar is stuffed on top of it, to which the sheathing for Ondulin is attached.
- Laying the roof.
- Insulation is placed between the rafters close to the film.
- If the thickness of the thermal insulation between the rafters does not meet the standards for thermal protection of buildings, then an additional sheathing for the second layer of mineral wool is attached from the inside of the attic.
- On the attic side, a continuous layer of Ondutis R70 or Ondutis R Thermo vapor barrier film is laid on top of the rafters (or additional sheathing).
- A counter-lattice is attached on top of the vapor barrier to finish lining the roof from the inside.
Insulated roof with two ventilated gaps
In this case, instead of a diffusion membrane, Ondutis RV 100 or Ondutis RS film is attached to the rafters. A special feature of the films is their high water-resistant properties (over 1000 mm of water column). They can be used as temporary roofing.
But since both types of film have limited vapor-permeable properties, there must be a ventilated gap between the insulation and the waterproofing. Another gap (between the roof and waterproofing) ensures the removal of condensate and ventilation of the under-roof space.
Typically, a roofing pie design with two ventilated channels is used for metal tiles or corrugated sheets, on which a large amount of condensation forms. But it is also chosen for Ondulin if the house is located in a region or area with a humid climate. For example, in a three-kilometer coastal strip or on the shore of a reservoir.
The roofing pie diagram looks like this:
- Ondulin sheets;
- roof sheathing;
- remote block of the first ventilated channel (number 1 in the diagram);
- waterproofing film with slight sagging (up to 2 cm);
- remote block of the second ventilated channel (number 2 in the diagram);
- insulation between the rafter legs (if the surface of the thermal insulation mats is not laminated, then wind protection Ondutis A100 or Ondutis A120 is laid on top of the insulation);
- the second layer of insulation between the additional sheathing (when the thickness of the main layer is not enough);
- vapor barrier;
- lathing for the interior lining of the attic.
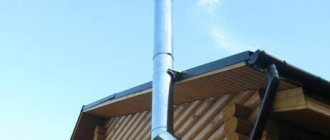
How to properly route a metal pipe through an ondulin roof?
It is not so easy to remove a metal pipe through an ondulin roof. The fact is that ondulin is a flammable material, just like the wood from which the roof truss is made.
If, for example, you are building a bathhouse and want to cover it with ondulin, then the chimney pipe should be located about 250 mm from the flammable material (wooden rafters). And in the ondulin you will have to saw a decent size hole. Moisture will enter the roof through this hole. This means that it is necessary to cover the roof with a special material that will protect the roof from leakage and at the same time, it must be non-flammable.
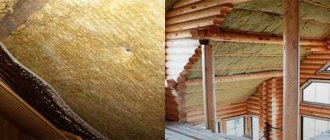
I know that basalt mineral wool is often used for these purposes. We bend the edges of the mineral wool, nailing it with nails or staples. You can still use sealing tapes along the edges. Provide the pipe exit points (above and below) with the necessary ventilation components. This is necessary so that air circulation under the roof is not disrupted.
Pipe fire safety diagram:
Insulating a metal pipe from the roof:
Depending on what kind of pipe it is, there may be a chimney and ventilation.
If ventilation, then there is such an additional element on sale (“ondulin ventilation pipe”),
If we are talking about a chimney, then of course there are some nuances here, ondulin is bitumen, that is, a hot material.
When passing a metal pipe through ondulin, special “penetrations” (metal) are used.
There are some nuances to the passage after covering the roof with ondulin and during installation.
The metal pipe itself is put into a special casing, inside of which there is thermal insulation, this is clearly visible in the photo.
The sheathing beam must be at least 10 cm away from the outer wall of the chimney.
To seal the passage, a “Master-Flash” cuff is mounted on a metal pipe.
You can attach it to the ondulin (cuff flange) using bitumen mastic.
[content-egg module=GdeSlon template=compare]
What materials and tools will be needed
To start covering the roof according to all standards, you need to prepare:
- Bitumen sheets measuring 2.05 * 0.95 m. The quantity should be 10% more so that there is a reserve taking into account overlaps and cutting.
- The profile is the length of the entire ridge. It is also necessary to take into account overlaps between parts of 10-25 cm.
- Timber for sheathing, impregnated with antiseptic. Recommended sizes: 40*40 mm, 60*40 mm.
- Thick polyethylene film (for waterproofing).
- Special nails to match the color of the sheets.
- Hammer, hacksaw.
- Pencil or chalk, tape measure for marking.
- To assemble the sheathing, use a screwdriver.
- Scaffolding or high ladder.
Moreover, the scaffolding should be of a comfortable height so that you can reach any corner of the slope without any problems.
How to properly remove a chimney through the roof of a bathhouse covered with ondulin
What is a chimney pipe for?
The traditional material used to fire the sauna stove is wood. When it burns, gases that are dangerous to humans are formed. When burning, they must be removed. This is why a chimney pipe is needed.
What is the difficulty of passing a pipe through an ondulin roof?
It would seem – what’s wrong with running a pipe through the roof?! But no! There are problems. The cause of all the problems that arise when removing a chimney through an ondulin roof is the composition of the roofing pie. Most types of thermal insulation are made from synthetics, and hydro- and vapor barriers are made from polymer films. Obviously, they are all flammable materials.
As a rule, the roof frame and ceiling in bathhouses are made of wood, which is also a flammable material.
Meanwhile, the corresponding SNiP prohibits the placement of flammable roof elements closer than 130 mm in the light of brick, concrete, or ceramic insulated pipes. For pipes without thermal insulation, the distance is even greater - 250 mm. If we take into account that this distance must be maintained on all sides of the pipe, we get a very large hole in the roof.
The presence of such a large hole in the roof can lead to moisture entering the insulation, both from the atmosphere and from the bathhouse room. In addition, the organization of ventilation of the under-roof space becomes problematic.
How to solve a problem
There are two ways to reduce the problems that arise when leading a pipe through an ondulin roof to a minimum, or even avoid them altogether.
The first method is to install your own rafter system around the chimney.
The gap between the pipe and this system must be filled with any non-flammable insulating material (for example, basalt mineral wool).
With this method, the chimney pipe is placed in an insulated channel. Around the rafter system created for the pipe, layers of steam and waterproofing are tucked in and secured with staples or nails. For reliability, it is worth sealing the joints with sealing tapes. The Ondulin company produces high-quality Ondufresh tapes.
In order to avoid disruption of air circulation under the roof, it is necessary to install the necessary ventilation components above and below the pipe exit point.
The second method is to install special mass-produced metal kits on the roof. However, there are a number of limitations:
1. Steel pipes for furnaces can be used if the temperature of the exhaust gases does not exceed 500 degrees Celsius.
2. The use of metal pipes for furnaces that burn coal is prohibited.
3. Chimneys must be equipped with spark arresters.
Advice. Do not attach the pipe rigidly to the roof structure. Any deformation of the roof can destroy the pipe.
There are technical solutions for how to remove a chimney through the roof of a bathhouse covered with ondulin. All you have to do is choose the one that suits you.
[content-egg module=GdeSlon template=compare]
Cold attic
The simplest roofing device is Ondulin laid on a sheathing without a waterproofing film. This scheme is possible due to the fact that practically no condensation forms on the surface of Ondulin.
This type of roofing is used primarily for unheated outbuildings and country houses for seasonal residence, when conditions for condensation formation cannot physically arise.
The disadvantage is the lack of protection against possible roof leaks.
The use of waterproofing film in the roofing pie eliminates the possibility of roof leakage and protects the rafter system and attic from condensation.
The standard cold roof diagram looks like this:
- Ondutis RV 100 or Ondutis RS film is attached to the rafters (logo facing up). It should sag a little (1-2 cm). The sagging allows condensation to drain and compensates for the deformation of the polymer film at low air temperatures.
- The joints of the waterproofing panels are glued with Ondutis BL self-adhesive tape.
- To form a ventilation gap, a spacer strip with a section height of at least 3 cm is stuffed on top of the rafters.
- The sheathing beam is attached to the batten. If the slope angle is less than 10°, then install a continuous flooring.
- Install Ondulin.
How to cover a roof with ondulin - installation details
about how to cover a roof with ondulin . There is nothing complicated here, it is only important to follow the rules, fasten according to the instructions and have a little skill in construction.
But often after roofing problems arise due to improper coating. Understanding such issues, it can be noted that the problem lies in the incorrect fastening of additional elements and other nuances.
You should pay no less attention to subtleties , because small mistakes can later lead to big problems.
Passage of a ventilation or chimney pipe through ondulin
Of course, every home has a basic kitchen hood. Also, a private house is equipped with a ventilation system , which is vented through the roof.
“Cutting” holes for such pipes is labor-intensive . Moreover, at the point where the ventilation pipe comes into contact with the ondulin, a gap will appear through which moisture will enter. In the future, this can lead to flooding of the room.
Ondulin manufacturers took care of their customers . They offer customers a special ready-made ventilation pipe. It is attached to the roof with nails and there will be no leaks.
Sometimes people, trying to save money, do not resort to such additional elements . They lead a regular ventilation pipe through the roof and leave it in such a state, which is strictly prohibited.
In this case, it is necessary to use a covering apron . But attaching it is much more difficult than a finished ventilation pipe.
When there is a fireplace or stove in a house or bathhouse, it becomes necessary to also bring the pipe to the roof through an onduline. To do this, using conventional technology, lay out a brick pipe and cover the roof with the given roofing material.
To avoid leakage, you must use the same covering apron. It is attached to the ondulin with special nails .
Installation and dimensions of an ondulin ridge
The ridge is an important detail in ondulin roofing . It is designed to decorate the roof ribs, as well as to protect against excess moisture.
Skates are purchased ready-made among other additional elements. Before fastening, it is worth finding out from which direction the winds prevail. Installation begins on the opposite side from the direction of such winds.
The skates are also laid with an overlap of a width not exceeding 1.5 cm. The skate is nailed with special nails to the upper wave of the ondulin sheet lying underneath it. In this case, the nail must be of such length that it is fixed into the sheathing bars.
Covering apron for ondulin
Other additional elements that are necessary to cover a roof with ondulin include a covering apron. With its help, they achieve sealing of joints .
It is used at the point of contact of the sheets with the chimney, for aesthetic design, as well as to protect the joint between the ondulin sheet and the vertical wall from moisture.
In the case of a pipe, the covering apron is attached at the bottom and nailed to each wave of the ondulin sheet. Next, using sealing tape, seal the joint with the wall, side joints and the top of the pipe.
To do this, the tape must be laid at least 10-15 cm higher to the vertical surface. The covering apron and tape are attached with a metal strip.
In addition to sealing pipes and vertical walls, a covering apron must be used to install the ridge element. To do this, it is installed with an overlap of 4 cm on both slopes.
In this case, the upper edges of the apron should be at least 2 cm apart. This measure is necessary for better air outlet . Skates are mounted on top of the attached aprons.
[content-egg module=GdeSlon template=compare]
Sparse lathing: precisely calculated step
For roofs with a slope of 10 degrees or more, it is allowed to install sparse sheathing specifically under the ondulin. We will try to cover all the technical aspects of this process.
How to achieve precise pitch?
Let's start with the fact that in order for the step to be perfectly accurate, make a wooden template and apply it from block to block:
Make the same template as in the illustration, or just a flat piece of timber that will be convenient to place between the sheathing boards.
How to guess the length of the bars?
Second point. The eaves overhang itself is provided with a fillet - a special board that is nailed to the lower end of the rafter. And on gable roofs, using the overhang of the laths and the length of the filly, you can increase or decrease the size of the entire roof slope.
In this way, a minimum number of ondulin scraps is achieved. That's why make the slats and fillets a little longer, and then saw off all the excess:
How to avoid getting a nail stuck in a piece of wood?
Let's tell you one more secret: when laying sparse lathing, carefully ensure that there are not many knots on it. Because when the nail gets into such a place, then you have to tinker. After all, the wood at the knot has a completely different density.
In this case, some craftsmen act simpler: they fold a stack of sheets, simultaneously make a thin hole in all of them, and then hammer nails into the roof at precisely located points, as if using a stencil.
This has its advantages: you can insert a nail into the hole and immediately feel for a piece of sheathing there, and then punch it.
How to check the evenness of the sheathing surface?
The next important requirement: the sheathing itself must be level. Of course, ondulin is one of the few materials that perfectly hides all the unevenness of the roof.
But this does not mean that you can not worry about this and prepare the foundation somehow. Any such errors in the plane geometry always result in future deformation of the roofing sheets.
But checking the evenness of the mounted sheathing is quite easy - using a stretched thread. If unevenness is found in any place, then make special pads from plywood. For this, take pieces about 4 and 8 mm thick and stuff them in the right places. Very comfortably!
Connection of ondulin to the pipe
Roof installation requires a serious approach and does not tolerate mistakes, as this can lead to leaks and damage to the structure. Modern roofing materials, which have recently become popular, have their own installation features. Therefore, the ventilation pipe, the ondulin around which must be reliably sealed, requires certain installation procedures.
Features of using ondulin for roofing
An ondulin roof has its own characteristics, among which there are both positive and negative aspects. Positive characteristics include:
Disadvantages include average strength and fading of colored elements in the sun.
On the roof, the pipe from the ondulin must be removed correctly, and it must also be ensured that the sealing is carried out accordingly.
Rules for arranging a chimney
On an ondulin roof, special attention should be paid to the pipe, the junction of which to the covering material should be sealed, taking into account the characteristics of the material.
The chimney should be routed through the roof according to the following rules:
Installation features
To ensure a high degree of fire safety and tightness, a separate duct is installed on the roof to provide a chimney passage.
In most cases, this applies to both round-diameter pipes and square or rectangular cross-sections.
Such chimneys are practical, economical and do not cause installation difficulties.
During installation, all connections should be hermetically sealed to prevent moisture or condensation from entering the chimney and attic. As it settles on the walls, it can lead to the formation of mold or mildew and contribute to the development of rotting processes.
What determines the method of arranging the pipe passage?
First of all, it depends on the type of pipe and the material of its manufacture. Each of the materials common in construction (brick, concrete, metal, etc.) has its own nuances for installing a passage.
If the stove installed in the house uses wood, coal or peat as fuel, then the chimney is not made of metal, as it will heat up too much. And this can be dangerous.
Depending on the size of the pipe, in some cases it is possible to select standard standard elements produced specifically for such purposes, which can be included with the roofing material.
A correctly installed passage for a chimney, taking into account fire safety rules and the operational characteristics of the coating (ondulin), can protect yourself for many years from problems with leaks in this section of the roof, as well as make home heating, regardless of the type of heating, safe and efficient . In addition, according to the recommendations of the roofing material manufacturer, specific building materials that are most suitable for these types of work should be used.
[content-egg module=GdeSlon template=compare]
Source
Quality requirements: material of manufacture
The main point in making lathing is that the distance between the bars should not exceed 61 cm. But there are still other points that relate to the quality and thickness of the material itself.
Unfortunately, ondulin sheathing is often made from something and somehow. The coating is budget-friendly and appears to be quite durable – that’s what they’re saying at this point. In fact, a poor quality base can negate all the characteristics of a bitumen roof! Therefore, treat this issue with full responsibility.
So, both wooden lathing and a galvanized steel profile are suitable for ondulin. Metal is even more preferable here, because it is not spoiled by fungi and is not sharpened by insects:
But let's start with a review of the technical characteristics of wooden sheathing, because... This is exactly the type of base that is most often installed on the roofs of houses in Russia.
Type and type of wood
So, before installation, the timber and boards must be brought to the standard humidity level for the rafter system - 19-20%. This way you will be sure that during operation the sheathing will not become deformed. Additionally, all bars should be treated with deeply impregnated antiseptic compounds. This measure will at least double the service life of the roof.
By the way, if for the manufacture of the sheathing you received wood with insufficiently low humidity, then before attaching the ondulin to it, firmly fix each board with two screws at once, on both sides. You may ask why use such material at all and why can’t you purchase normal material in the first place?
The fact is that some craftsmen like to work with this type of material, because the fibers here are still elastic, and therefore driving nails or screwing in self-tapping screws does not lead to random cracks. Although this is wrong.
But in any case, if you have doubts whether the purchased wood is really dry enough, pay attention to high-quality fastening. After all, without a special device it is difficult to measure this parameter, and in case of an error, the entire sheathing, unfortunately, will “lead.”
As for the quality of wood, the lumber market today will offer you quite a wide choice. To order, the bars will be cut to the required size and impregnated directly at the factory with antiseptics and fire retardants. Specifically, spruce and pine are best suited for lathing, because have the required strength and flexibility.
The main thing when choosing is to ensure that the wood itself is of high quality, without fallen knots, rot or anything else incomprehensible. Wooden blocks are marked according to grade from 0 to 5.
Also, be sure to check the purchased bars and boards for evenness. And not only with the help of a level or a cord. Take the board in your hands with one end so that its surface along its length is parallel to the ground and look at the entire length of the board through its end - this way all the irregularities will immediately become noticeable.
In addition, if we are talking specifically about ondulin, in which all the elements of the wooden sheathing will be in contact with the coating, it is necessary to sharpen them, creating a perfectly flat surface.
Boards, bars or slabs?
So, for the manufacture of wooden sheathing, boards that are at least 25 mm thick, or timber with a thickness of 50 mm or more, are suitable. And the greater the distance between the main roof rafters, the greater the thickness of the sheathing should be.
And the type of lathing looks like this:
- Edged, which is a neat board, sawn on all sides.
- Unedged, with partially sawn or not sawn edges. Inferior to edged only in appearance.
- Tongue and groove boards are edged boards that have special grooves for joining.
If we talk about continuous sheathing, then plywood with increased moisture resistance and OSB boards made from pressed wood shavings are suitable.
For small buildings, such as gardens, utility rooms or garages, it is allowed to use 4x5 or 4x6 cm timber as sheathing:
This is what 5x5 cm bars look like:
Unedged lumber without wane is also suitable as boards. Here is an example of using a board in combination with the bars that were used to make the counter-lattice:
Summarize. Wood as a sheathing is good primarily because it lends itself well to cutting, installation and is generally unpretentious in processing. From this pliable material it is not difficult to build everything you need, of any shape and design.
But such lathing has noticeable disadvantages in the form of deformation over time if it is not prepared correctly, as well as destruction due to fungus or bugs and dampness in some cases.
Advantages of metal profiles
Metal sheathing does not have all of the above disadvantages. Its main advantage is that it creates a perfectly flat, millimeter-accurate surface. Then laying ondulin or any other roofing covering on such a roof is a real pleasure! Moreover, if you are concerned about the fire safety of ondulin, then a metal sheathing under it is much more appropriate than a wooden one.
Second point: ondulin is attached to the metal sheathing with roofing screws. There are even special ones with a wider cap. This way, the ondulin sheets are fixed to the rafter system much more firmly, and the wind cannot tear them off.
But welding such a sheathing is not difficult in ordinary home conditions. Just remember that all welds are susceptible to corrosion and will have to be additionally treated with a primer and special anti-corrosion paint.
Also, anyone can assemble a metal sheathing like a construction set, from ready-made corners and profiles - directly onto the bolts. U-shaped profiles made of anti-corrosion steel are especially suitable for this purpose.
Of course, in the case of installing metal sheathing, you will have to spend more time than usual cutting wooden blocks, but you will do without splinters!
How to remove a pipe through the roof from ondulin
Errors when installing a roof are unacceptable. This affects the integrity of the structure and its durability. Ondulin has earned trust with its qualities and characteristics. And if you managed to install the roofing material, then another problem arises: how to remove the pipe through the roof from the ondulin. After all, you will have to make a hole in it that needs to be properly sealed.
In fact, the work is not difficult, since the manufacturers themselves provide detailed instructions and videos on how to do the job. With them, the pipe on the roof made of ondulin will not violate the integrity of the roof. We will look at the features of ondulin and the technology itself for removing pipes, ventilation or chimneys.
Sealing a square pipe on a slate roof
A slate roof adds its own nuances when it comes to creating a sealed pipe. Because of the slate, it is impossible to use any other parts for insulation, so the protection effect was achieved through a cement-sand apron, which was created as follows:
- All cracks must be covered with galvanized steel collars. This material does not corrode and can last a long time.
- The cement-sand mortar is poured so that it is above the roof level. If a cardboard cylinder was used in the process, then the procedure will be easier and simpler.
- Water drainage must be carried out using an inclined ledge, which must be located on the side of the ridge.
When sealing the chimney, do not forget about the water outlets Source dom.dacha-dom.ru
If, for convenience, a cardboard cylinder with plastic film or a plastic side was used when pouring, then these parts must be removed after the mass has hardened. Despite its appearance, this method of sealing is in no way inferior to alternative ones, which cannot be used on a slate roof.
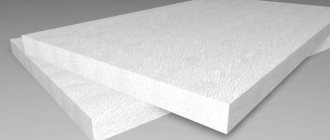
Benefits of ondulin
Roofing made from this material gained popularity for a reason. Ondulin is a type of roofing material, classified as soft, based on bitumen. Externally, its shape resembles slate, however, that’s where all the similarities end. Thanks to its special composition, it has a lot of advantages and is easy to work with. The material is made from cellulose fibers, bitumen compositions, mineral components, dyes and hardening resins.
What does this give? It is easy to cut, it does not crumble or crack like a cipher, so a ventilation or chimney pipe can easily pass through the hole made. Ondulin has the following positive qualities:
As for the disadvantages, these are average strength, color fading under UV rays and lack of fire protection. Since the material is soft, it is not difficult to pass the pipe through the ondulin. And thanks to additional materials, it is easy to make it airtight.
Features of pipe exit through ondulin
There are some rules to follow. They are related to the properties of the material. Professionals know that a residential building requires several pipes to be installed through the roof. This includes a chimney and a ventilation passage through the roof made of ondulin, which have a corresponding weight. When working, the following is taken into account:
You need to know this before you start working. Let's look at two types of work: removing a ventilation pipe through ondulin and removing a chimney.
Features of a sandwich chimney
A type of round pipe is a sandwich chimney. It consists of two pipes of different diameters, between which there is a heat-resistant thermal insulation material. They are made of stainless steel. The sandwich chimney is in great demand because it provides stable draft, does not heat up, is easy to install and looks beautiful in appearance.
The passage through the roof of a sandwich chimney can also be done using an elastic adapter. However, it may not be in harmony with its mirror surface. In this case, a metal adapter is used, the material of which is also stainless steel. It is not flexible, so you must take into account the diameter of the pipe and the angle of the roof slope.
Ventilation pipe outlet method
There is a method to make things easier for yourself. For this, not just an ordinary pipe is used, but a special proprietary transition element made of polyvinyl chloride. In construction stores, for example, STD Petrovich, there is an ondulin roof ventilation transition that you can buy. And then the process of removal through the roof can be divided into several stages.
First you need to determine the point from which the pipe will be led through the roof of the ondulin. Most often they are placed in the last row of roofing material. The installation of the passage element in the desired place is carried out so that its lower edge is overlapped and secured to the ondulin sheet of the bottom row. This overlap on the bottom row is 17 cm.
However, there are some nuances. If the work is carried out while laying ondulin, then it is enough not to lay the last row to the end, leaving space for the passage element. If the roof is already finished, then you will have to make a hole of the appropriate diameter and continue the process.
Installing a chimney in a finished roof
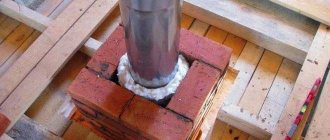
If the chimney is not installed at the construction stage of the house, but in a finished roof, the following is done:
- There is a place for output taking into account the requirements of SNiP. This should be the space between the cross beam and the rafters.
- A box is made of beams, the cross-section of which is equal to the cross-section of the rafters. The box is made such that the width of its sides is 0.5 m greater than the diameter of the pipe.
- A hole is cut in the roof equal to the perimeter of the box. To comply with it, through holes are drilled from the inside in the corners of the box.
- The roofing material is bent outward, a pipe is inserted into the hole and secured.
- The box is sealed with fire-resistant material for thermal insulation.
- The junction of the pipe and the roof is sealed. The flange (adapter) is being installed.
The pipe must be routed only through an adapter Source rinnipool.ru
We arrange the junction area for the chimney
There are several rules that must be followed when it comes to working with a chimney or stove pipe. These are the rules:
Fire safety when removing the chimney is given special attention. Although the fire source is low in the stove, the combustion products heat the chimney to an impressive temperature. In this case, sandwich pipes through ondulin are used. Their body can be seen in this photo.
It's like a thermos that holds hot liquid on the inside while keeping the outside cold. Thus. the chimney will not harm ondulin. As for chimneys made of brick or other material, they are covered in a protective metal casing with a layer of thermal insulation. Then the outer shell will heat up no more than 30–40 degrees.
Sealing round multi-layer chimneys
It is much easier to install sealing on modern round chimneys. The simplicity of the process is due to the fact that no additional equipment is required, since the pipe is already equipped with everything necessary. Installation takes place in three stages:
- Prime the edge of the pipe where the waterproofing will be attached.
- Make a hole in the waterproofing, then glue it to the pipe using mastic.
- The sheet must be attached to the sheathing. The pipe is passed through a cap, between which a clamp with a heat-resistant gasket must be located.
Round metal chimneys Source pinterest.com
If there are no caps, then flexible elastic seals for pipes are used instead. The sealant can also be used anywhere else where roof insulation needs to be improved.
Let's sum it up
The removal of a ventilation pipe or chimney is an important part of the roofing installation. We looked at several options for how to put everything into practice. The main task is to ensure high-quality waterproofing of ondulin at the junction of the pipe. If this is not done, the area will become a weak point of the entire structure. Moisture will penetrate there, destroying the insulation layer, if any, and the entire structure as a whole. Therefore, following the instructions, it is important to carry out the work correctly so as not to shorten the service life of the roof.
Source
Installation on a finished roof
The instructions are:
- A hole is made for the pipe in the selected location.
- Now you can install the pipe through a special apron. The edges of the apron are tucked under the ondulin sheet, and the gaps at the junction points are sealed using Onduflesh tape.
- The apron is nailed to the sheathing slats and reinforced with a flashing from the inside of the roof.
Note! If the apron is universal, then the angle of the roof is unimportant. Sometimes the angles don't match. In this case, the adapter is made by hand from galvanized steel or copper sheet.