Today's heating equipment market offers a wide range of electric and gas boilers, but solid fuel units remain in demand. They are cheaper, allow heating large areas, operate autonomously, and fuel is available for them. In order for the device to work properly and remain safe, a chimney through the wall must be installed. How to do this correctly – we will consider further.
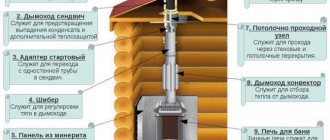
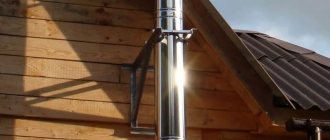
A chimney brought out through the wall Source dimohod.spb.ru
Features of working with wooden walls
Installing a chimney from a sandwich pipe through a wooden wall requires precautions.
- The dimensions of the hole in the wall are selected with a margin of 100 mm between the wall and the pipe. The distance from the chimney to other combustible materials is 450 mm.
- Basalt insulation is laid around the sandwich (it is resistant to high temperatures) and asbolite (or mineralite) around the perimeter.
- To hold the insulation inside the hole, it is covered with a sheet of stainless metal.
- A spark arrestor or umbrella is installed at the end of the chimney for fire safety purposes.
Do it yourself or order it?
You can only make a brick chimney yourself or a structure from an insulated single-layer steel pipe.
But laying smooth and beautiful walls of a brick pipe is more difficult than laying just a brick wall, and you must have the skills of an experienced mason. Single-layer pipes will have to be insulated; the quality of self-insulation is much worse than that of ready-made factory-made pipes.
You can independently install a chimney made of ceramics and sandwich pipes. It is impossible to manufacture elements of such chimneys on your own, but the industry produces many modules that allow you to assemble a pipeline of any design.
The question of whether to install a pipe yourself or hire a team of professionals is quite complicated.
Installing a chimney is quite a complex job, and it is worth thinking about and carefully assessing your capabilities: is it possible to take prefabricated scaffolding or scaffolding of the appropriate height, will you have assistants, do you have the skills to install building structures, how do you react to height.
Principle of operation
The principle of operation of a chimney is the ability of heated gases to rise, reducing their density. As a result, the cavity becomes rarefied and is replaced by air coming from outside. The draft increases, supporting combustion. When the gases cool, an acidic precipitate appears. It affects the internal walls of the structure, deforming and destroying them. To reduce the threshold for the formation of acid condensate, thermal insulation materials are used.
Features of the operation of brick chimneys
After the construction of the chimney is completed and the pipe has been successfully put into operation, it is advisable to familiarize yourself with the features of using a brick stove. In order for the heating unit to serve for a long time and without accidents, it is necessary to follow simple but important rules.
- The main enemy of brick is sudden temperature changes. It is better to heat more often, but for short periods of time. It is not recommended to make more than 2 fuel loads per firebox. This is especially true for coal, the combustion temperature of which exceeds 1000 degrees.
- Timely cleaning of the pipe from soot unlimitedly extends the service life of the chimney duct.
- If cracks occur on the stove body and chimney in particular, measures should be taken immediately to eliminate them. Neglected cracks tend to progress quickly and pose a threat not only to the integrity of the brickwork, but also to human health. Carbon monoxide, which is colorless and odorless, but poisonous to all living things, penetrates into the living space through small cracks.
- The slightest malfunction in the doors of the firebox or ash chamber (ash chamber) first significantly reduces the heat transfer of the stove, and then leads to an avalanche-like accumulation of soot on the chimney channels. If you find a door, view or valve that does not close tightly, you should immediately repair or replace it.
- At least once a year it is necessary to carry out preventative maintenance on the furnace. It is best to do this at the end of summer, before the start of the heating season. A daily preventative procedure includes opening the blower door for 15–20 minutes. This simple action will allow you to briefly create maximum draft, which will pull the soot deposited on the walls into the external environment.
- The use of damp firewood has an adverse effect on the cleanliness of smoke ducts, especially in winter. It is more rational to use fuel briquettes, the humidity of which is much lower. Firewood should be prepared ahead of time - drying wood naturally is a long process (from a year to two).
Types and designs of external chimneys
By design, external chimney devices when discharged through a wall are:
- wall-mounted They are fixed to the facade;
- indigenous. They differ from wall-mounted devices in that they are located near the frame house, and not on the facade wall. This is an independent structure with a foundation.
Main chimney
A chimney through a wall in a wooden house is made of fire-resistant materials. Brick, metal, asbestos-cement and ceramic variations protect your home from toxic gases to varying degrees. We will introduce you to the features of the most common types.
Brick
Built from red brick.
The brick is strong, durable, has a good appearance and is wear-resistant.
It has a rectangular cross-section, which is inconvenient for increasing traction force. The surface inside the structure is rough. The chimney is heavy. Only qualified masons can install it. Brick cannot withstand exposure to aggressive chemicals. The porous texture of the material promotes the accumulation of moisture and deposits of soot and soot.
Inspection hatch for cleaning an external brick chimney
Ceramic
A popular design is the ceramic sandwich pipe. It has a long service life. It is easy to install. You can handle its construction yourself. The walls inside the product are smooth, so good traction is guaranteed. The device can be installed both outside and inside the building.
Weight of a 6-8 meter ceramic chimney
Ceramic structures are not afraid of aggressive chemicals: alkalis, acids.
An important disadvantage is the high price.
Ceramic chimney in blocks
Metal
Single-component chimneys are metal pipes of round cross-section. They are not used for outdoor installation because they have high heat loss. Aggressive substances that appear when gases cool down destroy the metal structure. Therefore, the service life of single-layer devices is short. Their disadvantage is the need for expensive thermal insulation.
Sandwich pipes (double-circuit) consist of a large and small pipe and insulation. It also serves as an insulator. The pipes are made of acid-resistant stainless steel.
Smooth chimney walls provide good draft and reduce the amount of soot on their surface. Installing a chimney through a wall using sandwiches is a very common option.
Sectional view of a sandwich pipe
Classification of chimney structures
Before installing a chimney pipe through a wall, you should consider the types of construction. By design, it can be single-walled or double-walled. The first option is made of sheet steel. It is inexpensive and suitable for installation in country houses and cottages. The disadvantage of the product is its short service life. For effective operation, the structure will have to be insulated.
Double-wall chimneys are sandwich systems that are recommended for installation in wooden houses. The chimney is multilayer and has low thermal conductivity, which is extremely important for highly flammable materials.
Depending on the material used to make the structure, there are:
- Brick . Often, their construction requires a foundation, and for proper laying, certain construction skills. This option is acceptable when building a fireplace in the house.
- Steel . Stainless steel material is cheap, but requires external thermal insulation. If this is not done, condensation will accumulate inside the pipes, which will affect the quality of traction. Moisture can also get into the firebox and extinguish the flame. It will be difficult to light the boiler again.
Steel chimney Source krovlyamoya.ru
- Asbestos-cement . Such products are heavy and fragile. A foundation is required for their installation. Under the influence of hot gases and moisture, such products deteriorate faster.
- Ceramic . Such a chimney can withstand temperatures of more than 100 degrees, but requires thermal insulation and careful operation. Installation of such pipes is difficult, and they are expensive.
- From sandwich pipes . The preferred option for building a chimney on the street. To produce the product, two pipes are taken, placed inside each other. There is a thermal insulation layer between them. The system is installed simply and quickly.
When choosing a material, not only its technical characteristics are taken into account, but also its decorative properties.
Advantages and disadvantages of venting the chimney through the wall
Installing a chimney through a wall has the following advantages.
- It can be carried out after the completion of the construction of the house, and not at its beginning.
- You can install the chimney structure yourself, because installation is simple and consists of several operations.
- Since the chimney device is located outside the building, access to it is open, which facilitates repairs and maintenance.
- It is possible to regulate the traction force.
- High fire safety.
- Gas leakage is excluded.
- There is no need to make holes in the roofing pie.
- Saving space indoors.
The disadvantages of such a chimney include:
- violation of the aesthetic appearance of your home;
- heat loss. It goes into the atmosphere. It is necessary to properly insulate the exit through the wall;
- to prevent water from entering the pipe, it is necessary to install ebbs;
- additional fixation of the chimney to the wall is necessary;
- a large number of bends in the structure disrupt the draft and slow down the release of exhaust gases into the atmosphere.
May be interesting: Insulation of a house made of timber
What is it and what is it for?
A chimney is a vertically located structure that has a cavity inside through which hot combustion products are discharged into the atmosphere. In fact, this is a box made of non-combustible material (brick, metal, ceramics, asbestos cement, concrete), which serves to remove flue gases upward from the combustion chamber (furnace) under the influence of draft.
A chimney is needed to remove waste combustion products outside the home. Smoke poses a significant danger to humans:
- Exhaust gases contain carbon dioxide and carbon monoxide, which are toxic to humans.
- Smoke contains oxides of sulfur, nitrogen and some other elements; when the oxides combine with water vapor, aggressive and harmful acids are formed.
- Smoke carries soot particles, which, without smoke removal, will settle into the room, on the ceiling, furniture, things and in the lungs of humans and animals.
- Smoke contains a lot of water vapor produced by the combustion of hydrocarbons - the steam will also condense on walls and windows and create high humidity, promoting the formation of fungi and mold.
- In addition, hot gases can cause a fire.
The health and even life of you and your household depends on how the device is properly executed and high-quality materials are selected.
The service life of such a chimney
The duration of operation is influenced by factors:
- material. The most short-lived material is galvanized metal. The chimney will last 5-10 years, depending on the intensity of the fireboxes. The service life of stainless steel is 15-20 years. The ceramic design will delight you for about 40 years. The period of operation of a brick chimney is half a century;
- installation. If the pipe is installed correctly, then it can be used for 20 - 50 years;
- heating temperature of the exhaust gases. For a solid fuel boiler it is high - 300 degrees. In a gas boiler it is only 120 degrees. The lower the temperature, the more condensate forms inside the pipe. Condensate contains aggressive substances that corrode the walls and destroy them;
- heating type. Gas boilers are more durable than other heating systems.
To ensure that the exhausted chimney lasts as long as possible, ensure that it is cleaned and inspected.
Flaws
Although it has many positive factors, the structure also has negative sides. You need to familiarize yourself with them:
- An integral rule for installing a chimney through a wall is to create insulation on the pipes;
- Inside and outside the house you will need to allocate a relatively large horizontal area for the smoker;
- According to some experts, if this outer pipe is for a gas boiler, then the productivity will be low;
- This product will not be in harmony with the overall design, however, this can be played around somehow.
General rules for chimney installation
When deciding on installation, follow the established rules.
- It is prohibited to install a chimney near engineering systems: sewerage, electrical wiring.
- For proper operation of the chimney, a deflector is required. It eliminates the impact of precipitation on the traction and the internal casing of the structure.
- It is necessary to install a snow retainer on the roof in the part where the chimney exits the wall. It protects the chimney channel from mechanical damage.
- The pipes must be secured to the walls in increments of no more than 1 m.
- Before installing a double-layer chimney pipe over the furnace firebox, a sandwich start is installed.
- Non-flammable insulation (basalt) around the sandwich pipe protects the wood from ignition.
- The pipe extends from the boiler strictly horizontally, its length to the wall is no more than 1 m.
- The pipe in the passage through the wall is mounted in one piece without joints.
- To avoid emergency situations, it is important to provide open access to it in order to repair it at any time.
Recommendations
The chimney running outside the building should be collected using condensate. If you collect smoke, condensation can get inside the liner, wet the insulation - the pipe will be poorly insulated (the liquid conducts heat well), the outer liner will heat up, heat up the wall structures, which can lead to a fire.
In addition, freezing of the liquid can lead to damage to the pipes, and the acid in the condensate can lead to faster burning of the stainless steel inner liner.
At the same time, a small smoke leak in the open air is quite safe, but a large one is clearly visible and can be eliminated by additionally sealing the pipe joint with sealant.
Under no circumstances should you reduce the diameter of the chimney duct opening - this will lead to a decrease or stop of draft.
It is necessary to regularly (2 times a year) clean the chimney channel from soot, and the head from frozen condensate, ice and snow.
Insulation of external chimney
The sandwich pipe is already well insulated and does not require additional insulation. An exception is where the pipe passes through a wall or partition. For this purpose, different insulation materials are used, if possible fireproof.
Glass wool with a low melting point cannot be used for chimneys; basalt wool cannot be used for coal boilers.
The place where the pipe passes through the wall (sometimes through the wooden structure of the roof overhang) must be insulated with basalt or ceramic wool, foamed vermiculite, or asbestos.
Do not think that asbestos is super harmful - the finished products do not generate dust or emit harmful substances, and the asbestos itself will be closed and isolated from the room with a flange.
Wooden walls
The peculiarity of wooden walls is their flammability. Therefore, installing a chimney in a wooden house is more difficult than in a stone one.
When venting a chimney through a wooden wall, it is necessary to very strictly maintain the distance from the wall to the pipe (at least 260 mm) and perform high-quality thermal insulation of the passage through the wall. It is also important to pay attention to treating the walls with an antipyretic.
The installation of a chimney in a wooden house requires insulation of the wall surface near the outlet pipe of the heat generator and the first mounted monopipe. Insulation is carried out with non-combustible materials - plaster, tiles (porcelain stoneware), stone, fiber cement sheets, sheet metal with an asbestos sheet underneath.
Brick and concrete walls
Brick and concrete are resistant to fire - this is a big plus. But nevertheless, insulation in the place where the pipe passes is mandatory, the distance to the wall is at least 130 mm. The rules for installing chimneys were invented for the safety of people, and they should be followed in any case.
Fire safety requirements for chimneys
Fire safety rules during installation of chimneys are as follows.
- In places where the sandwich pipe touches wooden walls or partitions, it is important to use insulating materials.
- If solid fuel equipment is used, it is necessary to install a spark arrester made of metal.
- If the chimney height is below 5m, then an electrically driven smoke exhauster is installed.
- The external walls of the house at the location of the chimney structure are separated from it by a basalt lining or asbestos-cement sheet.
Rules for passing through the ceiling
The passage of the chimney through the ceiling must be carried out in accordance with the rules to ensure the safety of the entire house. In this area, the proximity to flammable materials is minimal, so insulation should be maximum. Certain rules also depend on the materials from which the chimney is made.
Chimney passage through a wooden ceiling
Let's look at how to install a chimney through a wooden ceiling, what distance and width is required. In this area, the brick chimney must have thicker walls than in other places. It should be 50 cm when there is no additional insulation and the pipe borders on materials that can easily ignite. If there is plaster with a thickness of at least 25 mm, then a width of 38 cm is allowed. The height of this cut above the ceiling must be at least 70 cm.
Between the building structure and the cut in the chimney opening through the wooden ceiling, it is imperative to fill the space with non-combustible materials. The thickness on each side must be at least 15 cm. Metal chimneys through wooden coverings must have penetration through sleeves made of non-combustible materials.
Selecting the type of chimney outlet
There are two ways to remove the pipe:
- leading the pipe outwards from the firebox in a straight line. Most of it ends up on the street.
- by lifting the chimney from the stove and bringing it closer to the middle of the wall height or to the ceiling. Most of it is located indoors;
The second method is more economical and effective, because only one elbow is used to install the chimney structure, which improves draft. In addition, soot plugs are minimized.
Building regulations
Chimneys are designed and installed in accordance with SP 60.13330.2012 “SNiP 41-01-2003. Heating, ventilation and air conditioning.”
Chimneys must meet the following requirements:
- The height from the mouth to the grate must be at least 5 meters.
- The internal channel should not have narrowed areas.
- The height above the flat roof is at least 0.5 m (preferably 1 m).
Head height for pitched roof:
- At a distance of less than 1.5 m from the ridge (parapet) - no lower than 0.5 m from the ridge.
- If the distance to the ridge is from 1.5-3 m - not lower than the level of the ridge.
- If the distance to the ridge is more than 3 m, the height should not be lower than a line drawn from the ridge at an angle of 10° to the horizontal (down from the horizontal).
- When calculating, you should take into account not only the height of the ridge closest to the chimney, but also the height of the highest ridge of the building (or the highest part of the building).
Pipes may have inclined sections at an angle of at least 30° to the vertical, with a horizontal pipe displacement of no more than 1 m. The cross-sectional area of inclined sections should not be less than the cross-sectional area of horizontal sections.
Determining the height of the chimney
The height of the chimney is an important indicator when choosing a design. The thrust and speed of gases moving out depends on it. To calculate the height of the chimney device, the following parameters should be taken into account:
- height of the house. If the height of the house is small - 5 m, then the minimum size of the chimney structure is also 5.5 meters. When it is less than the proposed value, problems may arise: smoke in the building, carbon monoxide poisoning, decreased draft, wear and tear of the solid fuel boiler. In the case of a long pipe, the efficiency of the boiler installation is minimal. The optimal height of the chimney device is 5-10 m. If the house is high, more than 10 m, then the chimney should be located half a meter above the ridge to prevent turbulence;
- boiler power. The higher the chimney device, the greater the power of the boiler equipment. For power below 20 kW, the chimney height is 5 m;
- roofing material. If the roof materials are flammable, then the distance of the sandwich pipe to the ridge should not be less than a meter.
Preparing for assembly
Before installing a stove in a country house with a pipe exiting through the wall, you need to prepare. Work requires special clothing and gloves. If you will be cutting metal products, it is advisable to wear safety glasses.
Selection of tools and materials
To complete the work, the following tools are required:
- drill, equipment for cutting material;
- heat-resistant sealant;
- riveter;
- clamps, dowels, corners;
- foil construction tape;
- screwdrivers;
- level, plumb;
- knife;
- ladder;
- When working with concrete walls, you will need a hammer drill.
Components for installing a chimney Source vse-postroim-sami.ru
The materials you will need are a steel pipe, with which the horizontal fragment is connected to the boiler. You also need a tee for connecting pipes, an elbow (with its help the structure is directed upward), and a support console. Brackets and dowels are used to mount products on the wall. The connection of several pipes is carried out using clamps. You also need thermal insulation material and a protective cap.
See also: Catalog of companies that specialize in the installation of fireplaces, stoves and utility networks.
Choosing a location
The house has central and side walls. The second is located on the side of the slopes and under the roof overhangs. Liquid gets onto this part when it rains (if the drainage system is not fixed). There is a small roof overhang above the central walls, so the risk of liquid entering from the roof is minimal.
It is better to mount the smoke exhaust structure on the front wall. Here it is taken into account that there should be no windows or balconies on it along the line of the chimney. If you have to install a pipe through an overhang, then high-quality fire protection is installed.
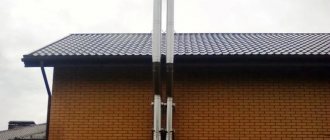
Choosing a location for the chimney outlet through the wall Source stroychik.ru
Calculation of chimney height
Since it is possible to correctly bring a chimney through a wall to the street in a wooden house only if technical requirements are met, the first parameter that is taken into account is the height of the structure. It depends on the number of floors of the house. If the height of the building does not exceed 5 m, then the minimum parameter for the height of the structure is 5 m. If this value is neglected, the structure in the house will smoke in the house, the draft will deteriorate, and the performance of the heating device will decrease.
If the pipe is too long, fuel consumption will increase. When the height of a building exceeds 10 m, the main reference point is its ridge: it should be 0.5 m below the chimney. This characteristic is affected by the cross-section of the pipes and the power of the heating equipment.
Chimney height Source vosaduly.ru
Pipe diameter calculation
The internal diameter of the structure must correspond to the dimensions of the pipe. Any narrowing of the internal volume of the pipe affects the formation of draft. The presented value is affected by the power of the equipment: the higher it is, the larger the internal diameter. You need to follow standard building rules:
| power, kWt | Internal section, cm | Minimum diameter, cm |
| up to 3.5 | 14×14 | 15,8 |
| 3,5-5,2 | 14×20 | 18,9 |
| 5,2-7 | 14×27 | 21,9 |
If we take into account all the technological features of installation, the structure will last for decades without significant problems.
How to assemble a sandwich using smoke or condensation
There are two types of element assembly:
- "by the smoke." In it, the lower part is included in the upper component. The upper part is put on top of the lower one. Both pipes are assembled in the same way. If the stove has a high combustion temperature, then this method is suitable;
- "by condensate". The inner pipe is assembled as follows: the upper part is inserted inside the lower one. The outer pipe is mounted differently. The lower part is inserted inside the upper one. When assembling the sandwich, the condensate flows freely into the sump.
Penetration for a metal chimney pipe
Special devices and materials for sinking a metal chimney
Box-shaped ceiling-passage structures
Arrangement of the passage of a metal chimney through a wooden floor structure can be done using a ready-made ceiling-passage assembly, or one made independently, but in compliance with the standard dimensions.
If a ready-made version of such penetration is purchased, then its size is selected according to the diameter of the chimney pipe. The convenience of using a factory box is that its design already includes all the dimensions established by SNiP, so you don’t have to rack your brains about it. All that remains is to open an opening in the ceiling for penetration, and then strengthen its thermal protection of the surfaces.
Such pass-through units are sold in specialized stores. Sometimes they are immediately supplied with sets of pipes for installing a chimney
You can make a box penetration yourself. It is made from different materials - it can be a steel sheet with a thickness of at least 0.5 mm, alone or in combination with mineralite, asbestos sheet, with mineral basalt wool foiled on one or both sides. If the box is purchased or made of metal, then it will need to be thermally insulated with regular or foil-coated mineral wool, vermiculite, or expanded clay.
If you decide to make such a penetration yourself, then the diameter of the hole in its central part should be approximately 0.5 mm larger than the outer diameter of the pipe. This is done so that the metal pipe passes freely through the box, but at the same time, the gap between them is not too large.
To make a penetration, you can use the dimensions shown in the illustrations and presented in the table:
The main dimensions of the passage box for a metal chimney
Recommended dimensions of the passage box
| Letter designation of structural elements and size in mm | |||
| d - hole diameter | L - length of the side of the decorative panel of the box | G - width of the sides of the box | H - box height |
| 205 | 580 | 370 | 310 |
| 215 | 580 | 370 | 310 |
| 255 | 580 | 450 | 310 |
| 285 | 580 | 450 | 310 |
- If the passage box is made only from foil-coated mineral wool 50 mm thick, then cutting the elements for it is best done according to pre-made templates. The parts are assembled into a single structure using heat-resistant foil tape. Having chosen this option for cutting, you must not forget that you will also need to purchase or manufacture one or two metal panels for it. One of them is fixed to the ceiling surface, flush with it, and the second (optional) covers the thermal insulation material from the attic side.
This box penetration is made of dense foil-lined mineral wool
- Another option for penetration could be a box made of metal sheet, insulated with the same foiled mineral wool. This insulation is cut into strips with a width equal to the height of the resulting box and laid along the walls at the end, with the foil side facing the pipe. The space of the box free from the pipe must be tightly filled with thermal insulator.
- The box can also be made of mineralite (fiber-reinforced concrete slabs) 10 mm thick. Structural elements are also cut out using prepared templates and then fastened together using metal corners. A smaller box made of a metal sheet 0.5 mm thick is installed and secured into a casing made of this material.
Minerite box penetration with metal liner
There should be a gap of 10÷15 mm wide between the walls of the outer and inner boxes, which is filled with basalt insulation, and the space around the pipe can be filled with vermiculite, expanded clay of fine or medium fraction, or the same mineral wool. The holes through which the pipe will pass must have the same diameter in both boxes. To aesthetically design the penetration from the side of the living room, you can also use a metal plate, or leave the fiber cement board open. After completing the installation work, it will be easy to paint the slab facing the living space to match the color of the ceiling.
Video - Manufacturing and installation of a homemade box-shaped penetration for the chimney of a sauna stove
Heat-resistant materials for making penetrations
The characteristics of heat-resistant materials that are used to insulate the ceiling penetration deserve a few minutes of attention. They differ in some qualities from conventional insulation made on the same basis.
Strong, durable, environmentally friendly material - mineralite
- Minerite is an absolutely non-flammable material, which is also called fiber cement boards. It is often used for wall cladding in areas where stoves are installed and where chimneys pass through.
Minerite prices
mineralite
This material is not only resistant to extremely high temperatures, but also moisture-resistant, has good mechanical strength, and does not contribute to the formation of mold and mildew colonies. Minerite is an environmentally friendly material, therefore at elevated temperatures it does not emit fumes harmful to human health.
Minerit LV panels are used to make screens installed in the grooves and on the walls around stoves and chimneys. In addition, such panels are also suitable for the construction of fire-resistant partitions.
- Non-combustible slabs made of basalt wool and covered with aluminum foil are used for fire protection of walls and passages around chimneys.
High-density basalt mineral wool slabs with foil coating can also be used as a material for the manufacture of ceiling penetrations
This material is made from environmentally friendly components and is highly resistant to aggressive biological and chemical influences. In terms of its thermal insulation properties, mineral wool is certainly many times superior to mineralite, but is inferior to it in mechanical strength and durability.
High-quality basalt slabs do not accumulate moisture, and they do not create a favorable environment for the settlement of rodents and insects, or the appearance of microflora colonies. This type of insulation belongs to the flammability group G1. (And this is only due to the adhesive layer that holds the foil covering, since in its “pure form” basalt insulation can be classified as a completely non-combustible material). Basalt slabs from different manufacturers may differ slightly in the upper limit of the operating temperature range. But in any case, it ranges from +750 to 1100 degrees, which should be more than enough for the chimney duct.
Prices for basalt slabs
basalt slabs
Installation of penetration for a metal pipe
Before installing the penetration into the window cut out for it in the attic floor, it must be prepared, additionally strengthened, if necessary, and insulated from high temperatures.
The installation of a box penetration is always preceded by checking and preparing the ceiling structure for this operation
- The first step is to additionally monitor the condition of the opening and the surrounding parts of the ceiling structure. This is done to make sure that the box will be securely fastened in it.
The box penetration must be firmly fixed to the ceiling structure. It is, of course, positioned so that it is between the floor beams (it is clear that these issues regarding the placement of the stove in the room are always thought out in advance). Beams can become a reliable basis for fastening the penetration, located on the sides of it.
However, it often happens that the floor beams are located too far from each other and therefore the floor “pie” in the area where the pipe passes does not have the necessary rigidity and will need to be strengthened. Another option, exactly the opposite, is that the spacing of the installed beams is too frequent and does not leave enough free space to accommodate the box penetration.
In any of these cases, after removing the desired section of the coating, you can mount the frame in accordance with the dimensions of the box using a wooden beam. The cross members of this frame are rigidly cut into the floor beams. If necessary, if the beams are too widely spaced, additional longitudinal support beams can be used in the frame. An example of creating such a frame is shown in the illustration.
An example of preparing an attic floor frame for installing a box penetration for a chimney.
Similar checks and strengthening (revision) of the frame will be necessary if the chimney is installed in an already built house. However, as a rule, the installation of stoves and, therefore, the installation of chimneys are planned in advance. And during the installation of floor beams during the construction of a building, such a frame is provided in advance for the subsequent installation of a box penetration.
- Further, all wooden parts of the ceiling structure located around the perimeter of the cut window for penetration must be additionally treated with a special impregnation. The fire retardants included in the composition will increase the fire-fighting characteristics of the created unit. Further operations are carried out only after the treated surfaces have completely dried.
Installation of the penetration must be carried out with high precision so that the verticality of the chimney pipe is not disturbed
- The next step is to install a penetration box into the cut opening from the side of the room. The edges of its bottom part are securely screwed onto the ceiling surface with self-tapping screws.
But this operation should be performed only after carefully monitoring the location of the round opening for the chimney relative to the heating device. It is unacceptable for even a slight deviation to cause unevenness or a “kink” in the installed pipe. This will create unnecessary stress in its walls and may well lead to insufficient sealing at the joints.
It is best to accurately adjust the position of the box passage using a plumb line to ensure that the axis of the pipe being installed is vertical.
- Next, the lower part of the chimney pipe is assembled, starting from the outlet pipe of the stove (boiler).
It is very important - whatever the distance from the stove to the ceiling, and whatever components are used, never, under any circumstances, the connection of two elements (pipes) of the chimney should fall on the ceiling. Moreover, the minimum distance from such a connecting unit to the surface of the ceiling (no matter from below, indoors, or from above, from the attic) must be at least 300 mm.
The requirements for the correct location of the interfaces of individual pipes are important, of course, from the standpoint of ensuring visual inspection. But the main predetermining factor of such a considerable (300 mm) distance from the ceiling is the continuing likelihood of a breakthrough of hot gases in these, let’s be honest, the remaining most vulnerable places of the prefabricated metal chimney.
- The next stage of work can be carried out from the attic or living space, depending on how it is more convenient to install the next section of the pipe. If the work is carried out from the attic side, then the next part of the chimney pipe is passed through the hole and fixed to the lower, already mounted section.
An approximate diagram of the relative arrangement of parts of the ceiling penetration assembly.
- When the pipe is brought into the attic, you can proceed to filling the penetration box with heat-insulating material. If one of the bulk thermal insulation materials is selected, and there are small gaps between the pipe and the border of the round hole, they can be sealed with basalt wool or plastic clay, and then the insulation can be poured on top.
The ceiling penetration box is filled to capacity with expanded clay
It is best to choose expanded clay or vermiculite from bulk heat-insulating materials. Ordinary sand is used for backfilling only as a last resort, since it has too fine a fraction, is heavy and has excessively high thermal conductivity for such a function. Expanded perlite sand is not particularly convenient to use in such conditions due to its excessively high “volatility”.
The easiest way is to fill the box with heat-resistant basalt wool, since it has the lowest thermal conductivity. When using mineral wool mats, the box from the attic side should not be completely sealed in order to have free access to the pipe along its entire length. If the pipe goes to the second floor, then the hole in its floor with insulating material around the chimney can be closed with a metal sheet, screwing it to the floor.
The selection of photographs below demonstrates the installation of a homemade box-shaped penetration made from dense slabs of foil-coated basalt insulation.
Installation sequence for a homemade box penetration for a chimney pipe
— The first two fragments: this is a finished homemade tunnel from different angles.
— Third fragment: a window was cut out in the ceiling to install the penetration. Please note: to ensure maximum safety, the master also filled the resulting gap between the ceiling covering and the attic floor with mineral wool.
— Fourth photo: The penetration box is inserted into the prepared opening and fixed from below.
— Fifth fragment: After installing the section of pipe leading into the attic, the penetration is closed from below with a metal panel. It is securely fixed to the ceiling with self-tapping screws, completely covers the edges of the window of the passage unit, holds the heat-insulating box well in the ceiling and provides mechanical protection for the mineral wool panel, which is not particularly durable.
— Sixth photo: Continued installation of the chimney pipe. The gap between the pipe and the box will be tightly filled with mineral wool. Since the attic in this case is “inhabited”, the passage unit will be covered with a decorative metal plate.
And in the video below, the master did without creating a box-shaped structure at all.
Video: fireproofing of a chimney pipe in a passage through a wooden ceiling
Step-by-step instructions for installing a chimney through a wall
Let's look at the installation procedure.
For a boiler or stove, it is important to install a stove, non-flammable lining - a podium. You can pour a concrete screed to level the base.
The foundation for the stove, laid on top with bricks
Mark a place for the passage of the pipe and cut it out.
To prevent the wall from catching fire, a protective screen is placed in front of it; it can be made of mineralite. If the boiler is solid fuel, then the protective brick screen is separated from the wooden wall by an insulator - an asbestos-cement sheet.
The chimney is diverted from the pipe at a right angle. The horizontal section is not insulated. The high temperature of the area may cause the insulation to become deformed.
Horizontal thin-walled section of the chimney
Insulation is laid around the sandwich pipe.
Wall penetration
A metal plate is screwed on the outside to protect the wooden wall from overheating.
Mount the tee. It's designed this way. that water flows to the lower part.
Protective sheet PPU and tee
They put up a support.
In some cases, the chimney is supported on a blind area or a separate foundation.
Support for low walls
The chimney is expanded “by condensate”.
Attaching the chimney to the wall with your own hands is done using brackets. The step of their location on the wall is 1 m. Fastening clamps secure the upper part of the gas exhaust pipe.
Mount a deflector or umbrella.
Umbrella
The joints are sealed with high-temperature sealant. We recommend using silicate sealants that can withstand temperatures of 1200 degrees. They have a black or black-gray color and a viscous consistency, harden within 15 minutes after application.
How to choose pipe diameter
For a chimney system, preliminary calculations are required taking into account the power of a boiler or stove operating on solid, liquid, or gaseous fuel. Standard options:
- For a flue from a low-power heating installation of 3 kW, a rolled product with a clearance of 8.5 cm is purchased;
- When the power is over 5 kW, systems thicker than 12 cm are installed.
The minimum thickness of the thermal insulation layer is at least 30 mm (basalt wool), for diesel fuel stoves - thicker than 4.5 mm. The installation process is always preceded by calculations of pipe diameter and thermal insulation thickness.
The installation process is always preceded by calculations of pipe diameter and thermal insulation thickness.
Do-it-yourself chimney installation
The passage of the chimney through the wall with your own hands is carried out exactly according to the instructions. If you know the nuances of construction, are not afraid of heights, and know how to use working tools and equipment, then you can do it.
Drawing and diagrams
Before purchasing materials and starting work, it is necessary to draw a drawing or develop a diagram of the location of structural elements, their sizes, and the distances between them. It is important to determine the list of tools and components needed for independent work. Consultants in stores that sell stainless steel sandwich pipes of well-known and proven brands that are not produced in artisanal conditions can help with this. These include CRAFT, BALTVENT, TERMOFOR, TEPLOV and SUKHOV, VULCANO, FERRUM, PHOENIX and others.
Selecting a place to exit through the wall
The side wall is located under the roof overhang. It gets water from icicles and rain if there are no special gutters. The front wall is located under the roof overhang. Water does not enter the pipe.
It is best to display the structure through the front wall. It is important that there is no balcony or windows under the ledge, so that you do not have to go around them when installing the structure. Any deviation from the vertical is fraught with a decrease in traction.
The device can also exit through the side wall. This solution is much worse, because you will have to make a hole in the roof overhang, assemble and install a drainage system to avoid flooding the sandwich pipe sleeve, getting the insulation wet, and heating the chimney.
How to install the most fire-hazardous section of the chimney
When installing an amber stove through a wall, sandwich systems are installed with your own hands. The first segment of the chimney is made from a fragment of a smaller pipe. It is fixed in such a way as to prevent overheating of the fasteners; for this it is necessary to retreat a sufficient distance. Basalt insulation is laid from the 2nd bend.
The first segment of the chimney is made from a fragment of a smaller pipe.
Safety regulations
Do not forget that the chimney is a source of danger. Place the flue away from the cable and gas pipe. Contact with other utilities is undesirable. The maximum length of individual fragments is 1 meter. It is important to follow building codes and regulations.
Place the flue away from the cable and gas pipe.
Possible installation errors
Installation errors affect the correct operation of the chimney. Let's look at some of them to prevent their occurrence.
- If the insulation of the passage through the wall is carried out poorly and the amount of heat-insulating materials is minimal, then the structure will overheat.
- If there is no low tide on the roof overhang, there is a risk of water flooding the insulation materials and compromising their integrity and functioning.
- Incorrectly calculated height of the chimney device impairs draft.
In addition, we recommend using high-quality sandwiches. In cheap and low-quality pipes, the materials are short-lived. Over time, the insulation shrinks and loses its positive qualities. Local overheating creates a dangerous fire situation.
Ceramic chimneys for wooden buildings
Modern industry produces high-strength and fireproof modular chimneys from high-quality ceramic materials. They are a kind of constructs that are assembled locally from several elements.
ceramic chimney
Such a chimney may consist of multilayer material. Its inner surface is made of ceramic material, which is particularly resistant to heat and acids formed during the reactions of combustion products. Their internal surface is very smooth, which prevents the formation of soot and creates smooth and powerful traction. But such a chimney system has considerable weight and requires special skill during installation.
Calculations and installation rules
Installation rules imply careful consideration of all stages of future work:
- You should make sure that the pipe itself will not come into contact with any flammable materials, which, under the influence of high temperatures, may begin to smolder and release toxic fumes.
- When installing the system directly externally, it is necessary to remember the deflection angles, which will act as active guides for smoke removal. The chimney pipe should not be located parallel to the wall of the house, since in this case smoke stasis will occur - it simply will not be removed from the system.
- Special tees must be installed in the lower and side parts of the pipe, which will be used as a place to install mechanisms for condensate drainage. If this step is not completed, then moisture when lighting a fireplace or stove will simply enter the firebox and extinguish the flame. All this will significantly complicate the kindling process!
- The upper part of the pipe should rise above the edge of the roof to ensure that smoke and soot are blown away in an area of more rarefied air. Typically, such zones are formed at a distance of 15-25 cm from the roof sheet.
What do the professionals advise?
As you can see, making an attached chimney yourself is not so difficult. The main thing is to choose all the materials correctly and take into account fire safety standards, which will allow you to avoid many unpleasant situations. It’s up to you to decide whether to vent the chimney through the roof or make it external. After all, what is better or worse is always easier to determine in each specific situation.
And finally, I would like to share some advice that professional stove makers give:
- Before you start purchasing chimney elements and installing it, be sure to determine the power of your firebox. The more powerful it is, the larger pipe diameter you will need.
- Be careful when choosing the height of the structure, which has a significant impact on obtaining good traction. A chimney that is too short will poorly remove combustion products, while a chimney that is too long will lead to excessive heat loss. Practice shows: the optimal pipe height is 5 meters. But here, too, everything is individual.
- If your boiler is equipped with forced draft, then the output of the external chimney can be completed at the stage of arrangement of only the horizontal section (without further extension of the vertical pipe).
- It is better to remove the chimney from the side of the gables (if possible). This greatly simplifies the task, since its arrangement will not be hampered by awnings and roof eaves.
- The maximum length of the horizontal section should not exceed 1.5 meters. It is here that the smoke flow is inhibited, which significantly reduces draft.
- Here, provide a special hole for technical needs: inspection and cleaning of the chimney. After all, the horizontal section is the most problematic in this regard. Sales consultants will help you choose the right item.
- If there is a wooden wall on the side of the boiler, fireplace, or stove, be sure to install a protective screen. These can be sheets of mineralite, asbestos, galvanized, fire-resistant plasterboard, glass magnesium or other fire-resistant material.
There's no need to do that
What decorative materials are used to finish “weak” areas?
Starikovsky expanded clay is rarely used in modern walk-through devices; now, to a greater extent, various basalt fillers or various fiber cement boards are used. They look like drywall and cut well. This is generally the best material at the moment. Fiber cement boards have many commercial names.
Brick is often used, the rule here is simple - the brick is laid from the pipe along its entire length, and this, in principle, is enough for fire protection. The heat is mainly removed by brick, but a little fiber cement board around the perimeter still won’t hurt.
Porcelain tiles are great because they can withstand temperatures up to 1500 degrees and can be used for decorative purposes along with fire protection. You can use its analogue - this is a very resistant special heat-resistant tile called terracotta. Excellent tiles that are used for thermal protection and at the same time for room decoration, both on the floor near the stove and on the wall at the chimney outlet.