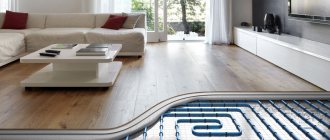
Underfloor heating via pipes placed under the floor covering is becoming an increasingly popular way to heat a room or home. This method is of interest to both apartment residents who are faced with drafts, and owners of private houses who feel cold from the floors on the ground floor.
Heated water floors, the installation schemes of which in the apartment require a particularly responsible approach, are a wonderful addition to the central heating system. In particular, this type of heating has its advantages:
- Natural heat supply. For the human body, heating from bottom to top is the most comfortable. This is the direction that the water-heated floor in the apartment sets.
- Elimination of drafts. As a rule, air currents travel along the surface of the floor, unpleasantly cooling your feet. When using heating, this problem disappears.
- Possibility to insulate the wall. This means compensating for heat loss through those walls that face the street.
- Saving. Warm floors from the apartment's heating system allow you to maintain a comfortable temperature in the house, and at the same time do not greatly affect utility bills.
Despite all the advantages, it is necessary to take into account that the efficiency of this type of room heating directly depends on the thoughtfulness and quality of the installation. In particular, a lot depends on the pattern according to which the pipes will be laid.
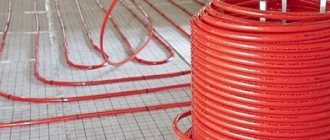
Schematic representation of a water heated floor
Read on in the article about what you will need to install water floor heating in an apartment, how to carry out the installation and how to choose a pipe laying scheme.
Water-type underfloor heating: disadvantages
Before proceeding to a more detailed acquaintance with the features of such floor heating and the intricacies of the installation process, for the sake of objectivity it is necessary to mention its disadvantages:
- Price. Unlike other types of underfloor heating, water types are more expensive both in terms of the purchase of components and the cost of the preparatory stages.
- Difficult to install. The process of preparation, installation and final work can take more than a week. At the same time, a mistake made at any stage will be difficult to correct.
- The need to obtain permission. Installation of water heated floors in an apartment cannot be carried out without permission. The issue will be studied in more detail below.
- Problematic repair. If problems arise, to eliminate them you will have to completely or partially destroy the top of the floor covering.
In addition, for an apartment with centralized heating you will almost certainly have to purchase various special equipment such as a thermostat, pump, collector. All this is necessary for the correct operation of the system, in which the neighbors will not feel any discomfort.
Coordination
When a technical conclusion is received from energy supervision or heating networks about the possibility of changing the contour of the floor, a project is made, which is then approved by the housing inspectorate. To develop a project, you should contact a design organization that has SRO approval.
After installing the floors, it is impossible to inspect the work, so builders fill out inspection reports for hidden work. These workers must also have SRO clearance. The documents are signed by them and representatives of the design organization. The executed acts are entered into the work production journal.
An organization that makes heated floors in an apartment must have a license. After the work is completed, the heating operation of the system is tested. Based on the test results, a corresponding report is drawn up. For a water floor, a hydraulic test certificate is required; for an electric floor, a certificate for testing automatic control and protection is required.
General list of documents that must be available at the time of installation of the heating system:
- License from the construction organization performing the installation;
- Certificate of inspection of hidden work and as-built documentation for the installation of heating elements;
- Hydraulic testing examination;
- Thermal testing examination.
List of documents required for further operation:
- Drawings, as well as a certificate of their compliance with the work performed;
- act of inspection of hidden work;
- act of thermal testing of heating devices;
- act of individual testing of automatic control and protection.
Bureaucratic obstacles: why can’t you install heated floors in your apartment without permission?
In order to install a heated floor in an apartment from central heating, the owner will need to obtain the appropriate permission from the competent authorities.
Without this document, of course, installation can be carried out, but such a system will be considered illegal, and if discovered, the owner will face a large fine.
There are good reasons for this condition:
- Durability of coatings. The floor in each apartment is designed for a certain load. If the heated floor in the apartment is water-based, then due to the thick surface layer, the ceiling systems may sag or begin to pose a threat to residents.
- Heat transfer. Since the heated floor from the central system takes water from a common riser, there is a risk that the supply will be disrupted and the heat will not fully reach the neighbors.
- Loss of pressure in the riser. One way or another, the warm floor changes the water pressure, making it weaker. Due to this, certain difficulties may arise.
The law classifies water heated floors in an apartment as redevelopment, so if an illegal connection is discovered, the owner faces not only payment for the energy spent on heating, but also a fine for illegal redevelopment of the premises.
Warm floors in a new building
Despite all the difficulties, it is still possible to obtain such permission. The easiest way would be for those living on the first floors with a top heat supply and for the inhabitants of the last floor with a bottom supply. From the point of view of utilities, a heated floor from heating in an apartment will not cause damage to the heating process and heat transfer if the water reaches it last.
The legality of installing heated floors in an apartment guarantees the absence of problems with inspection services and large fines. As an option, you can switch to autonomous or semi-autonomous heating. In this case, the only thing you need to worry about is thermal insulation so that the neighbors below do not heat up their ceilings.
Is it possible to install such heating: is it legal?
Obtaining permission to install water heating in an apartment building can be difficult. This is due to the fact that such heating is quite dangerous to operate due to the high threat of flooding of the lower floors.
Important
To get around all the obstacles, residents try to carry out installation by connecting the system to the heating risers. This is a gross violation of the law, so it is best to obtain official consent and act within the framework established by SNiP.
According to SNiP, the heating system of an apartment can be changed by connecting a water floor only if the modification is agreed upon with representatives of the housing and communal services and the heating network office. Such autonomous heating must be specified in the design documentation.
Official registration takes a lot of time and effort. But water heating that is completely made according to the standards allows you to safely and without problems use it legally, even sell your home without additional collection of documents and permits.
Warm water floor in apartments: how to connect
Before starting work on developing a laying scheme and installation, it is necessary to decide how exactly the heated floor will be connected to the central heating system.
Obviously, for residential premises the source will be radiators. When installing a heated floor in an apartment from a radiator, when laying pipes it is necessary to take into account the temperature distribution: near the radiators, the turns can be made sparser to avoid uneven heating.
In the case of a bathroom where there are no radiators, you can install warm floor heating in the apartment from a heated towel rail. Such a system will fit organically into the existing one and will not require major rework.
The warm floor in an apartment with individual heating is connected to the boiler. Of all the ones presented above, it is perhaps the most convenient.
Recommendations for use
It is important to remember that TPs are an inertial heating system. Therefore, noticeable changes in room air temperature occur several hours after adjustment.
Recommendations:
- Heating of the floor surface of residential premises should be maintained within 25–30 ºС. In the hallway, bathroom, along the outer walls, the temperature can be increased to 35 degrees.
- To reduce the shrinkage of the concrete screed, fiberglass and other fillers are added to the solution. The dosage is indicated on the packaging.
- It is necessary to add liquid in a timely manner, and also periodically monitor the heating temperature. The water transformer practically does not require additional maintenance.
The temperature control of heating circuits is usually done manually. But it is possible to install automation with a programmable controller that controls the thermostat servo drives and the pump. Such high-tech work should only be performed by experienced specialists. You can find out the warm floor in the apartment by following the link. Insulating the loggia floor you will find the answer in the link.
Prices for underfloor heating systems
warm floor
Connecting a heated floor to a central or individual heating system
Having figured out what you can connect the heating system to, you need to consider how this can be done. First of all, it is necessary to mention a number of additional equipment that should be used during installation:
- Unit pump. To ensure that water is evenly distributed throughout the system and does not linger anywhere, a pump is used.
- Air vent. With its help you can avoid air locks, which can often form in pipes.
- Pressure controller. It must be constant in the system. Sudden surges will, at best, lead to incorrect operation, and at worst, damage the pipes.
- Thermostat. With its help you can control the water supply and its temperature. Some models allow you to set start and stop times.
- Filter. It will purify the water, thereby increasing the life of the entire system.
Combs (manifold distributors)
Also, a water heated floor in an apartment from a heated towel rail, radiator or boiler must have a mixing unit. It is here that the water from the heating, which can reach more than 80 degrees Celsius, will be mixed with the return water. Due to this, the floor will have a comfortable temperature.
To better monitor the condition, you will need to install monitoring devices. In the case of connection to central heating, the permitting service may require the installation of a meter - this also needs to be taken into account.
Warm floors from hot water supply in an apartment, conditionally, consist of two parts:
- manager - this group includes all of the above devices;
- functional - the pipe itself.
As a rule, there are no problems with the installation of the first part - you just need to connect everything correctly. But the second part often causes difficulties even for experienced craftsmen.
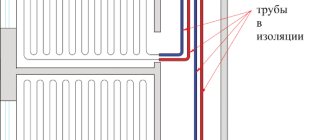
Laying pipes from central heating
Direct installation of pipes: choosing a laying scheme
Regardless of whether the apartment has a centralized or autonomous water-heated floor, attention must be paid to both the material of the pipes and the method of their installation.
In total, three main patterns can be distinguished:
- snail;
- snake;
- double snake.
Images of circuits: snake, double snake, spiral
The heated floor in an apartment from hot water can be laid in a double spiral: the small one is located near the window or outer wall, and the second one is located directly in the room.
Double helix
From the point of view of efficient use of pipes, the snail laying method is the most preferable.
In this case, the laying takes place in a spiral, which ensures uniform heating of the surface. Its disadvantage is the difficulty during installation: correctly calculating the radius, pitch and at the same time taking into account the maximum permissible bend is a difficult task that is best entrusted to a professional.
Snake laying method
A snake and a double snake are not much different - in both, the laying goes in turns and the end of the return is located in the same place as the beginning. The difference is that in a regular snake the return circuit runs along the perimeter of the room, while in a double snake it returns parallel to the supply part of the pipe.
The downside of the snake is the noticeable temperature difference. The water gradually cools down, so towards the end of the journey the temperature drops noticeably, which leads to poor heating of the floor.
The number of pipes for a heated floor in a one-room apartment varies depending on its size, but there are many calculators online that allow you to calculate the length. If necessary, you can use the formula:
k – pipeline bending coefficient;
Slot – area of the plot;
Hstep – laying step.
Preparatory work before laying pipes
In order to lay a heated water floor in an apartment with your own hands, you need to prepare a base for laying pipes.
The main requirement is a flat surface, since even with a pump, tilting the pipes can cause the system to malfunction.
Most often, special leveling mixtures are used, as this is a reliable way to provide a stable and even base for a warm water floor. However, there are alternatives:
- profile mats;
- heat-conducting plates.
Profile mats are relief slabs in the recesses of which pipes can be placed. As a rule, their level is leveled by wooden logs. Also, as an additional means of distributing heat over the floor surface, the mat can be used as a base for heat-conducting plates - a means by which uniform heating of the floor is ensured.
Laying the pipe in a profile mat
They can also be used as independent units. The plates are placed on a leveled wooden structure, and pipes are placed in a special recess.
Thermal conductive plates
If a screed is not used, then thermal insulation is laid before installing the fastening systems:
- rolled foil insulation;
- polystyrene foam mats.
Some profile mats are already made of heat-reflecting material.
In any case, thermal insulation is needed to increase the efficiency of the system.
After the preparatory work is completed, the pipes are laid and fixed. To be on the safe side, you can turn on the system to avoid the risk of leaks or pipe breaks. If there are none, then you can move on to the final stage. From above, the entire system is filled with flooring mixture, after which it is waited for it to dry completely. Only after this can the warm water floor be turned on.
Selection of pipes for warm water floors
Regardless of whether it is planned to install water heated floors into the apartment from a boiler or from central heating, the range of acceptable pipes does not change. There are several requirements that they must meet:
- absence of seams and joints;
- corrosion resistance;
- flexibility;
- long term trouble-free service;
- immunity to temperature changes;
- the material should not expand when heated.
Most often, heated floors from a gas boiler in an apartment, as well as from radiators, are laid using cross-linked polyethylene pipes. Their main advantage is flexibility and resistance to temperature changes.
Another, no less popular type is metal-plastic. The advantages of these pipes include:
- ease;
- high heat transfer rates;
- sufficient flexibility;
- resistance to plaque formation.
Less popular are copper and corrugated pipes. Despite the fact that they are not inferior in quality to the leaders, their main disadvantage is their very high cost.
Project development
The HTP design stage begins with deciding whether the system will be the only source of heat or whether radiators will be additionally installed in the premises. If installation of batteries is not intended, all circuits are connected directly to the boiler, without installing a distribution unit. With this scheme, the temperature on the boiler is set to 45 degrees, and the coolant flows directly into the pipes.
When combining floor pipes and radiators, installation of a mixing unit is mandatory. For the batteries to work, the coolant must be heated to 70 degrees, and for a heated floor this is too high a temperature. In the mixing unit, the coolant will cool before being supplied to the pipes.
Before installation begins, a detailed design for the placement of collector units and mixers is drawn up. Craftsmen recommend placing them in the center of the entire system so that the length of the pipes in all rooms is the same. This will help you make precise adjustments.
The next design stage is sketching a pipe laying diagram. There are 2 options:
- For small rooms (less than 10 sq/m) - parallel laying in a “snake” pattern in increments of 20 – 30 cm.
- In large areas (from 15 sq/m) - in a spiral. This method is more labor-intensive, but ensures uniform heating of the pipes over the entire area. Snake installation in large rooms can lead to broken pipes due to excessive bending and uneven heating in different corners of the room.
Spiral laying option
For rooms from 10 to 15 square meters, both installation schemes are suitable. The pitch between the pipes can be increased to 35 cm if additional radiators are to be installed.
If the room is large, divide it into several circuits. They must be the same size, the difference is allowed within 15 meters. If there is good thermal insulation, the standard step is 15 cm.
Standard formula for determining contour size:
- The heated area in squares is divided by the laying step in meters.
- The size of the curls and the distance to the collector are added to the result.
Expert opinion
Grebnev Vadim Savelievich
Heating system installer
When preparing the calculation and pipe laying diagram, hydraulic resistance is taken into account. It depends on the number of turns: the more there are, the higher the resistance. Please note that each circuit connected to the collector must have the same resistance.
How to choose a manifold and pipes
More often, users choose inexpensive collector models. But if there is no need to save money, then it is better to buy a model with servos and mixing units. Such devices allow you to automatically regulate the degree of heating of the water entering the pipes
A mandatory attribute of the manifold is an air vent valve and a drain valve for emergency situations. For the device to work normally, you can configure all valves once according to the required parameters.
To install the collector you will also need a cabinet. The best option is to use ready-made cabinets that are assembled and tested in the factory.
In this case, you only need to select the required number of collector groups, the power of the circulation pump and the mixing unit, if necessary. The cabinet is mounted in the wall and the heating circuit from the common riser and the circulation circuits of the heated floor are connected to it.
The standard option is to install the cabinet in the wall
The only drawback of using a ready-made manifold cabinet is its relatively high price, but when it comes to increased reliability and safety, it makes no sense to save.
For a rough estimate of the required number of pipes, you can proceed from the calculation of 5 linear meters of pipe per 1 square meter of floor. Polymer pipes made of cross-linked polyethylene are optimal in terms of price and quality ratio. They are lightweight, easy to install and have a service life of at least 50 years. Metal ones last longer, but they are more expensive and more difficult to install.
Preparing the base
The area for laying pipes must be perfectly level, with a height difference at the location of one circuit of no more than 6 mm. A concrete screed is used as the base. A layer of insulation is laid on it.
Extruded polystyrene foam is often used for the base.
Experts advise using extruded polystyrene foam - the degree of thermal conductivity is low and mechanical strength is high. This material is not exposed to moisture and does not absorb it. This type of gasket is produced in slabs measuring 50 by 1000 mm or 600 by 1250 mm, and with a thickness of 20, 30, 50, 80 and 100 mm. The product is equipped with snap grooves, this will allow for a strong connection.
Expert opinion
Grebnev Vadim Savelievich
Heating system installer
Expanded polystyrene sheets with a foil layer should not be used. There is no significant benefit from it, since the reflective property does not work in an opaque environment. In addition, the cement mixture is alkaline, it will very quickly corrode the foil.
Profile polystyrene mats are highly plastic, equipped with special bosses, and pipes are laid between them. Also, the bosses serve as a retainer for the heating elements. In them, the contour is attached in increments of 50 mm. The use of mats greatly simplifies the installation process, but they are more expensive than polystyrene foam insulation. The thickness of the slabs is from 1 to 3 mm, and the sizes are 500 by 1000 or 600 by 1200 mm.
If there is a heated room under the floor, a layer 3-5 mm thick is sufficient. If the room below is cold, the layer is increased to at least 20 mm. If this is the first floor and there is soil below the floor, the insulation layer should be 70-80 mm.
Along the perimeter of the room, the walls are taped with damper tape. It serves to compensate for the thermal expansion of the screed. If expansion is not taken into account, the screed may crack or swell. The height of the tape usually does not exceed 10 cm. It must be glued to the wall. After filling the screed, the excess is cut off.
After laying the thermal insulation, draw the contours of the pipes on the surface. This will facilitate the installation process and help identify design errors in advance.
Pipe installation
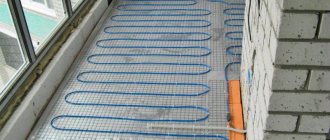
The most suitable base for laying pipes is a special mounting mesh made of metal or plastic with 100 mm cells. It is spread on thermal insulation, pipes are pulled from above, along pre-designated contours, and secured with wire or plastic clamps.
The advantage of using mesh is additional reinforcement of the base for laying pipes. The disadvantages include the complication of the installation process. But the end result eliminates this drawback.
Pipes can also be laid on polystyrene mats. They are specially designed for water heated floors. The mats are a kind of mats with protrusions on the front side in which pipes are fixed. Economically, this is a more expensive method, but installation on mats is much easier and faster. In addition, polystyrene serves as additional insulation.
During installation, try not to step on the pipes or drop heavy objects on them. Even microscopic damage can cause leakage when pressure is applied. Cut the pipe only after it is completely on the floor and back to the manifold. Don't skimp on stretching the material. Savings will lead to leaks in the future.
Expert opinion
Grebnev Vadim Savelievich
Heating system installer
If you choose snake installation, place the beginning of the pipe at the coldest wall or at a window. This will help avoid uneven heating. When laying in a spiral, this condition does not need to be observed. In any case, heating will be uniform.
Connection
The most common way to connect a water heated floor is a distribution unit. Its goal is to increase pressure, implement temperature regulation and uniformly supply coolant to several circuits. There are different devices - with manual or automatic adjustment.
Connecting the system involves connecting both ends of the pipe to the manifold distribution with clamp fittings. Using a collector, the heated floor is connected to the main heating system or to a specially equipped boiler.
When choosing a heating boiler, it is important to take into account its power; it should equal the power of all areas of the floor with a small margin. The boilers have an inlet and outlet for water, which are equipped with shut-off valves.
Also, to circulate the coolant, it is necessary to install a pump. Most often it is included with the boiler. But if you plan to heat a large area, you will need to install an additional pump.
After connecting the pipes, you can fill the system with coolant. The manifold responsible for supplying the coolant is equipped with a ball valve; water is connected to it. And a pressure testing pump is connected to one of the outputs connected to the heated floor circuit.
The system filling process is as follows:
- Close all channels except one. Open all air vents at the same time.
- Supply water. Using the drain hose, monitor the degree of cleanliness and air exit from the system.
- When all the air is out and the water comes out completely clean, close the drain valve.
- After this, shut off the filled system. If there are several circuits, perform the actions for each one.
- After flushing and filling all circuits, close the tap.
Expert opinion
Grebnev Vadim Savelievich
Heating system installer
Upon completion of the procedure, there should be no air in the pipes, and the water should flow perfectly clean.
Hydraulic tests
Concrete can be poured only after a test run of the system. Fill the pipes with coolant at high pressure and maximum temperature. Make sure all pipes are filled and heated evenly.
The next stage is crimping. To carry this out you will need a special pump.
Procedure:
- Bring the pressure to 5 bar and wait until it drops to 3 bar.
- Then bring it up to 5 bar again. Repeat the cycle 4 – 5 times. At the same time, inspect the circuits for leaks.
- At a pressure of 2 bar, leave the system running for 12 hours. If the pressure does not drop, proceed with the finishing tests:
- Set the maximum temperature and turn on the circulation pumps to achieve maximum pressure. If the system has radiators, set the mixing unit regulators to the operating marks.
- Wait for the entire system to warm up completely, including batteries (if any).
- Make sure that all circuits and radiators are heated evenly.
- Leave the heating running for a day. If the condition does not change, you can turn off the boiler and begin concreting the pipes.
When pressure rises in the pipes, they try to straighten out. If their fixation is not secure, then unpleasant surprises will arise during testing. After filling the pipes with concrete, there is no need to worry about this.
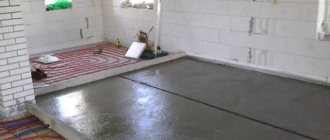
Bay screed
Pipes that have cooled to 25 degrees can be concreted. Use a special mixture to prepare the solution. It has the best thermal conductivity coefficient and will ensure uniform heating. The thickness of the concrete layer for living rooms is 20 mm, in utility rooms - 40 mm.
There are special requirements for screed mortar. The surface will be subject to mechanical and temperature stress, which can lead to deformation. Therefore, plasticizers and fiber are added to the cement-sand mixture.
Plasticizers will give the solution elasticity and increase mobility. This is important for free penetration of concrete between the pipes. Fiber will increase the strength of the base and, in addition, will prevent the formation of cracks in the screed. Polypropylene and basalt fibers are intended for warm water floors. The standard fiber rate per square meter is 500 grams.
The solution is mixed mechanically. Before pouring pipes, the surface is cleaned of dust. The concrete screed must be poured in one step, without interruptions in work. 4 hours after concreting, cover the floor with film to ensure that the solution strengthens evenly and prevents premature evaporation of moisture.
Expert opinion
Grebnev Vadim Savelievich
Heating system installer
Do not turn on the heating and do not lay the finishing coating until the concrete has completely hardened. This will take at least 28 days.
Finish coating
It is recommended to use porcelain stoneware or tiles as a finishing material for a water heated floor. Laminate, linoleum or carpet are acceptable only if there is a corresponding marking on the packaging.