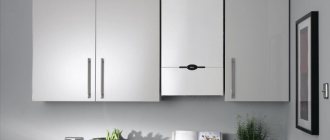
The kitchen is a common area where the whole family spends a lot of time. It is important that it is comfortable and cozy, and that the atmosphere is conducive to friendly conversations.
Today, you won’t surprise anyone with warm floors; they are installed in the bathroom, residential and even domestic premises. But many people have a question: do you need a heated floor in the kitchen and how to make it?
In the article we will talk about the types of heated floors, which of them are most suitable for the kitchen, and will dwell in more detail on how to install it yourself.
Advantages and disadvantages
Choosing the right flooring is not easy. You won’t be able to limit yourself to just a harmonious shade for the overall interior. It is necessary to take into account the quality of materials, their strength, wear resistance, and also take care of the arrangement of the floor, especially when it is planned to use tiles as a finishing touch.
Heated floors will bring additional comfort and coziness. Many people like to walk barefoot at home, but this is unpleasant on cold tiles or linoleum and can be harmful to health. Over time, joint diseases may begin to develop due to constant hypothermia. A heating system is a must with tiles, especially in the kitchen.
Advantages
The advantages of a heated floor are not only comfort, but also that it is a full-fledged heating system in the off-season, when it has already become cold outside and the central heating has not yet been turned on. The heated air rises to the top, warming the entire room well.
Advantages of the heating system
Classic heating is effective, but at its core it can be called a point source of heat, since the room is heated unevenly. At the same time, the cold actively penetrates through doors, windows, and walls facing outside. This heating method does not always maintain the same temperature, so recently heated floors have been in great demand. Its advantages are:
- natural body heating – from bottom to top;
- insulation of external walls, areas near windows;
- exclusion of drafts;
- possibility of temperature adjustment.
A floor insulated in this way becomes not just a luxury, but a necessary condition for comfort.
Even when the central heating is turned off, the power of the surface is enough to avoid any discomfort. This is especially true in apartments and houses where there are children.
Flaws
Design disadvantages include:
- dismantling the existing coating and reinstallation;
- the temperature in the cabinet compartments that are located close to the floor will be higher, so you need to reconsider the principle of storing food that spoils due to elevated temperatures;
- the cost of equipment and installation of the system is impressive;
- Electricity costs increase by approximately 1000 - 2000 rubles. per month.
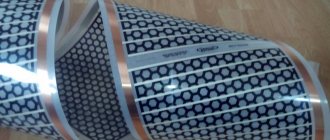
Laying the thermomat
We begin laying the thermomat from the temperature sensor. We believe that the thermomat was tested upon purchase.
The corrugation with the temperature sensor should be located in the first open turn of the thermal electric cable (figure above).
When unwinding the thermomat, carefully roll it around the kitchen according to the previously drawn diagram. At the same time, you must turn, avoid “invisible” obstacles, etc.
Important! You cannot cut the cable itself, the thermomat mesh must always be at the bottom, the heating mats themselves must not intersect or overlap each other. Make sure that the thermal cable insulation is intact.
Turns. U-turns. Obstacles
- To rotate the thermomat, you need to cut the mesh crosswise and turn the thermomat to the desired angle. In this case, the grid should always be located at the bottom.
- The cable is rotated when starting to lay a new row of thermomat. The distance between the thermomat sheets must be at least 6 cm.
- When going around obstacles, you need to remove part of the mesh and use a thermal cable to bypass the obstacle that has arisen. In this case, the thermal cable is fixed to the floor with metallized tape.
- The distance from the thermal cable to obstacles should be 5-6 cm.
- Obstacles are places where stationary equipment and standard furniture will subsequently stand.
Choosing coverage
Practical coverings in the kitchen are simply indispensable for a modern person. They must meet the following requirements:
- Hygiene - easy to clean from dirt, grease, and easy to withstand the effects of aggressive household chemicals.
- Moisture resistance. The forge in the entire house is the second room in terms of humidity after the bathroom, where the floor surface is actively influenced by water.
- Wear resistance - the floor must be resistant to abrasion, durable and reliable.
- Impact resistance. Preference should be given to a coating that can withstand falling heavy objects without damage.
These requirements do not apply to every coating. But in addition to this, it should suit the overall interior of the room, look aesthetically pleasing, and be recommended for use with heated floors. It is better to study the characteristics of the finish in advance to make the right choice.
Tile
This is the optimal choice of covering for the kitchen when planning additional heating installation. Ceramic tiles retain their environmental friendliness even with strong heating. It also does not collapse or crack with repeated heating and cooling, it has maximum moisture resistance, and is easy to clean.
Tile
But a high heating rate is not always good for your feet.
You need to choose the material wisely. For example, where there is not a lot of load on the floor, thinner tile coverings are also suitable. This will allow for better heating.
When selecting a specific type of material, attention should be paid to the following criteria:
- Hardness - it is measured on the ten-step Mohs scale. For an apartment, an indicator of 5–6 is suitable.
- Water absorption. In a room with high humidity, the water absorption of the tiles should not exceed 3 - 6%.
- Wear resistance. There are 5 different classes. For light loads on the floor, class 2 material is suitable, and in other situations, class 3 and 4.
- Chemical resistance. The tile itself is a durable coating, but it is especially important to pay attention to this characteristic for the kitchen.
- Porosity. When laying with heated floors, the density of the tiles should not be too low.
After laying the tiles, the floor must be checked for evenness. You can turn on the heating only after the glue has completely dried, otherwise the quality of the work will be ruined.
Self-leveling coating
Self-leveling flooring is a good choice for the kitchen. A screed is not required for its design, because it is capable of leveling itself. Minimal maintenance is required for such a surface; self-leveling floors are easy to clean and are not afraid of moisture, scratches, or impacts.
Another advantage is the ability to choose original colors, even if you want to create a 3D effect.
But such finishing is still considered a new product, so the cost is not the most affordable. The quality largely depends on the professionalism of the installer. Some do the job sloppy, as a result the floor looks uneven, and in the light of the sun every dot or swollen bubble is visible.
Before choosing this option, you need to find a reputable company that will do the job perfectly.
When installed correctly, the surface has a long service life - more than 50 years. It retains its original appearance for a long time.
Cork
As a cork covering for the kitchen, adhesive varieties are more suitable. The advantages of using them in the kitchen include:
- if it falls and hits the floor, the dishes will not break;
- It’s nice to walk barefoot;
- the material is an excellent heat insulator;
- good sound insulation;
- does not support combustion;
- does not release toxins;
- does not slip.
Cork
Despite many positive reviews and advantages, there are also disadvantages:
- high price, more laminate, linoleum;
- use of special glue and varnish for finishing;
- it is unacceptable to leave even minimal unevenness on the base under the cork surface;
- You won’t be able to lay the floor yourself without the services of professionals;
- high probability of scratches - easily damaged when rearranging furniture with metal legs, falling sharp objects or from the claws of animals.
There is an opinion that cork flooring is prohibited from being used with a heated flooring system. It is not true. You can conduct an experiment yourself, put a piece of floor on the battery. The material conducts heat well and is not prone to fire.
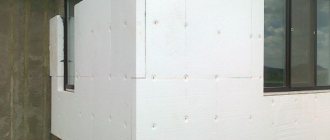
Which insulation to choose?
There are many materials available on the market as a heat insulator for insulating floors under tiles. Let's consider the highest quality and most popular options:
- Mineral wool . It has its own varieties, which differ in the source material. This includes mineral wool, glass wool, basalt, spar and stone. The production method for all types is the same - melting. For example, mineral wool is based on various rocks (carbonate rocks and gabbro-basalt compounds). Insulation is produced in rolls and mats of different thicknesses. Feature: hygroscopicity, leading to unsuitability in case of the slightest wetness.
- Penofol . This is a rolled material, covered on one or both sides with foil. Thermal reflective coating prevents heat loss. Penofol is equipped with a self-adhesive layer that prevents the penetration of cold air. You can choose rolls with different diameters and coating thicknesses.
- Styrofoam . A universal material for insulating floors under tiles with sheet thicknesses of 2, 2.5, 3, 5 and 10 cm. Available in two sizes: 100*100 and 100*200 cm. Depending on the density of the foam, its thermal insulation properties differ.
Choosing a color
The choice of material for the kitchen is influenced by many factors, including the design of the premises and its colors. If the interior is decorated in a discreet black and white palette in the style of minimalism, then finishing the floor with tiles is the best choice. The staggered installation method looks stylish and expensive.
If there is a ton of white furniture, then a dark floor will help maintain the contrast. The right choice will help to visually expand the space and hide visible imperfections.
Checkerboard finish
Combined coverings look interesting - they are more suitable for a large kitchen. This technique is often used by designers for zoning purposes. It is preferable to lay tiles and linoleum in the work area, and laminate, cork, and parquet in the dining area.
There are many options and combinations, it all depends on taste and imagination.
What do you need to know when buying tiles?
Before buying tiles, decide on the design of the kitchen: do you want the facing material to support the overall color scheme of the room or act as a contrast to the interior items?
IMPORTANT! When purchasing material, study the labeling: the products must be from the same batch, otherwise a situation may arise when the lamellas have different thicknesses or differ in color.
Design styles
- to create an oriental style, use lamellas in green, light gray or dark brown with applied patterns and a matte surface. A room with this design should have a large area;
- products in soft colors or with an artificially aged surface are suitable for decorating a room in a country style, characterized by delicate, pastel colors;
- For a kitchen in a classic design, choose plain materials or tiles with a smooth transition from light to darker tones.
- a spectacular duet of grace and simplicity, characteristic of Italian-style rooms, will help create facing elements in rich colors with a golden hue and a glossy surface;
- English style - restrained, elegant, without sharp contrasts (facing in pastel colors, brown and its shades, terracotta, white, blue, green, purple).
ATTENTION! When decorating a room, keep in mind that artificial lighting can distort the color of the cladding.
Tile sizes
Slats of the same color produced by manufacturers can be of different sizes. Large-format cladding elements look stylish, but if the kitchen is small, then opt for smaller-format tiles or mosaics: when installing a covering of a small area, significant cutting of the material will be required, there will be a lot of waste and the cost of repairs will increase.
Suitable lamella sizes: 200x200 mm, 250x250 mm.
Preparing the foundation
Installation of an electric floor in the kitchen must begin with an accurate calculation. The area that needs to be heated is calculated. Draws up a detailed drawing of the room, marking the places where furniture and household appliances are located. There is no need for heating underneath.
The length of the heating system is calculated by multiplying the calculated area by the specific power of the floor. If the heating is auxiliary, then the power should not exceed 120 W per 1 m2, and if the heating is primary, then no more than 150 W per 1 m2.
To prepare the surface in the kitchen for ceramic tiles or other coating, the old coating must be dismantled and the subfloor leveled.
Installing a thermostat
- Place electrical corrugation into the grooves made.
- One corrugation should go from the temperature sensor down the wall and along the floor to the thermostat (bending radius of at least 5 cm);
- The second corrugation should go from the temperature sensor to the floor.
- Insulate the ends of the corrugations on the floor from contact with the solution.
Some craftsmen lay one corrugation for the temperature sensor, and lay the cold power cable of the thermomat open. For myself, I would lay two corrugations, for the client - according to the instructions, one.
Summary of preparation
- The kitchen is free of furniture;
- Mounting box for thermostat installed;
- Corrugations are laid;
- The kitchen floor is primed.
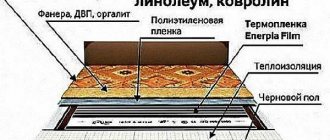
Installing electric heating
The stages of installing heating in the kitchen will be as follows:
- Preparing the space for the thermostat. For this purpose, a hole is made in the wall using a hammer drill. A groove is formed from it downwards for cables - power or electrical, as well as for the sensor.
- A corrugated pipe is placed in it so that its blind end ends 6 cm from the wall. The groove is sealed with a gypsum-based mixture.
- After carefully leveling the subfloor, a layer of reflective heat insulator is laid on it with the foil part facing up. The joints are sealed with tape.
- To fix the heating sections, a mounting tape is attached to the heat insulator using dowels.
- The cable is laid evenly without sharp bends or kinks.
- After installation is completed, the floor is filled with concrete mixture.
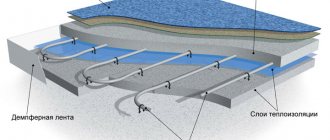
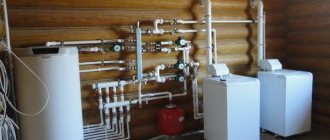
Installation of water heated floor in the kitchen
Water Heated Floor, installation
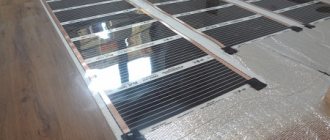
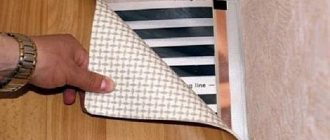
Despite the fact that electric film flooring is much easier and faster to install, it is more suitable for apartments. And since, more often than not, installation of underfloor heating is carried out in country houses, for which the optimal and profitable model is a hydrofloor, we will consider step by step how to make a warm floor under tiles in the kitchen:
- Drawing up a project - a pipeline laying diagram (“snake” or “snail”) is developed, and an area for installation of the collector unit is determined.
- Installation of the collector - it is usually installed in a metal cabinet, which is mounted in a prepared niche in the wall. To avoid problems with air exhaust, the collector must be placed above the surface level.
Installation of the collector and connection of underfloor heating circuits
- Preparation of the base - the old coating is dismantled, the concrete floor is leveled and cleaned.
- Thermal insulation - the material is laid end to end, and large cracks are sealed with polyurethane foam.
- Installation of damper tape - it is used to cover the perimeter of the kitchen, it prevents the screed from cracking when heated.
- Laying the reinforcing mesh; when using a mat with bosses as insulation, it does not need to be laid.
- Pipeline placement - pipes are laid according to the planned layout. The contour is mounted from the walls at a distance of at least 8 cm, and the step between the loops is from 10 to 40 cm. The pipes are attached to the fittings with clamps; do not overtighten them.
- Connection - the pipeline is connected to the manifold using compression fittings. One end to the supply, the other to the return. A corrugation is placed on the section of pipe located at the expansion joint.
- Checking the system - water is supplied to the main line at a pressure of 5 - 6 bar. Testing is carried out over 24 hours. If no leaks have appeared during this time, then you can proceed to pouring the screed.
- Filling the screed - work is carried out with the pipeline filled and under operating pressure. A cement-sand mortar is used for screeding. After placing and leveling the mixture, it must be allowed to dry, this will take about 4 weeks.
- Laying the finishing coating - only after the screed has completely hardened, the selected floor covering - for example, tiles - is laid.
You can turn on the system only after the screed has dried, and when using ceramic tiles, the adhesive has dried.
We install water heating
Water pipes with coolant are mounted in long loops. The maximum length of the circuit is no more than 100 m. The geometry of pipe laying may vary. Usually it is a snake or spiral.
The pipes are connected to a common manifold, which is placed in a separate cabinet.
The pipes are filled with screed on top, unless they are already equipped with special mats. Instead of a screed, when installation is completed, the system can be covered with sheets of fiber gypsum - this is an insulator for pipes and top decorative trim.
Laying the water circuit
Installing a thermostat
- Stretch the cold cable of the thermomat and the wire to the temperature sensor into the pre-laid corrugations;
- Reinstall the thermostat.
Connecting the temperature sensor
Checking the performance of the heated floor
We test the system for functionality. We check the resistance of the thermal cable, compare the resistance indicators with the data in the thermomat’s passport. We connect the thermostat. We check the system in operation.
Collector unit
Before routing pipes, it is necessary to install a pipe manifold. It is selected based on the number of circuits and the desired ability to regulate heating.
Collector unit
The simplest manifolds are equipped only with shut-off valves. Regulating their operation and adjusting heating parameters is almost impossible. For these purposes, manifolds with additional control valves are selected.
Attention! The manifold must be equipped with an air vent valve and a drain pipe.
The collector is installed in a special metal cabinet, the dimensions of which are selected individually. The standard thickness is 12 cm, which allows you to “sink” it into a wall niche.
The main rules for installing a collector:
- It is prohibited to recess the manifold cabinet into load-bearing walls.
- The cabinet is positioned so that it is equidistant from all circuits. If the contours are of different lengths, the cabinet is closer to the longer one.
- The cabinet is raised above the floor level for the operation of the air exhaust system. There should be enough space under the cabinet to accommodate and bend all pipe outlets.
For details on the assembly of the collector and its operation, see the video below.