For many, a vacation outside the city means a hot sauna, a delicious barbecue cooked over an open fire, or a quiet evening near a cozy fireplace. For all these pleasures you need well-dried firewood. If you store them haphazardly, the wood will become damp and unsuitable for kindling. The best solution is to build a firewood shed for your dacha, especially since a simple structure can be built in just a few hours from the most affordable materials.
Requirements for firewood storage
Wood is a material that is capricious in terms of storage conditions. Excess moisture leads to dampness and rapid deterioration of firewood. Heating a bathhouse or lighting a stove like this is not the most pleasant experience.
To protect the woodshed from moisture, it is arranged:
- in enclosed spaces with good ventilation - a barn, dressing room, garage or fireplace room in the house;
- outdoors - under a canopy, on a terrace, in a gazebo, an extension or a summer kitchen.
Firewood should not come into contact with wet ground or tall grass, so outdoors it is placed on waterproof bases. The wall-mounted design requires protection from precipitation flowing from the roof of the house directly onto the woodpile.
Fences are made with a large number of slots for air circulation. Do not allow wood to come into prolonged contact with heated surfaces, for example, a sauna firebox or a stove. It is prohibited to store fuel in boiler rooms or other places where sparks from open fire may occur. In addition to optimal storage conditions, it is necessary that the structure be durable, stable and ensure compact stacking of firewood.
By the way, recently subscribers described how to make a rabbitry with your own hands and detailed instructions for creating a chicken coop for 10-20 chickens, it will be very interesting to read.
Option two. Portable mini firewood basket
Typically, firewood is stored for the entire cold period of the year. But no matter how many logs are in the woodshed, you will still have to go outside from time to time for the next portion of solid fuel. To make it convenient to move, every craftsman can easily make a firewood basket with his own hands.
It will also not be difficult to make a mini firewood burner of a simple design. Even a beginner can build it, but it looks quite stylish.
Prepare the following materials and tools:
- metal rod with a diameter of 5 millimeters - 2 pieces;
- metal rod 15 centimeters long - 4 pieces;
- welding equipment.
The sequence of work when creating a firewood rack for a fireplace with your own hands is as follows:
- 2 blanks are made from metal rods. To do this, they need to be bent so that the diameter of each circle is 50 centimeters. The ends of the rods are connected by welding.
- The circles are placed side by side and intertwined with wire at the highest point. After the junction is fixed, the two circles are moved from below to the sides at a distance of 10–12 centimeters from each other. The resulting structure is fixed on the table using a clamp.
- Using welding, two points are fixed on top. At this point they then make a handle for carrying the mini firewood rack.
- Next, the structure must be given rigidity so that it can withstand the weight of the wood when carried. The future firewood shed is additionally reinforced with 4 metal rods. Their size depends on the distance at which the two circles were separated. Weld the rods parallel to each other.
- When the frame is ready, it should be given stability relative to a horizontal surface. To do this, you can use 4 metal loops - they are welded to the base.
- To protect the firewood rack from corrosive processes and give it an attractive appearance, this original firewood stand must be painted.
Types of woodpiles
The woodcutter can be portable or stationary, in the form of a stand, rack, bowl or shelf. Dimensions are determined individually, taking into account the dimensions of the site chosen for storage, as well as ease of use and safety.
The optimal depth of the woodshed depends on the length of the logs that will be used for kindling:
- for a bathhouse or stove it is at least 50 cm;
- for an indoor fireplace, 25 cm is enough.
The height of the storage should not exceed the height of a person, otherwise it will be inconvenient and possibly even dangerous to use. If it loses stability, the woodpile can collapse and injure a person.
A selection of photos of beautiful firewood sheds
Unusual design - Finnish woodshed
Drawing of a small woodshed for one row of logs. This is as easy as pie to make. And you can bring it into the house
Beautiful firewood. Straight log hut Lightweight design for small amounts of wood
These triangular structures are also firewood sheds. Two concreted logs near the wall. Variant of a large rectangular firewood shed with a gable roof. A large overhang of the roof will protect from rain. The main thing is that the wind does not tear off the roof. Interesting and stylish: can be placed near the fireplace or stove. A log makes a beautiful firewood shed, but it costs she…
Metal frame. There is not enough rigidity (slopes), so everything went wrong. This is an option with boards fixed like blinds
All of these models are easy to build, some are just modifications of those described above. We hope it’s easier for you to now build a firewood shed with your own hands.
Materials for woodshed
For production use:
- wood - boards, round timber, beams, slats;
- wood materials - plywood, OSB, chipboard;
- metal;
- brick;
- blocks;
- roofing materials;
- cellular polycarbonate.
Any available materials, construction pallets, obsolete utensils or furniture can be used. There are no restrictions on their use, but for outdoor conditions, moisture resistance is an important criterion.
Tree
This is the most affordable material for making a woodcutter with your own hands. It is easy to process, and with the help of mechanical fasteners you can assemble any spatial structures.
Wood combines perfectly with any other materials for country house construction. To be used outdoors, lumber must be treated to prevent rotting. They can be coated with waterproof impregnations, paints, and stains. For decoration, forged elements, decorative grilles, and clapboard cladding are used.
Metal
A durable, strong woodshed can be built from metal profiles, pipes, corrugated sheets, sheet metal, and fittings. The frame is assembled using welding, bolts or rivets. The outside is sheathed with boards, metal mesh or any other materials as desired. Metal parts are treated with a primer and metal paint.
In the wall-mounted version, the back part of the woodshed is already there. Racks or walls are installed on the sides, and the top is covered with roofing material sloping away from the wall.
Wall-mounted forged firewood
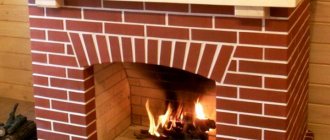
Brick
The brick woodshed is a solid, solid structure. Most often it is provided as part of a complex of an oven, barbecue and barbecue in summer kitchens or gazebos.
Brick is durable, not afraid of rotting, corrosion, and fire. But it is quite heavy, so it requires a solid foundation. It can be poured from concrete, laid out from blocks or bricks.
Polycarbonate
The woodshed made of cellular polycarbonate looks elegant and harmonizes with the surrounding country houses. The material protects well from precipitation, preventing the wood from getting wet. It can be transparent or colored and can be combined with any building materials.
For the installation of firewood, sheets with a thickness of 4-6 mm are used. They are attached to a frame made of wood or metal using roofing screws. The edges must be covered with protective profiles to prevent moisture from entering the cells and rapid flowering.
Non-standard solutions
The woodshed can be built from unusual materials:
- wooden barrels and other used containers;
- unsanded logs;
- sewer concrete rings.
The barrels are placed on their side on a non-rotting stand and firmly secured. After treatment with antiseptics, a simple but convenient woodshed is ready.
An interesting option is a woodpile for firewood made of a concrete ring, imitating the cutting of a huge round log. Manufacturing comes down to installing the structure in a recess and further decorative finishing. To imitate bark, textured plaster with a cement binder is used. The relief is created using a spatula, a roller attachment or fingers. After the solution has set, paint the surface with facade paint. To protect the ends of the rings from slanting rain and snow, you can install shields made of boards or moisture-resistant plywood.
Scandinavian woodcutter
The Norwegian-style firewood box looks very unusual and beautiful. This is a small house with plank walls and a squat, wide roof. The originality of the building lies in the fact that it is a frameless structure.
The boards are laid like crowns, that is, with a remainder. Cuts are made in the end parts of the boards. Each element rests on 2 neighboring ones and is rigidly clamped with a locking connection. There are gaps between the boards for ventilation, which creates a favorable conditions for drying even a large amount of firewood. The roof is made of lightweight material, such as flexible tiles.
In Scandinavian countries, not only utility blocks are built in a similar way. Not very nice objects are hidden in them, for example, transformer booths.
Homemade woodsheds: photo
There are many more similar buildings. The differences are small, the principle is the same: the frame is covered with boards with different gaps. There are several examples that were built by the owners of dachas or private houses themselves.
Woodshed attached to a barn at the dacha
To build it, only two pipes were needed, which were dug into the ground and concreted. Two beams were then attached to them. Similar beams were installed on the wall of the barn. Boards were stuffed between them and the roof was secured (cuts of corrugated sheets). To prevent the firewood from lying on the ground, they placed bricks and a sheet of old plywood on them. To make such a canopy, you can use leftovers from construction or buy pallets and disassemble them. Just the right size.
A simple woodcutter for a summer house
The second canopy was made of the same type. It is further divided into sectors in which firewood of different sizes is stored. The foundation for this structure was also not made; the fertile layer was removed, covered with sand, and compacted. Paving slabs were laid. There are bars on it that serve as supports for the crossbars on which the firewood of the lower compartment lies. It turned out neat.
A small firewood shed for a summer house, divided into sectors
Standing separately
The slope of the roof is organized in an unusual way: the front pillars are made higher, there is nothing unusual about this. But there are grooves cut into them that hold the rafters of the pitched roof. That is, the roof does not rest on the top trim, as usual, but on the side pillars. With a light snow load, this design is quite viable; with heavy snow, the roof is unlikely to survive.
These are two about photos explaining the construction process
The first serious building - a do-it-yourself woodshed
Where to put a woodshed in the country
The most convenient place is near a recreation area, a bathhouse or a summer kitchen, so that you don’t have to go far to get firewood. The woodshed should not interfere with movement around the site, reduce the illumination of the plantings, or create discomfort for viewing the surrounding beauty.
The site should not be located next to a body of water - the air contains a lot of water vapor. Do not store wood in a basement or underground where there is poor ventilation and a high risk of fire.
It is also undesirable to attach the storage unit close to the wall of a wooden house. Such proximity can lead to rapid infestation of structures with woodworms, since a large number of pests nest in firewood. A gap of at least 20 cm or a sheet of metal placed between the wall and the woodshed will solve the problem.
But if the storage cannot be organized closer to the gazebo or summer kitchen, we suggest making a special lightweight stretcher. For production, durable fabric, wood, plywood, wire, and rope are used. The bottom and walls of the future carrier are cut out in such a way that it is possible to stack a certain amount of firewood. Handles are attached for convenience. You will be able to bring a large armful of logs in your hands in one go.
Construction stages
Any construction has clear stages. If the storage facility is built from wood, they are as follows:
- The site is marked . The places where the corner and intermediate logs will be installed are outlined. Holes are dug under them, the depth of which should reach half a meter. Their size is at least 30 x 30 cm. About 15 cm of crushed stone is poured into them.
- The wood is treated with an antiseptic . The lower part of the supports is wrapped in roofing felt. The logs are placed in holes and concreted. They must go to a depth of at least a quarter of a meter. Thanks to this, the structure will be strong and will not collapse even from the strongest gusts of wind.
- To make the roof slope , the rear logs are set 3 cm higher than those in front.
- The base for the floor is installed - transverse joists. They are attached to supporting logs so that they do not touch the ground. There should be a distance of at least 10 cm from the ground. In this case, there will be good ventilation and the wood will not come into contact with moisture.
- Boards are laid on top of the logs . Leave 2 cm between them to allow ventilation.
- The woodshed at the dacha on three sides with boards , between which there is a gap of up to 15 cm.
- The supporting roof system is being built : rafters, transverse logs.
- The woodshed is covered with slate , roofing felt or other material.
- For aesthetics, the wood is painted or varnished.
Large wooden firewood shed with a door, varnished Source eurolain.ru
In principle, these stages are characteristic of construction not only from wood. In any case, markings are first made, the base, floor, then walls and roof are made. If a door is provided, it is installed last.
How to stack firewood for long-term storage
At a time when firewood was practically the only fuel, even children mastered the skill of stacking woodpiles. Now this activity is almost forgotten, but the principles are passed on from generation to generation.
If you stack the logs incorrectly, mold and rot will appear on them very quickly. It is important that the stack remains ventilated while maintaining stability.
Basic installation rules:
- At the bottom, a belt of tree cuts, log trims is arranged, or lattice panels are used.
- The first rows of logs are placed at an angle, filling the space with the most low-quality firewood - knotty, difficult to chop, etc.
- Then good logs are used, row by row they fill the depressions between the underlying logs.
- Fill the entire woodpile evenly. For stability, supports are installed on the sides of the stack. In a woodshed with vertical walls, the firewood will lie without the risk of falling apart.
There is no need to achieve too much density. The logs are also removed gradually, starting from the top row, in order to maintain the stability of the entire woodpile.
Some people practice stacking firewood by changing the direction of the rows. First, the logs are laid across the stack, then along. This method is most appropriate when the wood is still completely raw, and the logs are large and have approximately the same size.
How to fold an oval or round woodpile
Laying without side reinforcements in the form of a free-standing stack is possible. The firewood is placed evenly in a circle or oval, making sure that there is no distortion. The middle is filled in random order.
For stability, it is recommended to lay thin boards or slabs in the transverse direction every few rows. When finished, cover the woodpile on top with roofing material, film or slate.
Additional accessories
Let's consider useful additional things that will help when operating fireplaces and stoves.
Types of firewood
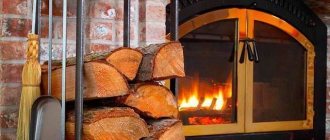
Depending on the original design of the fireplace, a firewood rack can be installed. Some products initially already have a technological niche for storing logs, but in its absence, you have to store the firewood either simply on the floor or near the fireplace. Freestanding firewood boxes can be of several types: stand, box or basket.
If you have the materials, time and desire, you can easily make such an element with your own hands, and use the main directions of the interior of the room where the fireplace is installed as decor. Forged accessories for the fireplace are in demand; they resemble products of past centuries, adding a special character to the design.
The firewood box is located in the immediate distance from an open fire and does not come into contact with the flame, so there are no special requirements regarding manufacturing materials for it.
Ignition accessories
Most specialty stores stock fireplace matches and lighters for biological analogues. The main difference between such matches and ordinary products is their length, and it reaches 20 centimeters, which will not allow you to burn your hands. Accessories can be packaged in boxes with interesting designs or original glasses.
Manufacturers offer kits consisting of special rolled paper for ignition and matches. To store paper, it is better to purchase a holder that will allow you to easily unwind the desired piece and ignite the flame.
Flame protection
If you have an open firebox, it is necessary to install protective equipment for fireplaces, represented by screens and grilles. These accessories are made exclusively from materials that are resistant to open flames and high temperatures. Most often, people prefer products made of tempered glass, with a metal frame, or without a frame at all.
Some interiors are more suitable for grilles, which also perform a protective function. They are made of durable steel and decorated with forged elements.
Depending on preferences and design, you can create a screen of any size and shape: flat, convex, round, square, oval, double-leaf, etc. Metal products can be installed as close as possible to an open fire, but glass screens are best moved away from the firebox by about 30 centimeters.
Cleaning accessories
An essential tool for the fireplace is a scoop or brush. These accessories are essential for cleaning up ash and coals after the fire has gone out. If you do not clean it, the firebox will soon clog.
It is best to choose a brush that has natural hard bristles or a fairly thin wire. When using accessories with artificial bristles, there is a possibility that incompletely extinguished coals will simply ruin the accessory.
To select the ideal proportion, you should start from the formula: the length of the handle is at least 20 centimeters greater than the depth of the firebox.
Vacuum cleaners
There are now many vacuum cleaners available in stores, the main task of which is to remove soot and ash. It works exactly like a typical household appliance, but is made from special, heat-resistant materials. The design is also significantly different.
The maximum temperature that vacuum cleaners can withstand is 50°C, which makes it possible to clean even before the coals have completely cooled. The devices have high suction power, and their containers reach volumes of 20 liters.
What accessories the fireplace needs is up to the owner to decide. Every detail plays an important role in the selection process: quality of materials, product design, manufacturing company, etc. Therefore, before going to the store, you should answer these questions for yourself, then the purchase will definitely bring joy, and the accessories themselves will be used constantly and for their intended purpose.
How to strengthen the frame
When stacking firewood at a great height, the entire system may become unstable over time. This can happen arbitrarily due to drying of the wood and changes in its geometry. The woodpile can “play” both in the longitudinal and transverse directions. That is why the frame must be securely fastened.
Lateral loads can be significant. To perceive it, the racks are immersed in the ground at least 50-80 cm. If these are metal pipes, they are hammered with a sledgehammer to the required depth. To protect the metal from corrosion, the bottom of the profile must be coated with mastic and dried.
Wooden supports are buried in holes, having previously been treated to prevent rotting. The easiest way is to use a special antiseptic impregnation. But if there are no special equipment at your dacha, you can use the old fashioned way:
- burn the bottom of the pillar at the stake;
- dip in liquid clay;
- install in the hole, fix and fill with the same clay.
This frame will last 5-8 years.
What are there
A sheet of metal will protect the walls from woodworms (wooden ones, of course)
. If you do not pay attention to the size, there are two types of sheds for firewood - attached to the wall of a building or standing separately. It is clear that it is easier and faster to install, but this is not always possible. Or rather, not with all buildings: it is dangerous to build on wooden walls. And not only from a fire safety point of view. With the firewood comes a whole army of wood-boring beetles, which will happily take on your home. Therefore, it is better not to attach woodsheds to wooden buildings, even with wood treated with bioprotection, but if you really want to, then nail an iron sheet to the wall. As in the photo. It should be larger than the size of the woodcutter. Then all the bugs (most of them, for sure) will remain in the firewood.
Free-standing firewood sheds can be completely open - several pillars, a couple of lintels and a roof. The main thing is that the roof is large enough: it is advisable to make larger overhangs. And the rest will be completed by air and sun. They say that they dry no worse than in more closed structures. In regions with heavy snowfall, to prevent snow from getting inside for the winter, sheets of plywood are attached (attached) below. They are removed in the spring.
How are walls made?
More often, woodsheds are built with lattice or slotted walls. It is better if the boards are stuffed at some angle - like blinds. Then, even with oblique winds, little precipitation gets inside. But even if the boards are filled at some intervals, everything dries well.
Boards/slats are placed on the frame mostly horizontally, sometimes vertically; they also make lattices from thin planks or place them diagonally. In any case, there should be a lot of cracks for ventilation.
Vertically stuffed planks are rare. This is a woodshed with a pitched roof
Does the drying speed depend on the method of installing the planks? No comparisons have been made, so it’s difficult to say for sure. But one owner claims that if you lay the boards diagonally (he has 10 cm with a 2 cm gap), with each wall in a different direction, it dries faster and faster: in a month.
About the size of the slots: they are made from 2 cm to 10 cm. But it also depends on the width of the board. If you leave the gaps very wide, snow will sweep in a lot. If there is little snow or you are not concerned about the amount of snow, you can fill the boards less often. It's also more economical.
Beautiful woodshed for the dacha
Not all woodsheds have doors (those with doors are also called “woodsheds”), as in the version in the photo. Often there is not even a front wall: this allows for more active ventilation. The front wall and doors are needed if stealing occurs in your area, but in general you can do without them.
Log location
Now a little about the structure of the woodshed. If it is small and everything fits in one row, then there are no special problems - everything is accessible. But if large volumes are loaded, it is better to divide the area into sectors into which batches of firewood will be loaded. Thus, previously imported and already dried out ones will not be covered by fresh ones.
It is better to divide the area into sections, so that you can go inside
If the woodshed is square, arrange the sections so that you can reach inside to remove the driest logs. To do this, a passage is left in the middle. In terms of depth, it should not be up to the wall, but it is advisable that only one, or maximum two, rows of logs separate you from the wall (and in general it depends on the volume) - this way they will all be accessible. It’s easier with rectangular ones: they are simply separated by non-sectors by a partition. For example, as in the photo.
This is a large shed for firewood - each section fits one car - about 4 cubic meters. The back wall is not solid; if you look closely, there are holes there.
And a little about height. You don’t need a large woodcutter for a (seasonal) dacha. All you need is one or two cubes for heating in the fall/spring, and even then only for the weekend. But if you have to heat a house, and even a bathhouse, you will have to build something solid. Then, regardless of the layout - long or square, the height is about 2 meters. With average height, you can load it almost to the ceiling. but there should be a ventilation gap at the top.
Read about how to make beautiful and inexpensive paths in your garden or on your property here. You can read about the construction of a homemade pond in this article, and about how to turn it into a fountain, here.
Foundation for woodshed
In some cases, when storing firewood, a foundation is made of blocks, beams or piles. This is done to ensure free air circulation and also reduce the likelihood of flooding during rain or melting snow.
Most often, the foundation is replaced with ventilated plank flooring. In order to withstand the weight of the wood located above, sometimes reaching several hundred kilograms, it must be strong enough.
Anchors, holders, corners, staples and brackets are used to attach the frame to the foundation. There are 2 installation methods possible:
- Embedded fasteners are installed during the concreting or masonry process, and then the posts are fixed to them.
- If the foundation is made of blocks or timber, the frame is secured in place using metal anchors or screws.
Beam support, galvanized, 140 x 76 x 100 x 2 mm, opened Metalist 1198462
Galvanized or stainless steel hardware is used. When connecting wood to concrete, a waterproofing gasket is required.
Design selection
When choosing a building in which firewood supplies will be stored, be sure to provide a roof that will protect the supplies from precipitation and sunlight. If you intend to build a free-standing structure, there are several projects for the construction of such a building:
1. A woodshed can be a structure with a roof and three walls.
Woodshed with a roof and three walls
2. A storage area for firewood can be made of a gazebo with a door, which can be entered as needed and stocked with the necessary supplies.
Woodshed for a closed summer cottage
3. Firewood can be stored in a real full-fledged barn. In this case, the frame must be made of boards attached with a gap for ventilation of the room.
If a barn is chosen as storage, you can build a larger building and provide space for gardening equipment and tools.
Woodshed with room for equipment
How to make a woodshed with your own hands from wood: step-by-step instructions
We propose to build a simple but convenient shed for storing firewood measuring 0.9x1.8 m.
For installation you will need:
- 4 blocks for the foundation;
- 4 boards for logs 1.75 m long;
- 2 boards of 90 cm for the bottom trim;
- galvanized screws 90 pieces;
- flooring boards 18 pieces;
- 4 racks of 1.2 m each;
- three-inch screws 16 pieces;
- rafter boards with an oblique end, 2 pcs. length 100 and 96 cm;
- boards for the top trim of the frame to support the rafters, 2 pcs. length 173 cm and 2 pcs. 76 cm each with an end cut at 30°C;
- 2 boards for rafters 94 cm with a bevel at both ends at 30°;
- plywood 100×190 cm;
- waterproofing area of 1.85 m²;
- soft tiles 1.85 m²;
- 12 boards 90 cm long for side walls;
- boards 178 cm long;
- 2 boards of 193 cm and 2 boards of 100 cm, cut at both ends at 30°.
Work order:
- Place the blocks in the corners of the woodshed and level them. The distance between the outer edges of the blocks is 90 and 180 cm.
- Mount the frame for the base by laying the boards on edge and fastening them with long screws. Each connection will require 2 screws.
- Secure the floor boards with self-tapping screws to the frame at regular intervals (insert a thick nail or strip).
- Install the frame posts, 2 per corner, fix the top trim boards, connecting the nodes with screws.
- Cut the side rafters and intermediate boards at 15°.
- Install the rafter system. Make the step between the beams the same.
- Secure the plywood to the rafters using self-tapping screws.
- Cover the entire surface with roofing felt.
- Lay and secure the tiles.
- Cover the frame with boards at intervals of 2-3 cm.
- Nail wind boards around the perimeter of the roof.
You can decorate the woodshed to your liking. Wood logs, which were made according to these drawings and a description of the step-by-step installation process
Adviсe
In order for the fireplace to delight you with warmth, and the firewood to always be dry and at hand, you must follow the recommendations of manufacturers and specialists: properly care for the fireplace and store fuel for it. Before firewood is brought into the room, it is usually stored outside.
It is recommended to make an outdoor woodshed from wood, on a wooden base, under which a drainage cushion of sand and crushed stone is poured. This way you can reduce humidity and eliminate contact with the soil so that the lower layers do not begin to rot. A canopy is required to protect the firewood from rain and snow, because wood absorbs moisture well. Before installation, all fuel material must be thoroughly dried to avoid the formation of unwanted condensation. To prevent the wood from becoming rotten and rotten, there must be sufficient ventilation in the woodshed.
It is better to stack firewood in the following order: place the largest and thickest logs at the bottom, gradually lay out smaller firewood, and place thin kindling on top for ignition. The wood chips can be placed on a separate shelf or in a specially designed sector of the woodpile. A canopy or terrace attached to the house will allow you to store fuel near the entrance for easy replenishment of the indoor firewood in bad weather.
Fire safety is a very important aspect of the operation of a fireplace, so a log burner with dry fuel should not be placed too close to an open flame or faulty wiring: the slightest spark can lead to a fire. But with knowledge and compliance with safety measures, these problems can be prevented. Under the fireplace and in front of the firebox there must be a platform made of non-combustible and fire-resistant material: metal, stone, concrete. A platform is also made under hanging and wall-mounted models. The wall behind the fireplace, located in the wall space, is also finished with heat-resistant, non-combustible materials. Special glass screens and doors, fireplace grates prevent sparks and embers from reaching the floor surface.
Another piece of advice on properly packing fuel for the winter: as you pull logs out of the woodshed, it is unacceptable for the woodpile to fall over or warp, and for the firewood to spill out of it. Large logs must first be chopped and wood chips prepared for ignition. Additional supports should be installed on the sides so that the rows of firewood do not subsequently fall apart and crumble. Stack stacking is possible, where logs are laid out row by row around a circumference. As a result, a stack of fuel is formed.
Special long-burning briquettes have been invented as fuel for the fireplace. They are sold in packaging and stored dry in a firewood rack.
Firewood cover
A woodpile stacked outdoors in the open air can be protected from precipitation with a simple device. You will need a piece of durable tarpaulin, such as a used awning or canopy, strong nylon thread, scissors and a sewing machine.
Before starting work, you need to test the machine and adjust the thread tension and seam width. Optimal seam quality is achieved with maximum tension on the upper thread and minimum tension on the lower bobbin thread.
Manufacturing algorithm:
- Fold the tarpaulin in half and sew a zig-zag stitch at equal intervals. Take the width of the pockets so that you can put a log inside (about 30 cm). Make bartacks at the ends of the seams.
- If it is difficult to stitch the outer layered edges, it is better to cut them off and remove the grommets with a flat-head screwdriver.
- A piece of tarpaulin that is too wide can be cut in half. Don't forget to tack the seams.
- Insert as even, identical logs into the pockets as possible, and cover the stack with a tarpaulin.
Design
Once upon a time in the villages there was no philosophizing about the construction of woodpiles - the simplest and most convenient construction from boards suited everyone. Today, for many, the dacha is not so much a garden as a place of relaxation, and the attitude towards it has become accordingly. A beautiful facade of a building, outbuildings in the form of log houses or aesthetic stone structures, landscape design of the territory - all this suggests a woodpile made of stone or log wood, convenient and effective. Entire projects are being developed to create such beauties. The photographs show the best of them.
The owner combined the fence with the firewood shed into a single building. The result is a beautiful, practical, ergonomic and environmentally perfect structure.
Peculiarities
Decorative firewood - can be indoors or outdoors. Be an additional functional and decorative element in the interior or be an element of landscape design.
firewood holder - installed indoors or in open and closed gazebos with a fireplace. They are made portable or stationary, organically fitting into the overall interior. They are made from wood, metal, thick fabric and other materials.
You cannot throw logs randomly into a woodpile. They should be folded correctly for better preservation.
Circular method
If you do not have a stationary woodshed, then you can stack the logs in the form of a barrel tower. It is necessary to drive a stake. It will serve as the basis of the structure being built.
Tie a fishing line or rope and draw a circle of a given diameter, depending on the amount of raw material. To prevent them from becoming damp and rotting, place tree bark or thick plastic film on the ground as a base.
Place the firewood on it in a circle carefully and tightly so that the structure is stable and does not sag. By laying firewood about 0.5 m high, you can fill the middle by stacking them in any order, but quite tightly. Continue laying in this way until the barrel tower is about 1.5 m high.
"Stack"
Stacking of logs is often used. This type of installation requires support. The wall of a house, bathhouse or other building is suitable as a support; firewood grate for a summer residence. When laying, strictly control the slope towards the support. If you are laying two rows, then place thinner logs on the support and thicker ones on the outside. Due to the difference in size, there will be a slope towards the support.
If your structure stands separately from the wall, then use a wooden beam as a support. The height should be small, otherwise, under the pressure of the firewood, the support beams may break and the structure will fall apart.
With stakes
If it is not possible to lay it otherwise, you can use stakes as a support. The stakes must be those that will not bend from the logs. Drive them into the ground from several sides, forming a frame.
When stacking firewood, line each row with branches. They will play a reinforcing role. Place the logs in a checkerboard pattern. The top must be covered with any covering material that does not allow water to pass through.
From greedy hands
For convenience and better preservation, separate freshly cut firewood from dry wood. This is necessary for large stock volumes. Inside the woodshed, leave a passage in the middle. Do not bring it close to the back wall. Along it, logs are stacked in one or two rows. On one side of the aisle there are dry ones, on the opposite side there are wet ones.
Lay long boards vertically between the rows at equal intervals. These will be sections. Arrange the logs in them by type of wood or size. Sometimes there is a need to hide your stock under lock and key.
To hang the door in the center of the front wall, two additional timber supports are installed at the construction stage. Loops are fixed on one of them. It is not necessary to remake the door. An old room or half of a cabinet will do.
What are they built from?
Before choosing the material from which you will make the firewood box, decide on the purpose and location. Stationary and portable outdoor firewood burners are made of brick, wood, metal, and stone. Indoors, they can be stationary or portable, used for their intended purpose or be part of the decor of the room.
The raw materials from which it will be made depend on this. For decorative firewood holders, dense fabrics, cord, jute, and glass are used. They are combined and decorated with various elements. Forged firewood racks near the fireplace look gorgeous.
Metal firewood rack for a summer residence
A metal firewood holder is the most durable and reliable. It is made from a lightweight aluminum profile, but for a small number of logs. It is possible to make a portable version.
A stationary woodshed made from a steel round or profile pipe or channel will be more reliable. The frame is covered with welded steel mesh. We cover the metal with primer-enamel or a protective layer of varnish. The fireplace may have a decorative stand for logs made of forged elements.
Wooden firewood for a summer residence
Wooden firewood is the most popular. It is easy to construct from scrap materials.
Any wooden blanks (boards, pallets, timber) are suitable for its construction. Making a beautiful woodshed is not an easy task. You need to show imagination and creativity, make the walls carved with beautiful patterns.
They must be ventilated to ventilate and dry the logs.