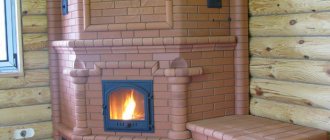
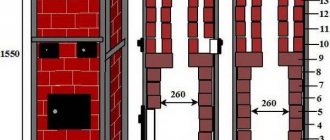
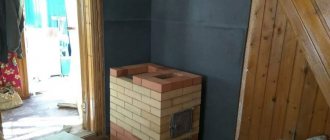
This article presents the order of the single-bell heating stove PTO-2300. Its size in terms of 2 by 3 bricks or 510x770 mm (including seams). The height of the oven is 32 rows, which is 2240 mm. The power of this furnace is 2.3 kW with two fireboxes per day.
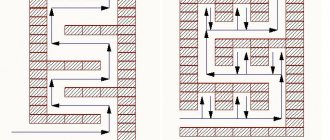
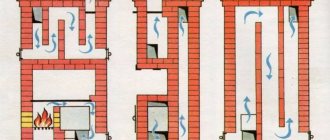
The furnace hood is formed by a square channel of 260x260 mm. Flue gases rise through this channel to the ceiling formed by three rows of masonry, then, cooling down, they fall down and go through the ceiling into the chimney.
The figure below shows the facade and sections of the PTO-2300 furnace:
This stove heats up well after a long period of inactivity, and also does not require a high pipe, which is a big plus.
If the stove is heated not with wood, but with coal, then when installing the firebox (row 5-15), it is necessary to use fireclay bricks.
Furnace structure
As a rule, a small-sized DIY oven measures two by two or three bricks at the base and has the shape of an elongated rectangle.
For heating efficiency, it is most often located in the center of the house, and due to its small size, this is usually not a big problem. It consists of a fuel chamber and an upper cap. Flue gases are released through a special channel, which at the top of it makes a 180-degree turn; such a system is called a pass. Thus, the flue gases have time to transfer more energy to the walls, increasing its efficiency. To build the stove, it is necessary to use fire-resistant materials. The foundation is usually made 5 centimeters larger than the base of the stove. But thanks to the lightweight design, in some cases, you can do without a foundation. As a rule, a metal sheet measuring 50x50 cm is installed in front of the combustion door.
We build quickly and reliably
The foundation is usually made of rubble concrete or brick with cement mortar. Please take into account that the foundation must be separate and not connected to the foundation of the house itself. It is better to make the dimensions of the foundation 5-8 centimeters larger than the base of the stove and 15 centimeters below the floor level.
For brickwork, clay-sand mortar is used in a ratio of 1:3. The thickness of the seams should be approximately 5 millimeters. Do not forget about bandaging the seams, this will give it the necessary strength. At each stage of construction, measure the masonry horizontally and vertically using a level. Remember that if the masonry is made without errors and from high-quality bricks, then the stove will ultimately have excellent decorative qualities and will not require excessive additional finishing.
For the walls of the fuel chamber and ceilings, only fire-resistant bricks must be used. The inner walls of the masonry must be perfectly smooth, so during construction, rub the protruding seams with a wet rag.
The chimney pipe is built from the same brick, except that cement-sand mortar is used for masonry. In the place where the chimney vent passes the roof slab, a cut should be made to increase the distance between the walls of the chimney vent and the flammable materials of the slabs.
Where and how to build a 2x2 brick heating stove?
Location determination
Before starting construction activities, it is important to decide where the future structure will be located and whether it violates fire safety standards. If according to the rules the placement is permissible, then it’s time to move on to the next steps
It is important to take into account that small-sized stoves produce maximum thermal energy, so it would be appropriate to place the structures in the center of the room. And also, do not forget about the risk of temperature changes with nearby load-bearing walls, which leads to gradual destruction in the case of proximity to heating stoves.
Determining the type of future design
The best option for a compact, small-sized stove is considered to be a single-bell “baby” stove. Such a device is an ideal design for summer residents. The layout scheme is very simple and understandable, the dimensions of the structure are not very large, which is why summer residents often use a similar structure as the main option for heating the room. The “baby” stove works on almost any material, be it coal or wood blanks, fuel consumption is considered minimal.
Foundation
Once everything has been decided on the oven type and location, it’s time to start laying the foundation. As a rule, it is laid separately, without being connected to the foundation of the house. The foundation is laid with rubble concrete, brick or rubble. In terms of size, the trend should remain that the foundation indicators are 7-9 cm larger than the base of the structure. After marking is carried out outlining the boundaries of the furnace, a pit is dug out and small stone or crushed stone is poured onto the bottom. After compaction, a concrete screed is made, having previously limited the edges with formwork.
Order and chimney
A two-brick heating stove is made according to an easy laying pattern, which even an inexperienced construction worker can understand. To fasten the bricks, a solution of clay and sand is prepared in a ratio of 1:3. To ensure a strong structure, it is not recommended to make seams thicker than 5 mm. Before work, bricks must be immersed in water to get rid of excess air, excess mortar is removed from the walls with a rag, and after each row the slope is measured using a building level. On the last rows a chimney is formed to remove gases. Do not allow more than 3 pipe branches. To prevent heat loss, the walls are insulated from the inside.
Preliminary stages of stove formation
Various stoves, in the process of creating which use different numbers of bricks, are created mainly according to the same principle. The difference here may be the amount of material and the features of its location in the row.
In order for the heating stove to be of high quality and durable, as well as safe and reliable, a scheme suitable for its size and parameters is used. Each step indicated in the order must be performed accurately and correctly, otherwise significant errors in the design can be expected. In this case, the masonry must be completely disassembled in order to make the necessary changes.
During operation, you should consider whether the stove will be equipped with any additional elements and equipment, since if they are present, then an appropriate place in the order must be allocated for them. Proper laying of a 3 by 4 stove or with other parameters must take into account the importance of the correct formation of the first row of the element, since the evenness and ease of the rest of the work process depends on it. To constantly check the evenness and correctness of work, it is important to use suitable measuring equipment - a level or plumb line.
poluchi-teplo.ru
Preparation and calculations
Consider carefully how best to position a small oven. For example, if it is built right next to an external wall, then most of the heat will go to heating the street, so it is best to place it in the center of the house
Take into account in which part of the house the heating chamber door will be located. It will be easier to add fuel and clean the stove if the door of the fuel chamber opens into the corridor or hallway
This way you will have less problems with ash and dust.
A small-sized brick oven does not require a lot of materials. Most likely you will need the following:
- Ceramic bricks – 200 pcs.
- Fire-resistant brick – 70 pcs.
- Ordinary clay - 0.2 cubic meters. meters.
- Fireclay clay – 15 kg.
- Fire door 250x250 mm.
- Blower door 130x140 mm.
- Cleaning door 130x140 mm.
- Viewing valve 130x130 mm.
- Roofing felt for waterproofing 800x500 mm.
If you are building a small-sized stove for the first time, you will need a detailed drawing so that you don’t have to invent anything. The most popular type is the 2x2 brick oven, Malyutka or Single-bell oven PTO-2300. You can easily find and print a drawing of this design on the Internet.
How much material is needed and what kind?
A small-sized brick kiln does not require deposits of construction products and equipment for production. To work you will need:
- ceramic brick 150-220 pcs.;
- fireclay fireproof brick material 70 pcs.;
- building clay 0.2–0.3 m³;
- sand, crushed stone;
- fireclay clay 10-15 kg;
- firebox and ash door;
- cleaning door;
- valves;
- waterproofing material;
- building level;
- corner;
- shoulder blade;
- nozzles and device for mixing the solution;
- container for mixture;
- Bulgarian;
- hammer.
Calculation of brick volume
In terms of laying a stove, they usually indicate the required number of bricks, and many professional stove makers know this. But there are options in which you can easily calculate how much material is needed for any stove, for example, a Swedish brick stove, for any home.
The calculation sequence will be as follows: multiply the amount of brick laid out completely in the first row by the height (number of rows), and then subtract 1/3 from the result obtained. This way you can make an accurate calculation of the amount of material for the project.
Brick oven diagram.
To make a more accurate calculation, you can use numerical data. Here's an example:
- The base is 3x4 bricks, which means the continuous row will be 24.
- The height is taken as the distance from the floor to the ceiling. This can be 2 m 40 cm. But approximately 30 cm should be subtracted from this height, taking into account the cutting height. In this case, 2 m 10 cm will remain.
- Knowing that the height of one row is 7 cm, you need to use the following formula: divide 210 by 7. We get 30 rows.
- Now 1/3 is subtracted from this number. As a result, 20 rows will remain.
- This number of rows is then multiplied by the base of 24 pieces, resulting in a total of 480 pieces. But you also need to remember about cutting, for which you will need 50 pieces. Total - 530 pieces.
Any stove has a pipe. If in the project it is brick, then it also needs to be calculated. In 1 m of pipe there are normally 14 rows, and in 1 row - 6 pieces. This means that you need to multiply 6 by 14. The result is 84. Now this value should be multiplied by the height of the pipe in meters, and we will get the required volume of the required building material. For example, we multiply 4 m of pipe by 84. The result is 336 bricks; for the construction of a Dutch oven, the calculation will be different.
The obtained values are, of course, conditional. There will still be an error, but these numbers will give you an idea of the total number of bricks and allow you to plan future costs. When the volume of material has been calculated, you need to select its type.
Selecting a location
Before you begin construction, you should decide where the stove will be located. If there is only one small free area in the house, there is nothing you can do about it. But to obtain maximum heat transfer, it is recommended to place the stove in the central part of the house or room. Thus, none of its elements will touch the street wall, and accordingly, warm air will not escape outside. In addition, when adjacent to the supporting structure, temperature changes may occur, which negatively affects the durability of the heating device and the operation of the chimney.
Final stage of construction
Upon completion of work, the fresh structure must be given time to dry. This will take 3 to 5 days. After this, the oven is ready for finishing work.
This article certainly provides information on some of the key points of building a small stove, but to cover all the elements, you will need to not only read additional materials, but also do some tests on your own. For example, if in the past you have not had the opportunity to work with bricklaying, then before building a small-sized stove at home, it is better to practice and lay the test first stage of the stove outside. This will give you the opportunity to better understand what tools are needed, how to level and bandage the masonry, and will also help you better select the proportions of the solution. You should also familiarize yourself with some issues related to construction. For example, in what cases is it not necessary to build a foundation? How many rooms can a small stove heat? Building a small-sized brick oven is an excellent project, even for those who have never encountered bricklaying before. By carefully planning each stage, you can complete the construction of a 2 by 2 or 3 brick oven in less than a week. And most importantly, you will have the opportunity to save on heating your home.
Tips for choosing
Selecting and purchasing good quality material is the first priority when preparing to lay a stove and chimney. First, the material must be carefully inspected and tested. How to do this is described below:
Parameters such as color and correctness of shape are assessed. Thin small cracks are not considered defective. The surface must be rough so that the mortar has good contact with it, providing a strong adhesion. Take random bricks and measure them.
If the data varies, then such material will have to be handled more than usual. The quality of the masonry will be low. Several copies need to be hit with an iron hammer. The sound should be clear and clear.
A dull sound is a sign of internal defects. A stove made of such bricks will last less than expected. Break several bricks. If they fall into large pieces, then this is a sign of quality.
Defective products crumble into small pieces. The color when scrapped should be uniform. Dark spots indicate that the brick is of low quality. If the brick is taken from a disassembled stove, then you can use those that lined the chimney, bottom and groove.
No. 9. External inspection of brick
When choosing a brick for a stove, it is necessary to look at the certificate of conformity, which should indicate the basic properties of the material and necessarily emphasize the fact that this brick can be used in the construction of a stove. In addition, a visual inspection is essential:
- the brick must have precise geometry with a maximum deviation of 2 mm;
- If you take a brick in your hand and, holding it up, give a weak blow with a hammer, the tool should bounce off the surface with a ringing sound. This indicates that there are no cracks inside the brick;
- It is not always possible to perform a crash test, but the way a brick breaks and what its internal structure is can say a lot. Crushing and uneven coloring of the cut is unacceptable;
- fireclay bricks must contain a minimum of shells formed during the release of gases during firing. There should be no more than 4 of them, and on different faces.
Types of kiln bricks
Kiln bricks can be divided into three types:
- Quartz contains a small sand content.
- Fireclay is made from fireproof clay.
- The main one contains a lot of limestone-magnesia mass.
Refractory brick can withstand high temperatures for a long time. It has high strength, which makes it difficult to machine. Fireclay clay is used in its production. Available in different forms, it does not have cavities or voids inside. A distinctive feature is a metallic ringing sound when you tap on it. When broken, it splits into large pieces without forming crumbs. Its resistance to high temperatures and chemicals makes it an ideal candidate for firebox lining.
The outer layer of the stove can be made of ceramic bricks. It is not so resistant to high temperatures, but it also has some advantages: it is easy to process. It can be given any shape using a pickaxe. When choosing such a brick, you should carefully study its appearance: there should be no cracks, and the geometry should exactly repeat the standard. The shade of the product should not differ across the entire surface.
Proper completion of the laying of a wood-burning stove for a summer residence
At this point, the laying of the outdoor stove is almost complete, but there are a few technological aspects remaining. Grate bars and grates should be located 7-14 mm below the combustion opening. A gap of at least 5-10 mm should be left between the grate and the masonry of wood-burning stoves along the entire perimeter, filling it with ash or sand so that the expanding metal does not damage the masonry when heated. When laying the grates, it is recommended to tilt them towards the door by 2-3 cm, which will ensure that unburned fuel rolls off the back wall onto the grate. The grate slots must be placed along the firebox (from the door to the rear wall).
Proper laying of the furnace implies that the structure must be dried naturally, or, in extreme cases, artificially. During the drying process, all valves must be open around the clock. The pipe can only be closed during a thunderstorm. This drying process takes approximately 10-12 days.
Artificial drying is faster. To do this, it is necessary to heat the stove with a gradual increase in the amount of dry fuel: shavings, straw, wood chips, finely chopped firewood. It is forbidden to dry the stove by burning a large amount of wood at once, since the water in the brick, turning into steam, can destroy the masonry.
The first addition of fuel should not exceed 20-25% of the amount required for normal combustion. For the second furnace, the volume of fuel can be increased to 30-40%, for the third - to 60-70%, etc. up to the full norm. After each firebox, all stove devices must be open, and the temperature of its outer surface should not exceed 50-60 °C.
Laying a stove for a summer residence and drying is considered complete when damp spots no longer form on the surface of the stove and there are no traces of condensation on the valve.
Iron elements of the furnace structure
- 1. According to the dimensions of the fuel door, an opening is made with a margin of five to seven millimeters. The gap is filled with basalt cardboard insulation, which will avoid smoke in the home and will become an excellent thermal insulator between the iron and the brickwork of the heating furnace, allowing the pressure of the expanded iron to be alleviated on the furnace masonry.
- 2. We place the door for a while, while laying an incomplete row of bricks on top of it, and wedge a brick in the middle.
- 3. We fix the passage row with the top row, after which we leave the entire structure until the solution dries completely.
Stove door installation steps:
- – using a grinding machine, the fastenings on the door, such as twists or wires, metal strips or strips, are cut off,
- – then the door is removed from the masonry and the ends of the fasteners sticking out are cut off flush with the brick,
- – marks are applied opposite the seams exactly along the perimeter of the structure,
- – in the place of the marked points, through holes are made approximately seven millimeters in depth. The hole must be made in the form of a cone in order to subsequently install a self-tapping screw into it,
- – the door is put in place, ceramic self-tapping screws measuring six by one hundred and twenty millimeters are screwed in. The optimal number of self-tapping screws used in this case is six pieces.
- 1. A pair of holes are made in the element in two passes. Initially, they drill with an eight millimeter drill using a drill without a chipper, after which they drill with an eighteen millimeter drill.
- 2. Bundle the bricks into a pallet.
- 3. Intercept two bolts using one wide washer.
- 4. Place the pallet in the brickwork of the hearth (stove or fireplace).
Base - monolithic concrete foundation
It is better to make a separate foundation for the stove. It can also be installed on the ceiling if its load-bearing capacity is sufficient, which is verified by calculation.
In rooms where the temperature is positive all year round, the depth of the foundation is influenced by the strength of the soil and the depth of groundwater. Under favorable conditions, the minimum distance between the bottom of the foundation and the planning mark at the outer side of the wall should be 0.5 m.
If the building has interruptions in heating in winter and there are soils with water within 2 meters under the stove: sandy loam, silty and fine sand, loam, clay, the depth of the foundation is greater than the calculated freezing depth of the soil. For sands it is 1.8 m, for loams and clays - 1.6 m in central Russia.
1 - sand and gravel cushion 150–200 mm; 2 - concrete foundation; 3 — waterproofing 2 layers of roofing material; 4 - brickwork of the furnace
If the concrete mixture is prepared independently, then for 1 m3 of concrete you will need:
- Cement M400 - 325 kg.
- Medium coarse sand - 1300 kg.
- Crushed stone or gravel - 1300 kg.
- Water - 205 l.
Important! All ingredients are subject to requirements that comply with SNiP and GOST standards. For concreting you will need the following tool:
For concreting you will need the following tool:
- Shovel for laying the mixture.
- Trowel for smaller jobs.
- Homemade tampers or vibrator for compacting fresh concrete.
- Concrete mixer or container for preparing concrete mixture.
- A trowel for leveling laid concrete.
In dense, non-crumpling soils, formwork may not be installed for laying concrete. The hole is dug according to the size of the foundation. In plan, it exceeds the size of the stove by 10 cm around the entire perimeter. A gravel (crushed stone), sand-gravel or compacted sand cushion 15–20 cm thick is laid on a compacted soil base.
In crumbling soils, formwork is required. If the stove is installed near a wall under which a solid strip foundation is laid, then the concrete base of the stove should be 5–10 cm away from it. The groove between them is filled with compacted sand. It is better to lay both foundations together so as not to weaken the wall structure.
To ensure the strength of the entire foundation of the furnace, it is better to lay the mixture at one time. The process of laying concrete is carried out in layers with mandatory compaction using tampers or an internal vibrator.
Stripping can be done if there is no danger of destruction of concrete that has not gained sufficient strength. At temperatures above +5 °C this is possible after 1–2 weeks.
From the moment fresh concrete is laid, it needs to be provided with normal hardening conditions. It is insulated at temperatures below +5 ° C and watered when it is hot and windy, at least 3 times a day.
Concreting of the foundation ends at a level 15 cm below the level of the finished floor. Next, 2 layers of waterproofing (roofing felt) are laid on the surface of the stove base.
Marking and arrangement of the foundation for a brick kiln
- If the stove is made in a house on a columnar or strip foundation, then the floor must be opened, if it is made of wood, and a foundation must be laid on the ground.
- When choosing a compact model for a house on a monolithic foundation, heating is done on it, only by making a layer of waterproofing
- The foundation of the stove and the house should not be common. Moreover, they should not be connected. The shrinkage of the foundations of the stove and the house itself are different, and it may turn out that with a connected foundation, one building will pull another along with it.
- The foundation must be 140 mm below the finished floor level.
First, there is a marking of the place where the base for the stove will be installed - the foundation. It should be taken into account that the chimney pipe, when passing through the attic floor, must pass at a distance of no less than 120-150 mm from the wooden beams. On wooden floors, the contours of the foundation are outlined by sawing out part of the boards. To accurately determine the place where the floor boards will be cut for the foundation, a plumb line is used, which is fixed to the ceiling, at the required distance from the floor beam. After the plumb line stops, a mark is made on the floor at one of the corners of the stove. Also, the remaining corner parts are marked with dots, and then the resulting plan is verified with a building level and a corner. Next, you should draw on the floor the shape of the future foundation (as already mentioned, it should be wider than the stove base). Based on the resulting markings, the floor boards will be cut out so as to reach the ground. A hole of the required dimensions is dug in the underground soil; the depth must be at least 50 centimeters from the surface of the earth. The foundation can be made of rubble stone or brick. If the base is built from rubble stone, then installation of formwork in the pit is not required. It is enough to lay the dirt-free stone in layers, each of which is filled with concrete mortar (each layer covers about 1/4-1/3 of the pit space)
It is very important to ensure that there are no unfilled voids between the masonry stones. Some advise laying sheets of roofing material around the perimeter of the pit, which will simultaneously serve as formwork and waterproofing. The masonry above the ground continues in the formwork, made in the form of a box, the boards of which must be tightly fitted to each other. To ensure that the solution dries evenly and the liquid is not absorbed into the wood of the formwork, it is recommended to cover it from the inside with thick polyethylene, which is secured with staples on the boards. The surface of the rubble-cement base is leveled for the next stage of work. The surface of the rubble-cement base is leveled for the next stage of work. Two rows of brickwork are installed on a flat and dry surface, and after the mortar has dried, two layers of roofing material are laid on it, which acts as waterproofing.
It is also quite possible to have the foundation slab completely poured into the formwork, with the installation of a steel reinforcing structure. True, the consumption of concrete solution in this case will be much higher. Then the order of creating the foundation will be as follows:
- Mark and make the foundation as described above
- The soil is thoroughly compacted, sand is poured in, moistened with water and compacted again to 10 cm.
- Sheets of roofing felt are placed around the perimeter of the pit, which is both formwork and waterproofing, and filled with concrete. As soon as the solution hardens, the formwork is removed.
- The sand-crushed stone mixture is compacted, and reinforcement made of wire or mesh is placed. All joints are tied together.
- The solution is poured into the pit, covering a third of the space.
- Then the second and third layers are poured. The second layer is done almost to the very top, leaving 50 mm needed to level the layer.
- Pour the top layer and level it with the rule.
- The base is left for three weeks, covered with polyethylene and moistened with plenty of water during this time. This method will make the concrete strong and durable.
- As soon as the formwork is removed, several layers of roofing material are laid as a barrier to the brickwork of the furnace from moisture from the soil or cold created by the underground.
How many bricks do you need for a stove for a private home?
Increasingly, the layout of private and country houses, cottages and other buildings includes a brick oven. But how many bricks do you need for a home stove, and how can you accurately calculate the consumption for a particular structure and the volume of material? It is necessary to calculate so that the quantity is enough to lay the stove, and there is a minimum of excess materials. Almost anyone can build a brick oven without much effort; work experience does not play a special role here. However, any builder will initially be concerned with the question of how many bricks are needed to lay the project.
Before building a brick kiln, it is necessary to accurately calculate the number of bricks for masonry.
Calculation of brick volume
In terms of laying a stove, they usually indicate the required number of bricks, and many professional stove makers know this. But there are options in which you can easily calculate how much material is needed for any stove for any home.
To build a stove, you should know how much material will be spent on its construction, taking into account the fact that the consumption will be not only for the project, but also for the chimney with the foundation.
The calculation sequence will be as follows: multiply the amount of brick laid out completely in the first row by the height (number of rows), and then subtract 1/3 from the result obtained. This way you can make an accurate calculation of the amount of material for the project.
To make a more accurate calculation, you can use numerical data. Here's an example:
- The base is 3x4 bricks, which means the continuous row will be 24.
- The height is taken as the distance from the floor to the ceiling. This can be 2 m 40 cm. But approximately 30 cm should be subtracted from this height, taking into account the cutting height. In this case, 2 m 10 cm will remain.
- Knowing that the height of one row is 7 cm, you need to use the following formula: divide 210 by 7. We get 30 rows.
- Now 1/3 is subtracted from this number. As a result, 20 rows will remain.
- This number of rows is then multiplied by the base of 24 pieces, resulting in a total of 480 pieces. But you also need to remember about cutting, for which you will need 50 pieces. Total - 530 pieces.
Any stove has a pipe. If in the project it is brick, then it also needs to be calculated. In 1 m of pipe there are normally 14 rows, and in 1 row - 6 pieces. This means that you need to multiply 6 by 14. The result is 84. Now this value should be multiplied by the height of the pipe in meters, and we will get the required volume of the required building material. For example, we multiply 4 m of pipe by 84. The result is 336 bricks.
The obtained values are, of course, conditional. There will still be an error, but these numbers will give you an idea of the total number of bricks and allow you to plan future costs. When the volume of material has been calculated, you need to select its type.
Type of material for the project
The outer layer of the project is usually made of ceramic bricks. This material is easy to process and has sufficient thermal conductivity.
When purchasing, carefully inspect its surface. High-quality stones of this type have no differences in color over the entire surface, there are no cracks or chips, and the geometry meets the standards.
The furnace firebox requires special refractory bricks that can withstand high temperatures and are highly durable. The latter property is both an advantage and at the same time a disadvantage, since it complicates its mechanical processing.
Refractory bricks are made in various forms. Moreover, it has no voids. This type of artificial stone can withstand temperatures of +1400… +1600 ºС. It differs from the usual type in its composition and characteristic metallic ringing when struck.
It is made from special refractory clay in industrial ovens at very high temperatures. This material has clear edges, which makes it possible to make precise geometric structures from it. But refractory bricks have a fairly high cost. Therefore, it is recommended to divide the building into external and internal decoration.
This allows you to significantly reduce project costs without compromising its safety and thermal conductivity.
Dutch "mini" and "maxi": diagrams, order and explanations
Even an experienced stove maker won’t tell you how many options there are for laying a Dutch oven. After all, this stove has many varieties in shape, size, it can be with a stove bench, stove, oven, and can also be enclosed in a metal case.
There are even Dutch ovens with water heating. In addition, craftsmen often independently make changes to existing schemes. But if you don’t have much experience in laying stove structures, we recommend that you find an order that completely suits you and strictly adhere to it . We also recommend carrying out preparatory work - this is an important stage in the construction of any stove.
We bring to your attention two popular masonry patterns with an order - “small Dutch” and “Dutch +”.
Order for a little Dutch woman
The Small Dutchwoman is ideal for a summer residence (the area of the heated room should not exceed 16-20 square meters). The size of this heating structure is only 520x520 cm. This compactness is achieved due to the fact that the smoke circulation seems to be curled into a ring. The height of the oven can be increased by repeating the group of rows from the 17th to the 22nd.
Brief explanations of the order...
The first 2 rows are solid. To lay them you will need 8 bricks. When laying the base of the furnace, be especially careful about the geometry: check the equality of the diagonals, angles, and correct ligation of the seams.
The 3rd row consists of only 5 bricks; the blower door is installed right there.
In the 5th row, the blower door is closed. Moreover, the building material is immediately trimmed a little so that the grate can be laid on it. Moreover, the niche for the grate should be approximately 5 mm larger than the grate itself.
A secret from an experienced stove maker! Fill the gap between the brick and the grate with asbestos cord, and lay corrugated cardboard on top to protect it from clogging with clay mortar. When you heat the stove for the first time, the cardboard will burn, but the asbestos cord will remain clean.
On the 6th row there is a door through which you will load firewood.
In the 8th, it is recommended to lay a 5 mm sheet of metal approximately 40 mm wide, and its length should exceed the dimensions of the firebox on each side by 3 cm.
In the 9th, a brick is laid on this metal sheet, which covers the fuel door.
From the 10th row , a smoke circulation is formed, that is, channels through which hot gases from the firebox pass. Strictly follow the given order so that your idea of folding a mini Dutchman with your own hands will be crowned with success.
In the 16th, lay two steel corners 50x50 mm, which will hold part of the masonry of the smoke circulation channels. The thickness of the steel should not be less than 3 mm.
The remaining rows are laid out quite simply. All you need to do is follow the order carefully. And only in the 29th row you will have to cut the bricks a little in order to mount the view-latch.
Order for a Dutch woman+
The three-turn Dutch oven+ is an oven of impressive size. It can easily heat a room of up to 50 square meters.
Brief explanations of the order...
The 1st row is carefully laid out on the prepared foundation and filled with mortar from above. There are 21 bricks at the base of the Dutch+.
The 2nd and 3rd rows are placed on the solution. Please note that if up to the 3rd row inclusive the bricks were laid flat, then they will then be laid on the edge until the end of the door trim in the 6th row inclusive.
On the 4th row, a stand should be equipped for the chimney partition.
IMPORTANT! To make the oven easier to clean, so-called “kick-out” bricks are laid along the back wall, that is, bricks that are laid without mortar. You can look for Dutch designs where a door is installed instead of “kick-out” bricks. But we do not recommend doing this, since the disadvantage of such structures is the rapid loss of heat.
At the same stage, the firebox door is installed, wrapped with non-combustible material, for example, asbestos. The door is fixed with steel wire in the masonry joint.
Subsequent rows follow the contour of the 4th.
The 7th row is interesting in that the bricks for it are laid out not only flat, but also on an edge along the back wall. Starting from the 8th row, the building material is again laid out flat.
The 8th row can cause difficulties, since beveled bricks need to be laid over the firebox.
In the 9th row, the brick moves slightly backward. Don't forget to place a non-flammable material on top of this row.
material. This is especially true for those who plan to install a heating and cooking stove model.
The 10th row is the beginning of the formation of the base for the chimney. If a brick chimney is too bulky and heavy for you, you can choose a metal pipe.
on the 11th row . Here the junction of the stove structure and the chimney pipe is formed. Please note that the Dutch masonry here is done in quarters.
Subsequent rows are performed in order. The process should not cause any difficulties.
When the masonry is completed, install the chimney and close the gap between the floor and the stove with a pre-furnace sheet so that sand does not spill out from under the Dutch oven. Special skirting boards are installed at the joints with the floor.
There are many ways to decorate a Dutch woman. For example, it can be tiled or painted. In some cases, such a stove design looks quite impressive without any unnecessary decor.
General recommendations for laying Dutch ovens
- Each brick must be dipped in water before laying. This will prevent the building material from absorbing moisture from the solution, worsening its properties.
- It is imperative to wrap the firebox door with asbestos cord. Otherwise, when heated, the masonry will expand and may burst.
- You cannot lay the firebox with ordinary bricks. Use only special heat-resistant building material for this. Refractory bricks must be used in masonry from the 3rd row.
- The thickness of the seams also matters. In the firebox they should be more than 3-5 mm. In other areas of the masonry - no more than 5-8 mm.
- If the stove is installed in the fall or winter, that is, during the cold season, it can be put into operation within a couple of days after the completion of the laying. But the structure can be fully used for heating only after 2 weeks.
The cross-sectional diagrams are quite convenient and will be understandable even to beginners in the stove business. But to dispel all your doubts that installing a Dutch oven yourself is not at all difficult, we recommend that you watch the video. This small master class will help you understand some points that were not reflected in the article.
No. 3. What should ceramic bricks be like for a stove?
Ceramic brick actually underlies the construction of the furnace and also serves for its cladding. It is not difficult to guess that the durability, safety and correct functioning of the stove depend on its quality and compliance with the requirements. For masonry, it is better to choose a brick with the following characteristics:
- The strength grade indicates what compressive load the material can withstand (kg/cm2). The market offers bricks from M75 to M300 and even higher grades. The denser the brick, the slower it cools, but at the same time, the slower it heats up, so here it is necessary to adhere to the golden mean. It is better to choose a brick of a grade no lower than M150 and no higher than M250, and for a two-story oven it is better to use M200-250. Bricks M100 and lower are not suitable, since they do not have sufficient strength and thermal properties, and bricks higher than M300 grade cannot be obtained from natural raw materials - additives are used for its production, which are justified in housing construction, but are harmful for stoves;
- frost resistance is indicated by the letter F and the number following it, indicating the number of freezing and thawing cycles that the brick can withstand. This parameter is especially important when installing a chimney that will constantly be exposed to temperature changes. It is better to choose a brick with frost resistance of at least F75;
- fullness. For masonry and lining of the furnace, only solid ceramic bricks are used (with the exception of the above-described case of arranging a pipe in cold regions);
- preparation method. Plastic molded ceramic bricks are suitable for laying and lining the furnace, which involves squeezing out a clay mass with a moisture content of about 20% through a die and further cutting the layer into modules of the required size. Semi-dry and dry-formed bricks are made from pre-dried clay, which makes it possible to obtain a product with the most accurate dimensions, but such bricks are inferior in strength to plastic bricks. You can recognize a dry and semi-dry brick by its even cut on all sides.
Ceramic bricks are divided into grades, and each of the three grades has the right to be used in the construction of a furnace, but only for certain work:
- the first grade is a brick with precise geometry, moderately fired, uniform bright color, gives a ringing metallic sound when tapped, edges do not crumble, cut marks do not have burrs, strength and pore size are sufficient. Such bricks are used for construction and lining of the furnace;
- the second grade is a slightly unburned brick with a lightish tint, when tapped it gives a clear but dull sound, can be used for cladding;
- the third grade is burnt brick, whose frost resistance and heat capacity do not meet the requirements for masonry and lining of the furnace, but the foundation for it can be made from such material.
Firestone
Fireclay bricks can be used to complete the entire masonry of the furnace.
But this is the lot of wealthy people, because this option will not be cheap. From the point of view of economic efficiency, it is better to construct the stove mass and chimney from refractory bricks. It is made from a mixture of red clay and quartz sand, which is then fired.
It is characterized by resistance to high temperatures (up to 1000 degrees). The heat capacity of refractory brick is also greater than that of ceramic brick, so the stove will remain warm longer. This brick can be found in two standard sizes: 250×120×65 mm and 250×85×65 mm.
This material can be used to line a steel chimney. Metal is resistant to strong chemical compounds, and brick complements it with greater heat capacity and reduces heat loss. Fire-resistant stones can have a red and brown tint.
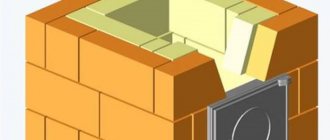
Rules for laying the furnace vaults of an outdoor stove
When laying furnace vaults, it is necessary to block the combustion openings, fireboxes, and chambers using simple and complex shaped lintels. The ceiling in a wall is called an arch or arched lintel, and the ceiling between the walls is called a vault.
To cover large spans, an arched ceiling is used.
Vaults can be steep, flat or gentle. The semicircular arch is equal to half a circle. A gentle vault is less steep. The three-center arch is even flatter, thanks to its design, heating occurs evenly over the entire surface
This is important when baking pies. The number of bricks in the arch and rows in the vault must be odd
The middle odd brick is called a castle brick. The bricks on which the lintel or arch rests are called heels. To give them the desired shape, such bricks have to be trimmed. The space covered by any jumper is called a span. The lifting height of a vault or arch is the lifting boom.
The construction of any lintel must begin with the laying of bricks on which it will rest. They should be hewn out according to a template. Since the height of the arch or vault can be different, the angle of the heel changes. You cannot use one heel shape for all arches and vaults.
The laying of the furnace firebox begins with the preparation of circles and foot templates; for this, on a sheet of paper, cardboard or plywood, it is necessary to draw a vault of the desired shape so that an odd number of rows of masonry can fit in it.
You can easily and quickly build a vault on two boards. An axis should be drawn in the middle of the narrow board so that it intersects the wide board. At a distance of 3-5 cm from the bottom edge of the wide board, you need to draw a straight line A-B, marking the width of the firebox on it. The axis should run in the middle of the firebox, between points B and D. On the axis from line A-B, the height of the arch lifting boom should be measured upward. The resulting point can be designated by the letter D. After this, you need to select the center O in such a way that the circle passing from it, forming the arch, runs through points B, D and the upper point of the arch lifting arrow.
The rules for laying a furnace recommend using formwork for the arch, which is laid on prepared circles.
After installing and securing the formwork, a nail should be driven into the central point O, from which the circle was drawn, and strong twine should be attached to it, which is necessary for checking the rows of the vault and marking the bricks to be laid. The brick for laying the vaults must be hewn, giving it a wedge-shaped shape.
In this case, the seams have the same thickness. When using regular brick, the seams will be thinner at the bottom and thicker at the top. They must be completely filled with solution.
The heels should be trimmed and laid very carefully, since filling large voids with mortar and crushed stone can lead to settlement of the vault or arch and their destruction.
The laying of the vault should begin from the edges, from both heels at the same time, moving towards the middle of the vault or towards the castle. The bricks need to be fitted tightly, so that they almost touch each other on the side of the firebox.
The last thing to be inserted into the row of masonry of a vault or arch is a castle brick, greased on both sides with clay mortar. It is advisable to strike only with a log or a mallet, since an ordinary hammer can split the brick.
Installation of stove cast iron and metal elements
All metal elements of the furnace, as is known, expand when heated, so thermal gaps must be formed around them, which are created using asbestos material. In some cases, asbestos cord is used, in others, strips of the required width and length are cut from a single sheet of this material. Thus, the door of the combustion chamber and the oven are wrapped with asbestos cord, and strips are laid under the hob.
The metal doors are secured to the masonry joints using wire twists. On the back wall of the metal door frame there are always special “ears” into which the wire is inserted, and then its ends are twisted together. The wire attached to the lower “ears” is embedded in the seams of the row on which the door is installed, and the upper twists are placed between the rows, one of which will be located flush with the top of the door frame, and the second above it. Before fastening in the seams, the door is aligned to the building level or using a plumb line.
The blower and cleaning door does not require wrapping with asbestos cord, since it does not heat up to very high temperatures. The gaps between them and the brick can be sealed with clay mortar.
If a metal strip is to be used to cover the fire door, then a gasket of asbestos strip must be made between it and the frame.
The smoke valve frame is also mounted on a clay mortar, but this work must be carried out carefully so that the solution does not fall into the grooves of the frame along which the valve must move.
Order
Before the floor is finished, 2 rows of bricks are made with the seams bandaged, and only then the laying of the first row begins.
The first row is counted from the finished floor mark. The two middle bricks are beveled towards the ash pit. The space between the wall of the ash pan and the rear wall of the furnace is filled with dry sand from the first to the third row inclusive.
In the second row, a blower door is inserted with a gap of 3–5 mm, filled with asbestos cord. The steel legs or wire of the door are embedded in the masonry.
The third row repeats the laying of the second, taking into account the dressing of the seams in 1/2 brick. Bandaging of shortened bricks is allowed less.
The fourth row involves partial covering of the ash pan. A 35x4 mm steel strip is laid under the brick to cover the ash pit. At the back of the oven, the sand is covered with a brick.
Fifth row. A grate is placed on the open part of the ash pan with gaps along the firebox and a gap of 5 mm, which is compacted with sand or ash. The bricks here are beveled according to the order.
In the sixth row, a furnace door is installed with a gap sealed with asbestos cord. The bricks of the back wall are chamfered.
From the seventh to the twelfth row, the firebox is laid with the seams bandaged according to the order.
From the thirteenth to the fifteenth row, the firebox is blocked and the rear smoke channel is laid out.
The sixteenth row involves the installation of cleaning.
From the seventeenth to the twentieth row, the laying of channels is underway.
The twenty-first and twenty-second rows combine two channels: lifting and lowering.
The twenty-third and twenty-fourth rows involve overlap of the middle and posterior canals.
A cleaning system is installed in the twenty-fifth and twenty-sixth rows.
From the twenty-seventh to the thirtieth row, the laying of channels is underway. A valve is installed in the twenty-eighth row.
On the thirty-first row, bricks are laid with releases for future reroofing.
In the thirty-second row, a ceiling is made and a valve is installed.
The thirty-third and thirty-fourth rows continue the laying of the roof and smoke duct.
How to build a simple brick oven with your own hands: examples with step-by-step diagrams
The comfort of a country house built far from gas supply networks is unthinkable without a stove.
In the cold season, it gives us pleasant warmth, relieving the air of dampness. The market today offers customers all kinds of designs of metal “stove stoves”. Despite this, many summer residents prefer the classic version - a heating stove made of brick. Its advantages are obvious: due to its large weight, it accumulates a lot of heat and releases it for a long time, warming the room well. The content of the article:
The service life of a brick structure significantly exceeds that of a metal one. Minimal costs for materials and simplicity of arrangement attract the attention of home craftsmen to a simple stove for a summer residence.
Our article will help you test yourself as a stove maker. In it we will look at several options for simple wood-burning stoves and give practical recommendations for their installation.
You will be convinced that there is nothing complicated in the drawings of these structures. Having learned to read “orders” - brick layout diagrams, you can build a full-fledged heat-generating device with your own hands.
How to build the simplest brick oven?
First you need to decide what you want to get from your future stove. If you only need to heat the rooms, and use bottled gas or electricity to cook food, then choose an option without a stove and oven. Anyone who loves soft healing warmth chooses the option with a bed.
For regular cooking of large quantities of food and pet food, a simple oven with a hob will be just right.
We will look at three examples of stoves with step-by-step guidance on how to lay them:
- Simple direct flow;
- With hob;
- Heating.
Let’s say right away that you cannot expect high heat transfer from a simple design devoid of gas circulation. For this reason, such stoves are installed in garages and other small rooms with an area of no more than 16 m2.
We will consider this option so that beginners get their first simple lesson in practical masonry.
Such a stove does not require a strong foundation. Having poured large crushed stone in a layer of 15-20 cm, filled it with cement mortar and leveled the surface, after a couple of days you can begin laying.
Stove dimensions in plan: width 2 bricks (51 cm), depth 2.5 bricks (64 cm). Since there is no blower chamber in it, holes for air intake are drilled directly in the combustion door.
The procedures for this design are simple. The main condition during work is to ensure that the seams are bandaged so that the top brick covers the seam between the two lower ones.
On the eighth row, the firebox is narrowed, using halves and “three-quarters” - ¾ of a whole brick. The exit from the firebox is thus obtained with a cross-section of 1 brick (125x250 mm).
The next row (ninth) is laid out in the same way as the seventh, using a whole brick.
After this, the brick tier is placed on the edge flush with the inner edge of the bottom row. The new tier is laid flat, using two whole bricks and four “three-quarter” bricks. In this way, the smoke channel is again narrowed in order to trap gases and increase heat transfer.
On the next tier, the stones are placed on edge. A brick is placed in the middle of the smoke channel. In this way, the oven is raised another five rows (one tier on an edge and a brick in the middle, the other tier flat).
The remaining four tiers are laid flat. With the last two rows of masonry, the smoke channel is narrowed to a size of 12x12 cm (half a brick). At this level, a smoke damper is placed in the furnace. A steel pipe is inserted into it from above.
Oven with hob
In the simplest version, this design has small dimensions (width 2 and depth 3 bricks - 78x53 cm). However, even in such a limited area it is possible to place a single-burner stove.
Work goes smoothly when you have everything you need at hand.
Therefore, purchase the following materials and accessories in advance:
- Solid red brick – 107 pcs;
- Blower door – 1 piece;
- Grate – 1 piece;
- Single-burner cast iron stove – 1 piece;
- Fire door – 1 piece;
- Pipe valve – 1 pc.
Fire bricks are not needed for a wood burning stove. Buying it is a waste of money. But red should be chosen carefully, discarding cracked and uneven ones.
Preparation of the solution
The masonry mixture is made by mixing four parts clay with one part water and adding eight parts sifted sand. The normal consistency is determined simply: the solution easily slides off the trowel, leaving no drips on it. When laying, it should not leak out of the seams.
The volume of the mortar is determined based on the amount of brick. With an optimal seam thickness (3-5 mm), one bucket is enough for 50 pieces.
Having prepared the masonry mixture, you can begin laying the foundation. Its width is made 10 cm larger than the width of the oven. The height of the foundation is selected so that the bottom of the first row of bricks is at floor level.
If the underground is deep enough (50-60 cm), then there is no need to dig a hole for the foundation. It is enough to make formwork on the ground with a plan size of 76 x (51 + 10 cm). Two layers of roofing felt are placed on its bottom to protect it from moisture. Having laid the concrete, it is given a week to gain strength, after which they begin laying.
The dimensions of the stove with hob we are considering are 3 x 1.5 bricks (76x39 cm).
Expert advice: lay out each new tier of brick without mortar (dry). After adjusting the bricks to size, you can begin laying.
The first row is placed on a layer of clay mortar (4-5 mm). Having leveled the base, lay out the second one, leaving space for the blower door.
Before installing the door, you need to screw a soft wire to it and put its ends into the seams for better fixation.
To compensate for the thermal expansion of the metal, a gap is left between the door and the brick. Before installation, its frame is wrapped with wet asbestos cord.
The third row is laid by overlapping the seams of the second. At this level, a grate is installed in the firebox.
The fourth row is placed on the edge, observing the ligation of the seams, and the walls of the combustion chamber are formed. Behind it will be the first and only smoke circulation (see section A-A in diagram No. 2). To clean its bottom, a so-called knockout brick is placed in the rear wall without mortar, which is periodically removed to remove ash. Inside the chimney, two stands are made from pieces of brick to support the internal partition.
The stones of the fifth row are placed flat, leaving space for the firebox door. In the back of the stove, in order, we see the walls of two smoke channels. During work, their surface must be thoroughly cleaned with a wet cloth to remove any clay protruding from the seams. This is an important condition for ensuring good traction.
Helpful advice! When focusing on the order drawings, do not forget to look at the two sections of the stove. They will help you better imagine its design and not make mistakes when laying out the bricks.
Having raised the masonry up to the eighth row, they close the furnace door, placing wire in the seams to secure its frame. At the same level, in the back of the fuel chamber, a brick with a beveled end is placed - a smoke tooth. It improves heat output by preventing flue gases from quickly escaping into the chimney.
Having completed the ninth row, an asbestos cord is laid along it on a clay mortar. It is necessary for sealing the joints of a cast iron slab and brick. On the tenth row, the firebox is covered with a hob.
On the eleventh, a smoke valve is installed in the pipe. It is also compacted along the contour with an asbestos cord soaked in clay.
Rows 12 and 13 - formation of the pipe walls. After they are completed, a lightweight sheet metal pipe is placed on the stove, leading to the roof.
Heating stove
Now let’s see how to build a brick stove with your own hands, designed to heat a small country house.
Its dimensions:
- width – 2 bricks (51 cm);
- depth - 3.5 bricks (90 cm);
- height – 2 meters 38 cm.
For construction you will need the following materials and accessories:
- Red solid brick – 390 pcs;
- Clay - 9 buckets;
- Sand - 18 buckets;
- Grate (25x40 cm) – 1 piece;
- Fire door (20x30 cm) – 1 piece;
- Blower door (14x20 cm) – 1 piece;
- Cleaning door (14x20 cm) – 1 piece;
- Gate valve - 1 piece;
- Pre-furnace steel sheet (50x70 cm) – 1 piece;
- Roofing felt for waterproofing (100x60 cm) – 1 pc.
Worker or stove?
The easiest way, of course, is to buy a special stove brick. But, firstly, not everything is so simple. Kiln brick is, in general, the same ceramic made from selected raw materials, except for heat-resistant for the combustion part, see below. Many manufacturers, taking advantage of the demand, add additives to the brand of brick, but they “forget” that the stove must breathe, fortunately, there are no standard methods for determining the frequency and depth of its breathing.
Secondly, which directly follows from the first – price. Special stove bricks are most often sold individually, depending on the brand and manufacturer - 16-60 rubles/piece. Sometimes - in pallets of 320-360 pieces, from 12,000 rubles. per pallet. Or by weight, somewhere from 14,000 rubles/t; There are also about 300 bricks in a ton. Used ones from a disassembled stove can be found for 8-12 rubles/piece. But for a more or less decent stove you need 1,500 ordinary and 200-400 refractory bricks, which are 1.3-3 times more expensive.
Therefore, we will proceed from the fact that the most ordinary ceramic brick will be used for the furnace: a working one for the main structure and a facing one for the cladding. The methods for rejecting it are the same as for the stove; Quality can be determined in advance in most cases without visiting the warehouse, from photographs of samples. Of course, you need to shell out your hard-earned money only after inspecting the lot.
As for the discrepancy between the module (basic size) of ceramic and refractory bricks, this is a thing of the past. Current refractories are manufactured in different modules, and it is easier to determine their quality by external inspection than working bricks.