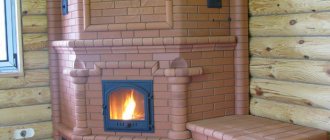
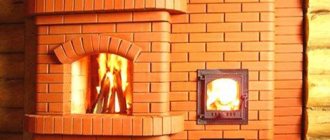
Despite the opportunity to equip a home with a heating system with a modern boiler using any type of fuel, building owners still use the services of stove makers. After all, masters are capable of creating real masterpieces. One of them is the Russian stove. Let's consider the features of such a heating structure. Read and learn its main structural elements, standard dimensional options, and ordering features.
Russian style stove Source twimg.com
Features of a Russian-style stove
A Russian-style stove has a different arch, firebox and smoke exhaust duct design compared to most fireplaces and the well-known heating structures under the general name “Dutch”. Some homeowners choose modern options. Many of them have a simpler design. After all, most Russian-style stoves are structures of impressive size. Some craftsmen even call them “a house within a house.”
However, adherents of the modern style consider such stoves to be archaic designs. Moreover, they do not justify the large investments required to build them. Fans of modern technologies believe that it is better to spend money on building, for example, in different rooms or even buildings, a separate “Dutch” and a fireplace.
The construction of a classic Russian-style stove is more expensive than the construction of a “Dutch stove” Source oboiman.ru
All people have their own opinions. However, the traditional Russian stove in the house has a number of advantages:
- Large surface area that gives off heat. Therefore, the heat flow has a low density. Because of this, the stove emits soft, even therapeutic heat, which does not dry out the air, unlike an electric heater or fireplace.
- The presence of a warm surface on which you can rest comfortably even at low temperatures in the room, provided that the Russian stove with a stove bench is built in compliance with masonry technology. It is recommended to build a heating structure with a place for rest, even if you do not plan to use it for its intended purpose.
- The ability to minimize the likelihood of deformation of the furnace foundation due to the loss of part of the heat that dries the soil. Therefore, the soil will heave less.
On a note! Many homeowners do not use a Russian-style stove as a building for heating rooms. They are designed to prepare various dishes that are superior in taste to food cooked on a gas or electric stove.
Very tasty dishes are prepared in a Russian stove design Source eco-kotly.ru
A moderately heated Russian-style stove remains in this state for several days. This allows the homeowner to leave his home for a couple of days and return to a still warm building. He will not have to quickly melt down the structure in order to create comfortable conditions in the premises.
A full-fledged Russian-style stove is suitable for houses where people live permanently. For a country house, the ideal option would be a small Russian stove with a fireplace. In some cases, a mixed heating system is suitable for such a building.
The Russian stove design warms up and fully begins to fulfill its purpose approximately 8 or even 10 hours after lighting. If this feature does not suit the homeowner, then it is possible to build a heating structure whose wall thickness will be less than that of a similar standard structure.
A Russian stove can warm up for up to 10 hours Source remstroybk.ru
There are variants of the Russian stove design, in which a combustion chamber with a gas burner is created. However, cracks appear more often in the fireboxes of such structures. The roof may even collapse in them.
Passing a brick pipe through the ceiling - cutting (fluffing)
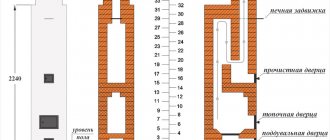
Video: Ordinal masonry of two variations of the Russian stove
Drying the lined stove
After completing the masonry process, the stove cannot be heated at full capacity immediately, since in this case it will dry unevenly and unsightly stains will appear on the surface of the walls. In addition, the mortar at the seams may crack, and the walls will depressurize.
To prevent this from happening, the oven must undergo a natural drying process for 10 ÷ 12 days. In this case, all latches and doors must be opened. In order to create favorable conditions for drying the furnace structure, in this case, an ordinary electric light bulb of 200 ÷ 250 W can be placed in the cooking chamber for the entire drying time.
After completing the first stage of drying, you can move on to forced measures - start heating the stove with a small amount of firewood, with the smoke valves open, but with the fireboxes closed.
The stove is heated for 7 ÷ 10 days according to a special system: in the first two days only 3 ÷ 4.5 kg of firewood is used for heating, every day adding 1 ÷ 1.5 kg of fuel to the initial amount, and so on throughout the entire forced period. drying.
You can check the readiness of the furnace for full operation as follows. If, after starting the next fire, no drops of condensate appear on the metal elements within 1.5 ÷ 2 hours, then you can safely carry out a full-fledged control fire using a lot of firewood.
If, after a long drying period and carrying out a control fire, minor cracks still appear in the seams between the rows of masonry, do not rush to repair them. They need to be monitored during the heating season. During this time, they will either stop in one position or expand a little more. Only after the end of the heating season can repairs be carried out, repairing all the defects that have appeared.
Safety precautions when starting to use the stove
Having a Russian stove in your home is simply wonderful, as it has always been considered a source of warmth and special comfort. However, you need to remember about safety measures, since if they are not followed, the oven can become a source of increased danger.
Before the start of each heating season, it is necessary to carry out a thorough inspection of all masonry joints - they must be airtight and not have deep cracks. Seal the cracks that appear with a solution of clay with the addition of sand.
If, after starting the fire, smoke appears in the room, it means that there is no normal draft, and such a faulty stove should not be heated under any circumstances. You need to immediately check whether all the valves on the chimney are open. If the chimney is completely open, but smoke continues to flow into the room, it means that the chimney ducts need to be cleaned.
The chimney must be checked and cleaned at least once a year. However, if the stove is new and high-quality fuel is used, then the chimney, in fact, should not be bothered for several years. If smoke occurs in this case, there is a risk that the masonry was done incorrectly somewhere, and you will have to invite a specialist to fix the problems.
If you follow safety rules and have a good ventilation system in your home, the stove will not be a source of danger, but will become a faithful assistant that will help out in many cases. In addition to the fact that this structure has a very wide functionality, a Russian stove will also create a unique, original flavor and special comfort in the house.
And at the end of the article - another video showing in detail the work of a specialist in the professional laying of a traditional Russian stove.
Russian style stove design
They put different models of stoves. However, any of the options is a heating and cooking structure. In addition, such a brick structure is equipped with an oven. Most of the options are also equipped with a bed of various sizes.
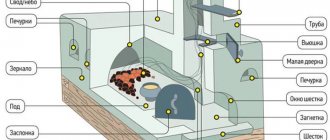
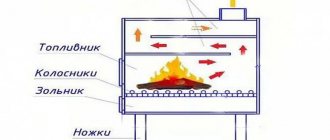
The laying of a Russian stove involves the construction of the following individual parts:
- A furnace, which is a firebox or cooking chamber. This compartment is used to store fuel, which is usually firewood. In the same chamber, dishes with products for heat treatment are installed.
- An oven that is used for placing and drying firewood. This part is not included in every model, because this department is not very functional.
The oven is often used to place firewood Source barbeku-stroy.ru
- A pole, which is a niche that is located in front of the crucible. In this part, a hob is most often created if the stove design implies its presence. In the absence of a stove, the hearth is used as a space where dishes previously cooked in the crucible are placed. This allows you to keep food hot longer.
- A cold stove, which is also not available on every model. However, this design element is typical specifically for a Russian-style stove. This department is used to store various utensils.
- The roof of the furnace, which is created with a slope towards the front part of the stove. Heated air accumulates under this structure. As a result, there is good heating of the stove walls and the stove bench, if it is located in the upper part of the structure.
- The hearth, which is the bottom of the crucible or chamber intended for cooking. The laying of this element is also carried out with a slope towards the front part of the stove. This feature of the hearth makes it easier to move dishes. To make it easier to move, this element is carefully polished during the construction of the entire structure.
Lined with a stove under the bottom of the cooking chamber Source mangal-besedka.ru
- Over-tube, made in the form of a niche located above the pole. A chimney is mounted above this part.
- Dushnik with outlet to the smoke exhaust duct. A Russian stove, the design of which includes this element, allows you to connect an old samovar that has a pipe for removing smoke. It is inserted directly into the choke. Although now stoves with it are usually not created.
- Thermal brick channel, the construction of which is carried out above the pole.
- A bed, usually located above the furnace and behind the main smoke exhaust duct. This allows this part of the structure to always warm up well.
On a note! In the old days, a couch was always used as a bed in winter. It was specially created in a large size so that several people could sit in this place at once.
- Views, which are a window, which is additionally equipped with a small door. Behind it there is a damper. It allows you to completely block the chimney. The damper can also be used to regulate the draft. This element is moved horizontally. More often, factory-made valves are installed instead of dampers.
A cross-section of one of the Russian-style stove design options Source pinimg.com
Modern brick heating structures are more functional structures than the ancient versions. Many homes have a Russian stove with a hob. Even structures with a water heating tank are being built.
On a note! Modern models are created with the possibility of heating the section under the firebox. This feature allows the entire structure to warm up much faster. Due to this, a comfortable temperature is created in the rooms in a short period of time.
Modern versions of Russian-style stove designs may have different departments. This allows you to use only the part with the hob in summer. After all, in hot weather there is no need to heat the room, but only need to cook food. This type of stove design allows you to maintain a comfortable microclimate in the building and at the same time save firewood.
Stove with hob Source mainavi.ru
For winter, a Russian-style stove is an ideal heating structure. It can be a multifunctional design. After all, it often houses an oven, a hob, a fireplace, a container for heating water, and a bed at the same time. In this case, the structure itself will heat the premises of the house.
See also: Catalog of companies that specialize in the design and installation of fireplaces and stoves
Basic requirements for combined models
There are often concerns about the safety requirements for combined fireplaces and stoves. All points, including the correct choice of location, are considered relevant.
It is necessary to plan the installation of a fireplace stove as early as possible. It's not just that you'll have to dismantle the floor to build the foundation. Just the presence of such a massive unit in a room cannot but affect its layout. Therefore, assume in advance that there are no wooden walls or flammable materials nearby. If it is not possible to exclude a dangerous neighborhood, then the entire coating should be provided with fire-resistant insulation.
Proper start-up of a new furnace is considered the key to its reliability. Fulfill all requirements for drying a newly built structure. Other issues related to the safety and compliance of the product are provided for in the finished designs of fireplace stoves.
Russian style stove dimensions
Before constructing a furnace structure, the site for the construction of a heating structure is always first selected. A Russian-style stove can be located in the corner of the room or along one of its walls. The dimensions of the heating structure depend on the size of the room. These parameters are also affected by the reliability of the foundation.
Nowadays, they often begin to build a stove in an already built house. This is not quite the right option. After all, it is more convenient to thoroughly think through the heating structure at the design stage of a residential building. However, even in this case, craftsmen will always build an effective stove. It can have the following design:
- Mini Russian stove, the width and length of which are 1240 mm and 1780 mm, respectively. This option is suitable for construction in a country house, under a canopy or even in a summer kitchen.
Miniature Russian stove design Source blogspot.com
- A medium-sized heating structure, also called a home stove. Its dimensions are 2130*1470 mm. This option is suitable for heating a house up to 40 m².
- Full-size heating structure with dimensions 3250*2250 mm. Such a stove is capable of heating a large one-and-a-half-story residential building.
On a note! The dimensions indicated above are unusual even for some stove makers. However, experienced specialists know well that previously the length was measured in arshins. Therefore, if you use not millimeters, but the ancient system of measures, then it turns out that a Russian home stove, the dimensions of which are now 2130 * 1470 mm, previously had dimensions of 3 * 2 arshins.
The above dimensions of a Russian-style stove are only recommended dimensions. When constructing such a heating structure, it is more important to maintain proportions when laying the vault, hearth, furnace and chimney. In the latter case, you need to lay out a channel of a suitable cross-section to ensure effective traction.
One of the stove size options Source ps.494444.ru
Difficulties during construction
Even at the project development level, think through all the necessary valves: for draft, for the exit of combustion products, for saving heat.
They must be installed during construction and function well during operation. Otherwise, negative phenomena are possible:
- release of combustion products into the room;
- rapid heat removal and furnace cooling;
- uneconomical use of fuel, etc.
If your house is wooden and the firebox is located close to the walls, it is necessary to protect the room from fire. To do this, create gaps between the walls and the stove with fireproof materials. It is better to make an additional free gap of 2-3 cm.
If during operation you notice excess soot on the walls and a decrease in thermal conductivity, the problem lies in the finishing of the furnace and furnace. During construction and finishing work, it is not recommended to lubricate the walls with clay from the inside.
Features of the furnace masonry
When laying a large and small Russian stove, the shrinkage of the seams between the bricks must be taken into account. Usually, experienced stove makers check its value before starting the main work. To do this, prepare a solution and lay out a column, for example, of 7 bricks.
Important! Typically the layer thickness is from 5 to 6 mm. In this case, the permissible value of its shrinkage is 2 mm.
The process of laying any stove is reminiscent of assembling a construction set. The work is simplified if the master uses one of the proven schemes. Regardless of the chosen option, the laying begins first without mortar. This allows you to accurately trim the bricks in the required places, align the rows, and adjust the bandaging of the corners.
The stove is not always completely laid out to dry first. It all depends on its size and ease of work. Craftsmen can first lay out several rows of bricks without mortar. Then adjust them. Only after this they will repeat the entire process, but using the solution. Any large or small Russian stove with a stove can be laid out using this principle.
The bricks are first laid out without mortar, then adjusted, then mounted on the mixture Source oboiman.ru
Important! The furnace is laid using refractory mortar. To prepare it, refractory clay and sand are used, and fireclay powder is also added. The proportion of components is 1:3. The heat-resistant mixture is used during the installation of the interpipe, combustion chamber, ash pit and chimney.
For laying bricks in other places of the structure, use a solution consisting of 1/4 part of fine-grained washed sand and one full portion of fatty clay. When facing bricks are installed, a special decorative mixture is used for this purpose.
On a note! Modern stove makers often use ready-made solutions in their work. They are distinguished by plasticity and heat resistance.
For brickwork, only blocks without defects are used. The tightness of the seams is ensured by a high-quality prepared solution. Professionals never coat the inside of the stove walls with it, since more soot accumulates on the mixture and its layer reduces the thermal conductivity of the structure.
Bricks without defects are always selected for the kiln Source iz-kirpicha.su
On a note! Depending on the furnace compartment, masonry can be carried out in one brick. This size corresponds to the length of the block. The process can also be done in half a brick. This is its width. The third option is a quarter brick, which corresponds to the thickness of the block.
Many experts soak the bricks before use. This allows them and the solution to dry evenly. After all, they will not absorb water from the mixture. Therefore, adhesion between the two materials will increase and it will be possible to build more airtight walls.
On a note! The protruding mortar from the seams is removed immediately from all sides of the bricks so that the masonry is as neat as possible.
External walls are usually one or half brick thick, while internal walls are exclusively half brick thick. If you lay out the structures thicker, then a large or mini Russian stove with a stove will take longer to melt and warm up with significant fuel consumption.
Trial fire
It is normal to light the stove for the first time, it is possible when the masonry is dry. It is necessary to perform the following sequence of actions:
- For 2 weeks, the stove is heated with small amounts of fuel, made from thin logs and wood chips. It is not advisable to completely cool the oven. The quality of heating is checked by placing crumpled newspapers in the cleaning channels. A small fire will not set the paper on fire, but how damp it becomes will indicate the quality of drying;
- The final one is also done gradually, you need to heat it several times a day, gradually increase the power of the flame, increasing the amount of firewood.
The frequency of cleaning the channels depends on the fuel used, generally this should be done 1-2 times a year. To clean smoke ducts, experienced stove makers recommend heating a Swedish stove with a fireplace with dry aspen wood once every 2 weeks. It is best to clean the pipe from soot manually, or using a homemade electric soot brush.
Step-by-step laying of the furnace
After all the preparatory activities have been carried out, the laying process itself begins. It must be performed exclusively by a master. Only he will be able to build an effective structure for many decades.
Professionally built oven Source kladkapechei86.ru
So, a Russian stove with a stove is laid out, the order of which is worked out at the initial stage, in the following sequence:
- 1st row of masonry.
It is created on a layer of waterproofing. The correct direction of the entire masonry depends on its implementation. Therefore, before installation begins, the boundaries of the furnace structure are marked. The laying of a continuous row is carried out strictly according to the horizon level. First, the outer wall of the structure is laid out. Then all the remaining bricks are installed inside the resulting rectangle.
The first continuous furnace row Source masternachasspb.ru
On a note! Many craftsmen first lay three-quarter blocks in the corners of the so-called base. They are pre-cut with a wedge. This option allows you to build the strongest corners of the heating structure. In addition, this method is used to prevent the structure from hanging.
However, the choice of method for laying corner bricks depends on the dimensions of the stove structure. Three-quarter blocks, trimmed with a wedge, are used when the dimensions of a Russian stove with or without a stove bench exceed 1000 * 1200 mm.
For smaller dimensions in the corners, bricks are mounted in the usual way, resting against each other with uncut ends. Some stove makers additionally reinforce any of the options with wire. With its help, adjacent bricks are tied in the corners, usually from rows 1 to 6.
Conversion instructions
Converting a stove into a fireplace is not required so often; usually such work is planned when there is already a stove in the house, but it is used extremely rarely.
Without spending a lot of time and money, you can use such a stove to make a beautiful and stylish fireplace that will not only warm the house, but will also become a real decoration for any interior. Stoves are not that difficult to convert into a decorative structure. Often such stoves are located in kitchens, in central rooms; they do not take up much space, but their appearance is not always aesthetically pleasing. Therefore, you can safely take on the renovation and use the fireplace as an additional source for heating the room.
To convert the stove into a comfortable and beautiful fireplace, you need to prepare the following tools and materials:
- kiln and fire-resistant brick, its volume depends on how much the furnace will have to be rebuilt;
- building level;
- Bulgarian;
- cement;
- clay masonry mortar;
- finished chimney pipe (if the old one has to be completely removed);
- Master OK;
- putty knife;
- tiles for facing;
- glass door for fireplace.
Before you start converting the stove into a fireplace, you need to take into account that the fireplace is heated differently. Only special wood briquettes or dry firewood are suitable. Therefore, it is recommended to immediately ensure that there is always a certain supply of fuel.
You should prepare all the specified materials and tools, and draw up an individual drawing of the future fireplace. Its appearance depends on the original stove. You should definitely inspect the stove, find out how well the body is made, and what condition the foundation is in. If everything is in perfect order, then there is no need to disassemble an already standing structure; the work is carried out on the material that is available. There should be a gap of 25 cm between the general foundation of the floor of the house and the base for the stove; it is completely covered with sand.
The depth of the firebox must be 50 cm, and the body inside the stove must be lined with refractory bricks.
If all the conditions meet the required ones, then you need to move on to inspecting the chimney pipe, since it may have to be rebuilt. For fireplaces, the requirements for chimneys differ from those for stoves; the height should be from 7 m, the cross-section should be at least 13 * 25 cm. It is necessary to have special channels that inside the structure will control the air flow along the doors. This will prevent soot from constantly settling on the door glass. A version of the converted stove design can be seen in the figure. IMAGE 1.
No matter how strange it may sound, quite often the question arises of how to convert a stove into a fireplace. There are several alarming facts that require additional clarification. Where did the stove come from in the 21st century? Why does it need to be remade? Is this possible, since the stove and fireplace are different devices?
Home
Video description
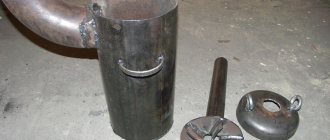
This video will help you understand the process of installing oven doors:
- 10th row of masonry.
The bottom of the furnace is formed from bricks. The arches of the small and large combustion chambers are also combined. In this case, the openings of the smoke exhaust ducts, which are located in the rear part of the heating structure, are not filled. They are discharged into the cooking chamber. In addition, at this stage the space for the water tank is also blocked.
- 11th row of masonry.
The corner of the metal prepared earlier is secured. It is installed on the edge of the masonry. Its installation is carried out immediately above two combustion chambers. A metal corner is needed to securely place the hob.
When laying the same row, a grate is installed with a large firebox. Moreover, its final fixation is carried out only at subsequent stages.
- 12th row of masonry.
The formation of the side walls of the cooking chamber begins. In this case, a valve is mounted to the left of the plate. It is installed in a horizontal plane. This is a damper that will be used to block the outflow of hot air from the furnace into the smoke exhaust duct. On the same row, the laying of the chimney begins, located to the left of the vertical valve.
Start of laying the 12th row Source builders58.rf
- 13th row of masonry.
Construction of the side walls of the brewhouse and other parts of the furnace structure continues, including the laying of the outer contour of the structure.
- 14th row of masonry.
An inlet hole into the chimney is formed. Its opening will be carried out by sliding a vertically located valve. The walls of the crucible are also exposed. In addition, the hole for the valve is designed.
- 15th row of masonry.
At this stage, the Russian brick stove narrows inside. Using blocks, the brewing compartment begins to be covered. In addition, the formation of a pipe to remove combustion products continues.
- 16th row of masonry.
The left and right outer side walls of the stove are held together with metal strips. The bricks themselves on this row are laid in exactly the same way as at stage 15.
- 17th row of masonry.
A strip of metal is mounted on the back wall and the arch above the cooking compartment continues to narrow, as well as the chimney is laid out. In addition, a metal corner is fixed above the opening of the hob. A steel strip is also installed nearby. Bricks will be removed from these two elements, from which the ceiling above the slab will be formed.
Metal corners of different sizes for the stove Source stpulscen.ru
What problems may this device have?
Fireplace stoves have several disadvantages. Namely:
- Uneven heating of rooms. Warm air accumulates at the top, and the bottom is poorly heated.
- It is necessary to periodically “feed” fuel so that the heat is retained for a long time.
- During long periods of inactivity, dust accumulates. And when heated, it burns and gives off an unpleasant odor.
- Some models are too expensive.
The fireplace stove is an amazing and multifunctional device that will decorate and fill any home with warmth. But when choosing, it is important to take into account the size of the room so that it does not interfere with the passage and evenly heats the entire volume. The chimney must be insulated, otherwise fumes and soot will enter the room.
Features of the arrangement of a small stove
A small stove in the Russian style is built in different designs. Each of its options has been tested in practice. Such models are built by adherents of Russian traditions. However, small structures are not used to fully heat rooms. They are mainly used for cooking.
One of the options for a miniature stove in the Russian style is a design with an enlarged furnace and an expanded entrance. This allows for accelerated drying of various vegetables and fruits. You can even prepare baked dairy products here.
A mini Russian stove, the ordering of which always begins with laying the first continuous row, is created on a reliable foundation, which, of course, is smaller in size than the classic version. Usually the concrete base is a monolithically poured slab.
At the next stage, the walls of the underfloor area are erected. They are needed for the construction of an arched vault and an opening of the same shape. Wooden templates are used during installation. Next, just as in the classic version, the space between the walls and the arched vault is filled with sand.
After installation, the stove vault is filled with sand Source builders58.rf
In principle, all further work is similar to the processes when constructing a large stove in the Russian style. During the construction of the miniature version, the walls, hearth and cross-pipe are also laid out. In this case, an expanded mouth is created in front of the opening of the compartment where baking is usually done.
The mini version of the stove is distinguished by the absence of complex smoke exhaust channels. Therefore, the construction of such a structure is usually carried out in a maximum of 4 days. If the ordering scheme becomes more complex, installation may take two weeks.
A la russe
The “a la russe” style involves the use of traditional authentic elements of Russian life. Once upon a time, classics were written about stoves with such decor. Shelves were placed near the whitewashed hearth.
Wood is an absolute favorite. The main decorative elements are samovars, brooms and spinning wheels, animal skins (not exotic) and towels with embroidered ornaments. It is not at all necessary to decorate the stove with drawings. A perfect white background is enough.
Briefly about the main thing
A classic Russian-style stove is a popular option for a heating structure with a large heating surface and equipped with a stove bench. Its design also includes a crucible, a hearth, an oven, a sub-pipe, an over-pipe, smoke exhaust channels, and a view.
A Russian-style stove can be miniature or medium in size. Large heating structures with a hob, fireplace, and oven are also being built. To build an effective stove, masters carry out masonry according to proven schemes. The stove structure with the hob is often adjusted. Miniature heated structures are also popular. This is a simplified version of the classic Russian-style stove.
Brick selection
It is important to choose the right material that is not afraid of extreme heat. For this purpose fireclay SHA15 is used.
It is not necessary to make the entire structure out of it; 150-300 pieces are enough for the hottest part of the structure.
For the remaining elements, other materials are suitable:
- most of the base, bench, mouth and over-pipe can be made of red brick (grade M250);
- Solid iron ore brick is suitable for the base, but it must first be sorted;
- For walls and the front part, ordinary stone is excellent.
To build a large oven you will need approximately 2.5 thousand pieces of stone and 1.4 tons of masonry clay. The cost of a small structure is almost half that.
Home heating options
The choice of heating method depends on the layout of the building - side or bottom. The first option is the best solution for houses with several rooms, since the adjacent room is heated using a side heating panel. The second method is used to supply heat to one room, but having a larger area.
The walls of the sub-floor space are heated from below. Currently, in order to increase efficiency, designs are equipped with a bell-type combustion, which makes it possible to ensure uniform heating and stable draft. In such units, fuel burns completely and less soot accumulates in them.