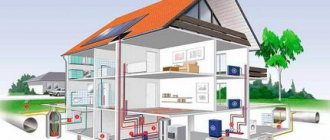
To grow vegetables all year round, the greenhouse requires artificial heating. After all, sun, warmth and water are the most important three factors, without which it is impossible to grow even berries. By using heating in a greenhouse, a gardener can easily extend seasonal work by more than three months, and grow seedlings as early as the end of February. So in a year you can harvest three harvests of one crop. But which heating is better to choose? What are the pros and cons of each type? The modern construction market offers many types of heaters for greenhouses, the three most promising of which are: cable, infrared film and infrared ceiling. Why these? Read on.
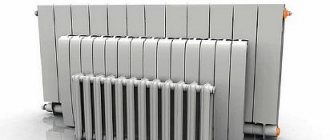
- 2 Cable soil heater
- 3 Ceiling and wall infrared heaters
Types of gas heaters
According to the degree of attachment to specific places in the greenhouse, gas heating devices are divided into stationary and mobile (portable).
Did you know? In addition to their intended purpose, IR emitters can effectively combat harmful microorganisms, of which there are a lot in greenhouses.
Stationary
Stationary gas devices installed at a permanent and specific place in the greenhouse can be attached:
- on the ceiling;
- on the wall;
- at the baseboard;
- in limbo.
Portable
Mobile types of gas heaters are able to change location inside the greenhouse depending on current needs. For this purpose, they are equipped with wheels or special legs.
What to look for when purchasing?
This paragraph will discuss what you should pay special attention to when choosing heating equipment for a particular crop. The first thing you should start considering is, of course, the dimensions of the model. The heater must be well attached and fit in greenhouses of different sizes.
The second is power and its adjustment. The last parameter is very important when several types of crops are grown in one area. Since there are several types, each has its own temperature regime. Moreover, each season has its own temperature required for a good harvest.
The last thing I want to say at this point is that the device must be new, otherwise a used sample may disappoint with its short-lived performance.
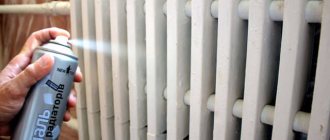
Heating a greenhouse with gas heaters: pros and cons
- During the operation of gas infrared units, many of their positive qualities were recorded:
- they heat primarily the soil rather than the air;
- do not create strong forced air flows, which makes it difficult to move dust and pathogens;
- low noise operation;
- infrared radiation spreads at an angle of 120°, which allows heating a large area;
- quick heating of the greenhouse and long-term heat retention;
- economical fuel consumption;
- long-term continuous operation;
- compactness;
- ease of installation;
- versatility of use;
- absence of moving parts in the design, which facilitates maintenance of the units.
- The disadvantages include:
- high cost of heaters;
- the opportunity to purchase a fake that is not durable;
- the need to carefully calculate the number of necessary devices for a specific greenhouse space.
Did you know? Why do IR heaters heat surfaces without heating the air? In the infrared wavelength range there are peculiar “windows” in which these waves are minimally absorbed. In one of these “windows” there is air, which is almost transparent to infrared waves.
Classification
Infrared heating devices differ in the sources of energy released, types of heating elements, installation methods and some other characteristics.
You will be interested in learning how to heat a greenhouse using wood.
Source of released energy
Today there are 3 sources of thermal energy released by heaters, according to which devices are divided into:
- electrical;
- gas;
- diesel
Heating element type
Heating elements in gas infrared heaters are:
- metal in the form of meshes, heated to high temperatures;
- ceramic in the form of tiles, which have great strength and the ability to quickly heat up to a high temperature and quickly cool down;
- metal in the form of tubes, giving a lower temperature.
We advise you to find out how to remove condensation in a greenhouse.
According to the type of heating elements, gas infrared heaters are divided into:
- light, which, causing a visible glow, heat metal mesh or ceramic tiles to temperatures above +600°C;
- dark, heating metal tubes to temperatures below +600°C.
Form
Light heaters, as a rule, have a round or rectangular shape and are not equipped with a smoke exhauster. Dark versions of these devices have an elongated shape and are equipped with a smoke exhauster that drives combustion products through a tubular heating element.
Find out how to make automatic watering in a greenhouse with your own hands.
Installation method
As mentioned above, depending on the installation method inside the greenhouse, heating devices are divided into mobile and stationary. Since gas heaters are tied to a gas supply, they are usually made stationary and mounted on the ceiling, walls, baseboards, or suspended from the ceiling.
Typically, baseboard heaters are mounted under windows, which allows them not only to perform the functions of a heating device in a greenhouse, but also to eliminate the entry of cold air from outside into the room. Suspension devices are fixed under the ceiling using special brackets and anchor bolts. Together with ceiling devices, they are most preferable for fully heating the soil in a greenhouse.
Heating temperature
Gas heaters heat up to temperatures from +400°C to over +1000°C . The required temperature directly depends on the area and height of the greenhouse. At the same time, in infrared sources, the heat flow mainly (over 60%), unlike a convector, is formed from electromagnetic radiation produced by heating elements heated from gas combustion.
We recommend reading how to make a ventilation system in a polycarbonate greenhouse.
Emission range
Wien's law explains the dependence of the heating temperature of the irradiated surface on the wavelength of electromagnetic radiation. The higher the temperature, the shorter the electromagnetic waves. In this regard, the radiation range is divided into:
- long wave;
- medium wave;
- shortwave.
Thus, short-wave radiation is used for large industrial greenhouses.
Important! The profitability of gas heaters is due to the lower price of gas compared to electricity. A 50-liter gas cylinder can provide fuel for heaters throughout the winter months.
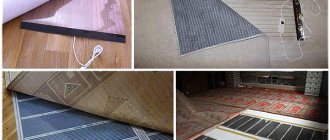
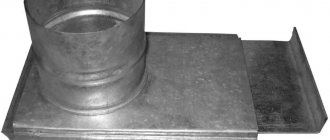
Do-it-yourself installation of a heating cable in a greenhouse
Greenhouses can be of various configurations and designs: with vertical/sloping walls, arched, single-slope, gable, with a mansard roof, round, rectangular, dome. Cable heating can be implemented in a greenhouse of any shape and area.
Before starting installation, you must draw a cable layout plan to scale and mark the location of the thermostat.
Soil removal: the top layer of soil is removed to a depth of 40-50 cm. This is the most labor-intensive part of the installation process. The recess is necessary, since laying the heating requires the formation of several layers of sand reinforced with a mesh.
Installation of the frame: optimal at this stage for a greenhouse made of lightweight structures. Recessing the frame into the base of the greenhouse will provide additional stability and wind resistance.
A layer of sand 10 cm: then sides are installed from a heat-insulating, moisture-resistant material, and sand is poured, which in turn will be a heat-accumulating layer and will allow heat to be evenly distributed in the base.
Compaction: the layer must be spilled and compacted to prevent displacement of the sand layers when laying the cable and subsequent installation of the upper layers of the cake.
It is not recommended to install thermal insulation of the soil in a greenhouse, since when deepened by 40-50 cm, the soil cools from the outside, while the insulation usually consists of waterproof materials, which can lead to moisture accumulation in the area where the heating cable runs. Also, obstruction of water drainage does not exclude rotting of plant roots. You can install insulated edges to prevent heat loss beyond the perimeter of the greenhouse.
For the same reason, we do not recommend installing waterproofing, since moisture does not harm the heating cable located in the sand bed, and waterproofing interferes with the natural moisture exchange of the system.
Laying the mesh: a reinforcing plastic mesh is necessary to fix the heating cable. The mesh is laid directly in the places where the cable will be laid. The mesh also prevents the sand pad layers from shifting.
Cable laying: the heating cable is laid in a “snake” pattern according to the diagram drawn up in advance. For fastening, you can use plastic clamps or perforated mounting tape such as TP.
Laying step calculation:
After selecting the appropriate kit, it is necessary to calculate the pitch of the heat cable with which the section will be mounted on the area. We apply the following formula:
Laying area / section length * 100 = laying pitch in cm.
The laying pitch is the distance between turns that must be observed to ensure uniform distribution of the coolant (cable) in the sand layer. The area, accordingly, is taken as useful (heated).
Why is it necessary to shed sand?
When wet, the sand is compacted and deaerated, preventing the formation of air bubbles around the heating tape, which increases the thermal conductivity and storage properties of the layer. In fact, spilled sand is close in its properties to cement screed.
Laying reinforced mesh: fine mesh (25x25mm) serves to protect the cable from mechanical damage when cultivating the soil and keeps the soil from moving.
Adding soil: a layer of soil is poured over the mesh into which plants can be planted.
How to choose infrared heaters for greenhouses?
The choice of the optimal heating device for a particular greenhouse is determined by many factors:
- room area, which, if more than 20 m², requires the use of a stationary option, and if the area is smaller, a mobile one;
- the power of the unit, oriented to the volume of the room;
- the efficiency of the device, which determines its efficiency;
- cost of energy sources;
- type of radiation;
- operational safety;
- ease of installation.
Features of installation and placement
When installing heating devices in a greenhouse, in addition to strictly following the included instructions, the following factors must be taken into account:
- The infrared heater should be installed at least 1 m from the ground surface.
- Since the distance from the device to the plant must be the same, during installation it is necessary to take into account the possibility of changing the position of the device as the plant grows.
- It is recommended to place infrared heating units closer to the walls and ceiling around the perimeter of the room.
- The distance between adjacent low-power devices should be at least 1.5 m.
- In large greenhouses, the best option is to arrange the devices in a checkerboard pattern.
Tips for use
The experience gained by gardeners and gardeners during the operation of IR heaters in greenhouses allows us to draw certain conclusions regarding their use:
- with proper operation of such a heating source for greenhouse plantings, the germination rate of seedlings increases by 40%;
- with the help of infrared rays it is possible to maintain optimal humidity and a favorable microclimate in the greenhouse at elevated temperatures, since IR radiation does not dry out the air;
- with the help of the correct location of IR equipment, it becomes possible to warm the soil to a depth of 7 cm, which cannot be achieved with other types of heaters;
- With the help of these devices, it is possible to warm the soil up to +28°C so that the air temperature in the greenhouse does not exceed +21°C.
Important! For small greenhouses, it is advisable to use long-wave gas infrared equipment.
An efficient and gentle microclimate in the greenhouse, the infrared gas heater is distinguished by the availability of the fuel used and ease of maintenance. When designing a heating system for greenhouses, more and more gardeners are giving preference to this particular device.
Storing vegetables
Humidifiers and dehumidifiers for vegetable storage
Maintaining optimal humidity and temperature conditions is necessary, among other things, to ensure long-term storage of vegetables without losing their presentation and consumer properties.
Vegetable and fruit storage facilities need a good ventilation system, specific temperature and air humidity. The conditions depend on the type of vegetables/fruits; dehumidifiers and air humidifiers (for example, so that the fruits do not dry out - if the warehouse is located in a warm, dry climate, do not rot - if the vegetable storage is located in a humid environment). Below is a table with temperature/humidity requirements and shelf life for vegetables and fruits.
NTP APK 1.10.12.001-02 Standards for technological design of enterprises for the storage and processing of potatoes and fruits and vegetables
Design temperature, humidity and gas conditions
| Products | Temperature in the product mass, °C | Relative humidity, % | Estimated shelf life, days. |
| 1 | 2 | 3 | 4 |
| Potato: | |||
| - food, | +3 | 90-95 | 270 |
| - seed | +3 | 90-95 | 240 |
| Root vegetables (carrots, beets, radishes, rutabaga, turnips) | |||
| food | 0 | 90-95 | 270 |
| Queen cells | 240 | ||
| White cabbage | |||
| food | 0 | 90-95 | 270 |
| Uterine | 0 | 90-95 | 210 |
| Food onion | 0 | 70-80 | 270 |
| Mother onion | +3 | 60-80 | 240 |
| Onion sets, onion selections | |||
| warm storage method | +18 | 50-70 | 240 |
| cold storage method | 0 | 70-80 | 240 |
| warm-cold storage method | +18 | 50-70 | 120 |
| 0 | 70-80 | 90 | |
| Food garlic | 0 | 70-80 | 210 |
| Seed (spring) | +18 | 60-70 | 195 |
| +2 | 60-70 | 45 | |
| Pomaceae: | |||
| Apples | |||
| early varieties | 0 | 85-95 | 60-120 |
| late varieties | 0 | 85-95 | 150-240 |
| Pears | |||
| early varieties | 0 | 85-95 | 30-60 |
| late varieties | 0 | 85-95 | 90-120 |
| Grape | 0 | 90-95 | 90-120 |
| Stone fruits: | |||
| Cherry | 0 | 90-95 | 10-25 |
| Apricots, peaches | 0 | 90-95 | 15-30 |
| Plum | 0 | 90-95 | 30 |
| Berries: | |||
| strawberries, raspberries | 0 | 85-90 | 5 |
| currants, gooseberries | 0 | 85-95 | 15 |
| Relative humidity, % | Estimated shelf life, days. | |||||
| CO2 | O2 | N 2 | ||||
| 1 | 2 | 3 | 4 | 5 | 6 | 7 |
| Pome fruits: | ||||||
| - apples | 1 | 1-5 | 3 | 92-96 | 95-98 | 180-270 |
| - pears | 1 | 2-3 | 3 | 94-95 | 95-98 | 120-180 |
| Stone fruits: | ||||||
| - cherry | 1 | 3 | 3 | 94 | 95-98 | 50-60 |
| - cherries | 1 | 3 | 3 | 94 | 95-98 | 50-60 |
| - plum | 1 | 3 | 3 | 94 | 95-98 | 50-90 |
| - peaches | 0 | 2-3 | 3 | 94-95 | 95-98 | 30-45 |
| Grape | 0 | 3 | 3 | 94 | 90-95 | 120-210 |
| White cabbage | 1 | 1-5 | 3 | 92-96 | 95-98 | 210-240 |
| Carrot | 1 | 3 | 3 | 94 | 90-95 | 150-210 |
| Beetroot | 0 | 1-5 | 3 | 92-96 | 90-95 | 150-180 |
| Onion | 0 | 1-5 | 2-3 | 92-97 | 95 | 210-240 |
| Garlic | 0 | 3-5 | 3 | 92-94 | 85 | 180-240 |
| Tomatoes | 12-15 | 0-1 | 3-4 | 95-96 | 95 | 45-60 |