The stove is a traditional means of heating rooms and entire structures. It is created from different materials, but the most popular are standard three-turn designs. They provide uniform heating of the rooms, and are also quite easy to form with your own hands. An important principle of competent masonry is strict adherence to the basic rules and requirements for this work. To do this, a special scheme is initially created, which must be followed during the construction process.
Types of stoves
The oven can be:
- heating, intended exclusively for heating premises;
- cooker, which is used for cooking;
- combined, providing both heating of rooms and the ability to carry out the process of cooking dishes on it.
Since the process of forming the structure with your own hands is carried out, you can independently decide what type the future stove will belong to.
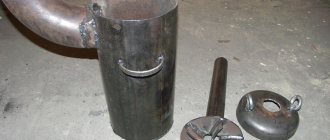
Long burn function
Such long-burning corner stoves are distinguished by the fact that the raw materials loaded inside will not burn, but will slowly smolder, due to which a minimum of ash remains and much less firewood is needed.
The advantages include the following characteristics.
- Heat transfer occurs within 6 hours.
- If you combine the design with water heating, you can heat the house in winter much faster.
- Extensive selection. Stoves are made on the basis of: cast iron, brick, a combination of cast iron and brick. Let's assume an independent production option.
- Simple configuration. The heating device consists of: a blower, a combustion chamber, two smoke channels, one of which must have a plug.
- Suitable fuels include: firewood, coal, pellet briquettes.
Advantages of use
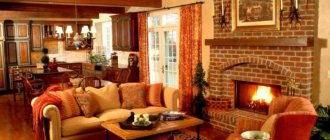
The best choice is a heating and cooking stove. It has the following advantages :
- the structure can be used not only for heating, but also for cooking;
- since the unit takes up little space, it ensures efficient use of the available space;
- the masonry scheme is not too complicated compared to the process of creating a standard heating stove;
- It’s not difficult to organize such a stove with your own hands;
- You can choose various finishing materials that will allow you to get a beautiful and bright structure that fits perfectly into the existing interior.
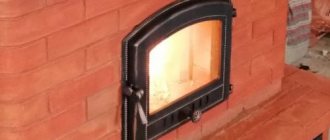
Country stove 4x3.5 bricks costing 11 thousand rubles.
Greetings to the readers of our site, the summer baking season of 2013 has ended, I have free time, I will start posting detailed videos and photo reports of the built stoves and outdoor complexes. I'll start with the simplest stove for a summer house, made of 420 bricks.
This stove, despite its simplicity of execution and small amount of materials, in my opinion, is optimal for a small cottage of 2 rooms with a total area of up to 30 m2. It has a summer and winter operation, a small firebox lined with refractory bricks on the edge, a large two-burner stove 70x40 cm. The heat capacity of the stove with a double firebox is about 3.5 kW per hour. The front part of the stove with the stove is located in a small room in the kitchen, and the main rear part with the heating panel opens into the common room (hall) of the dacha, evenly distributing heat. Thanks to a competent system of passes and a long system of vertical smoke circulations, the oven heats up evenly from the bottom to the outer row. To make it possible to cook food on the stove for 3 or more hours in a row without a large consumption of firewood and burning out the bricks, I made the firebox of the stove quite small; the width of the firebox is about 20 cm, the depth is about 40, the lining of the stove with fireclay bricks protects the stove from burnout.
Principle of operation
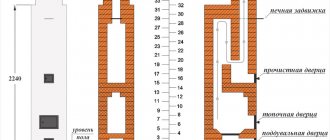
Before the actual construction process, it is necessary to carefully and in detail study the entire operating principle of this equipment. In this case, it will be possible to avoid numerous problems during the implementation of the main stages of masonry formation. The following elements of the furnace can be distinguished:
- The firebox is the central place of the entire structure. Firewood is placed in it, and this is where it is burned. For the high efficiency of this process, it is important to ensure the supply of oxygen to the firebox, which supports combustion, and combustion products must be effectively and efficiently removed.
- The blower door ensures that the required amount of air is supplied to the firebox.
- The ash pan is a special container into which ash from burnt fuel is collected.
- The stone filling is designed to allow combustion products to rise up along it, which then enter the combustion chamber through a special hole.
- A chimney is needed to remove combustion products to the outside, namely to the street, and it can be discharged through the roof or walls of the building.
- A secondary combustion chamber that increases the efficiency of the design.
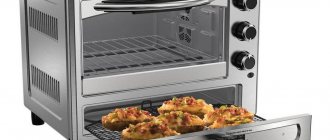
Kitchen stove with oven
The kitchen stove with oven has dimensions, mm: 1290x640x560 (without foundation, i.e. without two rows of brickwork on the floor). To lay a kitchen stove with oven, the following materials are required:
- red brick - 140 pcs.;
- red clay - 60 kg;
- sand - 50 kg;
- grate - 26x25 cm;
- fire door - 25×21 cm;
- blower door - 14×25 cm;
- cleaning doors 130×140 mm - 2 pcs.;
- cast iron stove made of five composite plates measuring 53x18 cm with two burners;
- smoke valve - 130×130 mm;
- oven - 45x31x28 cm;
- slab binding (angle 30x30x4 mm) - 4 m;
- pre-furnace sheet made of roofing steel - 500×700 mm;
- roofing steel sheet under the slab - 1290×640 mm;
- construction felt - 1.2 kg;
- metal box for collecting ash in the ash chamber - 350x230x100 mm.
One stove maker can put this stove together within 3-4 hours; in addition, it takes about 2 hours to carry the material and prepare the clay-sand solution. The heat transfer of the stove during double cooking is about 0.8 kW (770 kcal/h). The figure below shows a general view, longitudinal and cross sections of a kitchen stove with an oven. Below are the order drawings for each row. Laying a kitchen stove with an oven is also not difficult and is similar to laying a simple kitchen stove, but here you have to install an oven and cleaning doors.
Kitchen stove with oven: a - general view; b - sections A-A, B-B (vertical sections), B-C, D-G (horizontal sections). Designations: 1 - ash chamber; 2 — grate; 3 - firebox; 4 - cast iron plate; 5 - oven; 6 - smoke valve; 7 - combustion door; 8 — blower door; 9 - cleaning holes.
When laying slabs on an independent foundation, before starting work, level its top with a layer of clay-sand mortar.
When installing a slab on the floor, before starting to lay the first row, it is necessary to carry out the same work as when laying a simple kitchen stove.
The masonry of the first row is made from selected whole bricks, while strictly adhering to the rules of bandaging the seams. The length of the kitchen stove should correspond to the length of five bricks, the width to the length of 2.5 bricks. Using a cord, check the equality of the diagonals.
Laying the first row of a kitchen stove with an oven
The second row is laid out strictly following the order. Here an ash chamber measuring 380×250 mm is left, a blower door is installed and secured, and cleaning holes are left on the back wall (the width of the holes should be equal to the width of the brick, i.e. 12 cm). If possible, cleanout doors measuring 130×140 mm are installed. At the cleanout hole at the farthest from the ash chamber, a brick is laid on its edge, as shown in the masonry order. To better secure the oven, place half a brick on its edge in the middle of the installation site.
Laying the second row of the slab
The third row is similar to the previous one, but you must follow the rule of ligating the seams.
Laying the third row of the slab
The fourth row covers the blower and cleanout doors. After finishing the laying of the fourth row, an oven is installed on a thin layer of clay-sand mortar at a pre-marked place. After this, a grate is installed. With the same brick installed on the edge, the chimney into the chimney is blocked.
Laying the fourth row of the stove with oven
During the laying of the fifth row , the combustion door is installed and secured; the brick is cut off before installation behind the grate so that the fuel gradually rolls onto the grate during the combustion process.
Laying the fifth row of the slab
The sixth row is similar to the fifth.
Laying the sixth row of the slab
The seventh row is laid out in order. The resulting chimney channel from the front side is laid with three bricks, as a result of which the internal size of the resulting channel under the chimney will be 130 × 130 mm. In the image of this row near the oven, a steam pipe with a diameter of 10 mm and a length of 160 mm is visible, which connects the oven to the ascending duct. This pipe is designed to remove steam and odor.
Laying the seventh row of the stove with oven. The arrows indicate the direction of movement of hot flue gases in the heating furnace.
The eighth row is performed strictly horizontally in level. This row covers the oven and the fire door. The upper wall of the oven is coated with a layer of clay mortar up to 10-15 mm thick, which will protect the oven from rapid burning.
Laying the eighth row of a brick oven (before installing a cast iron stove)
In this case, it is necessary that the distance between the top of the clay coating and the cast iron plate is at least 70 mm. After this, a cast iron slab and lining made of angle steel are installed on a thin layer of clay-sand mortar.
Eighth row of brick oven (after installing the cast iron stove)
After laying the ninth row, only the laying of the vertical channel remains. The ninth row is placed according to the image below.
Ninth row of the oven
After laying the tenth row, a smoke damper is installed.
Tenth row of the oven
The masonry of the eleventh row begins the chimney. Further laying of the pipe does not present any difficulties.
The final row of the furnace (the masonry of the chimney is not taken into account)
A kitchen stove and oven works like this. From the firebox, flue gases are directed under the cast-iron stove, from where they, heating the oven from behind on both sides, fall under the oven and are directed to the hole under the chimney. Rising through a vertical channel, they enter the chimney through a smoke valve and are released into the atmosphere.
Making a brick kiln
Since the structure is usually created from brick, you need to know exactly how this process is performed. To do this, not only a diagram is formed, but also an order is made, which indicates the correct sequence of use of each brick in the structure. The process of creating a furnace can be divided into the following stages:
Masonry structure
To do this, it is important to use drawings and other documents created in advance with your own hands.
The masonry process begins with the creation of the first row, and usually no mortar is used for it. It is important to consider the correct seam, which corresponds to the data contained in the order.
It is necessary to correctly determine the location of the corner bricks, which are laid only with mortar.
It is important to constantly use a level so that all bricks are laid perfectly even and correctly .
If there are protruding elements, you can settle them with your own hands using a mallet. When the first row of masonry has been created, and the accuracy of the work done has been checked, the middle of the created row must be lubricated with masonry mortar . Next, the corner bricks of the second row are laid, and after that the perimeter is laid. As soon as two rows are laid out, you need to carefully check their evenness. The laying of subsequent rows is carried out in the same way, for which it is important to constantly refer to the existing order and diagrams. The seam in the stove masonry must be very thin, since the strength of the masonry depends on this . You also need to observe the correct ligation of bricks. For the firebox, the best solution is considered to be fireclay bricks, which are quite easy to work with your own hands.
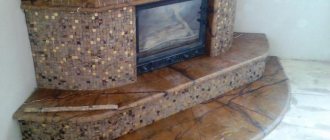
Corner fireplace made of brick and soapstone. Pogi.
The fireplace was built in 2015, and finishing work was carried out in the fall of 2016.
Our work on any product begins with a project - we draw on a diagram the main components of the fireplace in relation to the room.
We draw a sketch of the future fireplace in various options: the top is soapstone, the bottom is plaster.
. or face brick.
Since the chimney is already installed in the corner of the room, it is necessary to provide access to the inspection door for inspection and cleaning.
There is a wood burner at the bottom of the fireplace.
The installation of the Schiedel UNI chimney was carried out without our participation. The customer also purchased a NORDFLAM fireplace insert in advance.
The connection point between the fireplace insert and the chimney has an angle of 45 degrees.
There were some violations - the required gap between the chimney and the adjacent wooden structures was not maintained - this was corrected by our craftsmen.
The final appearance of the fireplace after the first stage of construction.
Facing made of plain brick can easily do without finishing - the fireplace was used in this form for more than a year and the customers were quite satisfied.
In the end, it was decided to bring the plan to its logical conclusion.
This is what our fireplace looked like after the finishing was completed.
The lower part of the fireplace is finished with Dufa Modellierputz plaster.
The finished fireplace harmoniously fits into the interior of the room.
The work was done by Sergei Nazarov.
Video: corner fireplace in soapstone and brick. Our approach to work.
Recommendations for work
In order for the stove to be reliable, durable and meet all the rules and safety requirements, during its formation with your own hands you need to follow certain tips, conditions and recommendations. It is advisable to watch a special training video in advance, which explains the various nuances and features of this work.
The basic rules include:
- It is important to strictly follow the pre-created order. No mistakes are allowed during the formation of a brick structure, because if there are any defects or deviations, then to eliminate them you will have to completely disassemble the entire created structure.
- The first row of the stove itself should be laid out with constant use of a level or other measuring equipment. All diagonals must be equal and clear. The verticality of the corners can be checked using a plumb line.
- All seams in the structure must have the same thickness, not exceeding 5 mm.
- Each subsequent row should be created only by laying out the bricks dry.
- be achieved by constantly settling the bricks with a trowel . In this case, excess mortar will come out of the seams, which must be promptly removed with your own hands so that it does not have time to harden.