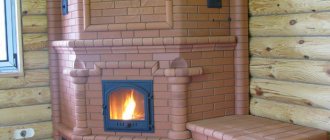
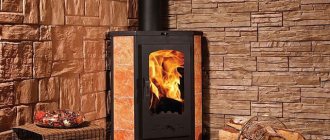
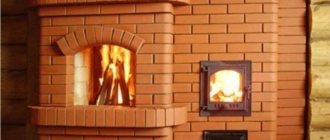
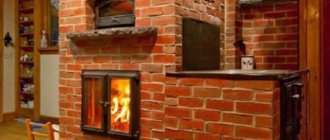
08/03/2017 19570 Stove maker (Moscow) The corner brick fireplace stove has a number of distinctive features and is universal. Such a heating unit can be installed both in a fairly spacious two-story house and in a small country house.
A corner stove, a fireplace made of brick, with fairly small dimensions and average weight, does not take up much space and at the same time can act as the main source of heating.
In this article you can get acquainted with the simplest arrangement, learn more about its design features and view the rating of the best purchased corner metal hearths. Selected photos will help you with visual familiarization.
Stocking up on materials
If you have chosen the type of stove (“mini” or “maxi”), a firm decision has been made to build a Dutch oven - it’s time to stock up on materials and select tools.
The following materials are required
- standard size refractory kiln bricks;
- clay;
- crushed stone;
- sand;
- water;
- roofing felt;
- thin steel wire.
In addition, you should take care of the facing materials. The furnace heats up to a very high temperature; accordingly, a number of requirements are imposed on the facing materials:
- high strength and heat resistance
- resistance to mechanical stress
- low porosity structure
- thickness from 6 mm.
The volume of materials used in construction is taken structurally. In this case, it is necessary to calculate how many bricks are needed to build a Dutch oven.
During construction you will need the following tools:
- level;
- Master OK;
- roulette;
- container for building materials;
- shovel.
In addition, you will need stove dampers that regulate the draft and burning rate of fuel, and a combustion door.
Let's move on to calculating the number of bricks required to build a Dutch oven.
Small nuances
By listening to the advice of experts, you can avoid some mistakes that can subsequently negatively affect the masonry.
What experienced professionals recommend:
- Firstly, carefully approach the calculation of the required number of bricks (it is better to make a small supply).
- Secondly, when building the foundation, also provide a place for firewood (if there is one in the project).
- Thirdly, you need to check each row with a level and plumb line. Necessarily.
- Fourthly, the numbers of the rows should be marked with a pencil on the adjacent wall, this will help to avoid confusion in the order of laying the rows.
- Fifthly, a sheet of roofing steel is laid on the floor at the base of the firebox.
Brickwork of the stove base
stove base masonry
At the end of all calculations, exactly twenty rows are obtained and now this figure must be multiplied by twenty-four (the result is four hundred and eighty). Also, we must not forget that an additional fifty bricks will be needed, which will then additionally need to be added to the general cutting.
During laying, we also must not forget that the required number of bricks to build a chimney must be calculated separately. And a novice builder will wonder how many bricks are in a linear meter. In order to build one linear meter of a standard pipe, you will need fourteen rows of bricks (each row has approximately six bricks). It follows from this that there are approximately eighty-four bricks in one linear meter.
A similar formula for calculating building material is distinguished by its simplicity and convenience.
But, it is important to remember that such a formula is conditional and you can easily make mistakes when making calculations (so double-check the resulting numbers several times)
You can also read about the features of stove construction here.
Preparatory stage of work
The first thing you will need to do is obtain permission from the relevant authorities to build a stove on the outside of the house and carefully consider how the chimney will be placed on the roof of the building.
Parameters of corner brick kiln.
Once the location has been decided, you need to prepare the necessary tools. Particular attention should be paid to the brick from which the corner stove will be built. The best option would be red brick; for installation you should choose only smooth bricks without visible chips and efflorescence. It would be a good idea to check the brick for strength before laying it. If, when you hit a brick, you hear a clear ringing sound, then the stove brick is good, but if there is a dull sound, then the brick has probably been insufficiently processed. Experienced masons, before building furnaces, place bricks in water so that all the air is removed from their cavity. Bricks are pulled out of the water only after bubbles stop coming out of them.
Prepare in advance:
- level;
- bushhammer;
- solution container;
- Bulgarian
How to calculate the number of bricks
The amount of this material depends on the size of the Dutch oven. If there is a ready-made project, then, as a rule, the amount of building materials is indicated. Experienced furnace specialists also know how much material is required for a furnace of a given size. But if you plan to lay a Dutch oven with your own hands, there is a universal formula for counting the number of bricks. It should be noted that the quantity calculated here is also imprecise, conditional.
You should calculate the number of bricks required to lay out the bottom row, provided that they are laid solid. Then calculate how many rows you plan to lay out in height, taking into account that the height of one row is approximately 7 cm. Multiply these two numbers and subtract 1/3 from the result.
//www.youtube.com/watch?v=apKtactWkqo
Let's say the base of the stove measures 3 by 4 bricks. It turns out that there will be 24 pieces in the first continuous row. Then you need to calculate the height of the future furnace. If the height of the house inside from floor to ceiling is 2 m 40 cm, the cutting height must be subtracted from this number - approximately 30 cm. The result will be 2 m 10 cm. Taking into account the row height of 7 cm, the result will be 30 rows in height. Then you should subtract a third of this number. 30 divided by 3 equals 10. Subtract 10 from 30 to get 20 rows. Then you need to multiply 20 by 24. You get 480 pieces. It will take about 50 pieces to cut, in the end it turns out that for such a stove you will need 530 bricks.
The amount of material per pipe is calculated separately. 1 linear m of pipe contains approximately 14 rows. For example, one row of pipe consists of 6 bricks, 6 multiplied by 14, you get 84. This number of bricks contains 1 m of pipe. Let the length of the pipe be 4 m, then 84 is multiplied by 4, you get 336. The result is that you will need 336 pieces per pipe.
The formula is quite simple. Of course, the amount of material calculated is not exact. But at the same time, you can already estimate how many bricks will need to be purchased and how much it will cost.
The Dutch oven has a simple design, is light weight and fits perfectly into a small room. It does not require large financial costs. For your dacha, you can build a rocket stove out of brick.
//www.youtube.com/watch?v=I4up-2P_lkc
It heats up quickly and can heat a room a few hours after it is lit. However, this design also has disadvantages. Its efficiency is about 40%, so it is difficult to heat houses where people constantly live. If you don’t close the view after heating, the stove will quickly cool down; it has a small heat capacity, so it has to be fired up often. These properties make the Dutch oven the most suitable, economical option for heating a summer house, garden house and other premises where people do not live permanently.
Fuel compartment and portal
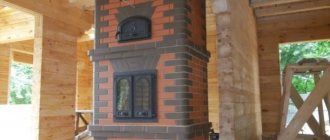
Corner fireplaces, photos of which you can find in this article, consist of two integral elements - a portal and a firebox.
The firebox must be made of fireproof, heat-resistant materials, since it is in this compartment that the wood is burned and the highest heating temperature is generated. Since the heating will be quite strong, red brick is not suitable for masonry; it must be replaced with fireclay. The thickness of the seams between the bricks will be 3-4 millimeters. Such seams are also called warm seams.
For safety reasons and to improve heating efficiency. The combustion chamber can be laid out as thick as two bricks. The inner layer is made of fireclay bricks, and the outer layer is made of simple bricks. Thus, the warm seam prevents the structure from collapsing, and the second layer ensures safe use and protects you from burns on the surface.
The fireplace portal, in turn, performs a decorative function. That is why its appearance and cladding must be thought out before construction begins. To do this, a detailed drawing is created on which all the structural elements of the portal and their dimensions are calculated and indicated.
To give the portal stability, at the stage of masonry and construction, a steel ceiling is laid in its lower part. However, it should not interfere with the passage of smoke masses into the chimney.
Other tips
The living room with the kitchen can be combined and decorated with various shortcomings
It is important to calculate and anticipate everything in advance. Decorators and craftsmen share tips that will help avoid problems during repairs and furnishings:
The result depends on how detailed the project is drawn up. Oddly enough, it is worth taking into account the growth of loved ones and relatives. It is also recommended to calculate the approximate number of possible guests. You can get rid of food smells by installing a strong hood or ventilation system.
Small models are more suitable for housewives who do little cooking. If you plan to have a sleeping place in the living room, then it is important that the ringing of appliances and other kitchen utensils is not heard. Silent dishwashers and other appliances will come in handy.
In addition, you can install a sliding door and install a soundproof partition. If there is sensitivity to ultraviolet radiation, the owners hang thick curtains made of light-proof fabric. If household appliances do not match the direction of the interior, they are hidden behind furniture or put away in kitchen cabinets. When installing luminaires and lamps, they are guided by several criteria
It is important that the light falls evenly throughout the entire space. Especially bright lighting is preferable in the kitchen area and where the dining table is installed
In the living room, designers create a subdued atmosphere using wall sconces and table lamps. Multi-level stretch ceilings with LED strip also look good in this room. Moisture-resistant finishing materials are more durable and easy to clean. Thus, they retain their appearance for a long time. The kitchen combined with the living room combines:
- personal tastes of the owners;
- reliable finishing materials;
- current design ideas;
- convenience;
- trends. The best photos of kitchen living room design
Choosing a location for the fireplace in the room
According to the recommendations of professionals, a corner fireplace should be placed against a load-bearing wall opposite the door and somewhat away from the windows. This placement is ideal for effective heating.
The choice of installation location and installation method for a corner fireplace depends entirely on the availability of free space. The interior also plays an important role.
Furnace foundation
Since brick stoves have a large mass, for their correct and safe placement in the house, it is necessary to create a separate foundation. In order to build the foundation yourself, we suggest using the following instructions:
- The foundation should be wider than the fireplace by 80 centimeters or more on all sides. Next, a hole is dug (0.5-0.7 meters) and simple sand is poured onto the bottom, the layer of which is 9-15 centimeters, after which compaction is carried out;
- Next, crushed stone is poured in a layer of 9-13 centimeters, and the reinforcing mesh is laid;
- The walls are sealed and insulated with asbestos sheets;
- The outer part of the foundation is equipped with formwork. For this, one sheet of metal is used, the thickness of which is several millimeters. In this case, bricks act as supports;
- Afterwards, a solution is prepared in a ratio of three to one in the ratio of cement to sand. The layer of solution can vary from 10 to 15 centimeters;
- After the solution has dried, a second layer is applied and after partial drying, the foundation must be covered with polyethylene;
- It usually takes 10 to 20 days for the structure to harden. After which the surface is additionally covered with several sheets of roofing material or any other insulation.
Tips for preparing materials
In order for the subsequently erected structure to have high strength, safety and properly perform its function, we recommend not skipping this additional stage of preparing building materials:
If the renovation and construction of the house has already been completely completed, pay special attention to the location of the installation. During work and construction, you should not be hampered by various beams, ceilings and partitions; Before starting installation and assembly, you need to remove all furniture from the room, since otherwise a large amount of dust, dirt and construction debris will settle on it;
- The brick is pre-soaked in running water for several days, and the construction of the furnace can begin only after several weeks after the construction of the foundation;
- Before using mortar to connect bricks, we recommend dry laying and joining each row one by one. Brick numbering is allowed.
Advantages of fireplaces in the house
Unlike traditional buildings, corner structures have their advantages.
These include:
- Excellent visibility from anywhere in the room;
- Significant savings in space where the fireplace is installed;
- Compact design layout;
- Ideal solution for small rooms;
- Heating of adjacent rooms thanks to heating of two walls;
- Types of fireboxes;
- Variety of designs;
- Decent level of security.
This is why corner fireplaces are a fairly common home improvement today. In addition, they attract with a variety of options. Each of them has positive characteristics.
Design and dimensions of the hearth
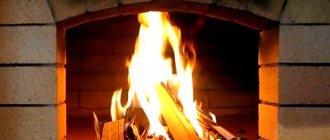
Structurally, similar fireplaces, an example of which is shown in the photo, are similar to their traditional wall-type “brothers”. The hearth consists of an open firebox without an ash chamber, a cone-shaped smoke collector with a chimney tooth and a straight chimney pipe. The difference is the triangular cross-sectional shape, which complicates the construction process.
The principle of operation of a triangular fireplace remains the same: wood is burned on the hearth of an open firebox, combustion products are removed through the chimney shown in the diagram below. A portion of the heat is retained by the chimney tooth (in general, about 20%), the rest goes away along with the smoke due to the natural draft that occurs in the vertical channel.
In order for the hearth to properly serve as a source of heat, it is necessary to select the dimensions of the structure to suit the volume of the room and take into account a number of points:
The size of the firebox opening is defined as 1/50 of the area of the room (usually the fireplace is located in the living room). The height of the portal is made approximately twice the maximum depth of the fuel chamber. If the draft is weak, smoke will enter the room, and excess will lead to increased heat loss, especially when the fireplace is not lit.
Therefore, the optimal cross-section of the chimney is taken to be 1/9 of the area of the combustion niche. For normal operation of the fireplace stove, it is important to organize the flow of air into the living room, otherwise the draft in the chimney will worsen. Burning wood often “shoots” heat particles through the front opening. To prevent fire, a pre-furnace sheet of metal is laid on the floor in front of the fireplace. If the structure is adjacent to the walls of a wooden house, then flammable surfaces must be protected with galvanized roofing.
A table that shows the dimensions of the portal and the cross-section of the chimney duct of corner fireplaces depending on the size and volume of the room will help you simplify your calculations.
We suggest considering the construction of a brick fireplace in a private house or country house using the example of the classic “Annushka” fireplace shown in the photo. The project is designed to heat a living room with an area of 18-20 m² with standard ceilings, the cross-section of the firebox opening is 70 x 50 cm (width x height).
Often in residential buildings, a simplified method of constructing a brick hearth is implemented using a cast-iron fireplace insert. How this is done is described in detail in the video:
Requirements for the barbecue construction site
The site for placing a corner brick barbecue at the dacha is chosen on the plain. Take into account the direction of the wind so that smoke does not blow into residential buildings. Rules for choosing a location for building a corner barbecue oven:
- a flat place, protected from drafts and gusts of wind;
- the grill is placed away from wooden buildings, trees and bushes;
- a large area so that a dining area can fit close to the stove.
Most often, a corner grill is placed near a summer kitchen or gazebo. The minimum size for placing a stove is 2*3 m.
Chimney construction technology
The chimney can be laid using the same mortar; the design, in principle, requires the same fire-resistant properties. The only thing is that it is preferable to “plant” the area located above the roof on cement. Even at the time of installation, it is recommended to rub and level the inner walls so that there are no turbulences and backdraft, and the channel will become clogged much less often. Also, do not forget that it is necessary to install a damper between the masonry of the fireplace and the chimney.
There are some nuances in construction in places of passage; remember that if you do not provide thermal insulation, then you must do “joining” to separate hot air from flammable materials. But, of course, it is better to make reliable insulation, use classic wool and “galvanization”. Make a special apron that will close the gaps between the brick and the roof covering
Don’t go wrong with the dimensions, it is important that the chimney meets classical standards and has reliable and proper operation
In conclusion of today’s article, I would like to say that it is very important to pay attention to every little thing, which in the end can become an irreparable source of trouble for the entire heating system
Installation of fireplaces
How to make a corner fireplace with your own hands? First you need to understand its design features, that is, what components it consists of. The most important elements are the firebox, portal and chimney. Apart from the mentioned parts, it is difficult to imagine a fireplace without a reliable and solid foundation. Let's take a closer look at all the internal components of the structure.
Firebox
The combustion chamber is considered the main component. In most situations, it is made of cast iron or heat-resistant metal. In the latter case, cast iron plates, fireclay or vermiculite are placed on the inside.
Fuel tanks are:
- closed;
- open.
The absence of doors reduces the efficiency of the design. That is why closed fireplaces, for example, with a door made of heat-resistant glass, are currently popular.
Chimney
An equally important part of a DIY brick fireplace is the chimney. It is connected to the firebox using a special pipe. In most cases today, thermoceramics and heat-resistant steel are used for the production of chimneys. Such materials are equipped with multi-layer thermal insulation. Therefore, operation is comfortable and completely safe.
Base
The fireplace base is a place that is located directly under the fuel chamber. Before its arrangement, it is necessary to place a two-layer waterproofing on the prepared foundation. Roofing cardboard with special impregnation or roofing felt are suitable for this.
Portal
It will not be possible to build corner fireplaces with your own hands without cladding. The portal is considered the exterior of any fireplace; it demonstrates its belonging to the design style. Nowadays, very often fireplace lining is made of expensive granite, tuff, and steel modules. The current solution is mosaic made of colorful glass, masonry, and ceramic slabs.
Arranging a corner fireplace: first variation
This stove is characterized by its small dimensions and average weight, thanks to which it can be placed in rooms with an area of 30 square meters. The layout, order and masonry technology were developed by Bykov:
- Buy a grate in advance, measuring 25 by 25 centimeters and strips of metal (thickness about 5 millimeters and width 3-5 centimeters);
- For the first and second rows you will need 14 bricks, which are laid out in the shape of a triangle (cutting will be required);
- The fourth row is the beginning of the combustion chamber assembly. For it, exclusively fireclay bricks are used;
- To install the ash pan on the 5th row, you will need to lay several metal strips on the side brick walls of the stove. On the sixth row a grate is laid out (we use fireclay bricks);
- The combustion chamber begins to line up and take shape already on the 7th row;
- We continue to build the oven portal from rows 8 to 12;
- When laying out the 13th row, we fix and install metal corners measuring 60 by 5 by 0.5 centimeters;
- On the fourteenth and fifteenth rows we begin to lay out the “mirror”. This element is necessary for the accumulation and retention of generated heat. The resulting wall should be at a slight angle of twenty degrees;
- At 16, we begin to remove the tooth, and coat its surface with a solution based on clay. So, this protrusion will be smooth and convenient for further use;
- Next, we create a bend that will serve as a frame for the tooth. Brick for masonry must have hewn walls (row from seventeenth to nineteenth);
- On the twentieth row we begin to lay out hilo, up to the twenty-second. The dimensions of this part of the chimney should be 14 by 27 centimeters. Next we install the smoke damper;
- Up to the twenty-fifth row we lay out the chimney so that the size of its inner part is 14x27 cm;
- We install a metal pipe and cover its upper part with a metal casing.
Popular wood-burning stoves
The following models of corner units are in demand among dacha owners:
- "Bavaria" . For the manufacture of the device, 6 mm steel is used, and the inside is lined with fireclay bricks. Due to the fact that such a long-burning corner stove for a summer cottage has a power of 6 kW, it is capable of heating a building with an area of 60 square meters. The side walls of the device are lined with ceramics. The continuous burning mode reaches 3 – 5 hours. The firebox door with fire-resistant glass is equipped with a thermally insulated handle.
- "Cupid" . The stove has panoramic glass equipped with a blowing system, which does not collect soot and soot. At the top there is a hob. The 9 kW unit is made of heat-resistant steel and uses a lining. It is capable of heating about 60-80 “squares” of area. Thanks to the ceramic panels with which the device is lined, it has improved heat transfer.
- "Neva" . A power of 6 kW allows you to provide heat to 50-60 square meters of space. The heating surfaces of this corner stove for a summer residence are covered with heat-resistant paint, so they retain their original appearance for a long time and are not subject to corrosion.
- "Teplodar" . The corner model with a power of 12 kW is installed in houses measuring up to 80 square meters. Its body is made of stainless steel and is resistant to burnout. The unit is equipped with a hob on top, and a firewood rack is located below.
All of the above-described samples of corner stoves for a wood-burning home can be installed on a finished floor covered with non-combustible building materials, for example, porcelain stoneware or sheets of metal. These units can be placed on any floor of the building.
A step-by-step guide to laying your own fireplace
Brick fireplace diagram
The first stage is choosing a place to build a fireplace.
First of all, remember that the fireplace should not be placed in close proximity to flammable products.
Examine the ceiling and roof of your home. To install a fireplace, you need to choose a place so that the chimney does not pass through beams and crosscuts. The second stage is preparation for laying the foundation.
The fireplace is built on an individual foundation. First, a recess is prepared for pouring concrete. Add 100-150 mm on each side to the dimensions of the future fireplace, and you will get the optimal dimensions of the foundation.
The depth of the hole is selected individually. Traditionally it is 300-500 mm. The specific value is determined in accordance with the characteristics of the soil composition. For example, if there is a lot of sand in the soil, a 30-centimeter depression will be sufficient. Otherwise you'll have to dig a little deeper. First, the bottom of the pit is covered with a small layer of sand, which must be compacted. Afterwards a layer of crushed stone is poured.
Corner brick fireplace
The third stage is preparing and pouring the solution.
For such a foundation, a simple cement mortar is suitable. Prepare it from part of the cement, the same volume of water and 3 times more sand. Mix the ingredients thoroughly until a homogeneous mass is obtained and pour it into the prepared pit. Level the solution using a trowel. Wait until the cement hardens, lay a waterproofing material on top of the pouring material (usually roofing felt is used, laid in 2 layers) and begin laying.
The fourth stage is the installation of formwork.
At this stage you need to install the formwork. Prepare wooden boards, beams, plates and wedges. Wedges are placed under wooden blocks.
The fifth stage is laying out the supporting parts.
Mark the rows along the formwork, taking into account the thickness of future seams. The fireplace will consist of an odd number of rows of masonry. The central brick is usually called the castle brick. It is installed vertically, at a central point.
Fireplace diagram
The sixth stage is the creation of a wedge lintel.
This element should be laid on both sides in the direction of the castle brick. Laying is done so that in the central part the lintel can be easily wedged with the center brick. Use a cord to check the seams are correct. Secure it at the junction of the lintel with the side partitions.
Wedge jumper. 1—direction of the reference plane: 2—locking brick
The side walls must have sufficient thickness and width, otherwise they simply will not cope with the incoming loads. Where the wedge lintel meets the side partitions, you need to make ties. To create them, steel strips are used. The ends of such strips should be bent upward.
The seventh stage is the installation of arched and beam type lintels. The structure of these elements differs from the design of the wedge lintel. The surfaces of the jumpers in question must form arcs with a certain radius. In the case of beam-type jumpers, their radius should exceed half the distance between the side posts. The jumpers in question are laid out evenly on both sides
Pay attention to the seams - they should be wedge-shaped
Arrangement of lintels and arches
Use a cord to check the accuracy of the brickwork and joints. Wedge the lintel with the locking brick.
The lintels must be allowed to settle in the formwork. The exposure time will vary. The specific period depends on the ambient temperature and the quality of the solution. For example, in the summer this may take 1-3 weeks. The colder it is, the longer it will take.
Eighth stage - laying out the firebox
At this stage, special attention must be paid to the rear wall of the firebox. If it is planned to install screens in the wall, the laying is carried out according to the pattern
An edged board is suitable for making patterns.
Corner fireplace. Firebox laying
Be extremely careful when laying a fireplace. Refer to the available drawings. Errors when laying even a single brick will inevitably lead to disruption of the masonry of further rows, and it will not be possible to correct the defects in all situations. Therefore, it is better to immediately do everything as required by the technology.
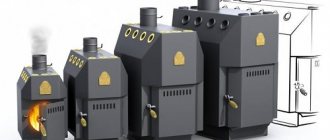
Wood-burning metal stoves-fireplaces
This equipment is compact and has a high degree of heating. Wood-burning corner stoves and fireplaces for summer cottages are devices that have a firebox that is covered with fireproof glass (read: “How to install a metal fireplace for your home with your own hands”). They can be equipped with a kitchen tile and a heat exchanger tank designed for arranging a water heating system.
The advantages of these units include:
- easy installation;
- high efficiency;
- small parameters and weight;
- no need to make a foundation;
- attractive appearance;
- affordable price;
- safety of operation.
A corner stove, a long-burning fireplace, made of metal and operating on wood, is economical and characterized by high efficiency. Oxygen is supplied to the device in doses and therefore there is no active combustion of wood.
Solid fuel smolders slowly, resulting in increased heat transfer and less ash formation. Operating in continuous burning mode, the unit can operate for up to 6 hours on one load of fuel, and the sealed door protects from sparks and hot coals.
If the fireplace stove has a water circuit, you can connect a heating system to it and get full heating of your country property. The presence of a stove in the upper part of the structure makes it possible to cook food, heat water and forms another plane with a high degree of heat transfer.
How to choose a good fireplace?
Corner wood-burning fireplaces for country houses are in great demand. You can find various models on the market. It is necessary to adhere to certain selection criteria in order to combine several useful functions in a purchase.
Helpful tips when choosing a corner fireplace:
- An electric fireplace with a power of 1 kW is capable of maintaining heat over an area of 10 square meters. m. For the best effect, add 30% to the accepted figure, or 1 kW, count on a quadrature of 70 square meters. m.
- Choose a firebox covered with glass; firstly, it is safer, and secondly, it is more efficient, since the wood takes longer to burn out.
- There are fireplace stoves that have built-in combustion modes; in addition to the normal program, it is desirable to have an economical combustion mode.
- Heat-resistant glass can be equipped with a self-cleaning function.
- It will be more convenient to remove ash from a removable ash pan.
- Fireplaces can be with a hob, with a built-in tank, oven, etc.
Choice of metal options
An increasing number of consumers prefer the use of ready-made metal fireplaces and stoves, including corner ones. There is a reason for this choice, because metal stoves have some distinctive qualities.
- These are multifunctional devices that are equipped with a hob and, in some cases, an oven.
- Metal stoves have a relatively small mass, so there is no need to build a foundation. All you need is a solid foundation.
- The efficiency of the furnace is high due to the physical properties of the metal used.
- Simple installation eliminates the need for the consumer to acquire stove making skills or spend money on a professional.
Modern interior with heating equipment
Among the huge number of models presented by different manufacturing countries, it is quite difficult to understand. Many buyers are forced to hope for luck. Each company provides a technical passport for its device, but not everyone is able to use such information. Therefore, all that remains is to focus on the opinions of other users and the rating, which is based on reviews.
The leading positions, according to various sources, are occupied by Russian companies that provide reliable and inexpensive equipment. Let's list the most popular ones.
- stove-fireplace “Bavaria” (EcoKamin, Russia);
- stove-fireplace “Pechora” (Meta-Bel, Russia-Belarus);
- stove-fireplace “Yenisei” (Meta, Russia);
- stove-fireplace “Neva” (Meta, Russia);
- stove-fireplace “Amur” (Meta, Russia);
- MBS Corner (MBS, Serbia).
All of the listed models have their own characteristics in external design or operating principle, however, for each room, a wide range of models from the companies presented will allow you to choose the best option.
External finishing of brick stoves
Despite the fact that brick itself is a rather aesthetic building material, there are several ways to cladding stoves.
Among them:
Painting
Painting is one of the most budget-friendly and simplest options. At the final stage of construction, the outer surface of the furnace is rubbed to reduce roughness and moistened with water, if desired, treated with a penetrating primer, and then with glue-based paint. Metal elements are painted with dark, heat-resistant paint.
Mazanka
Also refers to the simplest type of cladding. Muzanka is a manual finishing of the external walls of the structure and subsequent whitewashing. Furnaces treated in this way require cosmetic repairs every year, as cracks inevitably appear on them during operation.
Tiles
Using this method, the stove not only acquires an aesthetic, antique appearance, but also its heat capacity increases. Tiles are handmade ceramic tiles. They are practical and easy to maintain - to remove various dirt and dust, simply treating them with a damp sponge and detergents is enough. The tiles are painted by hand and come in various shapes and shades.
Finishing with tiles or tiles
Finishing with tiles and tiles is the most popular today. The types most often used for cladding stoves are terracotta, majolica or clinker tiles. It is not recommended to use this method for lining large stoves, because this will increase the likelihood of cracking of the structure. Finishing should be done using a mesh applied to the plaster, which will help facilitate the installation process and allow everything to be done more accurately and accurately. It is necessary to use special adhesive mixtures for tiles for lining stoves. They are characterized by increased resistance to high temperatures and retain slight ductility throughout their service life.
Which brick is more suitable for masonry?
Brick for laying a furnace must meet a number of requirements and standards. Not only the durability of the structure, but the safety and life of those living in the house will depend on the correct choice of material. Modern manufacturers offer us a lot of varieties of special bricks. Their common distinguishing features are fire resistance and resistance to high temperatures. Bricks for stove masonry are conventionally divided into two large groups: fireclay and solid. The former have high fire resistance, so they are used for laying out fireboxes where the fire source is located. They are intended for those furnaces that use coal or gas as fuel - during their combustion the highest temperatures are generated. If the stove is intended exclusively for heating with wood, then the use of this material is not so important.
Solid bricks are made from clay and fired using a special technology. They are moisture and heat resistant, as well as fireproof.
When choosing building materials, it is very important to purchase high-quality products and not forget about the aesthetic appearance. By using special shaped materials - corner bricks or round bricks - the fireplace stove can be given a solid, elegant appearance without additional external finishing, which will allow significant savings.
Open fireplace project
heating the room.
This gives a certain illusion that there is no firebox at all. There is simply a corner lined with bricks with a base on which you can light a fire.
Behind the apparent simplicity of this structure lies a complex engineering calculation that provides the structure with a certain lightness. High-quality work and fire safety for fireplaces built in a wooden house are of paramount importance, therefore they are put at the forefront. All parameters are precisely calculated, designed and implemented.
It is worth mentioning a few subtleties of building a fireplace in a new, newly built wooden house. Construction of the fireplace, in this case, will have to be postponed for about a year. The thing is that after the construction of a wooden house, some certain time must pass for the structure to shrink. If the fireplace is installed in a “damp” house that has not undergone shrinkage, then such defects as cracking, smoke emissions into the room, and much more may soon appear.
But the beauty of the fireplace, which is presented to your attention, is that it is designed and created in such a way that its structure is an element separate from the house:
- It does not have a close connection either with the walls or with the very structure of the house’s decoration.
- All parts of the fireplace can easily withstand the shrinkage of wooden walls, without suffering any damage to the structure. This will ensure maximum safety and reliability during further operation of the fireplace.
Technology of masonry work during the construction of a brick fireplace
We will assume that the foundation of the fireplace has already been built, poured with durable concrete and will support the weight of the structure.
- The concrete surface should be waterproofed with an inexpensive coating cement-polymer mixture (for example, CeresitCR 65), coating it twice with a brush or spatula.
- If the fireplace is adjacent to a wall made of combustible material, fire protection must be installed.
An inexpensive and effective option for fireproofing a fireplace and a wooden wall is a slab of basalt wool (at least 5 cm thick), covered on the fireplace side with reflective foil
Preparation of clay-sand mortar. When making your own, the clay should be soaked in advance. Water is added to the finished mixture before starting work in accordance with the instructions. The brick should be soaked - lower it into a trough of water for a few minutes. If this is not done, the masonry mortar may dry out too quickly and not gain the necessary strength.
In addition, the wet brick can be moved if necessary, which is important when a fireplace is laid by a not very experienced craftsman. Lay out the first row, it should be as even as possible, the horizontal level should be carefully controlled. If you “missed a little” with the foundation, the first row can be laid out on a cement-sand mortar, this makes it easier to correct flaws in the foundation. Next, the fireplace masonry is carried out in strict accordance with the serial plans
We recommend laying each subsequent row dry first, and only then applying the solution. If the fireplace is large, pull the cord; if the structure is small, control with a level and a square is sufficient.
If there is more than one brick in a row that needs to be split or sawn, we recommend that during dry laying you number all the elements, both solid and adjusted to size. The numbering should be duplicated on the serial plan
The vertical seams of the bricks should not be located one above the other; the need for bandaging should be taken into account when drawing up the drawings.
Laying begins with corner elements, strictly monitoring compliance with the horizontal level between them
Excess mortar is removed with a trowel, the seams are unstitched, and contaminated bricks are wiped with a wet rag.
The shape of the joint determines the profile of the seam, concave, convex or rectangular
Another way to make a neat seam is to lay the bricks along the guides
Take a closer look at the photo: a square metal profile is inserted into the seam from the outside; after a few minutes it is removed.
You should not place more than 8-10 rows in height in one shift.
Stages of constructing a fireplace