Author: Yuriy Fedorovich Kolesnikov, thermal power engineer
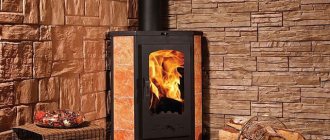
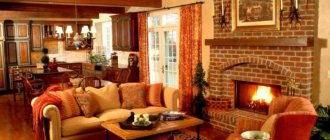
How to build an outdoor stove with your own hands is a relevant question both for residents of non-gasified regions and for inhabitants of completely civilized places. The first are interested in the opportunity to cook food in the warm season using waste fuel (dead wood, dead wood, construction chips) - a home heating and cooking stove in the summer is not very economical, and it makes the house very hot while cooking dinner. Secondly, the opportunity to sit by the fire in the gazebo or on the lawn in a relaxation corner at the dacha or on your own property, while at the same time preparing shish kebab or barbecue ribs, without shelling out a mind-boggling amount for a turnkey branded garden stove. Both are also attracted by the opportunity to receive home-smoked products that are obviously not adulterated and are much cheaper than store-bought ones.
Where is it correct and safe to install?
The choice of installation location for a stationary stove is approached thoroughly, because such a building is not built for one year. For ease of use, summer fireplaces are located near the recreation area, near or inside the gazebo. It would be a good idea to have a supply of firewood nearby. A brick cooking stove mainly runs on solid fuel, which is a source of open fire. During operation, a high temperature is created, so fire safety measures are taken into account:
- It is worth placing the fireplace near buildings, retreating at least 1 meter. This also applies to fences and other wooden structures.
- The close proximity of green spaces is an undesirable neighborhood, since the heat of the fireplace will destroy trees and shrubs.
- If the location is chosen near the house, then the leeward side is preferable, which will eliminate smoke from residential buildings.
Peculiarities
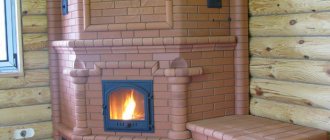
The Russian outdoor stove, unlike the classic model, is equipped with a horizontal firebox and hearth.
Its chimney is shorter, and the side walls are insulated, which increases efficiency with less fuel consumption. For ease of use, the cooking chamber in such an oven is placed on the front, and the combustion chamber on the left side. The rational design of the frying chamber allows it to be used not only for cooking or frying food, but also as a kebab maker, smokehouse for meat or fish. And if you install a damper, it turns into an oven for baking culinary products and bread.
Required Tools
The set of tools and materials necessary for the construction of stoves and barbecues is very simple and can be purchased at any construction stores. This:
- Aerated concrete blocks or refractory bricks are the main materials for building a stove at the dacha with your own hands, the consumption of which is calculated according to the drawing.
- Facing material.
- Clay and sand in the required proportion are required to prepare a solution for future masonry.
- Cement mixture for pouring the foundation for an outdoor stove.
- Doors for the vent and firebox.
- Construction tools for measurements - level, cord for marking.
- Tools for installation: shovel, spatula, trowel.
Swedish cooking oven
A small combined structure, equipped with a hood, is intended not only for heating, but also for cooking.
Strict adherence to the order, the use of a plumb line and a building level will ensure the construction of a geometrically correct, functioning structure. Excessively thick mortar joints or the presence of voids in them are not allowed. It is recommended to monitor the cross-sectional parameters of the smoke channels to avoid their narrowing.
Upon completion of work, the finished oven is cleaned of dust and excess solution and left to dry for several days. High-quality materials, compliance with work technology and fire safety measures will ensure a long period of its impeccable service.
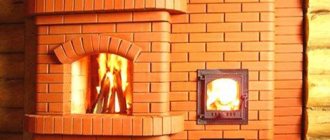
All lovers of country holidays dream of a stove in their cozy cottages. As you know, a brick stove is the oldest universal design for heating rooms. Its effectiveness and high performance have been proven for centuries.
It is not at all necessary to build a serious bulky structure. Sometimes a small-sized stove is enough, which you can build with your own hands. Models may differ in shape, size, type or design of the chimney, but in general, their construction will not take you much time and will not require serious stove-maker skills.
Style and design
It is better to equip the summer kitchen area with a barbecue and cooking stove in the country house taking into account the already established natural landscape. Even a beautiful hedge with trees nearby can be a great starting point for stylishly decorating a seating area.
A view of a river or pond also suggests an original plan in relation to the surrounding view. The main thing in the arrangement is that the design of the recreation area should be in harmony with the surrounding landscape and match the design style of the house. If there is no house structure yet, then the plan for the kebab shop site needs to be developed in the same style as the plan for the future house and surrounding areas.
In more difficult circumstances, when there is neither a house nor the beauty of the landscape around, there is only one way out - to choose the style direction for arranging the site and housing to your liking. Landscape designs of smooth, flowing lines using natural wood and stone, as well as the Art Nouveau style with the obligatory presence of forged elements are now popular.
Gazebos can be of different shapes - from round to polygonal options, and barbecues - cast iron, wrought iron, brick or metal. The main thing is to maintain the chosen style.
Accommodation
If you decide to install a barbecue stove on your property, then regardless of the type of stove you choose, you first need to think about fire safety - the place where it will be installed. It should be understood that any device with an open flame, if neglected in its placement and rules of use, threatens serious burns, large fires, which result in harm to human health (often fatal), surrounding buildings and nature.
It is safest to place a resting place with a barbecue on an area that is located at a considerable distance from the main buildings (country house, outbuildings, premises with animals and birds). But this is not always convenient, especially for an open outdoor brazier and those models that are under a roof, but do not have electricity, running water and other amenities of civilization.
Gazebos with barbecues can be placed on the same foundation as the house and under the same roof. But in this case, you must adhere to all fire safety requirements for buildings and residential premises.
It is not recommended to place such devices in the following places:
- near the storage area for firewood, hay, lumber and their waste;
- near dry grass, fire hazardous debris;
- close to fences and walls;
- directly under trees and overhanging branches.
When installing a collapsible barbecue in the garden or on the street, you need to take into account the speed and direction of the wind. Smoke should not go towards neighboring buildings and houses, and in cases of installing a stationary outdoor barbecue (including in a gazebo), you should take an interest in the local “wind rose” and build a protective screen on the side of the most possible “wind blower”. Special portable protective screens are available for sale, which is the best option for solving the problem of wind direction.
You also need to take care of the convenience of using the stove in the selected location of the site.
The following questions must be addressed here:
- a free approach to the device from at least two sides, because it is always more convenient and fun to cook with an assistant;
- there should be space for a table and seats nearby;
- the ability to provide a recreation area with clean water and lighting;
- Convenient access to the place from the house.
The following points should also be considered:
- how much time is expected to be spent at the dacha (this means constantly or only in the summer) - the installation of the stove indoors or in an open gazebo depends on this;
- how many people the recreation area is designed for;
- what design to choose for the barbecue area and gazebo.
Each owner will probably have a lot of questions about the design and selection of stoves, but they can already be solved in the process of creating the interior.
Scope and production
To begin with, it is necessary to say that creating outdoor stoves for a summer residence is not as simple as it might seem at first glance. You must first choose a good order and select the refractory brick needed for the job.
Purpose
First of all, outdoor stoves in the country are made for outdoor cooking or for barbecuing, which is equipped with the structure.
Moreover, they are often installed in country gazebos or on the terrace.
Some site owners use similar products to kindle baths. In this case, the stove is located outside in the country house, adjacent to the wall, which distinguishes it from structures with an internal location. Typically, such systems are equipped with an additional tank for heating water.
It must be said that such products do not require the manufacture of complex chimneys. This is especially convenient if country houses made from block containers are used, since the design will not take up space inside the building.
Preparing the site
It is worth noting that to install such a structure, it is necessary to prepare a special place, similar to the one that is used if renting a diesel generator for a summer residence is used. Therefore, first a strong and reliable concrete base is created, even if the product is located on a terrace or gazebo.
It must be said that the distance from the structure to various buildings should be at least a meter. At the same time, experts recommend installing protective screens against exposure to high temperatures or accidental sparks. When making an outdoor stove for a summer residence with your own hands, it is worth thinking through all the fire safety systems in advance.
Special attention is paid to the roof or canopy, which simply needs to be installed above the product. It will protect not only the structure itself, but also the firewood, and if properly executed, even the people who will gather near it
Therefore, it is advisable to have a full-fledged project, not only for the construction of the stove itself for a summer cottage, but also other additional elements.
Manufacturing
If you are making an outdoor stove at your dacha with your own hands, then you should first choose the right project with the order
In this case, you should immediately pay attention to what size brick is used. The fact is that there are completely different materials that can be used for these purposes.
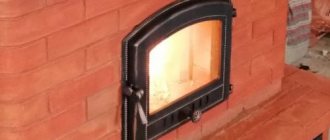
It is also very important to choose the right brick to create a firebox. Typically, refractory materials are used for these purposes, preferably ceramics.
However, recently, ready-made metal fireboxes have begun to appear on the markets, which can simply be lined with brick.
Special attention should be paid to the fact that a special mixture of clay is used to fix all materials in the oven. The fact is that cement cannot cope with such temperatures and quickly falls off.
Therefore, the installation instructions spend a lot of time describing the process of preparing the solution, although recently ready-made compositions for this type of work have begun to appear, the quality of which is even much higher than that of clay.
With such a placement of the stove, the chimney should be made at least 2.5 meters high. This way, combustion products will not interfere with your rest. At the same time, it is equipped with a special cap to prevent precipitation from getting inside.
Recommendations from the experts
Sometimes it is much easier to purchase a ready-made firebox, although its price can be quite high, than to make it yourself from brick. This will not only save time, but will also increase the service life of the entire structure.
- If the product has close contact with wooden materials, then they should be treated with a composition that prevents fire and additionally separated with asbestos. Taking this into account, many experts create the base for the stove so that it will rise above the floor.
- The firebox of such products must be tightly closed, and the chimney must be equipped with a damper. This is necessary so that the structure does not collect a lot of moisture in winter or autumn.
Which one to build?
First, let's see what kind of stove it is possible to build outdoors, taking into account the fact that it will not be heated intensively and irregularly, but will be exposed to climatic influences, freeze in winter, and it will be difficult to provide it with a high chimney. But the danger from the spread of carbon monoxide from an outdoor stove is reduced to the minimum possible, although it is not completely eliminated, especially in a gazebo, under a canopy and in calm weather. Don't forget about this: there is no stove that can be heated at random without fear of fumes. You can get burned just sitting by the fire.
Keeping these circumstances in mind, the choice of outdoor stove design is not so wide. The simplest garden stove is the well-known rough or rough stove. She can look terrifying, pos. 1 in Fig., but it can be heated with any fuel and it works properly, almost regardless of the quality of the materials used and the work: when building a rough structure, you can use broken simple red working bricks or stones from the surrounding area using ordinary cement-sand masonry mortar, i.e. .To. microcracks in the masonry have almost no effect on the technical performance of this stove. See, for example, the video below of how a 5-year-old child built a rough stove, which his family successfully uses and which can also be used for smoking. Which, by the way, not every oven allows, see below.
Video: a simple stove, a rough one, a design accessible to a child
An outdoor oven at a weekend cottage is often a barbecue roaster, pos. 2. Although, as we will see later, in fact this is not a barbecue at all. Such a stove takes about the same amount or less bricks as a rough one (about 200 pcs.), and you can use red working brick in the same way, but masonry mortar, due to the, so to speak, subtlety of the structure, is already needed for the stove for the street (see .further, about technology and materials).
Based on the brazier, the so-called. Finnish outdoor brick oven, which is a hearth, brazier or barbecue attached to a rough stove, pos. 3. In fact, the only Finnish thing about such a stove is that the Finns were the first to think of producing them in the form of a set - construction instructions with detailed instructions and procedures, dry mixture for preparing masonry mortar, embedded parts, fittings. Now domestic kits for building an outdoor brick oven are sold in the Russian Federation. Sometimes the set also includes bricks; if necessary, hemmed/trimmed and numbered. A kit for an outdoor Finnish stove is inexpensive, and even a completely inexperienced person can build a stove from it, which is why the Finnish outdoor stoves from the kit are very popular, see for example. track. video clip.
Video: Finnish outdoor stove
Note: a stationary smokehouse is also often attached to a wood-burning stove, pos. 4. But during use, it turns out that in the cooking mode the stove is quite gluttonous, and the quality of smoked meats is slightly above average. Why this is so and how to still combine an outdoor oven with a smokehouse, we’ll talk further.
Even less common in areas is an outdoor fireplace, pos. 5. The reason is limited functionality: you can admire the flames and cook something as if on a simple fireplace, although the material and labor intensity of an outdoor fireplace is quite high. A Russian stove is built on the street (item 6) even less often. The culinary qualities of products and dishes from a Russian oven are well known, but a small Russian oven requires 2500 bricks, a large one - 3500, the design is very complex and it is not easy to protect it from bad weather. For the same reasons, Neapolitan (item 7) and Sicilian ovens for pizza and pastries are not very common in private households; In addition, these are quite highly specialized devices.
Note: much more attention for the garden and picnics deserves the so-called. mobile rocket oven, pos. 8. Rocket stoves are a special article. Here we only recall that rocket stoves exist in 2 forms - a luxury item that allows you to get a warm bed at home without building a Russian stove, and a light, compact device on which you can quickly cook dinner using a minimum amount of waste fuel. In the latter case, the degree of heating of the cooking utensil is regulated as precisely as in a gas stove.
Laying the outdoor stove structure
Like most other buildings erected with your own hands, laying a stove device in a dacha begins with preparing the foundation. It must have good strength to support the weight of the structure.
- The place for the foundation to be constructed is marked using a construction cord. Its dimensions should be 100 mm wider than the future masonry.
- A pit 500 mm deep is dug into which concrete will be poured, for the preparation of which grade 500 cement is mixed with sand in a ratio of 1:5.
- The pit is filled with crushed stone, which is compacted efficiently. Everything is filled with a solution of liquid consistency.
What do we want to get from the oven?
The construction of a street fireplace solves many simple routine tasks that seem incomprehensible and irrelevant to an urban person from the outside. With the help of an open-air stove, you can do everything: cook food for yourself and your pets, do canning, bake bread and dry mushrooms, quickly heat water and, in the end, just burn some garbage, old branches.
There are a great variety of options for garden and outdoor fireplaces - these are barbecues and barbecues, fireplaces and analogues of potbelly stoves, tandoors and smokehouses, cauldron and cooking stoves. They all have their own purpose and their own characteristics.
Next we will talk about the brick cooking stove, as the most versatile. It is clear that it must be practical and functional, safe and durable, compact and prefabricated, and at the same time, also budget-friendly.
Author's projects of outdoor stoves for dachas: photos and videos
Saving space: three-dimensional design of an island stoveSource www.proektkamin.com Author's project of a stone barbecueSource masterstone.ru
Minion StoveSource glenoakspathology.com
Original project in oriental styleSource it.decorexpro.com
Barbecue in the style of Alexander Greene Source masterstone.ru Model in high-tech style Source kuhnidizayn.ru
BBQ Station Source unidoski.ru
The model will fit perfectly into any landscape designSource m.yukle.mobi
A simple and original solution Source bashny.net Version 2.0 Source tdmasterov.ru Designer model Source ebaumsworld.com
In the video you can see how to make an outdoor stove with your own hands:
Recommendations for selection
When purchasing heating devices, the choice must be made based on the conditions in which they will operate and what function they must perform. If you are thinking about purchasing a stove to heat the house in which you plan to live permanently, we recommend that you familiarize yourself with the rating of the best wood stoves for heating a home.
If we are talking about a dacha, then the main criteria for choosing country wood stoves include:
- Power. The heat transfer should be sufficient to fully warm the room. So, per 1 kW there should be about 9 m2 of area + 10% of the reserve.
- Additional functions. When selecting this criterion, it is necessary to find out whether convection ribs, a hob, or an oven are needed.
- Supports combustion of various types of fuel. If you plan to use coal or sawdust briquettes in addition to firewood, it is better to clarify this point in advance before purchasing, since many models only operate on wood.
- Dimensions. If the area of the room is small, then it is necessary to take into account the dimensions to be able to install the stove at a safe distance from the walls.
It is better to prepare for the purchase in advance, and be ready to name such indicators as: room area, fuel, desired functionality.
When you go shopping for a potbelly stove, you need to know exactly whether you need a hob or not. Models without a hob usually cost several times less
Don’t want to spend money on buying a potbelly stove for your dacha, but prefer to make a device from scrap materials? In this case, we recommend that you read the detailed instructions for making a homemade potbelly stove and a chimney for it.
Ordinary masonry of the stove
After preparing the base and familiarizing yourself with the drawings, you can move on
It is important to strictly follow the order indicating the correct position of the bricks and installation of stove fittings
With stove and bed
If you plan to bake a stove with your own hands, then the simple procedure looks like this:
- Make a continuous and even row.
- Lay out the internal compartments, design the cleaning channels and ash pan chamber.
- Place the door of the blower and cleaning chamber. Secure them with steel wire, placing the ends in the seams.
- Close the vault, block the entrances to the channels, form holes and decorate the ceiling of the bottom channel from the inside.
- Fix the grate in a large firebox. Carry out the internal masonry without mortar; it is better to use fireclay, cutting it in half in thickness. Place the door on the small firebox.
- Install the hot water tank.
- Place the grate on the small firebox and the door on the large firebox. Stretch the right wall with a strip of steel. There is no need for mortar behind a large firebox.
- Install and secure the small firebox door. Continue to output internal channels.
- This row is combined with the previous one.
- Lay out the bottom of the furnace, combine the combustion vaults. Bring the channel holes into the chamber and close the water heating tank.
- At the edge of the masonry, secure a 5x5 cm metal corner between the fireboxes. Cover the space of the large firebox behind the stove with a grate. There is no need to secure it.
- Form the chimney and the walls of the furnace. Install a damper on the left.
- Continue the algorithm.
- Form an entrance to the chimney. It will be opened by a valve (vertical). Remove the walls of the furnace and make a hole for the damper.
- Begin to narrow the masonry, blocking the roof of the chamber. Proceed with the removal of the chimney.
- Reinforce the walls with strips of metal.
- Secure the back wall with a strip of metal. Narrow the chamber vault further and prepare to lay the vault. Above the niche with the slab, lay a corner and a strip of metal - the basis for the masonry that creates the ceiling.
- Lay out the outer walls and roof of the furnace in the shape of a dome. You can install a template or weld an arch from strips of metal.
- Strengthen the wall above the entrance to the chamber with a strip of metal and surround the roof of the furnace with walls.
- Pour sand and compact it.
- Proceed to the base of the bed. Lay a sand embankment and narrow the slit in front.
- Narrow the overpipe and install a panel with a circular hole to change the direction of the smoke.
- Install the cleaning window door.
- Install the draft control valve.
- Continue to cover the space.
- Work according to the algorithm.
- Combine the overpipe and chimney on rows 27-29. Lay out the chimney before starting to form the groove. In the place where the chimney passes the attic floor, use cement mortar.
When the pipe is brought to the roof, make an otter - an extension above the roof in the form of an overlap. Close the gaps between the roof and the chimney with waterproofing.
The Russian stove with a fireplace and a stove bench is multifunctional. It gives warmth, they cook food on it, and they rest on top. Any things will dry on it instantly.
With a stove for a cauldron
Both the components and the masonry resemble a Russian stove with a fireplace and a stove bench. Refusal of the latter is beneficial due to the reduction in dimensions and a stove on which a large cauldron will fit. The order is:
- Make a level and continuous base.
- Install an ash chamber.
- Secure the cleanout doors.
- Place the grate.
- Form a flood chamber.
- Start lining the firebox.
- Start building the walls.
- Align the corners.
- Align under.
- Form a hailo.
- Place the stove.
- Build a combustion chamber.
- Close the smoke duct.
- Form the roof of a large firebox.
- Build walls.
- Continue the previous row.
- Connect the walls with the arches.
- Continue the row.
- Insulate the furnace.
- Take care of the general overlap.
- Continue the algorithm.
- Set the valves.
- Install cleanout doors.
- Continue the previous row.
- Follow the algorithm.
- Close the channel.
- Form a chimney.
- Install the valves.
All that remains is to build the pipe to the ceiling. Cover it with 2x1.5 bricks. To insulate the ceiling, non-combustible material is used - metal, asbestos.
You can build a stove with a firebox and a stove bench. In this case, the length of the combustion chamber is increased or an extension is built, inside of which there will be smoke channels.
Are you planning to build a Russian stove for yourself?
Not really
Laying the foundation
You can lay a finished road slab as a base, but this option has more disadvantages than advantages. And usually the foundation is poured with your own hands. The area of the slab is made according to the size of the furnace, with small tolerances around the perimeter. And the area in front of the barbecue is then laid out with the same tiles as the paths on the site.
Even at the design stage, the excavation depth and the thickness of the slab are calculated so that the surface of the slab rises 50-60 mm above the ground.
If the barbecue oven is relatively small, then it is enough if the thickness of the slab is within 10 cm. For a large oven complex, it is better to calculate the parameters of the slab based on the properties of the soil and the total load on the base. In this case, it may be necessary to fill a slab with a thickness of 12-15 cm.
Preparation
A step-by-step algorithm for preparing a site for concreting looks like this:
- Mark the place with pegs and string.
- Remove the top layer of soil to a depth of about 30 cm.
- Level and compact the bottom.
- Install formwork from edged boards or OSB strips. For reliability, tie the corners with “kerchiefs” made from scraps of material.
- Fill with crushed stone and sand in a total layer about 15-20 cm thick. Level, water and compact with a tamper.
- Cover the separating layer with rolled waterproofing. It will protect the foundation from getting wet by groundwater, and will not allow moisture to escape into the sand from the concrete during its maturation. The strips are laid overlapping by 15-20 cm, with access to the end of the future slab.
- A mesh of reinforcement is placed on the supports. You can link it yourself, but it’s easier to use a road grid map with parameters 100x100x6.0 mm or 150x150x8.0 mm. The reinforcement should lie approximately in the middle of the slab at a distance of at least 30 mm from the bottom and top surfaces. Along the perimeter, the mesh should not reach the boundaries of the formwork by 30-50 mm.
Required Tools
The set of tools and materials necessary for the construction of stoves and barbecues is very simple and can be purchased at any construction stores. This:
- Aerated concrete blocks or refractory bricks are the main materials for building a stove at the dacha with your own hands, the consumption of which is calculated according to the drawing.
- Facing material.
- Clay and sand in the required proportion are required to prepare a solution for future masonry.
- Cement mixture for pouring the foundation for an outdoor stove.
- Doors for the vent and firebox.
- Construction tools for measurements - level, cord for marking.
- Tools for installation: shovel, spatula, trowel.
https://youtube.com/watch?v=bGeFQgAnmn4
Which brick to choose and how much is needed to build a barbecue complex
Before starting construction work, it is necessary to calculate the amount of brick that will be used in the installation of an outdoor stove. This parameter depends only on which model you choose: simple, with a minimum of functions, or a whole complex.
The order drawings, which are developed along with the design project, will be of great help in this. These drawings indicate how many bricks, what brand and in what sequence will be installed during laying. The standard dimensions of a brick block are 25x12x6.5 cm, so based on this data and the dimensions of the future structure, it is easy to make a fairly accurate calculation.
According to the order, the amount of brick will be known exactly even for a stove of complex shape Source sadovayaferma.com
Choosing a place to erect a structure
When the question of what kind of structure it will be, for example, a Finnish outdoor stove or a Russian one, made of brick or metal, has been resolved, you can begin to choose the location for the work. If you have a ready-made cottage, installing a stove or barbecue for your dacha requires compliance with a number of rules and fire safety requirements:
- The structure is laid next to a recreation area, for example, near a veranda or terrace. If neither one nor the other is available on the site, then it is necessary to consider the option of building a canopy and installing benches. A universal outdoor stove will benefit from this.
- The size of the structure is determined by the owner of the house depending on financial capabilities and requests. However, if it’s just a brick grill, then you shouldn’t make it too big.
- To avoid the penetration of smoke into residential premises, an outdoor Russian stove or another variation of it should be built on the leeward side of the site, and places near bushes and branchy trees, the condition of which is negatively affected by high temperatures, should be avoided.
- Do-it-yourself outdoor stoves for summer cottages should not be placed close to buildings made of flammable materials.
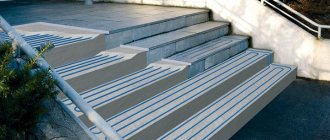
- The area around the cooking stove at a distance of several meters is covered with tiles or filled with concrete.
- For convenience, it is recommended to make a path to residential buildings and install street lighting, which will allow lovers of evening and night recreation to comfortably get from the gazebo, where a simple outdoor stove for cooking or smoking is located, to the house.
Cooking questions
In order to correctly make the stove you like, and before that, choose the right design, you need to know exactly what which outdoor stove can do. Therefore, before the technical and construction aspects, we will have to be distracted by culinary issues.
Oven or smokehouse?
An oven and a smokehouse are completely different devices. The furnace is required to “squeeze” as much heat as possible from the fuel load and not allow it to be wasted in space. Therefore, furnaces are designed (perhaps intuitively, based on the experience of generations) to burn fuel to the final combustion products - carbon dioxide and water vapor.
On the contrary, what is required from a smokehouse is not high thermal efficiency, but as much smoke as possible. But not just smoke that eats your eyes. Firstly, smoke for smoking should ideally not contain solid particles of unburned fuel. The final product should be smoked, not soot-encrusted. Anyone who has seen how a good industrial smokehouse works has probably noticed that in the area where the product is loaded, there is almost no visible smoke.
Secondly, smoke for smoking should not contain substances harmful to health. It is impossible to organize this chemically when burning organic fuel, so smokehouses are built in such a way that harmful impurities either “skip” past the smoked substance, or are neutralized and settle before it.
There is an important point here: in the temperature range of approx. It is extremely undesirable to smoke at 35-50 degrees, because... It is at such temperatures that there is a high probability of acid condensation; it is formed as a result of the interaction of chemically active particles of unburned fuel, the so-called. free radicals, water vapor and air oxygen. The acidified product not only tastes disgusting, but is also dangerous to health. Therefore, a trace is distinguished. types of smoking:
- Cold – the temperature in the smokehouse is up to 35 degrees. Preparation of products - salting in brine (saturated solution of table salt) and soaking immediately before loading into the smokehouse. Smoking time – from 5-6 days; breaks are not allowed. The taste of the finished product is the highest; shelf life without the use of means and methods of additional preservation can be calculated in months and years.
- Semi-hot (semi-cold) – smoking temperature 60-70 degrees. Preparation of products - short soaking in brine. The smoking period until ready is 0.5-2 days. Taste qualities are very high; the taste and bouquet are similar to those of cold smoked products. Keeping quality up to a month; usually up to 5 days.
- Hot – at a temperature of 85-120 degrees. Product preparation is not necessary. Smoking time – 1-5 hours. The taste qualities are very high, but the taste and aroma are not the same as those of cold smoked products. Shelf life without additional preservation up to 36 hours.
Considering the above, we can conclude that, firstly, the smokehouse for an outdoor stove must be a separate device. Any stove is not a smoke generator for smoking and it is impossible to set up the smoking process from the stove only by loading fuel and supplying air into the firebox; you also need to select the length of the flue from the outlet of the stove to the smoking chamber. Secondly, to feed a smokehouse with smoke, the simplest stove with low efficiency and a smoke tooth is best suited, see below.
Grill, grill and barbecue
An open flame is the enemy of any cooked food. Burning is only the visible and palpable “tip of the iceberg”: exposure to high temperatures on food products causes hydrolysis of fats, breakdown of carbohydrates and deep denaturation of proteins, saturating food with substances that are very harmful to health. In simple cooking ovens using solid fuel, direct contact of the food with the flame is avoided in various ways. What they have in common is that the food is not only baked, but also smoked, which is why, when properly prepared, its taste improves.
Grill
The hearth oven, which is commonly called a barbecue, is actually a classic Anglo-Saxon grill, the diagram of which is given on the left in Fig. Confusion arose in Canada, where French and English were mixed together. The grill structure follows from Anglo-Saxon culinary traditions, the essence of which was exaggeratedly but accurately expressed by Stubb from Melville’s novel “Moby Dick”: “You must take a piece of meat, from afar for a moment show it a slightly smoldering coal and immediately serve the steak to me!” Remember “bloody roast beef” from Eugene Onegin? In restaurants, baked meat is still offered rare - half-raw with blood, medium - baked until soft, juicy, like a kebab, and well done - crispy in a crispy crust.
Grill, barbecue and barbecue equipment
Note: if you find yourself in the southwestern United States, there may be something strange on the menu - hanaban (pronounced hanaban). This is a kebab in spices, removed from a skewer, something like Arabic khusal.
The grill is suitable for cooking rare, medium, and well done meat. This is achieved by placing the grate with the product at different levels above the brazier with coals. Coals rarely flare up, because... scattered in a thin layer over a dense floor and air access to them is limited. If they flare up, then the piece is simply moved to the side.
Brazier
Rare meat can be very tasty, but in southern countries, where pathogens of various diseases thrive, it can also be very dangerous. In addition, in many countries of the South they do not eat pork at all, and beef and lamb are rare and harsh. Hence the design of the barbecue (in the center in the figure): a holey under and partly the walls of a deep tray, a thick layer of coals. The meat is heated not only by thermal radiation, but also by a flow of hot air.
B-B-Q
In a real French barbecue (oh, those pampered paddling pools!), heat radiation is not involved at all in cooking. The design of a barbecue oven is quite complex (on the right in the figure), but reliable and multifunctional:
- Thanks to the separate cooking chamber with a hood, wind and outside temperature have almost no effect on the quality of the finished product.
- If you close the chamber portal with a flap lid, like in a Russian oven, the chamber turns into a semi-hot or hot smoked smokehouse.
- You can bake bread, cook pot roast, etc. in the oven. If salting the dish is undesirable, it is cooked in a container with a tight lid.
- Woodshed and dryer are relative concepts. Here and there you can dry mushrooms, berries, and fruits that require different drying modes. Additionally, it is regulated by dampers.
Note: pay attention to the protrusion of the hearth, which does not completely isolate the firebox from the oven. This is the so-called. a smoke tooth or jib is a radical means of reducing the dependence of the technical performance of any outdoor stove on weather conditions, see below.
Preparation for construction
Brick selection
The materials used in the construction of the furnace must comply with fire safety requirements. For this reason, various materials are used for its individual elements, which are listed in the table:
| Furnace element | Material |
| Laying the stove and chimney | · clay brick |
| Under and arch (lining) | refractory brick refractory brick |
| Facing | · plaster · tiles · natural stone |
| Fireproof insulation | · clay brick · asbestos cardboard · asbestos-cement heat-insulating boards · mineral wool boards, etc. |
The composition of the masonry mortar is chosen differently for each type of brick.
| Type of brick | Solution |
| Clay brick | clay-sand |
| Refractory brick | refractory clay and sand |
| Fire brick | fire clay and fireclay powder |
For the chimney, a solution based on lime and cement or lime and sand is used.
You can mix the solutions yourself or use ready-made certified mixtures, which are now available on the market in a large assortment. The advantage of using ready-made mixtures for a non-professional is compliance with technologies and proportions during production and compliance of the solution with the required characteristics.
With the correct selection and use of materials, the design of the stove: firstly, will comply with fire safety standards, which is of great importance in the house, and secondly, the entire structure will be provided with sufficient strength and stability.
Subtleties of preparing masonry mortar
Unlike regular mortar, masonry mortar for furnace work is much more difficult to prepare. Of course, you can buy a ready-made mixture at a hardware store - you can find one if you look hard enough. But, if the goal is to make the stove yourself, we will also prepare the solution with our own hands.
Masonry mortars for stoves are selected depending on the brick used:
- If solid brick of grade M150 or more is used for masonry, a clay-sand mortar is used in a clay-to-sand ratio of approximately 1:2. It is also used for lining the stove with ceramic tiles.
- For laying refractory bricks, mortars based on refractory clay with the addition of sand are used.
- When using fireclay bricks, solutions of refractory (kaolin, bentonite) clay and fireclay powder are used in a ratio of approximately 1:3–4.
- Brick pipes in the attic space are laid using cement-sand mortar.
Clay is a soft, non-metallic rock, and, as everyone knows, it can be used to sculpt sculptures, dishes, produce tiles, etc. The difficulty lies in the optimal selection of raw materials - in nature, clay occurs in different forms, and can be “lean”, normal or “oily”. The skill of the stove maker lies in selecting the optimal ratio of clay and sand in order to obtain the ideal masonry mortar.
To check the quality of a clay solution, many methods have been used for a long time. The simplest of them is to “knead” clay dough, roll out a thin flagellum and try to bend it. The smaller the bending radius at which the flagellum begins to crack, the better the solution.
Another, very accurate way: roll the prepared “dough” into a ball and carefully squeeze it between two boards. When compressed by a third of its diameter, normal clay will begin to develop fine cracks.
If the ball crumbled even earlier, the solution is too “thin”. If cracks appear when a lump of clay is compressed by half its diameter, the solution is greasy. In any case, it is better to get a fattier solution than a lean one.
How to mix clay mortar
To lay a Russian stove you will need approximately 3.5 m3 of mortar. Accordingly, the required amount of ingredients is taken in the ratio specified above and diluted with water in an amount of 1/4 of the volume of clay taken. For example: 1.1 m3 of clay, 2.2 m3 of sand and 0.27 m3 of water.
An iron barrel or a tin-lined box is used as a container; the clay is soaked in water for a couple of days. After this, sand is added and the entire solution is mixed with feet (you will have to stock up on high boots) until the mixture becomes homogeneous.
Important: since the width of masonry joints is no more than 3 mm for fireclay bricks and 5 mm for regular bricks, all large lumps and pebbles must be removed from the mortar
Technology issues
Base
Under the foundation of the outdoor stove, they dig a pit on the bayonet of a shovel (30 cm). First, an anti-heaving sand cushion with a thickness (thickness) of 15 cm is poured into the pit and compacted, and crushed stone backfill is placed over it to the ground level. The backfill is carefully leveled to the horizon. The extension of the sides of the pit beyond the contour of the furnace in plan is from 400 mm.
Further, if the foundation of the furnace is a ready-made concrete monolith, the foundation slab is simply placed on crushed stone. If the foundation is poured with your own hands, formwork with a height of 80-150 mm is made under it. Reinforcement is standard 2-level. Solution - from M250. It is impossible to lay the foundation of the furnace flush with the ground: it will soon become clogged with soil and its “chemistry” will ruin the lower rows of the masonry, which is equivalent to re-laying the entire furnace. To avoid tripping over the threshold of the foundation, a gently sloping blind area is made of curb stone or cement-sand mortar along its contour.
If the stove is built in a gazebo, on a veranda, or generally on a wooden floor of sufficient load-bearing capacity, the removal of the stove base must be done according to fire safety rules: from 600 mm on the side of the fire door and from 300 mm on the other sides. Asbestos cardboard with a thickness of 4 mm or basalt mineral cardboard with a thickness of 6 mm or more is placed on the floor, then a sheet of roofing iron. The iron flooring is moistened with a liquid clay solution, felt or basalt cardboard is placed on it and impregnated with the same solution. Laying the furnace structure begins when the clay impregnation is completely dry.
Brick
For an outdoor stove, you need exactly stove brick: dense, well-annealed. A rough stove or a 2-burner stove with a smoke tooth, in which the firebox does not get very hot, can be made of red working bricks, incl. hollow - the stove from it warms up faster and loses less heat in vain. Sand-lime brick is absolutely unsuitable for stoves, and fireclay masonry in outdoor stoves should be avoided: due to the high moisture absorption of fireclay bricks, it is susceptible to frost in the open air in winter.
Note: why would the authors of some publications and the rewriters who are crazy about stealing their material think that a stove can be made from gas blocks, the Almighty hardly knows. This is foamed cement mortar. Under the influence of high temperatures, cement gradually but quite quickly loses water of crystallization and disintegrates into dust.
Masonry mortar and masonry
Ordinary clay stove mortar is unsuitable for outdoor stoves: it will become limp during the period of inactivity during spring and autumn bad weather. Stoves with a relaxed thermal regime (rough, 2-burner with a smoke chamber) can be laid on a cement-sand mortar from M250 (Portland cement from M500: sand 1:3 - 1:3.5); in extreme cases, it won’t take long to completely shift them. Sometimes outdoor stoves at weekend dachas are placed on the same mortar with reinforcement of 6-7 mm thick seams with 3 mm thick steel mesh. However, with more or less regular use, a stove folded in this way will last no more than 5-7 years.
To build a truly durable outdoor stove, you will have to buy dry stove mortar for laying outdoor stoves and seal it according to the instructions. In general, this is a clay-cement-sand mortar, but the quality of the clay for it must be tested in the laboratory, and the dry mixture must be prepared on production equipment. If you don't mind taking the risk of laying down a rough or slab first, a trail of mortar for laying outdoor stoves is prepared at home. way:
- White or gray fatty clay is mixed with a large amount of water and left to “sour” for three days;
- The first two days the clay solution is periodically stirred, the third day it is allowed to settle;
- The suspension is drained, and the clay sediment is pressed through a sieve with a mesh size of 1.5 mm and dried in the shade;
- Dry clay is crushed to a fraction no larger than 1.5 mm and Portland cement grade M400 or higher is added in an amount of 10-15% of the volume of clay;
- Make a “sausage” test for the fat content of the clay-cement mixture, as when preparing stove mortar with your own hands;
- Add mountain sand of fraction 0.5-1.5 mm to the dry mixture to the desired fat content. Gully and rounded quartz river sand are not suitable. Only now the mixture is ready to work.
You need to prepare masonry mortar for the stove, from a purchased or home-made mixture, in small portions so that it can be worked out in 2-3 hours, because The clay-cement-sand mortar dries and separates in the bucket. For beginners, it is better to make a bucket of mortar at a time; it will be enough for 100-120 bricks. It is better to apply the mortar onto the brick with the palm of your hand in a layer of approx. 3 mm. The squeezed-out excess is immediately removed with a finger, and the seams from the outside are cut with a wooden stick to a depth of 4-5 mm for moisture insulation, see below.
Note: the thickness of the seam between fireclay and red stove bricks is 6 mm, because the moduli of their thermal expansion coefficients (TCE) are different.
Seam protection
Neither cladding with tiles, stone or face bricks, nor plastering with moisture-resistant plaster will completely protect the masonry joints of an outdoor stove from getting wet. A radical way to protect external joints from moisture has appeared only in our time: grouting the joints with glue for porcelain tiles. The seams are rubbed down after the masonry has completely dried (20 days at 15 degrees and 7 at 25). During the drying period, a temporary canopy is installed over the oven to avoid uneven heating by direct sunlight.
As for the internal seams, to protect them, all openings/openings in the stove structure are plugged with bags filled with dry grass, rags, etc. during winter downtime. So the temperature inside will be at least a degree higher than the outside one, which will prevent condensation. In the spring, before the first start after winter, the stove is quietly heated for an hour or two with paper, shavings, dry grass, until the smoke from the chimney brightens or becomes almost transparent. Now the furnace can be started at full speed.
Mortgages and accessories
Metal embedded parts can only be walled up in furnace brickwork; There should be no mortgages in fireclay. The thickness of the mortar layer between the metal and the stove brick is also 3 mm, so the seam with the embedded part will be 6 mm thick + the thickness of the embedded part. Because seams thicker than 13 mm are unacceptable, the maximum thickness of the embeds in the furnace is 5 mm, and the minimum, according to general building standards, is 4 mm. Wire embeds can be 3 mm thick.
Deformation gaps between the brickwork and fittings (doors, flaps, latches, gates) are required to be 6-12 mm wide. Most often, the gaps are 10 mm. Deformation gaps are filled with fluffed asbestos; As a rule, for this purpose, the fitting element is wrapped around the contour with an asbestos cord before installation. They put the fittings in place as soon as the masonry reaches the level of its bottom; It is unacceptable to push the part into the finished opening! Next, the laying is carried out by circling the fittings until they close at the top of it.
In the manuals for the construction of stoves they write that the fittings in the stove structure need to be secured only with wire, because... cast iron does not cook or cooks very poorly. This is true, which is why cast iron fittings are provided with eyes and/or grooves for 3-4 mm wire. Installation of cast iron elements of stove fittings is done as follows. order:
- As soon as the masonry is brought to the bottom of the part, grooves are selected in the bricks with a grinder for the wire whiskers. The width of the grooves is 6 mm. Laying the mustache in the masonry - from 1.5 bricks, better - 2.5-3.5 bricks. The ends of the wire should not fall on the vertical joints of the masonry!
- A wire is threaded into the lower eyes of the asbestos-wrapped fittings, the piece is put in place and the laying continues;
- In the last row of masonry before the part covering the part, grooves are selected for the upper wire whiskers, as in step 1;
- Insert the wire into the upper eyes of the part;
- Lay out the overlapping row and carry the masonry further.
At the same time, in outdoor stoves that are heated irregularly and not intensively, fittings made from ordinary structural steel are quite durable, incl. homemade. This saves a lot of money, because... cast iron fittings road. It is quite legal to attach steel stove fittings by welding to embedded parts made from a steel strip or angle.
The principle of operation of the design
The operating principle of the Russian stove is very simple.
Even a person who does not understand stoves at all and has never encountered them can understand it. A Russian outdoor stove works as follows:
- First, the fuel begins the combustion process in the fuel chamber. Combustion occurs due to the presence of oxygen (air), which enters through a passage in the lower part of the furnace, also called the mouth. The smoke then moves towards the arch, and finally enters the chimney.
- The combustion time of the fuel depends on its humidity; the drier the logs, the faster the heating occurs. During this entire process, a fairly large amount of heat is released, which can be rationally used in several areas. Now we will describe them. Areas of use of the Russian stove
- The first and main application of the unit is cooking or heating food in it. To do this, people used a variety of dishes, usually made of cast iron. The design and simple operating principle of the oven made it possible to do anything with food: food was fried, boiled, simmered, stewed;
- Also, the Russian stove has long been used as a source for heating a room. It was installed in the center of the room and evenly heated the air;
- Few people know, however, that people washed themselves in a Russian oven! Its size allowed it.
Chimney installation
The operation of the entire garden stove depends on a correctly installed chimney. The easiest way to make a chimney without errors is to use a modular system. Having collected a sufficient number of modules, you only need to assemble them like a construction set and cover the outside with bricks. It is important that the modules fit tightly together and are firmly connected with clamps or heat-resistant sealant.
There are several rules for installing a chimney:
- Installation must begin from the stove;
- The parts must fit tightly together without forming gaps or cracks;
- Good access must be provided to all parts of the chimney so that in case of blockage, the chimney can be cleaned;
- The joints of the modules should not be in the ceiling.
Step-by-step instructions for making a mini-oven
Taking into account the layout of the mini-oven for the dacha, let's get to work.
Masonry from 1 to 12 rows
The first row is laid out, and in the second it is necessary to provide space for the blower door. The rows must be coated with the solution. Before installing the blower door, it must be wrapped with asbestos, and the door will be secured with wire.
Next, a row is laid out using refractory bricks and a mixture of refractory clay.
During the laying of the row, a grate is installed. Starting from this row, right up to the masonry, it should be done with refractory bricks.
A firebox door should be installed in the row, with which the same work should be done as with the door for the blower (wrapped with asbestos, secured with wire).
We lay out the row according to the layout. Each layer must be coated with a solution. 8, 9, 10, 11 and rows are laid out in accordance with the layout.
Masonry from 13 to 24 rows
From the row we begin to form the combustion chamber and vertical channels. The main thing here is to carefully follow the procedures, otherwise you may violate the correctness of the design.
On the 15th row it is necessary to lay out a layer of clay-cement mortar. It will strengthen the bottom of the cleaning chamber, after which you can install the door itself.
Masonry from 25 to 35 rows
Further up to the row we lay the masonry in accordance with the instructions.
In the 25th row, the bottom surface of the second cleaning chamber should be sealed, also laying this row with clay-sand mortar, and then install the door.
Next, we lay the bricks in accordance with the order, forming a chimney channel.
In the 28th and 32nd rows, two valves should be installed, with the help of which the draft will be regulated.
Next we begin to raise the chimney pipe, as shown in the layout.
If everything is done correctly, after completing all the work you should end up with a compact model like this.
This model has the following dimensions: 51 cm width, 89 cm depth and 2.38 m height. Even beginners can make such a stove. In addition, if you do not have experience in the furnace business, then it is not recommended to make more complex models, since you can get confused in the procedures and damage the integrity of the structure, which will affect the quality of its operation and service life.
Small size and the ability to quickly and efficiently heat are the main reasons for the construction of small-sized brick stoves. These characteristics are achieved in a variety of ways, differing in masonry and design options.
What is this article about?
Miniature stove made from a can
This stove option is perfect for those who like to relax in nature.
The finished product has minimal weight and takes up very little space in a hiking backpack. Despite the simplicity of its design, a stove made from a can is very convenient and productive - you can boil a liter of water by spending a few small dry branches. Miniature stove made from a can
Moreover, such a homemade stove can work not only on branches, but also on leaves, cones and even hay. You definitely won't remain hungry!
The first stage is preparation of components
Prepare three tin cans of different sizes in advance. Canned food containers are perfect. From the largest can you will make the body of the stove, place a medium-sized can in the body, and from a small container you will make an impromptu burner.
Cans
Additionally, prepare scissors, a block, an electric drill and a felt-tip pen.
Wood block
The second stage is making a template
First step. Insert a wooden block vertically into the largest jar and, approximately at the level of the lid, mark a couple of lines on the wood at a distance of about 8 mm.
Insert a wooden block vertically into the largest jar and, approximately at the level of the lid, mark a couple of lines on the wood at a distance of about 8 mm
Second step. Cut a rectangular recess according to the markings, such a size that the upper edge of the container can freely fit into it.
Insert the block into the jar and draw two lines with a marker approximately at the level of the lid
Drill a hole according to the markings
Third step. Place the block so that the can rests steadily on it, and the upper edge of the large can is held in the previously prepared recess in the block.
We put the jar on the block
The third stage - preparing a large jar
First step. Draw a line over the bottom edge of the largest can. This line will serve as a marking to create ventilation holes. The line can be drawn with an ordinary felt-tip pen.
Making the markings
Second step. Drill holes along the marking line. The optimal number of holes can only be selected experimentally. Excessive ventilation will cause fuel to burn too quickly, and if there is insufficient draft, the stove will simply not be able to operate normally.
Making holes
Therefore, make a small number of holes to begin with, and then, if necessary, drill them after the initial tests of the stove.
Stage four - preparing the middle jar
Drill holes under the top edge of the middle can
Drill many holes in the bottom of a medium-sized container. Select the size and number of these holes so that the loaded fuel does not fall out in the future. As a result, the bottom of the jar will look like a sieve.
Drilling the bottom of the middle can
Fifth stage - stove assembly
Place a medium-sized jar into the largest container. The connection should be quite rigid, but not tight - a small gap is required between the walls of the two cans for air circulation.
Insert the middle jar into the large one
Stage six - making the burner
To create the burner, use the smallest tin can.
Cut off half of a small can, make holes closer to the edge, as well as one hole in the bottom
First step. Prepare holes in the side of the jar in the same way as you did with previous containers.
Second step. Cut out the bottom of the can using tin snips.
Third step. Carefully align the edges of the burner and clean them with a file.
Stage seven - checking the stove
Stacking the wood chips
Load the wood chips into the middle jar and set it on fire.
Take the main part of the stove (a middle container inserted into a large one) and load fuel into it (cones, wood chips, leaves, small branches, etc.). If possible, load dry branches directly from trees into the oven, because... Fuel from the ground may be damp.
The smallest part is the burner. We put it on top
Light the load and let it warm up. At first you may not be very good at it, but very soon you will learn how to light a stove with just a couple of matches.
We heat up the food or put on the kettle. The camping mini-stove is ready
Let the fuel burn intensely, place a burner on the stove, and a saucepan, kettle or other container on it.
An improved model of a supercharged mini-stove
How long does it take to build a summer outdoor stove?
Brick ovens built for outdoor cooking come in a variety of designs, the construction of which can take varying amounts of time - from a week to several months. The first heating of the constructed stove is carried out only after the mortar in the masonry has completely dried, that is, no less than 4-5 days from the date of completion of construction.
The long-awaited spring is coming, the heating season is already ending. In the village, wood-burning stoves are increasingly being fired up every other summer, and then only to cook dinner. A little more and it will be completely impossible to use the stove in the house - it’s too hot. Many rural residents and summer residents transfer their economic and culinary activities to summer kitchens, and the most cunning and “advanced” ones go outside.
Conclusions and useful video on the topic
Video #1. A video to help independent stove makers, the material presents a visual arrangement of a heating stove:
Video #2. A detailed guide to the construction of a heating and cooking unit according to ready-made procedures, but with some changes from the contractor:
When choosing a design for your own construction of a stove for a summer residence, you need to take into account your own capabilities and skills. It is possible that someone will consider the options we have proposed to be too complex or simple. In any case, the information presented will help you get an idea of the stove structures in order to use it yourself or monitor the actions of hired stove workers.
If you had to build a brick stove for your dacha yourself, please share photos of your own designs. Perhaps you know some subtleties that we did not take into account in our article? Tell our readers about them - leave comments in the block below.
Building an outdoor oven out of brick with your own hands
Stone is considered an excellent building material for barbecues - it is effective and very reliable, but its price is often too high. In addition, when working with rough stone, the process of building a barbecue will slow down several times, and even a professional will not be able to guarantee the high quality of the result. But brick suits all parameters: it is quite light, has good strength characteristics and is quite cheap. It is best to use red clay bricks that have been fired: such bricks become fireproof and are practically not afraid of exposure to high temperatures.
Criterias of choice
You need to select equipment for heating your home in such a way that it provides complete heating of the existing room, based on its area. A wood-burning stove, for example, is a fairly simple and economical device that quickly solves the problem of warming the inhabitants of a country house.
The following features are important when choosing:
- compactness and simplicity of design, especially if the house is small;
- safe operation in houses made of any material, tightness of the chimney, compliance with draft parameters;
- resistance to natural factors during periods when the stove is not in use;
- quick kindling, quick heating of the room, heat retention for a long period of time;
- the presence of a convenient door that allows you to use the device as a fireplace;
- arrangement of the hob;
- preferred fuel for heating – it is advisable to opt for more versatile models;
- mobility, ability to move if necessary;
- built-in units for connecting the hot water system in the house.
Types of designs that are used today
Gas, electric and solid fuel boilers are the main heating devices in country cottages and private houses. Some connoisseurs of everything ultra-modern use solar panels for these purposes. But still, a large percentage of residents of the private sector use an old Russian stove to heat their premises.
Until the 19th century, stoves in village huts and even in noble mansions were a box for burning fuel with a hob, a stove bench, and sometimes an oven. For owners of a modern home, overflowing with newfangled household appliances, a Russian stove in the interior is more of a decorative detail than a practical one. Today, the range of designs has expanded and is represented by such structures.
A large percentage of private sector residents use an ancient Russian stove to heat their premises.
Nowadays, the stove acts as a decorative element
- “Dutch” - intended exclusively for heating rooms, is a compact one- or two-tier vertical structure with a chimney. This type is rarely found in modern buildings due to its inexpediency (it is easier to heat apartments using a central heating system - pipes and radiators).
- A Russian stove in a stove bench is a mandatory attribute of a village hut in Rus'. The firebox located in the lower part of the structure heated its upper part, and in the middle there was a cast-iron hob. The chimney in such a system is duct.
- “Shvedka” is an improved and simplified version of the traditional Russian stove, which is characterized by high efficiency while saving fuel. The “Swedish” can be equipped with a hob, a stove bench, and a platform for drying food (berries, mushrooms).
Each type can be built from scratch or an outdated version can be reconstructed. In order for a Russian stove to perform its functions 100%, the structure must be positioned correctly.
You can equip a place for rest on the stove
A stove in the kitchen interior will create a cozy and warm atmosphere
An imitation stove can be made using a modern fireplace
Where to begin
It is best if, before starting any work, you draw up a detailed drawing (order) with the exact location of each structural element, and first develop an action plan. Decide on the location, design, purpose, and size of the stove. In fact, such a painstaking approach will save you time and help you calculate the exact amount of building material needed.
To build a stove, ideally you need to use a new heat-resistant brick, without damage, with clear geometric dimensions. This allows masonry to be done with a minimum layer of clay mortar, which is an important unwritten rule for a “seasoned” stove maker. To save money, of course, you can use used bricks, but they must be clean, smooth and certainly fireproof.
One of the most important issues that needs to be resolved is preparing the correct solution. The main thing is that it is not very greasy, but moderately plastic. An excessively fatty solution will crack when drying; a thin solution will not have sufficient strength.
Much depends on the characteristics of the clay available to you. There is one that is suitable for masonry without filler; fatty clays are mixed with sand (preferably not river sand) in various proportions (most often 1:1, 1:1.5, 1:2).
There are many ways to check the characteristics of the solution, the simplest is to prepare samples of different proportions, mold them into balls and throw them onto the floor from a height of 1 meter; if the ball crumbles or cracks appear on it, then the solution contains too much sand. Experiment by changing the percentage of filler, you will definitely find a happy medium.
The clay must be soaked in advance (2-3 days in advance) in a suitable container, then, adding sand little by little, knead it using feet or a tamper so that there are no lumps left and the solution becomes homogeneous. Be sure to feel it with your hands for the presence of unnecessary impurities, clots, and pebbles.
Experienced stove makers recommend sifting or grinding all the ingredients and the finished mixture through a sieve. Do not doubt that you will make up for this time when laying, especially since for a hundred bricks you only need about three buckets of mortar.
In construction supermarkets you can purchase ready-made dry mixtures for laying stoves. Convenient, but expensive - not suitable (we have a budget option).
Installation process
If you nevertheless decide to lay the furnace with your own hands, then familiarize yourself with the features and technology of carrying out the main work. This will help you complete the process correctly and avoid mistakes during installation. According to experts, many are able to complete all stages of construction without outside help.
Foundation and foundation
It is very important to take care of constructing a reliable foundation for a brick structure. It must withstand heavy loads and not sag under them
The lower part of the oven is reserved for baking and remains free. It is convenient to store household supplies and kitchen utensils there. Concrete slabs or steel beams in combination with brick are chosen as the floor for the oven.
Due to the high fire danger, the use of wooden supports is not recommended, but is not prohibited. If you still cannot replace such material with anything, do not forget about antiseptic wood treatment. Otherwise, the ceiling may be damaged by insects.
It is also necessary to pay attention to the seams and their correct processing. They should look neat after applying the cement mortar.
External walls are plastered with conventional mixtures intended for interior decoration.
Brick walls are laid parallel to each other in two rows on top of the foundation, observing the alignment. In the third row, a door for the blower is installed. Next, the masonry continues, and doors for cleaning the firebox are installed in the fifth row, and lining is also performed (internal lining made of refractory bricks). The next row will require installation of a grate.
In the seventh row we form blind channels, thanks to which we will get a warm place for the bed. Here we install the furnace door. Then you need to create channels (lowering and rising). Up to the eleventh row, the whole process is repeated, and only in this row the combustion door is closed and suction channels are formed (from the heil to the side channel, from the firebox to the riser and two transitions between the blind chambers).
Next, the suction channels are blocked and the formation of the caps (blind channels) is completed. In the thirteenth row, it is necessary to complete the lining and shut off the fuel chamber. The next layer of masonry consists of floors.
Starting from the sixteenth row, it is necessary to form a vertical channel (smoke) and a partition for protection from fire. This process lasts until the twenty-second row, in which the chimney valve is installed. Now all that remains is to lay out the chimney and you can move on to the decorative finishing, thanks to which the Russian stove with a warm stove bench, created by yourself, will organically fit into your interior.
The process of constructing a small-sized furnace
The small-sized oven occupies only 0.4 square meters.
It is laid out from bricks placed on edge or flat. If you know the basic rules for building a stove, then you won’t even need a diagram or preliminary calculations to build it. Due to the relatively light weight of the mini-oven, it does not require a foundation, but in this case a thick, durable board, well secured to the joists, should be used for the floor.
Order of masonry
- The first stage is traditionally choosing a place and preparing it for the construction of a furnace. To do this, you need to lay a piece of plastic film, roofing felt, hydrosol or glassine measuring 78 by 53 centimeters on the surface. Pour dry sand on top of the litter (layer thickness 1 cm) and level it.
The first row of bricks is laid out on the sand (12 bricks are used without fastening) strictly horizontally, which can be checked with a level. On top of the first row we thinly apply a clay solution and install the blower door. Pre-wrap the door with a piece of asbestos cardboard or wrap it with cord. Secure it with wire.
- We are laying the second row of our stove.
- We lay out the third row of fireclay bricks. We install a grate on it, which will be located strictly above the ash pit.
- In the fourth row, the bricks are laid edgewise. And inside the chimney, a stand is mounted on which the internal partition will be installed. When laying the back wall of the stove, do not use clay, but use so-called knockout bricks (for this they should protrude slightly outward).
- The next essential element of any stove is the firebox door. Wrap it with asbestos cord before installation. We secure the door with wire, use two bricks for temporary fixation: one on the back, the second on the first, and install the door on top of them.
- We lay the bricks in the fifth row flat, following the contours of the fourth row.
- We place the bricks of the sixth row on edge, and then rub the walls of the oven with a damp rag.
- For the seventh row, we again lay the bricks flat. At the same time, in order to ensure a connection between this and the next row, you need to start with three-quarters. Then place two bricks on edge and begin building the back wall.
Briefly about the main thing
A small stove for a country house will take up minimal space in the room. Despite its compact size, it has high heat transfer and a more attractive appearance than a “potbelly stove”. Its construction requires a minimum of materials and time.
A small stove structure can be intended only for heating a room. The construction of models is also carried out, in which there is a hob and a niche for an oven or a water tank. For the construction of any of the structures, ceramic and fireclay bricks are used. The construction process begins after selecting or developing a project, preparing the necessary materials and foundation. The masonry itself is carried out using a solution of sand and clay according to a pre-selected pattern.
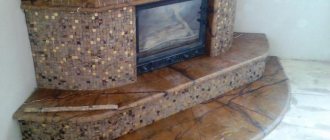
Chimney pipe
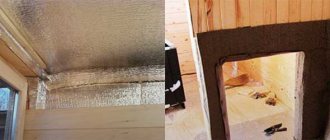
The beginning of the chimney pipe was laid out dry. The smoke collector was constructed: the author picked out the outer halves of the bricks to make it a little wider, planted them on the mortar and from the top a couple of rows of bricks on the edge. A brick was cut into a smoke collector. Then it became clear that making the semicircular cutouts was in vain, it was necessary to catch up to the overlap of the smoke collector without cutouts, time was wasted. Cutouts were made in the ceiling for a diameter of 180 pipes. The pipe went: an old 180 mm disc was used as a guide.
The pipe is made of a quarter of a brick and there is simply no room to install a damper. Therefore, it was decided to lay a slab larger than the pipe. The result is protrusions of 8-10 centimeters. According to the design, protrusions must be made. We bought 10 kg (there is no smaller package) of heat-resistant cement called GC 40, they will be sawn.
Next, the oven was insulated, a mesh was laid on it, and one layer of mortar was placed on it.
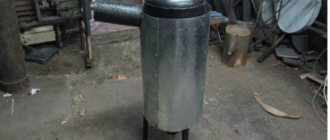
Making a pipe from a used roofing sheet took one day. The distances to the roof locks seemed to specifically coincide with the 180 diameter I needed. All that remains is to saw off the sheet to length and bend it along the mandrel cut from the outlet.