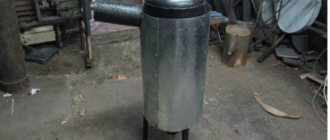
In a classic Russian bath, the main source of heating was a wood stove. The heater was made of refractory bricks and clay and served for many years. In modern baths, a metal stove has become an alternative to a brick stove.
In both design options, brick lining is popular. If for a traditional heater this is done more for the purpose of decoration, then for metal ones it is about longer heat retention, fire safety and only then decoration.
Users also search for:
- Heat-resistant plaster for stoves
- What stones are suitable for a bath
Is it necessary to line a sauna stove?
The answer is ambiguous and directly depends on the material from which the structure is made.
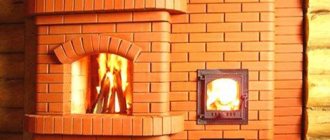
Brick
Lining a brick kiln is not necessary. The main raw material for masonry is refractory brick. The solution is a mixture of fireclay clay, sand and water. If the proportions and laying technique are followed correctly, the product is strong and durable. Such a stove retains heat well - the risk of burns upon contact with the surface is minimal, and has increased fire resistance compared to metal.
Cladding with tiles, stones, and tiles is used to decorate the product.
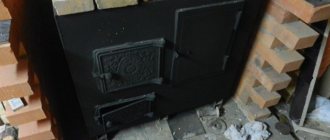
Metal
When choosing a finished metal stove, it is important to consider a number of requirements:
- Compact so that it does not take up much space in the room.
- The power of the equipment must correspond to the size of the room. If you buy a very powerful oven, it will be difficult to maintain the desired temperature.
- It is always necessary to remember to comply with SNiP and fire safety rules.
SNiP standards warn that a metal stove should be located at a distance of 15 cm or more from wooden floors.
The reasons why brick cladding is recommended are as follows:
- An iron stove heats up quickly, but also cools down quickly.
- Hot iron through radiation negatively affects the health of those present.
- When overheated, the metal loses its working properties. The product will need to be insulated.
- High risk of burns upon contact with hot metal.
- The air in the steam room becomes dry.
Advantages of brickwork around the stove:
- The air acquires the necessary humidity. It becomes pleasant to breathe in the steam room.
- The stove looks nice and neat.
- Warm air is distributed evenly throughout the room.
- The equipment retains and retains heat indoors longer.
- The level of fire safety is increasing. The risk of burns is minimal.
Most modern models of factory-made metal stoves are suitable for later covering them with brick.
Preparing construction tools
To build a brick sauna stove with your own hands, it is recommended to prepare working tools:
- grinder with a circle;
- electric drill with a special attachment;
- wide plastic container for solution;
- Master OK;
- level;
- tape measure and pencil;
- metal strips.
This is a basic list of tools, but if desired, it can be expanded with additional equipment.
At the stage of choosing a place where a small brick oven will be located, as well as preparing a construction project, it is important to take into account the basic requirements for the future design:
- Firebox safety doors should face the door.
- The base for the stove device must be at least 75 × 75 cm in size and up to 22 cm in height.
- The shelves should be located along the wall near which the stove is installed.
- Heating stoves made of bricks are built in compliance with the technological gaps between the walls of the structures and the walls of the steam room.
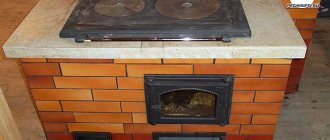
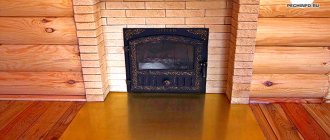
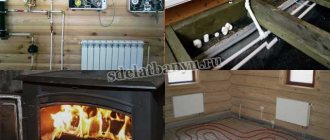
Stove cladding options in photographs
Below are ready-made options for cladding stoves that will fit perfectly into the interior of frame baths, as well as baths made of logs and blocks. The furnace firebox is located both in the steam room and in the dressing room.
What kind of brick is best to line an iron stove in a bathhouse?
Below we will look at the materials that are recommended for cladding and those that cannot be used for stove masonry.
Ceramic
It would be best to line the stove in the bathhouse with ceramic bricks.
It is very durable, lighter than fireclay. The completed finish looks beautiful and neat. It is allowed to use used bricks.
Chamotte
Fireclay is suitable for lining.
Its advantages:
- It is fireproof, which minimizes the risk of fire.
- Lasting. If you follow the masonry technique, the stove will last for years.
- Excellent heat retention.
But there are also disadvantages:
- The high price is why red ceramic is in great demand.
- The brickwork comes out rough and not very beautiful. Therefore, owners often have to re-finish with porcelain stoneware or tiles.
Fireclay is often used to line the internal parts of the stove, such as the firebox, line the chimney pipe, and lay ceramic on the outside.
Facing
The advantage is the choice of textures and colors. Will fit into any style of bathhouse design.
Minuses:
- retains heat worse;
- less durable compared to ceramic.
Hollow cladding is not used to decorate stoves, only solid cladding.
Silicate (white)
Sand-lime brick is not used for the internal and external masonry of the furnace, because it cannot withstand sudden temperature changes and is not resistant to high humidity.
Under such conditions, it will begin to crack and collapse within a few weeks.
White brick is used for laying small buildings, garages, and outbuildings, which are then lined with other materials.
A few final words
The labor costs and money spent on lining a sauna stove are more than justified.
A brick casing increases the operational safety of a metal stove; heat is distributed evenly, since the artificial stone first accumulates heat and then releases it. And the heat is retained much longer; you can steam in the sauna comfortably for several hours in a row. The benefits are obvious.
- Date: 01/18/2015 Comments: Rating: 45
It is known that the result of a trip to the bathhouse depends directly on the quality of the installed stove. Most owners prefer to use this attribute in a metal version.
Of course, stoves of this type can be installed in a short time, heat up quickly, have attractive appearance and are notable for their low price. However, they do not retain the heat of the base for long and cool down in a short time. Therefore, there is a need to periodically add firewood.
If you have a metal stove in your bathhouse, then to improve the distribution of heat throughout the steam room and increase safety, it is better to line it with bricks.
To heat the entire room, you need to spend a sufficient amount of time. The walls of the stove become very hot, as a result of which they quickly wear out. To increase the time of using this attribute and create conditions for more productive distribution of heat throughout the steam room, experienced craftsmen often resort to covering its base with a certain material. Let's consider what kind of brick to line a sauna stove and what material will give the best performance.
Plating methods
Stove makers use three methods:
- Continuous cladding. The method accelerates heat transfer. Rarely used, mainly for decoration.
- Creation of a heat shield. Acts as a partition. Increases the comfort of people sitting next to you in the bathhouse. Improves the level of heat transfer.
- The lining performs the function of a convector with vents. The best option for a bath. Suitable for any metal stoves. The area of the steam room is not important.
The layout of the lining will depend on its purpose and the functions of the stove. For decorative purposes, it is made in full brick. If the equipment acts as a water heater, then it must be laid in half a brick.
To correctly calculate the distance from the brick screen to the stove body, you need to add 2 cm per 1 kW of unit power.
There is no point in placing it close to the body - the lining will not perform the necessary functions.
People are also interested in:
- DIY metal sauna stove
- Brick stove for a bath
Conclusion
The importance of the above-mentioned bath structure cannot be overestimated, therefore the design of this stage of construction should be carried out at the very beginning. Remember that the safety you provide is precisely the factor that will allow you to enjoy your bathhouse and your work for many years!
During the heating of the bath, the surface of the stove heats up to 300-400°C
At the same time, it begins to emit infrared rays and itself becomes a source of heating. The coming heat is distributed throughout the steam room, but first of all it hits the walls adjacent to the stove. If the walls are wooden, then under the influence of high temperatures their charring begins. And there it’s already a stone’s throw away! The only truly effective way to insulate wooden walls from heat is to create protective screens and cladding from non-combustible materials in the bathhouse.
During the heating of the bath, the surface of the stove heats up to 300-400°C. At the same time, it begins to emit infrared rays and itself becomes a source of heating. The coming heat is distributed throughout the steam room, but first of all it hits the walls adjacent to the stove. If the walls are wooden, then under the influence of high temperatures their charring begins. And there it’s already a stone’s throw away! The only truly effective way to insulate wooden walls from heat is to create protective screens and cladding from non-combustible materials in the bathhouse.
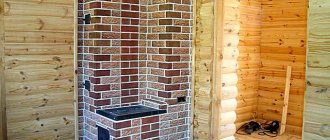
Subtleties of lining a stove with bricks depending on the room
The stove is installed directly in the steam room or the firebox is placed in the dressing room. Let's look at the nuances of each option.
In the dressing room
The advantage of a stove with a remote firebox is that it heats two rooms at once: a steam room and a dressing room. Great for small baths. It differs from conventional metal units by the presence of a fuel channel.
When installing, it is important to remember fire safety rules. The minimum distance from the wall is 0.5 m. Sections of the walls near the stove must be sheathed with thermal insulation; a protective fireproof screen can be installed.
The distance from the firebox door to the wall or door is at least 1.25 cm. It should be located towards the door to the steam room.
For a unit with an external firebox, the installation of the partition is carried out in stages as follows:
- A place for the oven is selected. The foundation is poured (detailed instructions are given in the section below).
- After the foundation has completely hardened, the structure is placed on it. An opening for the firebox is marked on the wall. It should be larger than the camera itself, 25 cm on each side. The exact choice of opening dimensions for a specific stove model is indicated in the product data sheet.
- A hole is cut with a grinder. Pieces of excess material and debris are removed.
- It is recommended to place the stove on the foundation again to check the correctness of the hole made and the evenness of the base.
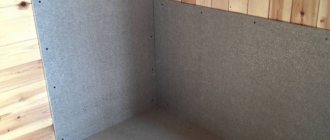
- The oven is being cleaned. Thermal insulation material is being prepared.
- Basalt cardboard is taken and cut into strips. Attached to the walls of the hole with a stapler. Then the ceramic fabric is fixed in the same way.
- Aluminum foil is attached to the stapler.
- Take two sheets of mineralite. Carefully cut out a hole for the firebox.
- The blanks are placed on the side of the steam room. Mounted to wooden walls using self-tapping screws.
- The brick for facing is soaked in water. The mixture is being prepared for ordering.
- The masonry work begins in the dressing room. The first row needs to be laid in half a brick. The last elements of the row are placed across, so you get beautiful protrusions.
- In the second row there is space left for an ash pan. Air circulation will occur through it.
- The minimum distance from the stove body to the partition is 3 cm.
- When the height of the masonry is reached above the firebox, two steel corners are placed in the brick row. This will prevent contact with metal.
- Now the foil and the remaining cardboard are carefully trimmed. When a gap is formed, it is filled with mineral wool. They compact well.
- At this stage, laying in the steam room begins. The stove is placed on the foundation.
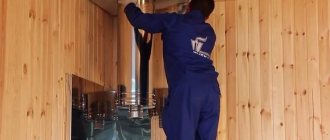
- The chimney pipe is connected.
- Marking is being carried out. A partition is created in the same sequence.
Another advantage of this design is that it reduces the risk of carbon monoxide entering the respiratory tract. Oxygen remains in the steam room, since fuel combustion occurs in another room.
In the steam room
This arrangement is less expensive in terms of materials, but requires increased attention and compliance with fire safety rules. There are open-type designs where stones are laid on top of the stove. By pouring water on them, you can regulate the amount of steam in the room.
A step-by-step guide to installing the unit in a steam room is described in the section below.
Recommended reading:
- How to clean a chimney
- Installing a stove in a bathhouse
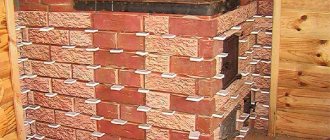
Brickwork
Brick laying is carried out according to a pre-developed plan. During work, it is important to maintain the sequence of rows and the evenness of their construction. The first row should be perfect.
The general scheme for discharging a brick sauna stove with your own hands consists of a number of steps.
- The first row sets the general direction of the walls. Must be perfectly smooth. A plumb line is made from it to check the vertical.
- The next step is to make the ash pan. Its tasks include collecting waste generated during the combustion process.
- The third and fourth rows are responsible for attaching the blower. A metal strip is used to secure it. The blower is responsible for regulating the combustion process. Open position – intense flame, closed – small flame.
- After the fifth row, steel corners for the grate are laid.
- Starting from the 6th row, a firebox is installed. Fireclay bricks are used for it. The height of the firebox is 25 centimeters, the width is just over 30. A grate is placed on top of the firebox.
- In the last rows, the firebox area expands. Refractory bricks are used for external masonry. Openings are created for secondary air supply. They are made of bricks cut with teeth.
- The laying continues with the outer brick. Doors for the firebox and a partition for the chimney are installed.
- A water tank is installed.
- At the height of the 15th row, the firebox is covered with a slab of refractory material, and stones are laid on it.
- The laying of the compartment under the stones begins. Its size depends on the number and size of stones.
- The chimney is laid out last. Fireclay bricks are used for it. The chimney gradually narrows upward. Exited through a wall or roof. The passage points through the bathhouse partitions are lined with thermal insulation. The last to be installed is a chimney protected from rain and dirt.
During operation, the solution is applied to the previous row. The brick is laid with the smooth side facing the chimney. The vertical and horizontal lines are checked after each row. The remaining solution from the side surface is cleaned every 3-4 rows. After laying out, the oven is left to dry.
Other materials for oven cladding
In addition to bricks, tiles, stones, and tiles are often used to decorate structures. Let's look at the features of each material in more detail.
Tile
The following types are suitable for cladding:
- Clinker. It is based on clay. Molding occurs under a press, firing at high temperatures. The material's properties are similar to ceramics.
- Terracotta. It is obtained from a mixture of terracotta clay and fireclay powder. The finished tile comes out reddish in color. Has good strength.
- Majolica. To create it for industrial purposes, a complex technological process is used, which is why the price of this material is high. Glazed look of tiles. Its working properties are similar to terracotta.
- Porcelain tiles. Marble chips are added to make durable tiles. The material is reliable and lasts for years. It has a beautiful view.
- Chamotte. A fireproof type of cladding, but its decorative properties are several times inferior to other tiles.
Tiles are considered a separate type of facing tiles for stoves. Their properties and features of use will be discussed below.
Stone
Natural and artificial stone is used to decorate the stove.
Of the natural rocks that are distinguished by their strength, resistance to temperature changes and heat transfer, serpentinite and soapstone are used.
Artificial stone is an imitation of natural stone. The properties and installation method are similar to tiles. It is lightweight, so for compact stove models it is necessary to pour a foundation, and it is much cheaper than a natural one.
Fixation to the walls occurs using glue with a layer thickness of up to 2 cm.
If, as a result of manual masonry, a pattern or a certain design should be obtained, then it is better to prepare a drawing in advance, make markings and designate each of the elements with numbers.
Tiles
Tiles are three-dimensional clay tiles. On the outside there are protrusions - rumps - with which the elements are connected to each other.
It is recommended to lay tiles immediately after the construction of a stove or fireplace (applies to brick ones). Correctly connected elements form a solid wall, which is very durable.
To decorate a metal stove with tiles, it is better to first make a brick partition and place pieces of wire in the seams between the bricks, with the help of which the elements will be connected to the masonry. The solution becomes an additional binder.
There are tiles on sale in round, square, triangular, and trapezoidal shapes. Wide selection of colors, reliefs.
Parts with multi-colored patterns, drawings of animals and plants are in demand.
Brick selection
Not every material is suitable for lining a stove. There are a number of requirements for brick. The stove heats up to high temperatures, which means the brick must withstand such temperatures.
Fireclay brick, heat-resistant alumina brick, clinker brick or fire-resistant red brick are suitable. These species can withstand high temperatures, are full-bodied, and will last you for many years.
Fireclay bricks can be used even at temperatures above 1000 degrees. It is made on the basis of clay by firing and with the addition of fireclay chips. Fireclay brick, despite its light weight, is dense. And due to its light weight, it conducts heat faster than others.
But the material is very expensive. Therefore, in order to save money, it is used for partial lining: it is used directly at the fire source. Red refractory brick will cost several times less, as a result of which it is used much more often.
It is also made from clay. It can be used for a complete covering or only at the site of the fire. Red brick accumulates heat and releases it. Alumina is in demand because of its price and good characteristics.
You can also look at the brick in section: it should be free of stains and well painted. Be sure to ask for quality certificates; if there are none, do not purchase anything from this store.
How to properly mix masonry mortar
For cladding, a solution of sand, cement, and clay is mixed. Clay and cement are taken in equal proportions and 30% of clean river sand is added to them.
The main condition is a uniform consistency, as thick as sour cream, without lumps.
It is better to mix the ingredients dry first, and then gradually add water. To speed up mixing, it is convenient to take a construction mixer.
Before use, let the mixture sit for about 30 minutes. You need to prepare the solution in small portions, otherwise it will thicken quickly.
A good mortar should not run off the brick.
If the thickness is insufficient, you can add a little sand.
How to brick a metal stove in a bathhouse with your own hands
To make it comfortable to warm up near the sauna stove, it is recommended to cover it with bricks. We will discuss the main stages of work below.
Materials, tools
You need to prepare in advance:
- red ceramic brick M150;
- masonry mortar;
- cement, sand, crushed stone (for pouring the foundation);
- boards for formwork;
- roofing felt;
- reinforcing mesh;
- level, tape measure;
- construction mixer;
- shovel;
- plumb line, trowel.
The masonry mortar is prepared after the foundation has hardened.
Selecting a location
There are two most popular options:
- Install the stove in the corner. The advantage of this approach is the minimum consumption of facing bricks.
- Install it on top of a brick base, which is made above the floor level by about 0.5 m.
When building a bathhouse from scratch, it is important to think through the foundation and protect the wooden floors from fire.
The walls are made of wood, the floor must be separated with basalt slabs. The height of the slabs should be approximately 0.5 m larger than the stove.
Foundation for the stove
When the reliability of the old foundation is in question, it is better not to risk it and build a new one.
An important point: the stove foundation should not be connected to the foundation of the entire building.
If the weight of a stove with brickwork is up to 700 kg, then it is not necessary to pour a separate foundation for it.
The work order is as follows:
- Marking in progress. According to it, the floorboards are cut.
- The size of the foundation should be 15 cm larger than the dimensions of the stove on each side.
- When the boards are removed, a pit is dug up to 40 cm deep.
- The formwork is made from boards around the perimeter of the pit.
- Waterproofing is carried out with roofing felt.
- A cushion of sand and crushed stone (layer up to 15 cm) is poured onto the bottom and compacted.
- Cement mortar is being poured.
- Reinforcing mesh is laid.
- A thin leveling layer is poured.
- The evenness of the filling is checked by level.
The foundation hardening time is up to two weeks. Until it hardens completely, a break is taken in construction work.
Base
A brick pedestal is laid out in one layer on the frozen foundation.
The horizontality of the masonry is controlled by the level. Roofing felt is laid on top.
Then the iron sheet is laid. The dimensions are chosen 10 cm larger on each side than the base itself.
The oven is being exposed. To prevent the surface from becoming smeared during cladding, it is better to wrap it in plastic film during the work.
Preparing bricks for cladding
The first portion of ceramic bricks is cleared of debris. Soak in water for 12 hours. The procedure is necessary to ensure that the material does not take excess moisture from the solution.
Furnace lining
When working, it is necessary to take into account the following nuances:
- The masonry can be solid or lattice. Solid - this is a large consumption of bricks, but high efficiency; with a lattice - a minimum of material consumption, but the efficiency of the screen is several times lower.
- If the body of the unit is round, in the form of a semicircle, then the masonry should completely follow the shape of the stove. If it is difficult to build it yourself, you need to invite a stove maker to help.
- The recommended distance from the body to the brick partition is 4 cm. There is no need to install jumpers between them. With a smaller distance, the brick will quickly begin to crack; with a much larger distance, the effectiveness of the cladding will be minimal.
- The average number of rows of bricks is 13-15.
- It is better to do the work more than in one day. First lay out 7 rows. Let it sit overnight. Check levelness in the morning. If there is no variation, then report the remaining rows.
- The thickness of the masonry is half a brick.
Main stages of lining:
- The order should start from the corner. Horizontality is checked with a level or a protractor is used.
- The solution is applied with a trowel. Excess must be removed immediately.
- There should be no leaks or excess mortar on the inside of the masonry. Otherwise, air circulation is reduced.
- In the second row, you need to leave two gaps the size of half a brick so that hot air can escape into the room. The same holes are left in the sixth and eighth rows.
- A metal mesh is laid on top of the second row.
- The first three rows are connected to each other with wire.
- The recommended seam thickness is 5 mm.
- In the row where there will be space for the ash pan and furnace door, a corner of metal is placed. To strengthen the row, the row is tied with wire.
- The firebox door is positioned so that when opened it does not come into contact with the walls.
- The last rows are laid out in any form at the discretion of the owners (arch, ladder, evenly).
The masonry can be finished at the level of the slab so that the hot coals are visible or the chimney can be completely covered with brick.
Finishing
After tiling, you need to wait at least three days until the solution dries completely. After this, the remaining solution must be removed.
To give the bricks an even shade, laundry soap is diluted in water. Using a stiff brush, the soap solution is applied to the walls and washed off with water. Next, wipe the surface with a cloth.
If desired, the seams can be made in a different color, but for this you will have to buy special stove paint.
Features of the first firing of the furnace
Upon completion of the facing work, a test firing of the furnace is performed. You need to start heating gradually, filling the chamber with wood only a little at a time. The first heating should take an hour, the second – up to three hours. With each subsequent heating time increases.
After each lighting, the stove is allowed to cool completely.
A properly executed lining of a metal stove will create a cozy atmosphere inside the steam room, retain heat longer, and its decorative design will decorate the interior.