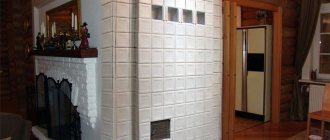
Covering a stove with ceramic tiles with your own hands is not such an easy task, but if you wish and take a careful approach to this process, it is quite doable. Tidying up the walls of a brick kiln is done if the plaster previously applied to them begins to peel off, or if the brickwork, which is not covered by anything, looks sloppy.
Do-it-yourself oven cladding with ceramic tiles
This process becomes especially relevant when a major renovation is planned in the room where the stove is installed. You can, of course, remove the old cladding and plaster the surfaces with a new layer of mortar, but such a finish will still look “boring.” Therefore, quite often plaster is combined with tiles or the walls are completely finished with ceramic tiles of one type or another.
It is also important that often the ceramic layer can perform not only a decorative function - it becomes an additional heat accumulator and an effective source of thermal infrared radiation.
Calculation of the number of tiles
To do this you need to know a few things:
- the total area of all oven surfaces on which the tiles will be laid;
- the dimensions of possible areas with a narrow decorative layer of ceramics;
- dimensions of ceramic tiles.
To calculate the area, you will need to subtract the dimensions of the blower doors, combustion chamber, and gaps between finishing parts. For furnace cladding, it is recommended to make gaps of up to 10 mm.
If you plan to make a narrow finishing belt, make barriers and other decorations, the area of such a layer is taken into account in the calculation. Now knowing the dimensions of the tiles, we can easily calculate the number of tiles of the main layer and decorative belt.
We divide the total surface area by the area of 1 tile and get the number of parts required to complete the work. If the doors on the firebox and ash pan are small, they can not be subtracted from the total area. For reserve, it is recommended to increase the number of tiles by 20% of the calculated value.
Functions
The furnace lining performs a number of specific functions:
- reducing the time required to heat the room;
- ensuring ease of maintenance of the device - cleaning tiles is much easier than, for example, a plastered surface;
- attractive decor;
- increase in heat transfer and heat capacity of the furnace;
- psychological aspect - according to most psychologists, the presence of a traditional stove in the house has a good effect on the general atmosphere in the home, as well as the mood of others.
Tile requirements
To get acquainted, we will analyze the main types of tiles and the criteria for their selection. It is recommended to use several types of finishing materials for lining heating units and fireplaces:
- "Majolica". Such tiles can be found on old stoves. Ceramics covered with a layer of special heat-resistant enamel - the high price does not make it popular among the population;
- Terracotta tiles are a simple version of majolica. It is made from clay, due to its properties it is not subject to deformation from high temperatures, and is resistant to cracking and mechanical damage. It is successfully used as a finishing for stoves in garden houses with seasonal heating and long breaks in work. This finish will protect the stove from dampness and cracking.
- Clinker tiles are an alternative to refractory bricks. The composition includes several types of clay with the addition of fireclay and various dyes. The finished mixture is pressed under high pressure, then fired;
- The use of porcelain stoneware increases the service life of the stove finish. It is made from different types of clay with the addition of granite, marble and binding additives. The thermal properties of the material make it possible to reliably protect the stove surfaces and give them a beautiful appearance.
Any tile must meet several requirements, which we must pay attention to when choosing finishing materials:
- Surfaces must be smooth, without cracks or chips.
- Individual parts of the series must be painted the same color. If even the color tone is different, it is not recommended to buy such products. It could be a defect or a fake.
- Each part must be geometrically smooth, maintaining right angles. To check, place several tiles on the surface and join them together. If there are the slightest gaps or the slab does not adhere to the surface, it may be a mismatch or a fake.
- We make sure to check the seller’s quality certificate for the product, which should indicate the environmental safety class and other performance characteristics.
Color spectrum
The color of tiles for stoves and fireplaces should be matched to the overall design of the room. Clinker plates are presented mainly in natural shades - from pure white to chocolate. The range of shades of porcelain stoneware is simply huge. With its help you can create a designer unique finish for a heating unit.
If it is necessary to emphasize the naturalness of the hearth, to bring the structure as close as possible to a rustic stove, choose terracotta of a natural clay shade for cladding. Marble plates, majolica, and tiled elements are produced mainly in light colors, complemented by painting and various patterns.
What glue should I use to glue tiles to the stove?
Having chosen a tile, you need to select a composition to securely fix it on the walls. To answer the question: how to glue tiles to the stove, we follow several recommendations:
- it is better to purchase a ready-made composition so as not to perform complex calculations on the amount of materials;
- we select glue produced for lining fireplaces or stoves;
- It is recommended to use heat-resistant mastic “Standard” with a heating temperature level of 10,000. We take into account the material consumption of 1.5 kg per 1 m2;
- glue “Plitonit – SupenrKamin” is produced using a dry mixture, which we dilute before work;
- Atlas-Plus hardens within a few hours. Consumption rate 2 kg per 1 m2;
- “Fixator” adhesive is recommended for use when lining garden house stoves. It can withstand high temperatures during furnace operation and cold during long breaks.
Where is it used?
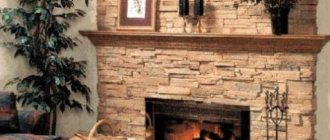
Fireproof tiles for fireplaces and stoves are used primarily as a decorative element for the surfaces of heating devices. Thanks to tiles, these objects can be transformed into a real work of art, giving a stove or fireplace a personal touch, or finishing in accordance with certain cultural traditions.
An excellent example is the Russian stove, which is still used in homes directly for its intended purpose or as a bright element of room decor.
Tiles are not used for finishing the space around the stove, working and internal surfaces.
All types of fire-resistant tiles must have a quality certificate. Only with supporting documentation can we say that the material will meet the declared characteristics.
Materials and tools
In order to glue tiles to the stove, we will prepare the required materials and tools according to the list:
- tiles or other type of material with a reserve;
- mounting mesh or just chain-link;
- hammers with rubber and metal strikers;
- hammer drill with chisel;
- ready-made glue that can withstand high temperatures;
- device for cutting tiles;
- spatulas;
- building level;
- devices for protecting the corners of the furnace;
- special primer;
- ready-made or home-made parts for setting equal gaps between the cladding;
- heat-resistant grouting.
Leveling the floor
If you have a concrete floor, you can use a special construction mixture or a solution of cement and sand. The use of the second option involves a process similar to conventional plastering.
But if you choose a building mixture, then you need to know the technology for carrying out the work. It will not be difficult to prepare such a solution, since the manufacturer prints instructions for correct mixing on each label. The standard also indicates the thickness of the layer that can be laid on the floor in the bathroom, and how long it will take to dry. If the concrete surface has pores, cracks, joints and gaps, then you need to think about waterproofing. To ensure that the mixture and the base adhere well to each other, a primer is used, which is initially used to treat the floor surface.
The next step is to draw a level along the entire perimeter of the room. This can be done using a water level. Its design is a thin hose with graduated flasks attached to it. The measurement principle is based on communicating vessels, that is, the flasks are filled with water and placed around the perimeter. To carry out high-quality measurements, it is better to carry them out together with a partner, one of whom will mark the marks on the wall, and the second will align them with the markings of the flask. Next, the resulting points are connected with a ruler into one continuous line.
The resulting horizontal lines serve as the basis for installing pendulum slats. After this, the surface is filled with the resulting solution.
If air bubbles begin to form, they can be removed using a needle roller. The direction that must be followed when leveling the floor is from the far wall to the door.
But in old houses, wood was often placed on the floor. The difficulty of such a coating is that the wood does not have a rigid structure, which means it will be difficult to lay tiles on the floor. If floor tiles are placed on old and rotten boards, they will crack very quickly.
Therefore, first of all, you need to take care of replacing old boards with new ones, the thickness of which should be at least 2.5 cm. You should not forget about protection against fungus, mold and rot. To do this, it is necessary to perform an autopsy with special solutions. Again, a layer of waterproofing is needed under the tiles on the bathroom floor.
Leveling wooden floors occurs using the same building mixture. But before pouring the surface, a construction mesh is attached with nails or pieces of brick at a distance of 5 mm. Only after this is it covered with the selected mixture. The average drying time for such a floor is 28-30 days, then further work can be carried out.
Preparing the furnace for cladding
At this stage, you will need to perform a number of auxiliary works:
- We clean the surfaces of the oven from the mortar and layer of plaster. We cut the seams between the bricks to a depth of 10 mm, for better fixation of the tiles on the surfaces. If you used a solution of clay and sand, you can put a metal brush on the grinder, but there will be a lot of dust;
- Removing traces of paint. If the surface is completely painted, you can make shallow cuts with a chisel or grinder;
- We attach the mounting grid to all planes.
Installation process: step-by-step instructions
Let's consider the technology of laying ceramic tiles step by step. 1. Prepare the work surface for laying new material. If the oven is covered with a layer of paint, remove it with a wire brush along with dust and dirt. If the stove is covered with tiles, remove them using a chisel, moving from top to bottom. It is not advisable to break old tiles, as this may damage the brick from which the stove is built. After cleaning the stove from the old coating, it is necessary to deepen the masonry joints by 0.5-1 cm (to improve the adhesion of the mortar). 2. To ensure that the new tile holds firmly and does not peel off over time, we level the walls of the oven using a metal mesh with cells no larger than 15x15 cm. We fix the mesh on the work surface with tension - a ceiling dowel is quite suitable for these purposes. After this, we treat the stove surface with plaster - we use a solution based on sand, clay and cement in a ratio of 0.2: 3: 1. The final preparatory step is primer. It is advisable to use a heat-resistant, high-quality mixture.
Advice!
To reduce the amount of primer consumed without negative consequences for the quality of the finish, you can walk over the surface with a damp cloth before starting priming work.
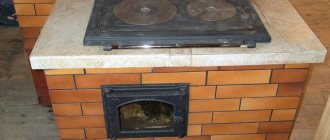
3. Let's start laying tiles. Pay special attention to the first row of tiles - this will affect the evenness of the masonry as a whole. Keep in mind that the laying begins only from the bottom, and from the corner (any). To create a perfectly horizontal first row, it is advisable to place gypsum fiber sheets under it. We install crosses between the tiles, which will ensure the same width. Apply the adhesive composition to each tile, spreading it with a notched trowel, then press the tile to the surface with your hands, gently tapping it with a rubber hammer. Experts advise not to lay more than three rows in one go. In order for the glue to grip firmly, it is better to take at least hour-long breaks. 4. After finishing the tile laying process, the seams are cleaned and the surface is thoroughly washed. It is important to wait until the adhesive has completely dried. After which you can begin grouting the joints with a special mixture or clay-sand mortar, which is applied using a rubber spatula/construction gun. Excess grout is carefully removed with a damp sponge. All that remains is to thoroughly wash the stove after the grout has dried, and the laying process can be considered complete.
As you can see, laying ceramic tiles is a simple process; you just need to follow the instructions and carry out the work carefully and without haste. Good luck!
Methods for cutting tiles
In order to cover the stove, the tiles have to be adjusted to size. There are several tools you can use for this job:
- To cut simple, thin tiles, you will need a simple glass cutter. We trim the layer of glaze and then break the tile, laying it on a flat surface;
- electric jigsaw. This tool can cut any types of materials and shapes of parts. But the file leaves chips, even gluing tape to the front surface does not help;
- grinder with diamond blade. This tool can make smooth, straight cuts on any type of tile. To do this, mark the cutting line and lay the part on a flat surface. First, we do not deepen the disk, remove the layer of glaze along the entire line and only then cut off the part;
- tile cutter It is used by professional tilers; if it is possible to rent it, this will be the best tool option. The cuts are smooth, the front part does not crumble. Simply lay the tiles along the line, run the cutting tool and you can lay the tiles in place;
- for larger cutting sizes, after cutting with a glass cutter, you can gradually chip off pieces of tile using sharp tongs or wire cutters.
Design
The determining factor when choosing a stove cladding design is not the type of material, but the interior of the room in which it is located. A characteristic feature of the design of facing tiles specifically for stoves is the almost complete absence of geometric patterns.
It is not found in almost any style.
But the design of such products is replete with complex ornaments:
Floral patterns, characteristic of majolica or tiles, can be used in almost all styles - from classic to modern. Faience with its famous blue and white Gzhel color scheme would also be appropriate.
For a classic interior, you can choose porcelain stoneware; its possibilities are almost limitless. With it you can create entire paintings.
A modern interior does not imply too colorful decoration. Elegant monochromatic tiles with small splashes of decor would be more appropriate here. Various imitations of malachite and marble, as well as wood, will look good.
In a hunting lodge or country cottage, you can use natural stone. In order not to reduce the cost of the interior, you should not mix natural material with other types of finishing; it works well alone.
Real stoves are rarely found in techno or futurism style interiors. However, if elements of such design trends are still present, a plain tile would look good here.
In a country house, terracotta and clinker would be appropriate. Images of plants and flowers in the Khokhloma style will be especially good.
How to cover a stove with tiles?
Do-it-yourself tiling of the stove is carried out according to a certain scheme in several stages:
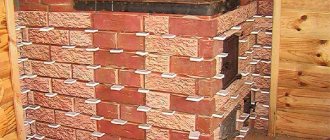
- We begin to lay the rows from the bottom. To prevent slipping and provide protection during operation, we attach a special perforated corner to the bottom along the markings. We fasten the corners to dowels with self-tapping screws. The pitch between the mounting holes is 200-250 mm. We cover all corners of the oven with the same parts. This will level all surfaces, protect corners from chipping and securely fasten the tiles.
- Prepare the glue. We dilute the dry mixtures and be sure to let the solution sit for 10-15 minutes.
- We apply the finished glue to the wall, filling the surface for laying a maximum of 7-8 tiles in a row. The thickness of the layer depends on the consumption rate indicated on the packaging. From the corner we begin laying out the ceramic parts. The first row is the basis for the entire finishing structure, so we lay out each tile level, bringing its position to the ideal. We insert special crosses into the gaps. Their thickness may vary depending on the type of ceramic. For simple tiles, it is enough to lay crosses up to 5 mm thick. We remove the protruding glue, the seam should not be filled, we will fill it with a special grout.
- If an incorrect position of a part is detected, it can be repositioned within 15-20 minutes. Place crosses on the bottom row on 2 sides and begin to make the 2nd and next rows. We check the installation of each part using a level. All seams must be even. After laying 4-5 rows, we take a break for 2-3 hours for the glue to harden and fix the lower rows.
- We bring the rows to the top row and determine the size of the tiles to be cut to size. Now we apply the solution to the wall for each part separately. To cover all the irregularities, we fix the corner with self-tapping screws. Having laid the top row on all sides of the stove, we check that there is no adhesive on the front surfaces and in the seams. Leave the oven for 3 days until the glue completely hardens.
Stages of work
Features of tile laying
When heated, materials tend to expand, and when cooled, they return to their normal state. This may prevent the products from covering the entire surface of the structure.
Type of stove tiles: a - straight, b - angular.
This is the same tile, but it is made from baked clay. It may contain various components that increase the resistance of products to high temperatures. The tiles are covered with a pattern; their surface can have a uniform shade. In addition, you can choose smooth or embossed products if desired. Majolica tiles are usually covered with glaze. Terracotta tiles without glaze are also very popular. Cornice, flat or corner - these are the types of products. However, all tiles at the back have an open mounting box, rumpa.
Tiles should begin to be laid on the stove from the corners, gradually moving horizontally. it is necessary so that between adjacent products there are seams equal to 3 mm, which is necessary to compensate for the shrinkage of the hearth. After masonry, broken products may remain, which can be used to fill the tiller. The holes of the tiller must be supplemented with wire pins, which are installed vertically, their diameter should be approximately 5 mm. The pins should be bent at the bottom and top into loops, which should be connected with wire, the ends of which are mounted into the masonry itself. The rump ribs will gain additional strength if you use staples made on the basis of strip steel during operation. They are used for attaching tillers vertically and horizontally.
It turns out that this is how ceramic chain mail is created for the stove, which will need to be looked after, cleaned, and monitored for its appearance.
Covering the stove with tiles: a - without selecting tiles, b - with preliminary selection.
The surface must be leveled before ceramic tiles are laid on the stove. The difference in the cases of using tiles and tiles is that tiles, as a rule, are laid during the construction of the stove, and ceramic tiles are glued to the finished surface.
When purchasing a tile, you should add approximately 15% to the amount obtained during the calculation process. About 10% of additional tiles will be needed in case of cutting or damage to the material during operation. The remaining spare tile will be needed if some products fall off during use. For masonry you will need 2.5 mm crosses.
Final works
At this stage of work:
- We remove all the crosses from the grooves;
- We put 2-3 kg of firewood into the firebox and dry the surfaces before completing the work. We carry out this operation at least 3 times, allowing the oven to cool completely after each stage;
- Prepare a solution of heat-resistant grout or use mastic. If necessary, you can add a color pigment to the composition to shade or highlight the main color of the tile. We fill the seams using a small rubber spatula. Immediately remove excess solution using a dampened cloth. If a heat-resistant sealant is used, fill the seams using a mounting gun;
- We treat the seams with a special water-repellent composition based on silicon;
- Let the grout harden a little, and after 2-3 hours we finally clean the front surfaces of the oven.
By carefully and slowly doing the work, you can improve your old brick oven or metal unit screens during the day. The work is not difficult, but responsible. The main thing is not to be afraid and do it. By redoing defective areas, we gain invaluable experience.
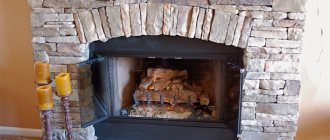
Stylistic directions
An indoor fireplace is a multifunctional unit. In addition to heating, it performs important aesthetic functions and is an original decoration of the central room. The finishing method and the shape of the tiles have a significant impact on the overall style of the room. You can make your fireplace attractive in a variety of ways. Using facing tiles you can decorate a stove or fireplace in the following styles:
- Under Gzhel. They use majolica and tiles of various shapes. A unique design is created individually for fireplaces in rustic, ethno, country styles;
- Imitation of brickwork. Decorating a fireplace in a modern style using brick-like tiles allows you to create a unique atmosphere. Minimalist design involves completely hiding the heat source behind a brick false wall;
- Under a stone. Modern production technologies make it possible to decorate the fireplace with tiles that imitate the texture of natural stone. This material looks great in the English style, chalet, Provence;
- Mirror tiles. The finish is suitable for modern interiors in Scandinavian style, minimalism, hi-tech. Elements with reflective glossy surfaces are often placed inside the hearth to create the effect of flame reflection;
- Panel. You can lay out an original panel over the hearth using porcelain stoneware, clinker tiles, or tiles. Patterns with natural motifs and original drawings will fit perfectly into the oriental, eco style.
Rules for installing facing elements on a stove wall
According to the technology, it is better to start gluing tiles on vertical surfaces from the bottom, and it is necessary to lay out the first row and allow the adhesive mixture to harden. This will allow you to set guides along which you can navigate when installing the next rows. Therefore, when installing the first row of facing elements, you need to be especially careful. The tile installation process is carried out in the following order:
- • Apply a sufficient layer of adhesive to the underside of the tile using a regular spatula.
- • The facing element is pressed against the base surface, first with the lower part, and then with the upper, after which it is installed in the desired position with light blows.
- • When installing each tile, it is imperative to check the correctness of its spatial location with a small level.
- • As you fill the row with facing elements, you must periodically make sure that you have not deviated from the specified parameters, using a longer level for this.
After the adhesive mixture of the first row has hardened, you can begin further installation of tiles, filling the next rows. The procedure for performing this task is the same as for the first row.
But now a long level will also be needed to check the vertical plane of the plane being created, which is advisable to do during the installation of each of its next elements.
A stove wall usually has certain places in its structure that should not be covered with a tiled covering, for example, firebox and ash doors, well windows for removing accumulated soot, and so on. In order to beautifully decorate such areas when installing tiles on the wall of the stove, it is necessary to change the format of the ceramic tiles, which means removing any of its fragments and, quite often, the figured ones. Tile is a rather fragile material, so if the cut line is not straight, but has any angles or turns, then you should use a grinder to form a non-standard element, after which it is mounted on the wall in the prepared space.
It is also often necessary to cut tiles when completing a row, since it is rare that there will be an even amount of tiles on the wall. Therefore, you need to measure the width of the missing piece with a tape measure, taking into account the size of the seam.
After this, you need to make an insert of the required size, separating the excess part from the whole tile using a tile cutter.
The finished part should be installed in its place using the same adhesive.
As can be seen in the photographs presented above, in order to achieve as much symmetry as possible when installing elements of the tiled covering, it is important to use limiting crosses, which are inserted into the seams between the tiles, two on each side.
This will ensure uniform spacing between the installed elements and keep them in this position until the installation mixture hardens. When the surface of the stove wall is completely covered with tiles, you will need to wait a day or two so that the hydration of the cement included in the installation mixture occurs to a sufficient extent, when you no longer need to be afraid that the stability of the elements of the tile covering will be disrupted.
Filling the seams with a special mixture
The final stage of facing the heating block is grouting the joints. For this construction operation, a special composition is used, which, when hardened, has good resistance to aggressive substances, such as water or household detergents. After pouring a certain amount of powder into water, it should be mixed manually to the desired consistency.
Using a rubber spatula, push the finished mixture into the space between the tiles (before this, the crosses must be removed), after which, by running the corner of the tool along the seam, they give it a beautiful shape, distributing the working mass evenly.
Particular attention must be paid to places such as the windows of stove wells, having beautifully framed them using a grout mixture.
Having wiped all the seams, you should wait until the substance filling them becomes solid, after which all that remains is to remove its remains from the tile with a rag and enjoy the new beautiful look of your heating structure.
As can be seen from the above description of the work process, tiling a stove yourself with ceramic tiles is not a difficult task. It is only important to strictly adhere to the technological sequence. Of course, when performing such work for the first time, you should not expect ideal results. Still, you don’t need to worry too much about something that didn’t work out the way you would like, because, most likely, only you see these shortcomings, and to those around you, your heating structure looks very elegant.
Perhaps one of your friends will even ask you to help with renovations in their home, and over time, your new specialty will turn out to be a good help, providing you with an additional source of income.