The stove in houses lasts for many years and over time the cladding loses its appearance. Therefore, repairs are needed. You can simply cover it with a new layer of plaster or renew the brick. But tiles look more attractive, an assortment that is replete with various options on the modern market. The material is not budget-friendly, so in order to save money, many try to do it on their own, which is possible even without skills, but quite difficult. We'll look at how to cover a stove with tiles in the article. We also recommend reading about installing tiles under fireplaces with your own hands.
Tile installation methods
When choosing how to lay tiles on the stove, a self-taught master should be guided not only by the beauty of the design. Each method has its own characteristics. They need to be taken into account at the stage of thinking about an idea and drawing a sketch.
Before tiling the stove with your own hands, it must be used in full for 1-2 months. In this case, shrinkage processes occur and small defects in the furnace masonry are revealed.
There are few main methods for installing tile coverings:
- Direct masonry (joint to joint) is used for lining a brick oven with ceramic tiles with details of a common large panel. Elements without a pattern can also be laid in this way if they have the same shape and size. To get a beautiful surface, it is advisable to use only whole tiles.
- Any types of ceramic tiles, imitation stone, and porcelain tiles can be laid staggered or with seams bandaged. This method allows you to mask cut elements by fitting them into the masonry pattern.
- Diagonal masonry is made from parts turned at an angle of 45° to the vertical and horizontal edges of the stove. This spectacular method is quite uneconomical and involves a lot of work in cutting triangular fragments to decorate the corners.
- Chaotic masonry is used for rectangular tiles with an aspect ratio of 2:1. The material to be laid is placed in pairs so that the elements form a square. The adjacent pair must be laid perpendicular to the previous one. The method makes it possible to do without cutting halves for masonry at corners and is convenient if the stove has a complex shape.
In addition, when decorating stoves with tiles with your own hands, a combination of elements of different sizes is used. Ovens with borders, friezes and other additional decorative details look very beautiful. Combination requires complex calculations when determining the amount of material.
In simpler cases, when making calculations, measurements are taken from the stove. Guided by the size of the material with which you would like to line its walls, the number of whole parts is calculated. When calculating, you should add 10-15% for a possible fight or marriage. It is recommended to add another 5% for repair copies, so as not to have to look for the right tile, since several parts may break or fall off during use.
Porcelain tiles
This material is increasingly used in oven linings. It has excellent heat resistance and unique characteristics. Porcelain tiles are used to decorate not only the outer surface, but also the interior of the oven. In addition, he is not afraid of temperature changes, evaporation, cold and shock.
How to cover a stove with porcelain tiles:
- Apply glue to the surface with a notched trowel.
- The fragment is installed and compacted with a mallet.
- Several rows are laid in this way and allowed to dry.
- Work continues. At the end, the cut tiles are glued.
What material is suitable for finishing the stove?
Finishing the stove with tiles yourself requires the use of heat-resistant materials. Ordinary tiles do not withstand use under conditions of strong heat and temperature changes. Elements often crack and may suddenly fall off. How to properly tile a stove so that the coating lasts for many years without repair? Why can tiles crack?
The material from which the finishing parts are made is of great importance. Thin porous tile elements contain air, which expands stronger than ceramics. As a result, the entire part is subjected to internal stresses and sometimes cannot withstand them. With the modern choice of ceramics, it will not be difficult to choose heat-resistant, finely porous tiles. When choosing, you need to pay attention to the indicators of resistance to mechanical damage.
It is recommended to choose not very large elements. Small tiles are much more durable and stay in place more firmly than large ones. The maximum size of the stove lining should be about 10x10 cm.
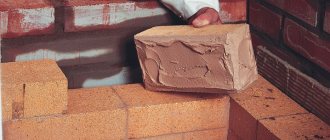
There are a number of materials specifically designed for tiling stoves of any design:
- terracotta is an unglazed material made from baked clay;
- majolica - finely porous parts coated with white or colored glaze;
- clinker is a special facing material made from refractory shale clay;
- porcelain stoneware is an artificial material made from different types of clays and fillers, resistant to temperature shock;
- tiles are specially shaped ceramics coated with glaze, specially designed for finishing stoves and fireplaces.
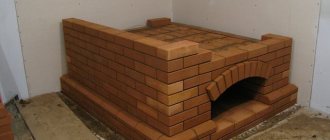
Due to the special structure of the tile and the method of its installation, installation of the coating can only be done at the time of construction of the stove. Experienced stove makers usually undertake the finishing of tiles. It is better for the home craftsman to opt for other types of materials offered.
To attach the tiles to the body of the stove, you will also need a special solution. Regular tile adhesive will not work for this purpose. Clay is traditionally considered the best material. It tolerates high temperatures well, only becoming stronger.
A solution of fatty clay can be prepared by taking it in a 1:3 ratio with fine river sand. The glue is prepared in advance by placing a measured 1 part of clay in water. When they are wet, the liquid must be stirred and wait until the solid particles settle to the bottom. Carefully drain the clear water, leaving only the settled particles in the container. Add 3 parts sand, mix the adhesive thoroughly, adding a little water if necessary. The consistency should be similar to thick sour cream.
You can purchase ready-made dry mix in construction stores. You need to add water to it according to the instructions on the package and knead a thin solution. Clay compounds do not set as quickly as cement or gypsum, so large quantities of glue can be prepared. If necessary, water can be added at any time.
Preparing for work
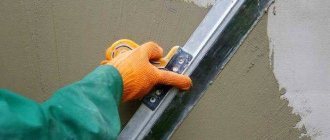
Before tiling the stove with your own hands, you need to prepare its surface. To do this, the master will need a spatula. It is necessary to completely remove all plaster and plaster from the walls of the heating device. Clean the seams between the bricks, deepening them by 0.5-1 cm, and carefully remove dust. An ordinary plastic bottle with a hole in the lid can help in this process: the dust is washed away with a stream of water.
For further work you will need:
- Rabitz;
- self-tapping screws or nails with washers;
- notched spatula;
- rubber spatula;
- clay tiles and adhesive;
- crosses or other pattern to obtain even seams;
- rubber hammer;
- tile cutter;
- plumb and level;
- grout for fireplaces and stoves.
Both old and newly built stoves must be lined with chain-link mesh to ensure the strength of the clay plaster. Fasten with self-tapping screws, screwing them into the seams between the bricks.
Leveling the surface and corners before laying the tiles on the stove will greatly facilitate the installation of the coating. For plastering work, a clay mortar prepared according to the recipe described above is required. Before leveling the surface, it is better to heat the oven so that its walls are warm (about + 35°C). If you have to apply plaster more than 5 mm thick, then it is better to do this work in 2 stages, drying each layer for at least 24 hours.
Corners for fastening
Making these elements yourself is a rather long and complex process. They should be of such a shape that the tiles are fixed on all sides.
The galvanized sheet must be cut into strips 44 mm long, from which the corner is made.
To make it easy to bend these parts, you can build a device that will greatly facilitate the work. To do this, you need to take a block onto which a 6 mm metal plate with a protrusion of 3 mm is attached.
You can see the dimensions of the corner in the diagram.
We place the workpiece on the fixture and clamp it with clamps. Then we take a wooden mallet and bend the corner.
We adjust the plate to the dimensions of the next bend and again make a corner. Due to the presence of a 3 mm protrusion on the device, the bend goes under it.
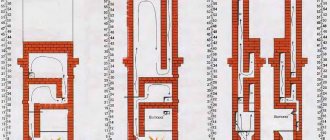
Installation of tile covering in horizontal rows
But how to cover the stove with tiles so that the seams are even? To do this, stove makers make markings using a level and plumb line. Marking should begin from the top rows so that the cut tiles are at the very bottom. The threads for the beacons can be pulled onto small nails driven into the clay. By focusing on them, it will be possible to lay out very even rows of tiles.
The marked oven is ready for installation of the covering. Laying tiles on the stove should start from the bottom. In this case, those rows that are located above will be able to rest on the lower ones, and the row will not “float”. To ensure that the clay sets quickly, stove makers always recommend heating the house before gluing the tiles to the stove. But its walls should not be very hot: the ideal temperature for work is about + 35°C.
Between the lowest row, from which tiling of the stove begins, and the floor of the room, you need to leave a technological gap of 5-10 mm. If the floor is not laid, you should determine its level in its pure form, leave a gap taking into account this indicator and nail the support rail to the stove. A small distance between the ceramic and the flooring will allow the heated lining to expand, otherwise it may crack or fall off.
To properly line the stove with tiles or other material, you need to start with the corner elements. Having determined the upper boundary of the bottom row using the beacon, trim the required number of tiles (if you didn’t get an integer number of levels). Before tiling the stove, spray the plaster with water.
Place a little mortar on the back of the part, stretching it with a notched trowel. The thickness of the adhesive layer should not exceed 7 mm. If the wall deviates greatly from the vertical, then it may be better to cover part of the surface with the mixture.
Glue the lower corner element, pressing it to the solution with rocking movements. If necessary, level the vertical by tapping with a rubber hammer. You need to tile from corner to corner, placing the tiles with tape. It is convenient to align the vertical and horizontal sides of the parts using beacons, and the plane of the wall should be checked for verticality with a plumb line.
After laying the first 3 rows of tiles on the stove with your own hands, you need to take a break. In a short time, the solution will set and strengthen, and tiling the stove with ceramic tiles can be continued after about 1 hour, but this time may be longer.
Using hot melt adhesive when laying tiles
Ceramic tile laying diagram.
Next, apply hot glue to the entire surface. If you don't have hot glue, use sand-cement mortar. To prepare the solution, use cement (one part) and sand (one third). There should be no impurities in the sand. Use river material. If you are working rough with hot glue, try to prime the seams in advance. Of course, don't forget to apply plaster.
Once you have processed the surface, attach a wooden strip to the wall. Place the upper edge of the slats above the floor, the distance should be equal to the width of the tile. Using this method, you can lay the tiles evenly.
It is necessary to lay the tiles on the rough from the 2nd row, which is located at the very bottom. The laying is carried out upwards and to the sides. Spread it out evenly. Using a flat spatula, apply hot melt adhesive. Using a notched trowel, smooth out the glue applied to the surface. Using spacer crosses, you can even out the gaps between the tiles. Remove the sacrum from the material before grouting.
Once you have laid all the tiles on the rough, remove the lath and add the last row. If necessary, trim the material.
Smooth the seams with a rubber spatula after the hot-melt adhesive has dried. That's all. Now you know how to lay tiles on rough.
Diagonal laying of tiles
Step-by-step instructions on how to lay tiles on a stove in diagonal rows will help novice stove makers do this complex finish correctly. There is no difference between the general laying principles; markings must also be made from above. You will have to stick the tiles differently:
- It is better to lay out the bottom row, orienting the parts in the usual way, with one side facing the floor. This will align the horizontal. But if the floor is flat, then you can immediately make diagonal rows. The first tape should be laid out from triangles (halves of square parts). The laying should be done on the longest side (hypotenuse).
- Check the horizontal line of the row, focusing on the vertices of the triangles.
- Make an installation of whole squares, placing them between the sides of the triangular parts.
- The horizontal position of this row can be checked by the upper corners of the tiles.
- Make 1 more row of masonry and check its horizontalness.
- Take a technical break for 1 hour, then tiling the stove diagonally can be continued, following the step-by-step recommendations for the initial 2 rows.
- You can complete the laying in a straight row or make it out of triangles.
With this method, corner elements should be installed last. To finish the corners you will also need triangular halves.
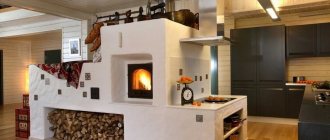
Advantages and disadvantages of the furnace after lining
Many argue that lining the stove causes the device to completely lose its thermal capacity. However, we can say with confidence that this is not the case. However, it is worth saying that cladding allows your stove to gain a number of useful advantages. Firstly, heat-resistant ceramic tiles result in the stove receiving greater protection from heat loss.
It takes longer for the oven to cool down and require heating again. Secondly, you have the opportunity to give your heating device an attractive appearance, since the tiles, thanks to their glossy surface, attract the eye
It is also important to note that finishing with a ceramic hob may result in a longer heating process for the work surface, which may not be to the liking of some consumers.
Grouting joints
Jointing is carried out when the lining is completed and the glued material has had time to dry for 24-72 hours. At this stage you will need a rubber spatula and a special grout mixture. You can buy it ready-made or make it yourself from sand and clay (3:1, respectively). The jointing mixture can be tinted with colors if you want to make the seam less noticeable or highlight it with even more contrast.
The plastic composition must be rubbed into the gaps between the tiles with a rubber spatula, carefully filling all cavities. Clean the surface with a sponge or damp cloth, being careful not to damage the seams. After the solution has set (after 1-2 hours), the tiles can be cleaned again using a grout film remover. This will make it shiny and completely clean.
Having completed the finishing of the Russian stove or Dutch oven, you need to wait 3-4 weeks until the solution dries completely. Only after this can the brick kilns be heated without allowing the walls to heat up too much. As soon as the tiled heater becomes warm, the fire should be extinguished and the heater should be allowed to cool completely. After this, the finishing material placed on the stove will be ready for use.
Some useful tips
After grouting, you can make a neat seam with a concave surface. To do this, you will need an even stick or tube of suitable thickness. It needs to be pressed against the still soft mixture, pressing it between the tiles.
It is very convenient to use strips of drywall as a template for seams. Its thickness is 10 mm. This will allow you to lay the tile with a constant gap by simply pressing the side of the tile against the strip. Once the binding is completed, the templates can be easily removed.
An element that accidentally falls off after finishing must be cleaned of glue and its remains removed from the wall. Lubricate the entire underside of the tile with clay mortar and install the part in place. Press the glued fragment tightly, aligning it with the adjacent ones. They also carry out partial repairs of the coating during operation, rubbing the tile seams.
Do-it-yourself stove repair will be successful only if the tile laying technology is followed. It is better not to skimp on materials; porcelain tiles or clinker suitable for stoves and fireplaces are expensive, but they also last a very long time.
Special ready-made adhesive solutions or mastics
The line of these mixtures is represented by a smaller number of brands. This is due to the fact that the adhesive ability of the finished solution is lower than that obtained from a dry mixture. Nevertheless, the following gained the favor of the masters:
Adhesive mixture “Parade K-77” “Parade K-77” (Belarus, 300 rub./15 kg.). It is used on surfaces with a heating temperature of no higher than 800 °C, and is characterized by increased fixing properties. Not intended for use on plastered surfaces.
Adhesive mixture MIXONIT TERMO T24 Adhesive mastic Terracotta
A brief analysis of adhesive mixtures and solutions for laying tiles on stoves and fireplaces allows us to conclude that there is a significant variety of them, and the choice depends on many factors, taking into account which will make it possible to perform the cladding with high quality and for a long time.