Order and description of masonry
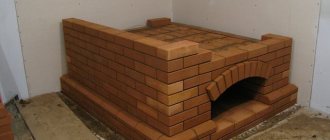
The order of a Russian stove with a stove bench and a stove
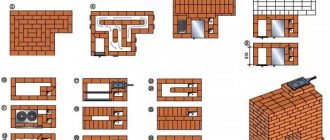
The laying of a Russian stove with a stove bench and a stove is carried out according to the order (in the photo above), which clearly shows where each brick needs to be placed in rows and at what stage to install the stove fittings.
Description of masonry in rows:
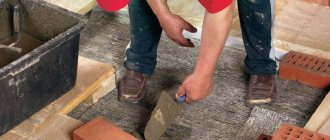
- The 1st row is laid solid in the following order: first, the brick is laid around the perimeter of the structure, and then the middle is filled. This row determines the evenness of the entire structure, so it must be well aligned;
- in the 2nd row they begin to form under. To do this, bricks are placed on edge;
- in the 3rd row, install a blower door and continue to lay out the bottom of the cooking section with bandaging of the elements of the previous row;
- the laying of the 4th row is similar to the 2nd;
- The 5th row is the formation of a clearing passage and laying the foundation under the arched vaults;
- 6th row - they begin to narrow the cleaning channel and install the grate;
- 7th and 8th rows - installation of the combustion chamber door, placement of the steel sheet;
- from the 9th to the 11th row - formation of the firebox, installation of the stove;
- from the 12th to the 16th row - laying a niche on the hob;
- 17th and 18th rows - narrowing of the arches of the niche;
- from the 19th to the 21st row - completion of the laying of the bed;
- 22nd row - formation of a heil;
- from the 23rd to the 33rd - raising the chimney with the installation of valves and cleaning hatches.
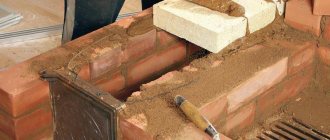
When laying a stove, the seams are bandaged in each row, using bricks that are not full size. For proper dressing, you can also use the poke-and-spoon masonry technology, when the brick of the bottom row is laid flat, and in the next row - with the poke outward.
Ceramic products can draw water out of the joint material, so they are immersed in water for a few seconds before installation. Excess clay-sand mixture protruding on the internal surfaces of the parts of the device must be removed with special care.
Construction technology
For construction, it is important to find good drawings of the “Ekonomki” stove and an ordering diagram, or better yet, get acquainted with the recommendations of experienced stove makers and watch the entire work process
Dimensions
We take as a basis the dimensions of our stove:
- width – 890 mm;
- depth – 1400 mm;
- height – 2250 mm.
The dividing partition between the fireboxes is made with 3 cavities for the passage of gases, measuring 100/200 mm. The hob is heated by gases, so you can dry berries, fruits or mushrooms on it and cook food.
Materials and tools
For work we will prepare:
- pick and hammer;
- Master OK;
- a trough for soaking clay and preparing a solution;
- steel square for marking the corners of the furnace;
- plumb line, level;
- measuring instrument;
- large file for cleaning edges;
- up to 1300 ceramic bricks;
- 2000 kg of sand;
- 2500 kg of clay;
- air valve, 4 doors
Having prepared the tools and materials, we move on to the main work.
Description of the masonry
Photo of the arrangement of the “Housekeeper” stove:
A DIY wood-burning stove is made taking into account the ordering scheme and construction stages.
Row No. Description of work 1,2
We lay out 1 row on a solution of clay and sand. We lay the brick flat, maintaining the correct position and thickness of the entire row.
The entire design of the furnace depends on this. We lay the second row according to the diagram, begin to lay the ash pan channels and the ash pan.
3 We wrap the frame of the ash door of the main fuel compartment with asbestos cord and install them at the mounting points. We fix them with bricks and mortar. We install the frame and door of the ash pan of the small firebox.
4 We install and secure the blower door for the small combustion compartment on the other side of the stove. 5 We trim the edges of the inner row of bricks to install the grate. We carry out the laying according to the diagram. 6 Install the grate
It is important to provide a gap of 4 mm to the brick and fill it with asbestos cord. Such a device serves as a thermal gap. 7-10 We carry out the masonry according to the diagram
On the bricks of the 10th row, we select grooves for installing the hob. 11-14 On the 11th row, we fill the gaps with asbestos and install a hob with 2 burners. We carry out all work in order. 15 Bricks are cut at an acute angle. The formation of the roof of the brewing compartment begins. We install special ties on the sides to secure the structure. 16 We continue to install the couplers and form the mouth of the furnace. 17 We make a transition channel between the combustion compartments for the passage of heated gases.
All further rows are carried out strictly according to the ordering scheme and according to the drawing of the furnace. We determine and install an air damper on the chimney, making sure to seal the connection with a cord made of fire-resistant material.
Important! To bring the chimney to the roof, it is better to use sandwich pipes, connecting them to a brick pipe at the level of the floor slab. They are equipped with a layer of thermal insulation and do not heat up the wall surfaces
The internal pipes, made of stainless steel, are smooth. A layer of soot will not be able to settle on them.
All further work is carried out similarly to the process of drying and first firing of brick stoves. This work will take 3-4 days, but will allow you to check the stove for defects and smoke, eliminate faults and gradually dry the brick surfaces from moisture.
But before that, we open all the channels in the lower part of the furnace and combustion compartments and remove construction debris. We check the draft level in the chimney. If the torch flame does not draw into the firebox when the vent and air damper doors are open, this means that the chimney is clogged and needs to be cleaned. Only after achieving a normal level of traction can you start drying the “Housekeeper”.
How to make a Russian stove
- Specifics of the masonry of a modern Russian stove
- Installation of required appliances for the furnace
Russian stove with heating According to the time of its creation, the black Russian stove is considered the oldest. It was also called kurna. On the guardianship, as the peculiar elevation was called, a vault with thick walls was erected. Below it is a crucible (the space located under the arch). The food was placed, then firewood was thrown through a small mouth, in front of which there was a pole resembling a table.
More and more often, stoves are found in private homes. They are used for heating, cooking and just for beauty.
From this stove, smoke poured first into the hut, and then through the window it found its way out. To permanently eliminate this drawback, they came up with an over-pipe (smoke collected there) and a smoke pipe. But even such a modernized stove did not heat the floor. As a result, a new furnace with flooding was invented. It is similar to the classic one, but the stove is placed in the hearth and there is a firebox, and the firebox is separate. From a Russian stove with flooding, chimneys run along several walls or along one wall. Usually they melted the flood, but in severe frosts they used a crucible to keep it warmer.
Interior of a village house with a stove
The method of designing the stove structure depends on the chosen design trend. Finishing materials will determine its appearance.
Tile
If you want to create a luxurious atmosphere in a rustic kitchen, the stove can be refined using tiles - special ceramic or clay heat-resistant tiles created specifically for finishing stoves. The unique shape of the tiles makes them easy to install, and the unique pattern will allow you to create a delightful design, unlike others. In the 19th century in Rus', tiled stoves were in fashion among the upper strata of society and were considered an indicator of prosperity and luxury.
Ceramic tiles heat up quickly and retain heat for a long time
A more affordable option for designing a stove structure is to use tiles. It can be of any shape, rectangular, square or imitate various natural fibers.
Tiles will help create a unique stove design
Design of a stove in a private house, decorated with tiles
When choosing tiles, you need to choose fire-resistant samples that can easily withstand high temperatures and have a dense structure. Thanks to these properties, they will last a long time and will not require cosmetic repairs.
Very often, tiling is carried out only in the part where the fire is ignited and maintained.
Stone
Upgrading the surface of a Russian stove with stone allows you to get a unique rustic interior with an antique accent. This option is quite labor-intensive and requires significant financial investments. But by spending time and money, you will get a unique design that will delight more than one generation of your family.
A stone stove will become the main highlight in the house
Plaster
When designing the kitchen of a private house in rustic, Provence, country or Russian styles, plastering with clay mortar is an excellent way to finish the stove. After it hardens, heat-resistant paint is applied to the surface. With its help, the stove can be decorated with an original ornament, ideas for which are suggested in the following photos.
Decorative plaster gives a Russian stove a special charm. It will help you recreate any pattern you like on its surface. The following selection of photos will convince you of this and inspire you to create an extraordinary design.
The rustic style almost never completely went out of style. Even having their own huge dacha, stuffed with ultra-modern equipment and perfect, economical heating devices, people strive to build something on their site in the old style - a small gazebo or sauna. But many, having acquired a country house, want to completely transform it, turning it into something like an old Russian hut with a real stove.
What does it consist of?
Before you start laying a Russian stove, you need to understand what it consists of. Due to some names, it is not clear to modern people why they are needed, we tried to figure it out.
- Podpechek is a small niche at the very bottom. Used to dry firewood.
- Opeche. It can be called the foundation. In the old days it was covered with boards. In modern construction, it is made of stone or concrete. Above is located below.
- Under is the bottom.
- The pole is a small niche in front of the crucible. Traditionally used for cooking and heating food.
- The crucible is the heart of the furnace. This is the place where heat-resistant dishes were placed and food was cooked.
- The burnt area is a place where burnt coals were raked. Located on the side of the pole.
- The pole window is the hole located directly above the pole.
- A stove is a recess in a stove. There may be several of them. Traditionally used for drying small wet items.
- A small door leads into the chimney and is used for cleaning it.
- Hailo is a smoke passage located between the mouth and the pipe, necessary for proper smoke circulation.
- View - this is used to cover the pipes after heating to preserve heat.
- The valve is a metal plate for regulating draft.
- The pipe is designed to allow smoke to escape.
- Cutting is a thickening in the wall of the pipe where it passes through the ceiling, in order to prevent fire.
- Mirror – side wall. Sometimes she goes into the next room to better heat the house.
- The mouth is the entrance to the furnace, covered with a valve.
- The valve is a metal lid that closes the mouth.
- The vault is a furnace ceiling, made in the form of an arch on the furnace floor.
- Lounger - located above the arch. The warmest and most comfortable place in a Russian hut.
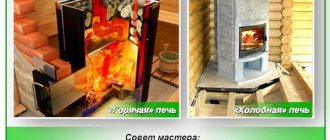
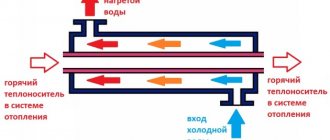
In addition, the oven can be equipped with a heating element. A separate firebox allows the stove to operate in 2 modes - winter and summer.
The bottom line is that in winter mode, the smoke travels a greater distance and transfers heat to the walls of the stove, thereby heating it up more and heating the room better. In summer mode, smoke is released directly into the chimney along the shortest path, thereby making the house less hot, but you can still cook food. In the figure above, yellow indicates the path of smoke from the firebox to the chimney in summer, and red from the firebox to the chimney in winter.
Stove with stove - multifunctional structure
The stove is so useful, convenient and ergonomic that building a structure without it simply loses its meaning. Perhaps this is why all modern modifications of Russian stoves have cast iron stoves - with one, two or even three burners.
In fact, models with a stove do not contradict one of the main features of a Russian stove - they have two fireboxes. It is the small firebox that is responsible for heating the stove. Moreover, in simple stoves it has a separate chimney, connected at the top to the chimney of the furnace.
One of the popular options for placing the stove is right in front of the mouth of the furnace. Heating is carried out independently of the large firebox, through the lower heating
For more complex designs, there is the possibility of “summer” and “winter” fireboxes: in the first case, the small furnace (furnace) operates autonomously, and in the second, with its help, the walls and the large furnace are heated.
There is a third option for locating the flooding - in the main structure, but on the side or on the opposite side. This solution is not always acceptable - for example, if the stove needs to be located in a corner. In this case, it is more convenient if both fireboxes are on one side and located one above the other.
A successful engineering solution in which a small stove with a cast-iron stove is placed separately, but has a common wall with the main structure. Disadvantage - takes up more space
The advantages of the design with a hob are obvious:
- autonomous heating with a lower degree of heat transfer;
- fast heating process of cast iron and walls;
- cooking all kinds of dishes on the stove;
- the ability to heat or store food warm;
- economical fuel consumption - firewood;
- easy maintenance - cleaning the ash pan.
On the stove, when it is no longer hot, but has cooled down a little, you can dry household items. For the same purpose, stoves are used - small recesses in the walls of the stove, as well as a brick perimeter around the cast-iron surface.
For summer residents, the model with flooding is much more convenient, as it is used more often. A large firebox is usually used either in early spring or late autumn, when the cold season sets in and the entire stove needs to be heated.
Furnace projects
It is better to choose a design for a stove with flooding at the stage of planning a residential building in order to tie the foundation of the device to the elements of the building in order to create stove openings in the ceiling and attic floor. Fire safety regulations must be taken into account. The customer can choose the type and design of the stove, as well as determine its functionality.
Among the most popular heating device projects:
- Barbecue ovens. Installed in garden gazebos, residential buildings and public catering establishments.
- Stoves and fireplaces. The fireplace instantly heats the room, and the stove helps maintain heat for a long time.
- Complexes - a combination of 2 or more furnaces. Their advantage is the ability to heat even a large area.
- Furnaces with bottom and side heating. Such devices have a pipe channel in the center of the smoke collector.
- Stoves with water heating boiler. Convenient if the house has a large number of rooms.
- Simple heating devices.
- Heating and cooking structures. Most often they have a two-tier smoke circulation system. Flue gases enter first into the lower part of the furnace, and then into the upper. Such heating helps to retain heat for a long time.
- Sauna stoves.
When choosing a project, you need to pay attention to the details: the specific dimensions indicated in the diagram, a complete and accurate description of each construction step, comments and explanations. To make it easier to build a stove, we recommend that you familiarize yourself with the designs of devices in such magazines and books as:
To make it easier to build a stove, we recommend that you familiarize yourself with the designs of devices in such magazines and books as:
- "House";
- "Myself";
- “We do it ourselves”;
- “Professional Advice”;
- A.M. Shepelev “Masonry of stoves with your own hands”;
- Ya.G. Porfiryev “Kiln works”;
- P.I. Voropai “How to fold a stove.”
Material selection
The following materials are required for construction:
Red ceramic brick. It is necessary to check in advance that it is well fired and has a high quality density
It is especially important to choose the right bricks for the hearth (even, smooth, the same height). Solution
Its composition should include sifted fatty clay, river sand and clean water. Cast iron parts: furnace, blower, cleaning, ventilation doors, grate, view, damper, stove and two burners, water heating box.
Preparing the site
The foundation must be made so that it can withstand heavy loads. That is why it is better to design it in parallel with the house itself, since it will be difficult to build a foundation in an existing structure.
Professionals usually adhere to standard technology: they make a protrusion between the edge of the foundation and the masonry of at least 0.5 m.
After the structure is ready, it is necessary to lay cardboard impregnated with a special composition in two layers as a waterproofing material. To achieve the best result, choose strong bricks without breaks and make thin seams (up to 5 mm).
Concept of blast furnace and smelting
Modern civilization is inextricably linked with the development of production technology, which is impossible without improving the tools and materials used for their manufacture.
Among all materials of natural origin or created by man, the most significant place is occupied by ferrous metals - an alloy of iron and carbon with the presence of other elements.
Alloys containing 2–5% carbon are classified as cast iron; those containing less than 2% carbon are classified as steel. For melting metals, a special blast furnace technology is used.
Blast smelting is the process of producing cast iron from iron ore processed in blast furnaces or, as they are also called, blast furnaces.
The main materials needed in the process of such production are:
- fuel in the form of coke obtained from coal;
- iron ore, which is the direct raw material for production;
- flux – special additives made from limestone, sand, and other materials.
A blast furnace is a device for producing cast iron by reducing smelting of iron ores or concentrates.
The main equipment of a blast furnace is a blast furnace - a round shaft furnace lined with refractory masonry.
To protect the furnace casing from heat, refrigeration devices are used. The furnace casing and furnace furnace device are installed on the foundation and supported by columns.
The starting material for smelting is called charge and consists of iron ore, manganese ore, sinter, and pellets. The charge is supplied to the furnace top by skips or a belt conveyor. The skips are unloaded into the furnace through the receiving funnel. Air is supplied through air heaters, the smelting product exits through tapholes into ladles located in the lower part.
Modern blast furnaces are equipped with a centralized control and monitoring system that provides recording of instrument indicators and complex indicators of blast furnace operation - coke consumption per 1 ton of pig iron and daily blast furnace productivity in tons.
Additional fuel is used, which reduces coke consumption and the cost of cast iron. Improving the design of a blast furnace is aimed at increasing its power (volume), improving the preparation of raw materials, and introducing new progressive, high-performance technologies.
Pig iron is smelted in blast furnaces, which are a shaft furnace. The essence of the process of producing cast iron in blast furnaces is the reduction of iron oxides included in the ore with gaseous (CO, H2) and solid (C) reducing agents formed during the combustion of fuel in the furnace.
The blast furnace smelting process is continuous. Source materials (sinter, pellets, coke) are loaded into the furnace from above, and heated air and gaseous, liquid or pulverized fuel are supplied to the lower part.
Gases obtained from fuel combustion pass through the charge column and give it their thermal energy. The descending charge is heated, reduced, and then melted.
Most of the coke is burned in the lower half of the furnace, providing a source of heat, and part of the coke is spent on reducing and carburizing the iron.
A blast furnace is a powerful and highly productive unit that consumes a huge amount of materials. A modern blast furnace consumes about 20,000 tons of charge per day and produces about 12,000 tons of pig iron every day.
Chimney installation
The chimney required for the operation of a Russian stove is absolutely no different from the chimney of any stationary solid fuel unit, be it a “Dutch”, “Swedish” or some new-fangled bell-type stove, calculated using computer modeling. The design and arrangement of the chimney can be taken from the drawing below.
Chimney device for a Russian stove with orders
During the work process, we recommend following a few simple rules:
- The design and installation location of the pipe for removing combustion products must comply with the standards of the current SNiP.
- At the point of transition from the ceiling to the attic, the pipe should thicken.
- The lower part of the chimney is placed on the same solution as the stove.
- The internal cross-section of the smoke duct must correspond to the power of the heating device.
- Above the roof, the chimney is built using a mortar with the addition of cement.
- The places where the pipe passes through the ceilings are insulated using non-flammable and waterproofing materials.
During work, the geometry of the structure and the deviation from the vertical are constantly monitored using a level or plumb line.
Advantages and disadvantages
The main advantage of the Russian stove is that it takes a long time to cool down.
The advantages of the Russian stove include the following properties:
- Durability. The brick structure, subject to operating conditions, will last for decades.
- High degree of fire safety.
- Cooking occurs without direct contact with fire.
- The oven is cooling slowly.
- Wide functionality of modern models.
- Low cost. This is due to the simplicity of the design and the lack of automation.
- You can build it yourself. A design for the future furnace is first created, and then installation work is carried out.
The disadvantages are the following:
- Low efficiency (about 30%) compared to modern heating devices, whose efficiency exceeds 90%.
- Uneconomical consumption of firewood.
- Uneven heating of the room. The difference between the top and bottom points can be 20°C.
- Uneven combustion of fuel. Wood in different parts of the stove burns with different intensity.
- It is impossible to observe the cooking process.
After studying the positive and negative qualities of the Russian stove, you can decide whether to make it in the house or not.
Laying 7-10 rows
The seventh row is laid out in the same way as the fifth, squeezing the butts of the side walls under the heel. The eighth row is formed according to the same principle as the sixth. This is where the creation of the foundation for the pole begins, which includes three rows of full-size interlocking bricks. The countdown starts from the frontal plane of the unit.
The ninth row repeats the location and shape of the bricks of the seventh row. The base of the pole continues to be laid out on it. It is formed above the arch of the substructure, forming a continuous lining. When laying out a Russian stove with flooding, the order must be followed exactly, otherwise the design will turn out to be unreliable.
The corners of the tenth row are laid out from 3/4 bricks, the sides from full-size spoons, and the back from full-size bonded bricks. The front part of the structure is laid with three rows of full-size bricks deep. As a result, each row should have 7 bricks laid flat. As a result, a special plane is formed - a sixth. The space created between the back wall and the pole must be filled with gravel, sand and clay.
Order and description of masonry
Arranging a Russian stove with a stove bench and stove
The laying of a Russian stove with a stove bench and stove is carried out according to the order (in the photo above), which clearly shows where each brick needs to be placed in rows and at what stage the stove fittings should be installed.
Description of masonry in rows:
- The 1st row is laid solid in the following order: first, the brick is laid around the perimeter of the structure, and then the middle is filled. This row determines the evenness of the entire structure, so it must be well aligned;
- in the 2nd row they begin to form under. To do this, bricks are placed on edge;
- in the 3rd row, install a blower door and continue to lay out the bottom of the cooking section with bandaging of the elements of the previous row;
- the laying of the 4th row is similar to the 2nd;
- The 5th row is the formation of a clearing passage and laying the foundation under the arched vaults;
- 6th row - they begin to narrow the cleaning channel and install the grate;
- 7th and 8th rows - installation of the combustion chamber door, placement of the steel sheet;
- from the 9th to the 11th row - formation of the firebox, installation of the stove;
- from the 12th to the 16th row - laying a niche on the hob;
- 17th and 18th rows - narrowing of the arches of the niche;
- from the 19th to the 21st row - completion of the laying of the bed;
- 22nd row - formation of a heil;
- from the 23rd to the 33rd - raising the chimney with the installation of valves and cleaning hatches.
When laying a stove, the seams are bandaged in each row, using bricks that are not full size. For proper dressing, you can also use the poke-and-spoon masonry technology, when the brick of the bottom row is laid flat, and in the next row - with the poke outward.
Ceramic products can draw water out of the joint material, so they are immersed in water for a few seconds before installation. Excess clay-sand mixture protruding on the internal surfaces of the parts of the device must be removed with special care.
Mortar for laying the stove
The thinness and elasticity of the composition and the absence of cracks after drying are important. You can use a ready-made mixture from the store or make it yourself. For this you need purified clay. It needs to be soaked in water, and after a day kneaded with sand - first, several variations of the solution are made for testing, changing the proportions. From each they form cakes, 1 cm thick. After 2-3 days they are examined - where there are fewer cracks, the composition is better.
66cc21e0577ca4d907f14c51c1e7267e.jpe
To ensure uniformity of the clay, after soaking it is wiped through a mesh with 0.5 cm cells. When preparing the solution for the firebox, it is better to replace ordinary sand with fireclay powder. Mix it with clay 1:3(4).
Peculiarities
The Russian outdoor stove, unlike the classic model, is equipped with a horizontal firebox and hearth. Its chimney is shorter, and the side walls are insulated, which increases efficiency with less fuel consumption.
For ease of use, the cooking chamber in such an oven is placed on the front, and the combustion chamber on the left side. The rational design of the frying chamber allows it to be used not only for cooking or frying food, but also as a kebab maker, smokehouse for meat or fish. And if you install a damper, it turns into an oven for baking culinary products and bread.
Laying order and arrangement
The laying of a Russian stove is carried out using the following order as a basis:
| Row No. | The order of the masonry of a Russian stove with flooding |
| 1 | The brick is laid solid: first they form the outer perimeter, and then fill the inner part |
| 2 | Form the bases of cleaning channels, furnace walls, ash pans |
| 3 | The masonry of the second row is repeated, with the difference that the seams are covered with entire blocks. Fix the blower door and cleaning chamber in the masonry. To do this, use steel wire, one end of which is attached to the door frames, and the other is placed in the seam between the bricks |
| 4 | Completely repeats the pattern of the third row (in dressing) |
| 5 | Continuing the formation of channels, laying the grate and installing the combustion door |
| 6 | Laying out the firebox with fireclay bricks and installing a water heater |
| 7,8,9,10 | Repeats the pattern of the sixth row |
| 11 | The furnace firebox is framed with a corner and the hob is mounted |
| 12,13,14 | Formation of the furnace chamber and the base of the chimney |
| 15,16, 17 | Formation of the furnace chamber, extension of the chimney channel |
| 18 | Formation of the arched vault of the furnace |
| 19; 20 | Extension of furnace walls |
| 21,22 | Formation of the overlap, the beginning of the narrowing of the overtube |
| 23 | A cleaning door is installed in the chimney |
| 24 | Installation of a valve for adjusting draft |
| 25,26 | Cover the space above the damper |
| 27, 28, 29 | Combine the overpipe with the chimney channel |
| 30,31,32 | The furnace flue channel is formed |
Example of a finished design
Example 2
Preparation of materials and tools
To build a Russian stove with a flood chamber with your own hands, you need to prepare in advance the full amount of building materials, tools, auxiliary equipment, as well as shaped parts made of cast iron and steel.
Materials
To design a Russian stove of traditional shape and dimensions: 1.9 - 2.0 m high, 1.6 m wide and 2.38 m long, you will need:
| Name of material or shaped part | Unit | Quantity |
| Hardened red brick M – 200 | Thousand PC. | 1,75 |
| Fireclay fire-resistant brick | Thousand PC. | 0,23 |
| Oily clay | kg | 250 |
| river sand | kg | 300 |
| Hob with two burners 40x70 cm | PC. | 1 |
| Grate 20x28 cm | PC. | 2 |
| Grate 25x38 cm | PC. | 1 |
| Fire door 25x21 cm | PC. | 1 |
| Fire door 25x18 cm | PC. | 1 |
| Cleaning door 13x13 cm | PC. | 2 |
| Blower door 25x15 cm | PC. | 1 |
| Smoke damper 18x26 cm | PC. | 1 |
| Damper 38x45 cm | PC. | 1 |
| Water heating tank 28x12x50 cm | PC. | 1 |
| Steel corner 5x60x60 mm | m | 1,5 |
| Steel strip 5x50 mm | m | 20-25 |
| Steel sheet 5x50x50 mm thick | PC. | 1 |
A Russian stove with a flood chamber is a rather massive structure and requires reliable support. When calculating its dimensions, not only the weight and dimensions of the furnace are taken into account, but also the soil composition and groundwater level in the area of the future pit. The support in the form of a rectangular slab should be wider than the main structure by 10-15 cm in each direction, and the depth, depending on the characteristics of the soil, should be 50-80 cm.
Concrete can be purchased ready-made, but it will be cheaper to mix it yourself. To build a monolithic foundation slab 1.7x2.5 m and 0.6 m thick, you need to purchase:
- crushed stone - 4.2 m3 (0.7 m3 - for the underlying layer and 3.5 m3 for concrete);
- sand - 3.5 m3 (0.43 m3 - underlying layer and 3 m3 - in concrete mortar);
- cement M400 - 0.66t (13 bags);
- reinforcement with a diameter of 8÷10 mm - 85 m (53 kg);
- board for formwork 40 mm thick - 0.2 m3;
- roofing felt - 9 m2;
- polyethylene film - 5-6 m2.
Tools
A standard stove maker's kit should consist of:
- Trowels (trowel) - used to take the masonry mixture from the container and distribute it over the surfaces of the brick. During the process of laying a Russian stove, a trowel is also used to clean off excess mortar that has protruded beyond the seam.
- Hammers - picks - split and trim brick blocks to fit individual masonry segments or give them a certain configuration.
- Joints are a special tool for designing seam lines.
- Cords - moorings - control the straightness of the rows and the perpendicularity of the walls, but more often craftsmen perform this work with a plumb line and a building level.
- Ordering - necessary to align the thickness of horizontal seams.
- Plumb line - a device for checking the verticality of walls.
- A building level is a tool for controlling the evenness of each row.
- Rules - used to create a smooth plane on top of the foundation structure.
- Shovels and two containers for making concrete and mortar.
- Measuring bar - for measuring the thickness of the seam.
Safety precautions
Improper handling of the stove can cause a fire. To avoid such trouble, it is recommended:
- do not allow the use of other types of oils, except for used engine fuel;
- do not start up faulty equipment;
- do not allow the unit to be installed in a garage that does not have a ventilation system;
- do not leave the room if the stove is working;
- do not allow fires to start if there is no smoke exhaust duct;
- the hole to the burner must not be blocked;
- Oil should not splash onto a hot surface.
Important! The stove can only be used by adults. Children and animals should not come close to the unit
Ignoring safety precautions may cause a fire.
The video of making a stove during testing for a garage provides additional information on the construction of a heating unit:
More complex repair work
You can save on stove repair services not only during routine repairs, but also when carrying out major work to eliminate serious problems. You can also do it yourself by re-installing the firebox, replacing the fire door, restoring the masonry and solving other problems. In this case, only specialized mortar and refractory materials should be used in order to prevent additional problems from arising when operating a Russian brick kiln.
Partial and complete relocation of the firebox
Despite the properties of refractory brick, over time it becomes unusable, so timely replacement of this component of the structure is also necessary. Rebuilding the firebox with your own hands is a rather complicated process and is often entrusted to a professional stove maker, but in order to save money, you can carry out a major overhaul of the stove yourself.
To begin with, purchase a special solution for fireplaces and stoves, for example “Pechnik” or “TerraKot”, as well as the certain amount of refractory brick required for repairs.
If the structure reveals minor damage in several bricks, then a complete relocation of the firebox may not be necessary, making only a partial replacement. For this purpose, damaged parts in the masonry are removed and, after cleaning the surfaces, a new masonry is made using a special solution.
Relining the lining
Relining is one of the most common types of major repairs. In its production, exclusively fireclay bricks are used. It should be remembered that the refractory masonry should not come into contact with the brickwork of the firebox body.
Laying fireclay bricks can be done either flat or on edge - it all depends on the size of the furnace being repaired.
Replacing the fire door
To avoid reducing the overall efficiency of the design, you should purchase new parts with the same parameters and dimensions as the old ones. This also applies to the firebox door, which is most often made of cast iron. When buying a door, measure the old one and when purchasing a new one, compare them in size. Also remember about the need to use exclusively specialized solution for fireplaces and stoves.
Dismantle the old part along with the frame, clearing as much space as possible for the new door. Then you can start replacing it:
- Clean the masonry from old mortar;
- Attach the steel tabs to the new cast iron piece and install it so that the strips are inside the masonry seam;
- A pre-purchased cord with fire-resistant properties should be laid between the stove masonry and the door frame;
- All gaps are filled with a special solution;
- The composition is allowed to dry for 1-2 days.
When replacing a door, you may need fire bricks if the old masonry is accidentally damaged.
Brickwork repair
In a Russian stove, frame brickwork is rarely damaged, since it itself does not come into contact with fire and is not in danger of being damaged due to temperature changes. But if the stove maker did the repair work incorrectly, then it too may be damaged. Frame restoration is a simple type of repair; it does not require specific skills or specialized materials.
Mini stove finishing process
Incorrectly selected solutions may not immediately crack or even crumble the next day, but they will still not last long.
Building a stove with a firebox and a fireplace is a fairly long process. People often look forward to its end. The most labor-intensive and time-consuming part of the work is brickwork. However, even after the last brick is laid, it will be too early to consider the job finished. You will also need to complete the finishing that the mini-heater needs.
If the mini stove is very neatly built from beautiful facing bricks, has a smooth front edge and right corners, you can do without additional finishing. However, quite a large number of people have their own prejudices about the fact that brickwork should not be in the house at all. Consequently, the heated house is often provided plastered and whitewashed.
The traditional method would be to simply coat it with clay mortar.
This is done without the use of any special tools - clay is thrown on and smoothed with a moistened palm.
The surface after such a finishing process may not be completely smooth, with traces of handmade work. It is worth understanding that today this technique is widely used to create something unique in interior design.
Modern technology for applying plaster involves the use of special tools. among which there will be trowels that will be needed to apply the solution, trowels to level the applied solution, a grater with which the solution is compacted and the surface is leveled in a circular motion.
The heated building can only be plastered when it is 100% dry. Before moving on to this process, you should heat it. The solution will consist of clay and sand in a ratio of two parts sand to one part clay.
Drying
To dry a Russian stove with a stove bench and a hob, shavings, chips and small logs are used. The first combustion should be carried out with fuel in an amount of no more than 30% of the maximum volume. With each subsequent firebox, the volume of loaded firewood increases.
The drying time is influenced by the size of the oven, the degree of humidity of the brickwork and the temperature in the room. Typically, drying in the summer season takes a week; in the cold season, this period can last up to 25 days. All this time, the valves and combustion damper must be open.
You need to stop drying the oven at the moment when there are no damp spots left on its surface, as well as condensation on metal parts.
Is it worth it yourself
Does it make sense to take on such complex work yourself? How much does the work of an experienced and reliable stove-maker cost? If 100% of the cost of materials, as is customary in general construction work, then it is not that expensive.
By no means, not twice as much against the material. You can come across offers to build a stove for 20,000 rubles, but this is obvious nonsense. Let's try to figure it out ourselves.
A stove maker works in mid-latitudes for six months, and always with an apprentice. Considering their employment at 100% of working time, the salary of a master at 25,000 rubles, and an assistant at 15,000, and the work completion time is 7 working days (this is a completely realistic period), we find that a simple stove will cost no less than 45,000 rubles, and a Russian stove with a stove and water heater (see figure) at 55,000-60,000 rubles.
But in a week it will be possible to heat it. There is only one condition: the master must tell where, when and to whom he has already installed the stoves, and they must be inspected personally. Good masters always stock up on recommendations, and if they hesitate and mumble, it’s better to turn to someone else.
To give a more complete idea of the complexity of the work, let's look briefly at how to lay out the simple oven described above. For example only; the detailed order of the Russian stove is a rather voluminous brochure.
Modern Russian stove with your own hands: recommendations
In order for the stove to be reliable, attractive and serve its owners for a long time, it is important not only to follow the instructions for laying rows, but also to know some of the tricks that experienced stove makers use in their work.
So that the masonry is strong and reliable, and the stove is efficient and safe, it is necessary:
- Select high-quality bricks without chips and cracks, which must be soaked before laying.
- In places where cast elements are installed, a technological gap should be left between the brick and the plates for metal expansion.
- Every 5-8 rows, make a fire-proof cutting in half a brick. If there is not enough space for bricks, then for cutting you should choose materials with low thermal conductivity (vermiculite, supersil, calcium silicate).
- Joints in masonry should be made no thicker than 7 mm.
- To organize the firebox, it is better to use refractory fireclay (yellow) bricks, which can withstand temperatures up to 1600°C.
Before you start installing the stove yourself, professionals advise studying the relevant literature and, if possible, observing the stove maker at work. Preparations for work should be approached responsibly and thoroughly, because an incorrectly assembled stove can cause fire hazards and endanger the life and health of all residents of the house.
What materials will be needed for construction?
- red brick – 750 pcs.;
- fireclay clay;
- sand;
- felt or asbestos fiber for insulation;
- roofing felt on the bottom layer also for heat and waterproofing;
- fasteners;
- metal corner, sheet and steel wire;
- grate – 2 pcs.;
- doors for the combustion chamber and ash pan – 2 pcs.;
- damper – 1 pc.;
- valve – 1 pc.
... and tools:
- building level;
- spatulas;
- Master OK;
- drill with a mixer attachment for mixing the solution;
- buckets;
- sieve for sifting clay and sand.
Don’t forget about the tools: spatula, trowel, drill with mixer. Additionally, have buckets or tanks and a sieve on hand. To ensure the oven is level, use a level.
Order
1-6 rows
We do not use screed to waterproof the foundation; we lay it dry - sweating is excluded. We start from the left front corner (pos. a-1 in the figure). Place a 3/4 brick in the corner with the poke outward. From it there is a row of 12 full-lengths to corner a-2. Seam – widened to 13 mm; This will be everywhere in the first 3 rows, because... in the 4th row a masonry ledge will be formed.
In corner a-2 - two 3/4 pokes and a double row of full-lengths to corner a-3. We arrive at corner a-4 in the same way as a-1 – a-2. Row 1 is completed by two full-length frames, forming an opening of 540 mm. We check the masonry using the rule and diagonals.
In the second row (pos. b) on the sides the pokes of the 1st row are covered with spoons. In the corners there are 2 three-fours, laid in spoons. The full-length frames framing the opening are covered with 3/4 pins with bandaging of the seams. The third row (pos. c) is identical to the first.
4th row - according to pos. on the brace. The arrangement of bricks is the same as in row 2. We narrow the seam to 5 mm to get a ledge of 25 mm on the sides. We check the masonry with a level.
5 row - according to pos. d. In d-2 and d-3, two 3/4; between them there are two rows of spoons. The side walls are bonded. We squeeze the walls of the oven opening under the heel of the arch. We place the circles on the supports and lay out the 6th row identical to the 4th.
First arch
When laying out the arch, in addition to the above, you must observe the following; for subsequent arches/vaults too:
- There should not be a single untied seam across the arch from heel to toe (on the left in the figure below).
- The seams from the top to the heels gradually taper from 13 to 5 mm.
- The circles with formwork are removed only after the solution has dried.
7-10 rows
The 7th row is laid out as the 5th; 8 - like the 6th (on the left in the figure) In the sidewalls from the inside, the pokes are cut to fit the heel of the arch. On the 8th row, we begin to lay out the sub-height: three rows of full-length splice stitches, counting inward from the forehead. The middle poke from below needs to be tucked under the arch of the arch. We place the 9th row as the 7th, but we lay out the 2nd row of the sub-stitch with spoons. We lay out the roof of the baking area.
Row 10 is special, in Fig. on the right: corners from 3/4, sides from spoonfuls; the rear is made of full-length buttocks. From the forehead inwards - 3 rows of full-length buttocks. There are 7 pieces in a row, laid flat. This will be the hearth with the bending hearth.
Bedding
We make the furnace backing from broken bricks and clay mortar. We tamp and stretch as indicated by the arrow. It’s better to do it yourself with a break and not try - not every stove maker can do it.
Rows 11-17
We lay out even rows as the 10th. In the odd numbered ones there are rows of butts on the sides; behind - spoon. The 15th and 16th are tucked under the heels of the arches. Upon completion of the 17th row, the laying of the walls around the furnace is interrupted until the entire front of the furnace is laid out, up to a vertical plane passing along the rear wall of the mouth.
Zev, squeeze, mouth, crucible
Arches and vaults are erected along the circles of the arches with formwork. The side walls of the bend will go into brick; the forehead and mouth are half a brick. The heel of the pharynx arch will be on the 15th row; the heel of the mouth arch is on the 16th. It will be especially difficult for a beginner to smooth the inner walls of the heil: from above you cannot see what you are doing, and from the inside dust and crumbs fly into your eyes. Therefore, the hilo needs to be processed from above, checking with a template.
18 and above
We place odd rows as 1 or 11; even - like 2 or 10, see fig. If the floors are laid on clay, then starting from the 19th row, the bricks from the inside are pressed in place to the roof of the furnace. But this does not always save the clay floors from falling through, so the best craftsmen build a box around the crucible, make a backfill of brick chips on the clay, level it and compact it, and over it they put a continuous lining of spoons, framed with ends with three-quarters at the corners. In order for the flooring to last forever and not push through the vault, what happens next depends on the prosperity and generosity of the customer: either a wooden board-flooring, or a row of facing bricks on mortar with bandaging of the seams.
The last method is not as simple as it seems: the arch is tilted anteriorly. Therefore, a row of bricks are placed flat on its locks lengthwise and with the seams bandaged relative to the key ones. Then they cut it onto a wedge so that the crossbar is flush with the walls.
The backfill will be double-sided, and the floors will lie on the wedge and walls. What's the point here? Let us remember the mechanics of construction: it is much more difficult to crush a vault from above than to break through it from the side. The load from the floors will be transferred to the lock, and from it along the arch to the cheeks of the stove. The arch of the vault will only work in compression and, if the floors fail, they will remain intact, and the floors are not difficult to restore.
If you undercut the bricks of the upper rows, then the load from the floors will give a lateral shear load on the vault. Building materials do not hold up well to shear. If the floors fail, the roof will fail and the stove will need to be rebuilt.
Rules for laying the furnace vaults of an outdoor stove
When laying furnace vaults, it is necessary to block the combustion openings, fireboxes, and chambers using simple and complex shaped lintels. The ceiling in a wall is called an arch or arched lintel, and the ceiling between the walls is called a vault.
To cover large spans, an arched ceiling is used.
Vaults can be steep, flat or gentle. The semicircular arch is equal to half a circle. A gentle vault is less steep. The three-center arch is even flatter, thanks to its design, heating occurs evenly over the entire surface
This is important when baking pies. The number of bricks in the arch and rows in the vault must be odd
The middle odd brick is called a castle brick. The bricks on which the lintel or arch rests are called heels. To give them the desired shape, such bricks have to be trimmed. The space covered by any jumper is called a span. The lifting height of a vault or arch is the lifting boom.
The construction of any lintel must begin with the laying of bricks on which it will rest. They should be hewn out according to a template. Since the height of the arch or vault can be different, the angle of the heel changes. You cannot use one heel shape for all arches and vaults.
The laying of the furnace firebox begins with the preparation of circles and foot templates; for this, on a sheet of paper, cardboard or plywood, it is necessary to draw a vault of the desired shape so that an odd number of rows of masonry can fit in it.
You can easily and quickly build a vault on two boards. An axis should be drawn in the middle of the narrow board so that it intersects the wide board. At a distance of 3-5 cm from the bottom edge of the wide board, you need to draw a straight line A-B, marking the width of the firebox on it. The axis should run in the middle of the firebox, between points B and D. On the axis from line A-B, the height of the arch lifting boom should be measured upward. The resulting point can be designated by the letter D. After this, you need to select the center O in such a way that the circle passing from it, forming the arch, runs through points B, D and the upper point of the arch lifting arrow.
The rules for laying a furnace recommend using formwork for the arch, which is laid on prepared circles.
After installing and securing the formwork, a nail should be driven into the central point O, from which the circle was drawn, and strong twine should be attached to it, which is necessary for checking the rows of the vault and marking the bricks to be laid. The brick for laying the vaults must be hewn, giving it a wedge-shaped shape.
In this case, the seams have the same thickness. When using regular brick, the seams will be thinner at the bottom and thicker at the top. They must be completely filled with solution.
The heels should be trimmed and laid very carefully, since filling large voids with mortar and crushed stone can lead to settlement of the vault or arch and their destruction.
The laying of the vault should begin from the edges, from both heels at the same time, moving towards the middle of the vault or towards the castle. The bricks need to be fitted tightly, so that they almost touch each other on the side of the firebox.
The last thing to be inserted into the row of masonry of a vault or arch is a castle brick, greased on both sides with clay mortar. It is advisable to strike only with a log or a mallet, since an ordinary hammer can split the brick.
Recommendations for use
The stove does not require maintenance. To avoid undesirable consequences, you must follow the rules for using a mini-oven:
- You cannot fire two fireboxes at the same time. In this case, the ash and combustion doors of the unused firebox must be tightly closed;
- Do not use flammable liquids such as gasoline or kerosene for kindling;
- keep the heater damper closed. If there is a need to open it, then first you need to open the ventilation duct valve;
- monitor the amount of ash. Remove it in a timely manner, otherwise there will be no fuel savings, because it will absorb heat and the heating of the rooms will deteriorate. It is better to do this procedure at least twice a week;
- you need to let the fuel warm up well for ten minutes, and only then start cooking food in the oven;
- It is not very practical to use paper for kindling - it burns quickly. It’s better to put wood chips or birch bark in the oven;
- Check periodically for any cracks in your stove. If any are found, they need to be repaired. If the damage is significant, then major repairs will have to be made. A clear indicator of a problem is a decrease in the heating temperature produced by the stove. The house has become colder - inspect the stove;
- It is preferable to carry out repairs in the warm season, when the stove is not used for heating;
- Before burning fuel, you need to close the doors of the ash pit and fireboxes;
- you need to clean the chimney in a timely manner;
- It’s better to start heating the stove during the day, then by the evening the whole room will warm up;
- It is preferable that the fuel be dry. And to ensure that it is not exposed to moisture and water and does not become damp, store it in a specially designated place. It should be dry and closed;
- It is desirable that the logs are approximately the same thickness and length. This is necessary because thin ones burn too quickly, and thick ones, on the contrary. The house will not be heated well enough in this way;
- stack the logs not randomly, but in a certain order. First, rake the coals with a poker closer to the door. Place a log across it. Then thinner firewood is laid obliquely, and thicker firewood is laid on top of it.